In this tutorial, you’ll learn how to use the Arduino delay function to add a time delay between events in your Arduino projects. We’ll also discuss some variants of Arduino delay to achieve a time delay of (microsecond, millisecond, second, and 1 minute). Then, we’ll discuss why you shouldn’t always use the delay in your Arduino projects and what are better alternatives to the delay function.
Without further ado, let’s get right into it!
Table of Contents
- Why Do We Need Delay in Arduino?
- Arduino Delay Function (delay Milliseconds)
- Arduino Delay Milliseconds Example
- Delay Variants Implementation
- Why You Shouldn’t Always use delay in Your Arduino Projects
- Arduino Delay Alternative (Without Blocking)
- Concluding Remarks
Why Do We Need Delay in Arduino?
In Arduino projects, you’ll always need to meet timing requirements for whatever you’re trying to build. Maybe you need an event to occur every x time unit or you just need to insert some time delay that separates two consecutive events. Or maybe you just need the CPU to wait some time before attempting to execute a certain piece of logic in your code.
There are many examples of situations in which you’d need to use a time delay. Which include the following list of examples:
- LED Blinking
- Buttons Scanning
- Sampling/Reading Sensors
- Running a control loop at a lower speed
- and more…
Despite the fact that using a delay function is not generally preferred, it’s still a very popular option for various use cases. And we’ll discuss later in this tutorial why it’s not always recommended to add a delay in your Arduino code, and what are better alternatives.
Arduino Delay Function (delay Milliseconds)
Description
The delay() function pauses the program for the amount of time (in milliseconds) specified as a parameter. Given that a second = 1000 milliseconds, you can achieve a time delay of 1 second by passing 1000 to the delay function like this: delay(1000);
Syntax
|
1 |
delay(ms); |
Parameters
ms: the number of milliseconds to pause. Allowed data types: unsigned long
Arduino Delay Milliseconds Example
Now, we’ll test the delay() function with a very simple LED blinking example.
LED Blinking With Delay
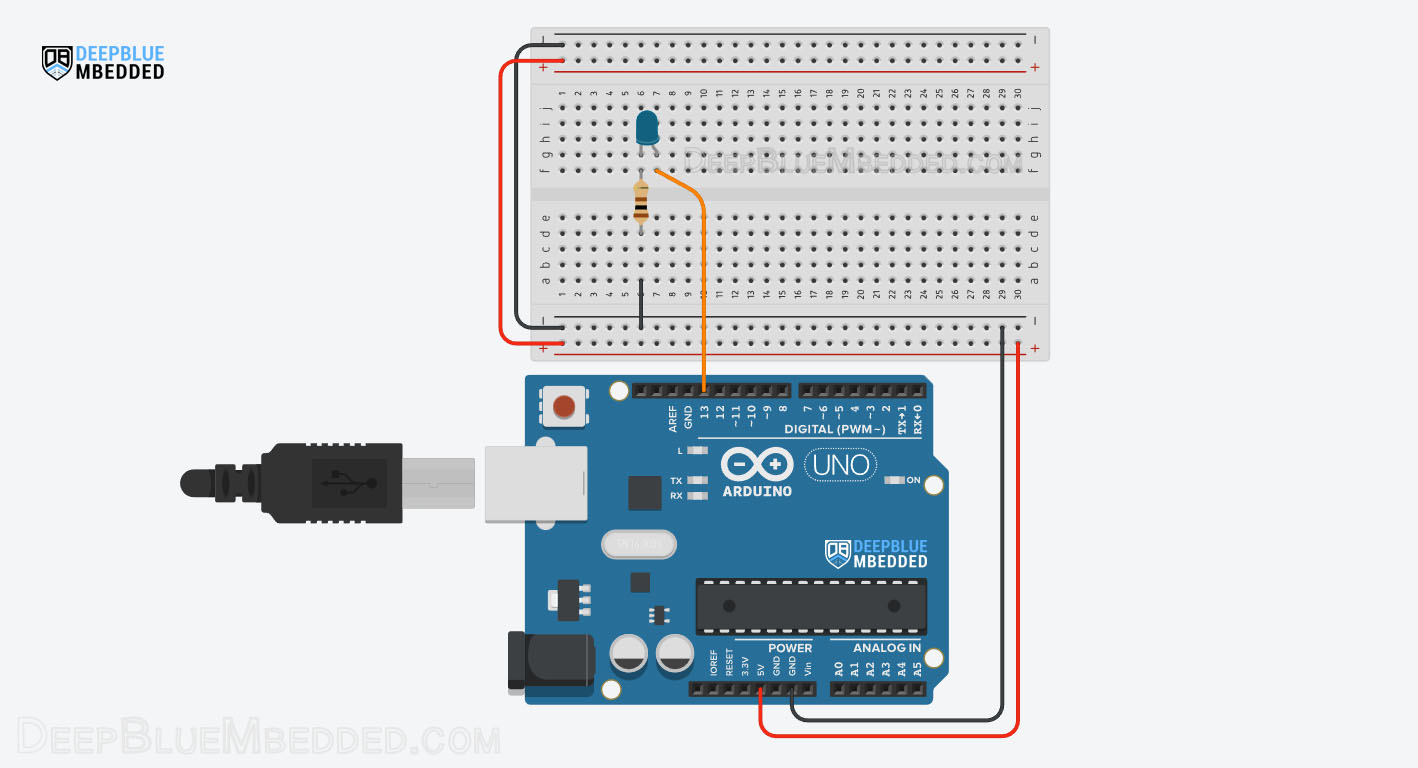
We’ll turn an LED on and off for a second each time (1sec = 1000ms). And will be using the built-in LED which is connected to Arduino’s IO pin13. But as it’s not fun enough, we’ll hook the pin to another external LED on a breadboard to show the same blinking effect on an external LED.
Wiring
Here is how to hook up the external LED output. (note that the LED current limiting resistor is 330Ω)

Example Code
|
1 2 3 4 5 6 7 8 9 10 11 12 13 14 15 16 17 |
/* * LAB Name: Arduino LED Blinking * Author: Khaled Magdy * For More Info Visit: www.DeepBlueMbedded.com */ void setup() { pinMode(LED_BUILTIN, OUTPUT); } void loop() { digitalWrite(LED_BUILTIN, HIGH); delay(1000); // Wait for 1000 millisecond(s) digitalWrite(LED_BUILTIN, LOW); delay(1000); // Wait for 1000 millisecond(s) } |
Code Explanation
The code example simply sets the Builtin-LED IO pin to be output and sends output signal High and Low with 1 second time delay after each state change.
setup()
in the setup() function, we initialize the digital IO pin ( LED_BUILTIN or pin 13) to be an OUTPUT pin.
loop()
in the loop() function, we use the digitalWrite() function to set the pin state to high and low. And we also use the delay() function to insert a 1000ms (1sec) time delay after each state change.
Simulation
Here is the simulation result for this project on the TinkerCAD simulator.
You can check this simulation project on TinkerCAD using this link.
Testing Results
Here is a demo video for testing this project on my Arduino UNO board.
Delay Variants Implementation
In this section, we’ll discuss some useful delay variants that you’d need to use in different Arduino projects to insert a time delay with a specific time unit. Given that the standard delay() function has a parameter unit of 1 millisecond.
Arduino Delay Milliseconds
The delay() function has a time unit of 1 millisecond. The delay function has a range of 1 millisecond up to around 25 days. You can achieve any time delay within that range using the standard delay() function.
Arduino Delay Microseconds
If you need a shorter, more precise, time delay that’s less than 1ms, you can use the Arduino delayMicroseconds() function. Which will give you a time delay with a time unit of 1 microsecond.
For example, the Ultrasonic sensor (HC-SR04) needs a trigger signal to start operation. That trigger signal is actually a short pulse with a width of 10µs. So, here is how to achieve this using the Arduino delayMicroseconds() function.
|
1 2 3 |
digitalWrite(TrigPIN, HIGH); delayMicroseconds(10); // Delay For 10µs digitalWrite(TrigPIN, LOW); |
This tutorial will give you more in-depth information about the Arduino delayMicroseconds() function with multiple examples. And will also show some different ways of measuring the accuracy of the delayMicroseconds() function and how to enhance it.
Arduino Delay Nanoseconds
There is No Arduino delay in nanoseconds function. For Arduino UNO, it’s practically impossible to achieve such a resolution with the AVR Atmega microcontroller running @ 16MHz. The lowest we can get is 1 CPU Cycle which turns out to be 62.5 nanoseconds.
If it’s mandatory for your project to generate a very precise time delay or measure an incoming pule (or event) at this level of resolution, you should consider finding another Arduino board with a more powerful microcontroller that’s running at a higher frequency than the Arduino UNO.
Arduino Delay Seconds
If you need to generate a one-second time delay with Arduino, you can still use the delay() function. But make sure to do the time unit conversion and pass to it the desired time in milliseconds.
Here is a code example for a 1-second time delay with Arduino.
|
1 |
delay(1000); // 1 second = 1000 milliseconds |
And here is another code example for a 30-seconds time delay with Arduino.
|
1 |
delay(30000); |
Arduino Delay 1 Minute
If you need to generate a 1-minute time delay with Arduino, you can still use the delay() function. But make sure to do the time unit conversion and pass to it the desired time in milliseconds.
Here is a code example for a 1-minute time delay in Arduino.
|
1 |
delay(60000); // 1 minute = 60x1000 = 60,000 milliseconds |
And here is another code example for a 15-minutes time delay with Arduino.
|
1 |
delay(900000); // 15 minutes = 15x60x1000 = 900,000 milliseconds |
Why You Shouldn’t Always use delay in Your Arduino Projects
The major issue with excessive usage of the delay() function is that it’s going to mess up the timing behavior of your system and it keeps the CPU blocked waiting for a certain time without doing something useful.
It can be acceptable only if you’ve got a very simple application like a blinking LED or you just need the CPU to halt until a certain event occurs. But otherwise, you just need to avoid using the delay function in larger projects where you’ve got a lot of operations running on the CPU to achieve the desired functionality.
Arduino Delay Alternative (Without Blocking)
The best alternative for delay is using internal timers instead. The timer module will provide a time base that can be easily checked and used to trigger various logical functions in your applications. In this way, you’ll have each part running simultaneously at the desired periodicity without blocking the CPU in a busy-wait state unnecessarily.
There are also two Arduino functions that are built using an internal free-running timer module to provide a timestamp for the running application. Which is the millis() and micros() functions.
We’ll discuss the implementation details with examples for both delay alternative solutions in a future tutorial.
Parts List
Here is the full components list for all parts that you’d need in order to perform the practical LABs mentioned here in this article and for the whole Arduino Programming series of tutorials found here on DeepBlueMbedded. Please, note that those are affiliate links and we’ll receive a small commission on your purchase at no additional cost to you, and it’d definitely support our work.
Concluding Remarks
To conclude this tutorial, we can say that using the delay() and delayMicroseconds() functions is pretty much easy. But you need to be very careful and use them reasonably because it can lead to major timing issues in your system. And in most cases, you’d be better off avoiding using delays altogether.
In the following cases, it’d be acceptable to use delays in your Arduino projects:
- During initialization to make sure that a software component has completed initialization successfully
- If you purposefully need the CPU to be blocked waiting for a certain event
- If the delay time is very short like 10µs or something in that range
If you’re just getting started with Arduino, you need to check out the Arduino Getting Started [Ultimate Guide] here. And follow this Arduino series of tutorials to learn more about Arduino Programming.
This is the ultimate guide for getting started with Arduino for beginners. It’ll help you learn the Arduino fundamentals for Hardware & Software and understand the basics required to accelerate your learning journey with Arduino Programming.
FAQ & Answers
delay() is a function used to insert time delay between events in Arduino. It keeps the CPU blocked waiting for a specific period of time (in ms unit). You can use it to generate a time delay from 1 ms up to around 25 days.
The Arduino delay() function has a range from 1 ms up to around 25 days. You can still use the delayMicroseconds() function to get down to a 1µs delay resolution.
It’s a delay of 1000ms (1 second). This function call delay(1000) will insert a time delay of 1 second between two consecutive events in your Arduino code.
No, the Arduino can’t do a delay in nanoseconds resolution. For Arduino UNO, it’s practically impossible to achieve such a resolution with the AVR Atmega microcontroller running @ 16MHz. The lowest we can get is 1 CPU Cycle which turns out to be 62.5 nanoseconds.
If it’s mandatory for your project to generate a very precise time delay or measure an incoming pule (or event) at this level of resolution, you should consider finding another Arduino board with a more powerful microcontroller that’s running at a higher frequency than the Arduino UNO.
To calculate delay in Arduino, get the desired delay time and convert it to a milliseconds time unit and pass it to the delay(ms) function. Where ms is the calculated time delay (in milliseconds). Let’s say you need a 1-minute delay, so the calculation will be as follows: 1min = 60sec = 60x1000ms = 60,000ms. Therefore, it’ll be done like this: delay(60000);


hello , what is Delay high and low for this frequencies : 5 hz 5,5 hz 25 hz and 40 hz because i want to blinking LED with this frequencies and it is possible to blinking LED with 2 frequencies 5 hz in left and 25 hz in right
Hi David,
5Hz: 200ms (High=100ms, Low=100ms)
5.5Hz: 180ms (High=90ms, Low=90ms)
25Hz: 40ms (High=20ms, Low=20ms)
40Hz: 25ms (High=12.5ms, Low=12.5ms)
Yes, it’s possible to program different events to be executed at different periodicities using the Arduino hardware Timers. You can refer to the tutorials below for more information about it!
https://deepbluembedded.com/arduino-timers/
https://deepbluembedded.com/arduino-timer-library