In this tutorial, we’ll discuss Arduino-Timer Library how it works, and how to use it to handle periodic tasks (functions). The Arduino-Timer library can be easily installed within Arduino IDE itself and it’s based on the millis() & micros() functions which are also based on Arduino internal hardware timers.
We’ll create a couple of Arduino-Timer Library Example Projects in this tutorial to practice what we’ll learn all the way through. We’ll test both milliseconds & microseconds periodicity resolution for the timer library.
Table of Contents
- Arduino Timers
- Arduino-Timer Library
- Arduino-Timer Library Installation
- Arduino-Timer Library Example (ms Task)
- Arduino-Timer Library Example (μs Task)
- Arduino-Timer Library Wrap Up
Arduino Timers
Timer modules in Arduino provide precise timing functionality. They allow us to perform various tasks, such as generating accurate delays, creating periodic events, measuring time intervals, and meeting the time requirements of the target application.
Each Arduino board has its target microcontroller that has its own set of hardware timers. Therefore, we always need to refer to the respective datasheet of the target microcontroller to know more about its hardware capabilities and how to make the best use of it.
1. Arduino Hardware Timers
Arduino UNO (Atemga328p) has 3 hardware timers which are:
- Timer0: 8-Bit timer
- Timer1: 16-Bit timer
- Timer2: 8-Bit timer
Those timer modules are used to generate PWM output signals and provide timing & delay functionalities to the Arduino core, and we can also use them to run in any mode to achieve the desired functionality as we’ll see later on in this tutorial.
Each hardware timer has a digital counter register at its core that counts up based on an input clock signal. If the clock signal is coming from a fixed-frequency internal source, then it’s said to be working in timer mode. But if the clock input is externally fed from an IO or any async source, it’s said to be working as a counter that counts incoming pulses.
2. Arduino Timers Comparison
This is a summarized table for Arduino UNO (Atmega328p) timers, differences between them, capabilities, operating modes, interrupts, and use cases.
| Timer0 | Timer1 | Timer2 | |
| Resolution | 8 Bits | 16 Bits | 8 Bits |
| Used For PWM Output Pins# | 5, 6 | 9, 10 | 11, 3 |
| Used For Arduino Functions |
delay() millis() micros() | Servo Functions | tone() |
| Timer Mode | ✓ | ✓ | ✓ |
| Counter Mode | ✓ | ✓ | ✓ |
| Output Compare (PWM) Mode | ✓ | ✓ | ✓ |
| Input Capture Unit Mode | – | ✓ | – |
| Interrupts Vectors |
TIMER0_OVF_vect TIMER0_COMPA_vect TIMER0_COMPB_vect |
TIMER1_OVF_vect TIMER2_COMPA_vect TIMER1_COMPB_vect TIMER1_CAPT_vect |
TIMER2_OVF_vect TIMER2_COMPA_vect TIMER2_COMPB_vect |
| Prescaler Options | 1:1, 1:8, 1:64, 1:256, 1:1024 | 1:1, 1:8, 1:64, 1:256, 1:1024 | 1:1, 1:8, 1:32, 1:64, 1:128, 1:256, 1:1024 |
Playing with any timer configurations can and will disrupt the PWM output channels associated with that module. Moreover, changing the configurations of timer0 will disrupt the Arduino’s built-in timing functions ( delay, millis, and micros). So keep this in mind to make better design decisions in case you’ll be using a hardware timer module for your project. Timer1 can be the best candidate so to speak.
3. Arduino Timers Control
You can configure & program the Arduino timer modules in two different ways. The first of which is bare-metal register access programming using the Timer control registers & the information provided in the datasheet. And this is exactly what we’ve discussed in the Arduino Timers & Timer Interrupts Tutorial.
The other method to control timer modules is to use Timer Libraries like the Arduino-Timer Library. This is the topic of this tutorial, as we’ll discuss how to install and use arduino-timer library. Which can be a lot easier to use than what we’ve done in the Arduino timer interrupts tutorial previously.
For more information about Arduino Timers, fundamental concepts, different timer operating modes, and code examples, it’s highly recommended to check out the tutorial linked below. It’s the ultimate guide for Arduino Timers.
This article will give more in-depth information about Arduino Timers, how timers work, different timer operating modes, practical use cases and code examples, and everything you’d ever need to know about Arduino Timers.
Arduino-Timer Library
The Arduino-Timer library is a community-contributed library that enables users to configure timer-based events (tasks) without the need to do register-level programming for the timer modules. It uses the built-in timer-based millis() and micros() functions, so it’s like a wrapper layer of useful APIs on top of the built-in timer-based functions.
1- Using Arduino-Timer Library
To use the Arduino-Timer library, you need to include its header file and create a Timer instance.
Include the library like this.
|
1 |
#include <arduino-timer.h> |
Create a default timer instance with default configurations.
|
1 |
auto MyTimer = timer_create_default(); |
Alternatively, you can specify the configurations you want for the timer instance as shown below.
|
1 2 3 |
Timer<10> MyTimer; // 10 concurrent tasks, using millis as resolution Timer<10, micros> MyTimer; // 10 concurrent tasks, using micros as resolution Timer<10, micros, int> MyTimer; // 10 concurrent tasks, using micros as resolution, with handler argument of type int |
As you might have noticed there are 3 different templates for creating a Timer instance. This enables you to specify the maximum number of tasks that you’ll need to use with the timer instance, the resolution of task periodicity (in ms or μs), and the argument data type for the task handler functions (if needed).
2- Arduino-Timer MainFunction
The main function in the Arduino-Timer library is called .tick() and you must call it in the main super loop() while the microcontroller is IDLE to advance the tick count and dispatch the tasks when their periodicity time is due.
|
1 2 3 |
void loop() { MyTimer.tick(); } |
If the microcontroller is busy-waiting or doing other logic that takes too long so it doesn’t call the tick() function frequently, you’ll risk missing the deadlines of the periodic tasks assigned to the timer instance.
3- Arduino-Timer Task Handler Function Creation
To create a task handler function, use the following function definition template.
|
1 2 3 4 5 6 |
bool Task_Handler(void *argument /* optional argument given to in/at/every */) { // Handle The Task // ... return true; // true: repeat the action, false: to stop the task } |
The task handler function can take an optional argument while assigning it to the timer instance using any of the functions .in(), .at(), or .every() which we’ll discuss hereafter. You can just remove it if not needed and declare your task handler function like this.
|
1 2 3 4 5 6 |
bool Task1_Handler(void *) { // Handle The Task // ... return true; // repeat? true } |
4- Arduino-Timer Tasks Assignation
After creating an instance of the timer class, you can assign to it the tasks (functions) that you’d like to run periodically. And this can be done in 3 different ways depending on what you’re trying to achieve.
Let’s say you’d like to attach the function Task1_Handler() to the timer instance ( MyTimer), you can use any of the following three methods.
.every()
|
1 |
MyTimer.every(interval, Task1_Handler); // Calls Task1_Handler every (interval) units of time. |
.at()
|
1 |
MyTimer.at(time, Task1_Handler); // Calls Task1_Handler at a specific (time). |
.in()
|
1 |
MyTimer.in(delay, Task1_Handler); // Calls Task1_Handler in (delay) units of time, deafult unit of time is ms. |
5- Arduino-Timer Tasks Cancellation
To cancel a task, make sure to get a handle for that task while assigning it to the timer instance. Here is an example of how to do it.
|
1 2 |
auto Task1Handle = MyTimer.every(interval, Task1_Handler); MyTimer.cancel(Task1Handle); |
To cancel all running tasks, use the following function.
|
1 |
MyTimer.cancel(); |
Arduino-Timer Library Installation
You can download and install the Arduino-Timer library manually from GitHub, or alternatively, install it within the Arduino IDE itself. Just open the library manager. Tools > Manage Libraries > Search for arduino-timer. Then, click Install and let it finish the installation.
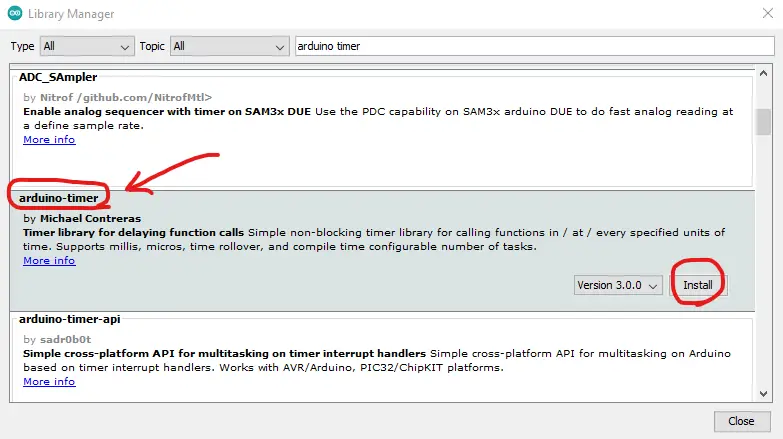
Now, you can easily use the Arduino-Timer library and check the built-in examples for the library to help you get started.
We’ll move now to the practical code examples to test this Arduino-Timer library for generating periodic events in both resolutions (ms and μs).
Arduino-Timer Library Example (ms Task)
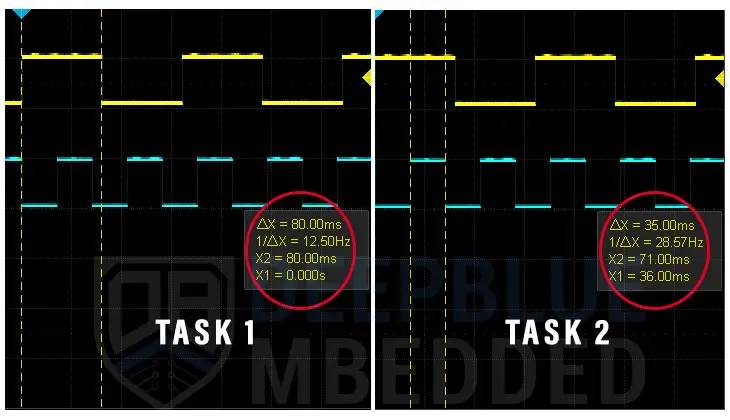
In this example project, we’ll test the Arduino-Timer library. We’ll create two tasks with 80ms and 35ms periodicities. Each of which will toggle an LED output pin. And we’ll measure the output timing using an oscilloscope to make sure that the timer library is working as expected.
Arduino-Timer Library Example Code
Here is the full code listing for this Arduino-Timer Example (ms Tasks).
|
1 2 3 4 5 6 7 8 9 10 11 12 13 14 15 16 17 18 19 20 21 22 23 24 25 26 27 28 29 30 31 32 33 34 35 |
/* * LAB Name: Arduino-Timer Library Example (ms) * Author: Khaled Magdy * For More Info Visit: www.DeepBlueMbedded.com */ #include <arduino-timer.h> #define LED1_PIN 13 #define LED2_PIN 8 Timer<2, millis> MyTimer; bool Task1_Handler(void *) { digitalWrite(LED1_PIN, !digitalRead(LED1_PIN)); // Toggle LED1 return true; // repeat? true } bool Task2_Handler(void *) { digitalWrite(LED2_PIN, !digitalRead(LED2_PIN)); // Toggle LED2 return true; // repeat? true } void setup() { pinMode(LED1_PIN, OUTPUT); pinMode(LED2_PIN, OUTPUT); MyTimer.every(80, Task1_Handler); MyTimer.every(35, Task2_Handler); } void loop() { MyTimer.tick(); // tick the timer } |
Code Explanation
We should first include the library and create a timer instance.
|
1 2 |
#include <arduino-timer.h> Timer<2, millis> MyTimer; |
Task1_Handler() And Task2_Handler()
This is the Task1 handler function that we’d like to execute periodically every 80ms. In which we’ll toggle the output LED1 pin.
|
1 2 3 4 5 |
bool Task1_Handler(void *) { digitalWrite(LED1_PIN, !digitalRead(LED1_PIN)); // Toggle LED1 return true; // repeat? true } |
This is the Task2 handler function that we’d like to execute periodically every 35ms. In which we’ll toggle the output LED2 pin.
|
1 2 3 4 5 |
bool Task2_Handler(void *) { digitalWrite(LED2_PIN, !digitalRead(LED2_PIN)); // Toggle LED2 return true; // repeat? true } |
setup()
in the setup() function, we’ll set the LED pins’ mode to output and attach the Task1_Handler & Task2_Handler functions to the timer instance we’ve created and set them to be called every (80ms & 35ms) time intervals respectively.
|
1 2 3 4 5 6 7 |
void setup() { pinMode(LED1_PIN, OUTPUT); pinMode(LED2_PIN, OUTPUT); MyTimer.every(80, Task1_Handler); MyTimer.every(35, Task2_Handler); } |
loop()
in the loop() function, we need to continuously call the .tick() function which is the main function of the Arduino-Timer library.
|
1 2 3 |
void loop() { MyTimer.tick(); // tick the timer } |
Proteus Simulation
Here is the simulation result for this project on the Proteus (ISIS) simulator. The TinkerCAD simulation for this example will not produce a reliable behavior maybe due to inaccuracies in the microcontroller model in the simulation environment. The proteus simulation is way more accurate and behaves exactly like the real Arduino UNO board.
Moreover, we’ve got a better and much more powerful set of virtual measurement tools (oscilloscope, function generator, multimeters, virtual serial terminal, etc).
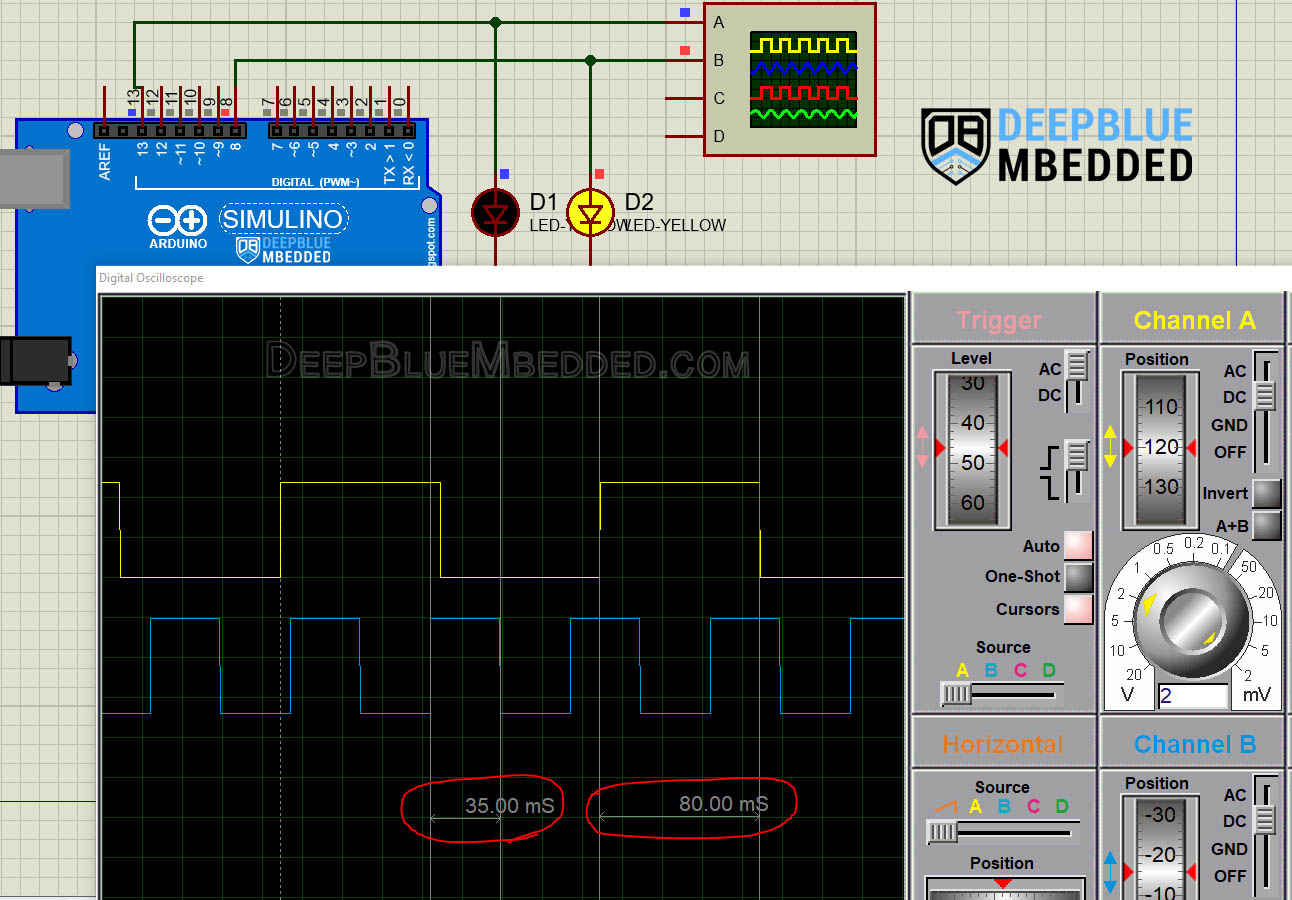
Check out the tutorial below to help you get started with simulating your Arduino projects in the Proteus simulation environment.
This article will provide you with more in-depth information about using proteus ISIS for Arduino projects simulation.
Testing Results
It shows a perfect 80ms pin toggle event & another 35ms pin toggle event, exactly as we have expected and seen in the simulation.
Arduino-Timer Library Example (μs Task)
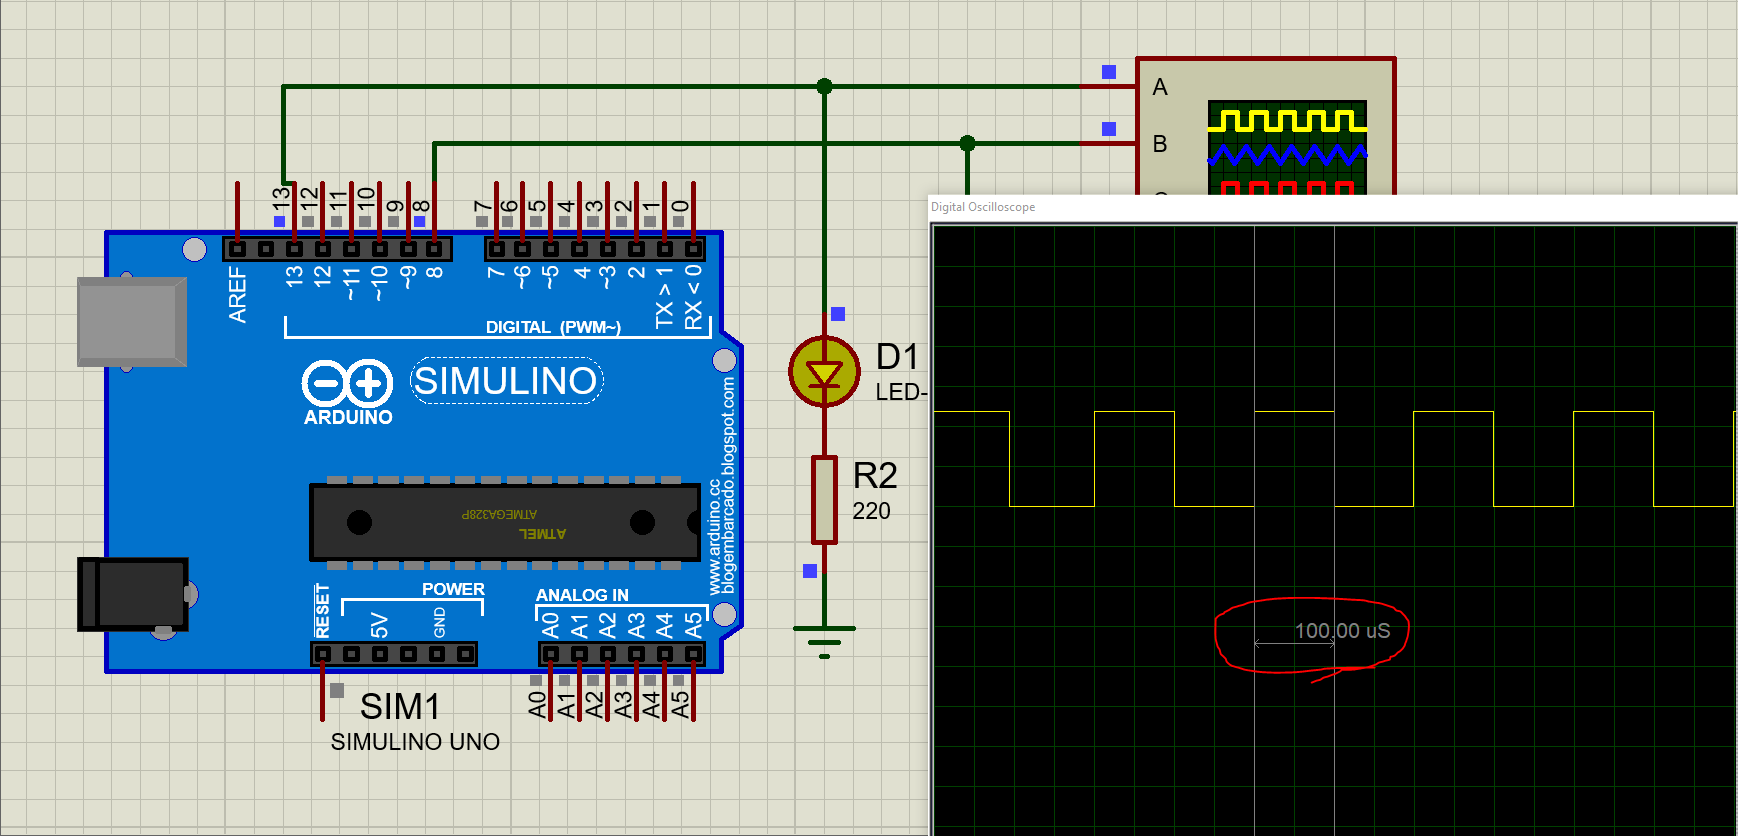
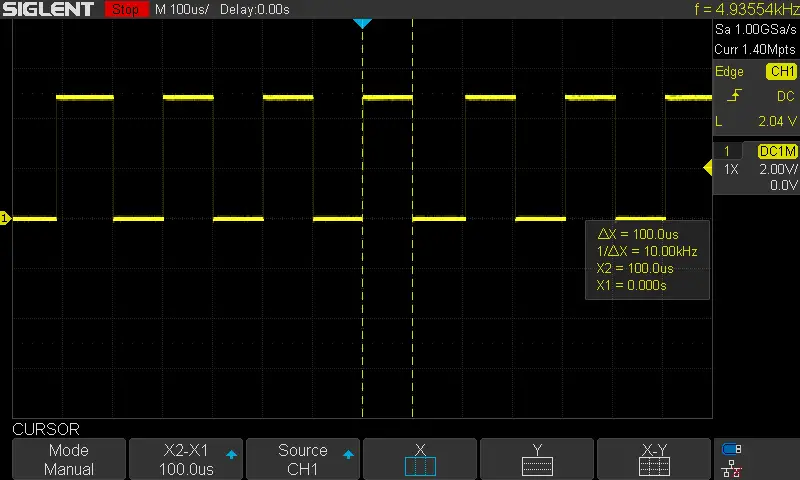
In this example project, we’ll test the Arduino-Timer library microseconds resolution. We’ll create a periodic task that executes every 100μs, in which we’ll toggle an output LED pin. Then, we’ll measure the resulting waveform timing to make sure the timer library is working as expected.
Arduino-Timer Library Example Code
Here is the full code listing for this Arduino-Timer Example (μs Task).
|
1 2 3 4 5 6 7 8 9 10 11 12 13 14 15 16 17 18 19 20 21 22 23 24 25 26 |
/* * LAB Name: Arduino-Timer Library Example (μs) * Author: Khaled Magdy * For More Info Visit: www.DeepBlueMbedded.com */ #include <arduino-timer.h> #define LED1_PIN 13 Timer<1, micros> MyTimer; bool Task1_Handler(void *) { digitalWrite(LED1_PIN, !digitalRead(LED1_PIN)); // Toggle LED return true; // repeat? true } void setup() { pinMode(LED1_PIN, OUTPUT); // Call The Task1_Handler Function Every 100μs MyTimer.every(100, Task1_Handler); } void loop() { MyTimer.tick(); // tick the timer } |
Code Explanation
We should first include the library and create a timer instance. Note that here I’m setting the configuration for MyTimer instance to use micros() function as a resolution instead of millis() that we’ve used in the previous example.
|
1 2 |
#include <arduino-timer.h> Timer<1, micros> MyTimer; |
Task1_Handler()
This is the Task1 handler function that we’d like to execute periodically every 100μs. In which we’ll toggle the output LED pin.
|
1 2 3 4 5 |
bool Task1_Handler(void *) { digitalWrite(LED1_PIN, !digitalRead(LED1_PIN)); // Toggle LED return true; // repeat? true } |
setup()
in the setup() function, we’ll set the LED1 pin mode to output and attach the Task1_Handler function to the timer instance we’ve created and set it to be called every (100μs) time interval.
|
1 2 3 4 5 |
void setup() { pinMode(LED1_PIN, OUTPUT); // Call The Task1_Handler Function Every 100μs MyTimer.every(100, Task1_Handler); } |
loop()
in the loop() function, we need to continuously call the .tick() function which is the main function of the Arduino-Timer library.
|
1 2 3 |
void loop() { MyTimer.tick(); // tick the timer } |
Proteus Simulation
Here is the simulation result for this project on the Proteus (ISIS) simulator. The TinkerCAD simulation for this example will not produce a reliable behavior maybe due to inaccuracies in the microcontroller model in the simulation environment. The proteus simulation is way more accurate and behaves exactly like the real Arduino UNO board.
Moreover, we’ve got a better and much more powerful set of virtual measurement tools (oscilloscope, function generator, multimeters, virtual serial terminal, etc).
Testing Results
It shows a perfect 100μs pin toggle event exactly as we have expected and seen in the simulation.
Parts List
Here is the full components list for all parts that you’d need in order to perform the practical LABs mentioned here in this article and for the whole Arduino Programming series of tutorials found here on DeepBlueMbedded. Please, note that those are affiliate links and we’ll receive a small commission on your purchase at no additional cost to you, and it’d definitely support our work.
Download Attachments
You can download all attachment files for this Article/Tutorial (project files, schematics, code, etc..) using the link below. Please consider supporting my work through the various support options listed in the link down below. Every small donation helps to keep this website up and running and ultimately supports our community.
Arduino-Timer Library Wrap Up
To conclude this tutorial, we’d like to highlight the fact that the Arduino-Timer library is very easy to install and use. It acts like a wrapper for the timer-based Arduino millis() & micros() functions and provides us with very easy-to-use APIs as we’ve seen in the example projects in this tutorial.
This tutorial is a fundamental part of our Arduino Series of Tutorials because we’ll build on top of it to interface various sensors and modules with Arduino in other tutorials & projects. So make sure you get the hang of it and try all provided code examples & simulations (if you don’t have your Arduino Kit already).
If you’re just getting started with Arduino, you need to check out the Arduino Getting Started [Ultimate Guide] here.
This is the ultimate guide for getting started with Arduino for beginners. It’ll help you learn the Arduino fundamentals for Hardware & Software and understand the basics required to accelerate your learning journey with Arduino Programming.
![Arduino Timers Tutorial [Ultimate Guide] Arduino Timers Tutorial [Ultimate Guide]](https://deepbluembedded.com/wp-content/uploads/2023/05/Arduino-Timers-Tutorial-Ultimate-Guide-300x169.jpg)

Very helpful, keep it up!