In this tutorial, you’ll download Arduino Proteus Library and learn how to simulate Arduino Projects with Proteus ISIS software. We’ll also discuss some tips for Arduino Simulation to avoid running into problems while testing your projects. Without further ado, let’s get right into it!
In a previous tutorial, we discussed how to use TinkerCAD for simulating Arduino projects and we’ve created some sample projects for testing. However, proteus ISIS is another simulation tool that is considered to be a more powerful software for electronic circuit simulation and especially microcontroller-based applications.
Please, be advised that you first need to have installed Proteus ISIS on your computer and your license (time-limited free, student, or whatever) can simulate microcontroller projects (AVR, PIC, etc). I’ll show you how to install the add-on Arduino Proteus Library and use it for simulating Arduino projects.
Table of Contents
- Arduino Proteus Library
- Arduino Proteus Library Simulation Demo
- Arduino Proteus Simulation Remarks
- Download Attachments
- Conclusion
Arduino Proteus Library
The Arduino Proteus Library is based on the AVR microcontroller’s model that comes with the Proteus ISIS simulator itself, we just need to install an add-on library to have a couple of Arduino boards models included as well as some sensors that you can use later on for your Arduino Projects Simulation.
Arduino Proteus Library Download
You can download the Arduino Proteus Library using the link below or the button near the end of this tutorial. And unzip the folder to see its contents, and here is what’s inside.
[ Download Arduino Proteus Library Here ]
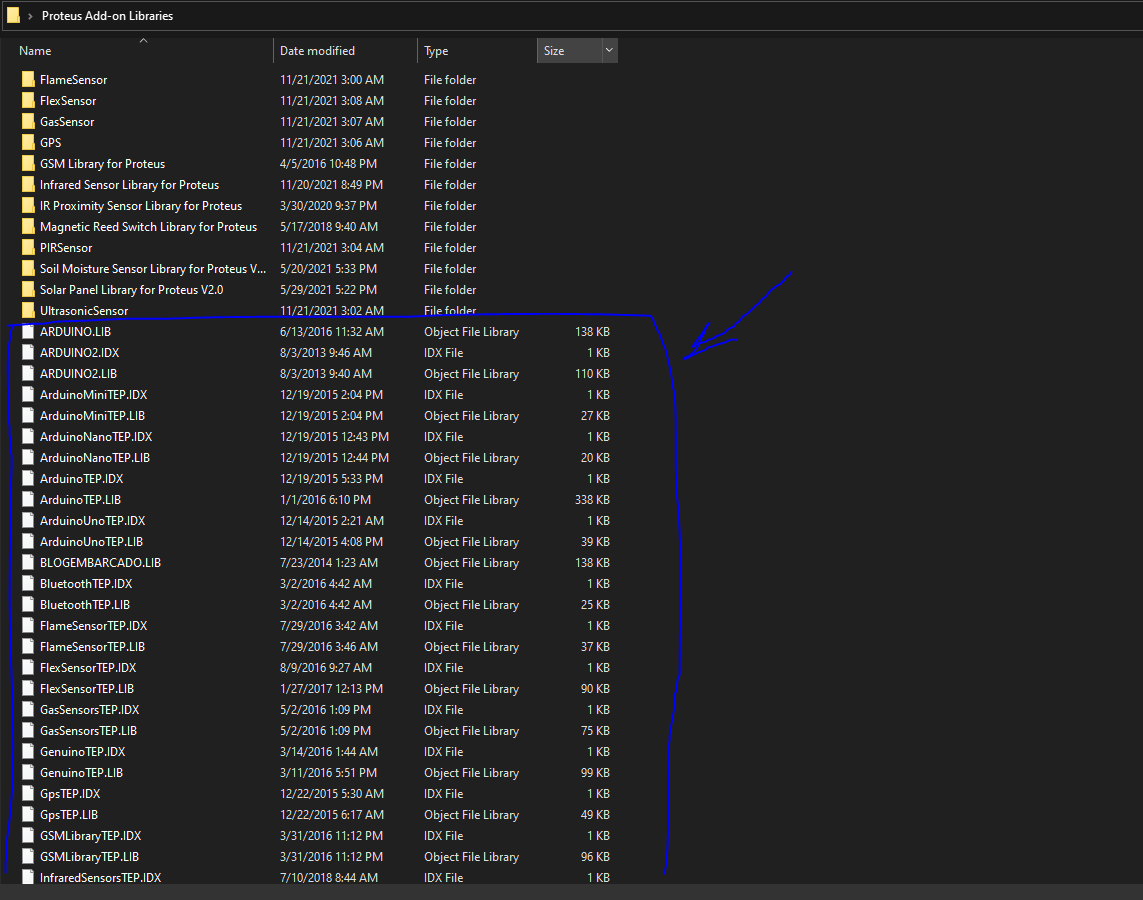
Unzip the library folder and open it, and you’ll find some folders and files. The Files I’ve marked in the screenshot above, are the model files ( .LIB and .IDX ) that we’ll copy and paste for installing the Arduino Proteus Library. Follow the next section’s step-by-step installation guide.
Arduino Proteus Library Install
Here is a step-by-step guide for installing Arduino Proteus Library in Proteus ISIS.
1- Copy Library Files
After downloading the library folder, unzip it and copy all the ( .LIB and .IDX ) files.
2- Go to the Proteus libraries folder & Paste
Open the installation directory for proteus which is usually as follows:
C:\Program Files (x86)\Labcenter Electronics\Proteus 8 Professional\DATA\LIBRARY
And paste the files you’ve copied right there.
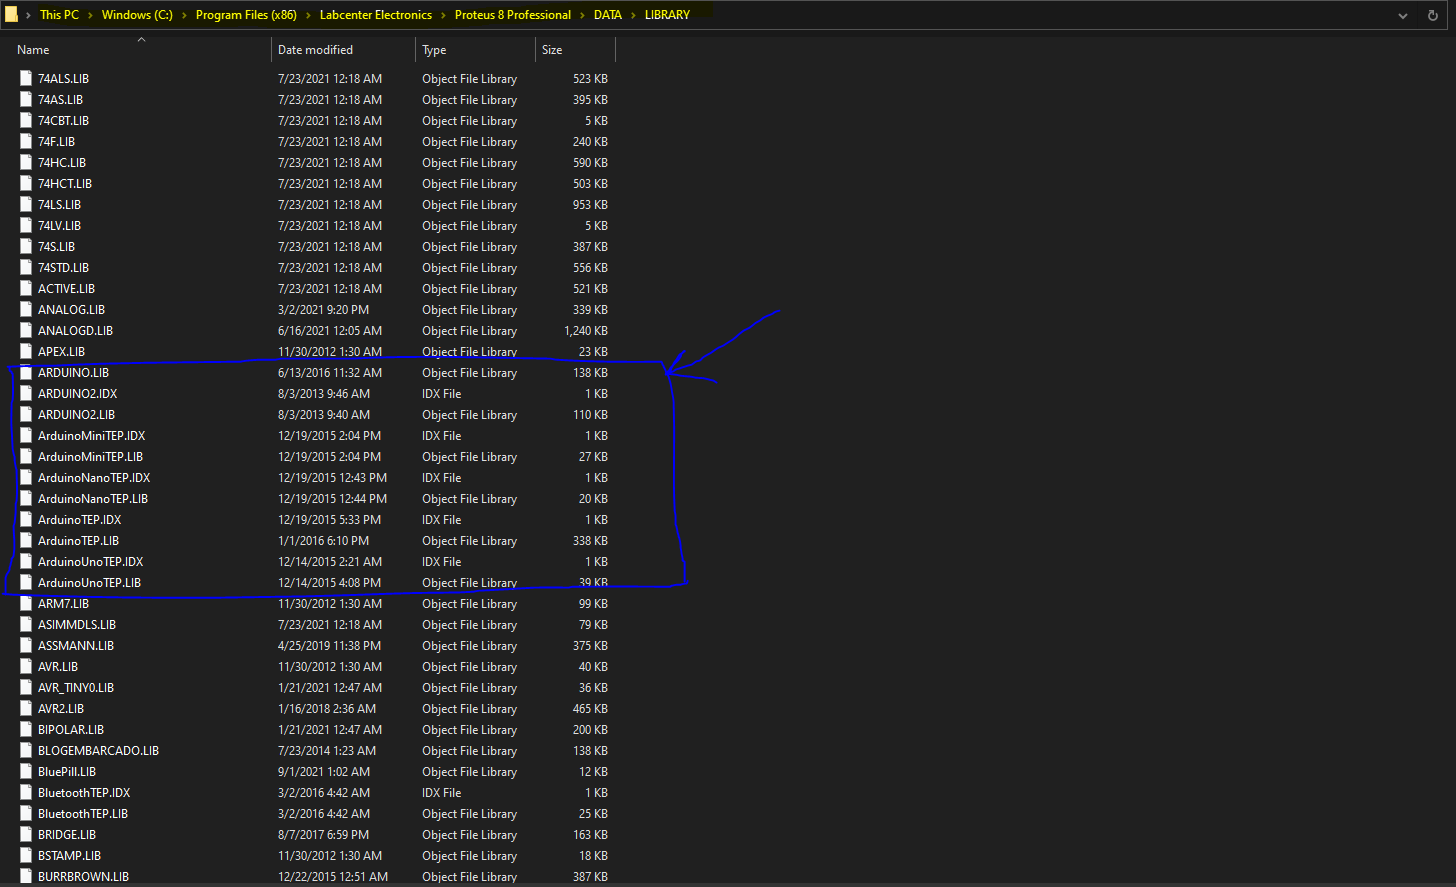
3- Open Proteus (ISIS) and Test
It’s now done, and you can open Proteus (ISIS) and create a new project to test the functionality of the Arduino Proteus Library. And that’s what we’ll be doing in the next section hereafter.
Arduino Proteus Library Simulation Demo
In this example, we’ll test the Arduino Proteus Simulation with an LED blinking example.
Arduino Proteus Simulation Project
Now, let’s create an Arduino Proteus Simulation project in ISIS (v8.13)
Open Proteus ISIS
Create New Project
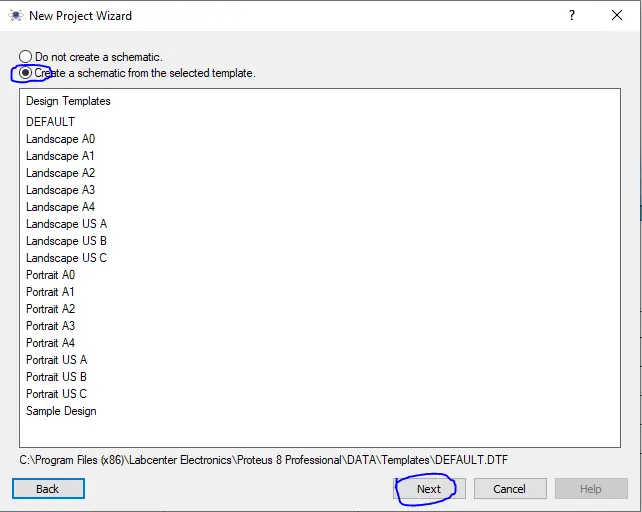
Create a Schematic With the Default Template
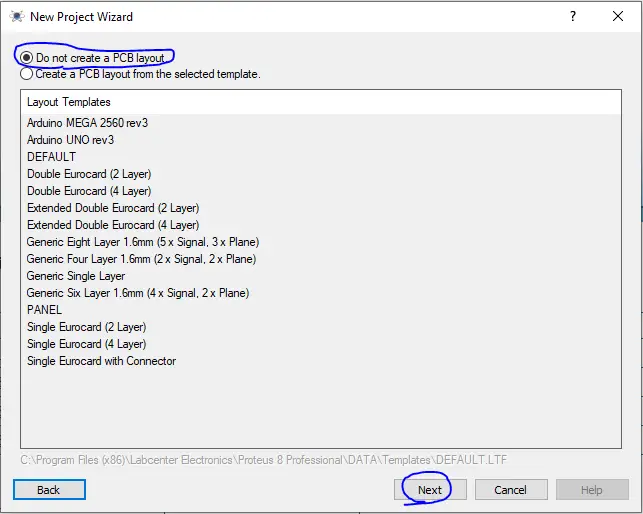
Do not create a PCB layout
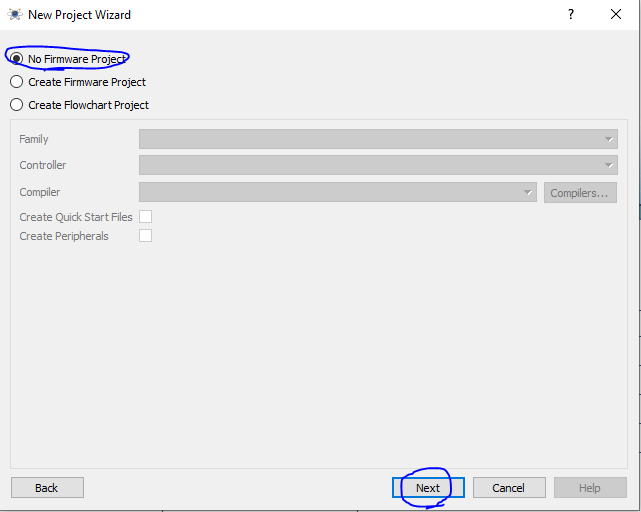
No Firmware Project
And Click Finish
Now, we’ve created the simulation project. Let’s add the Arduino UNO board and hook up an LED to the IO pin13.
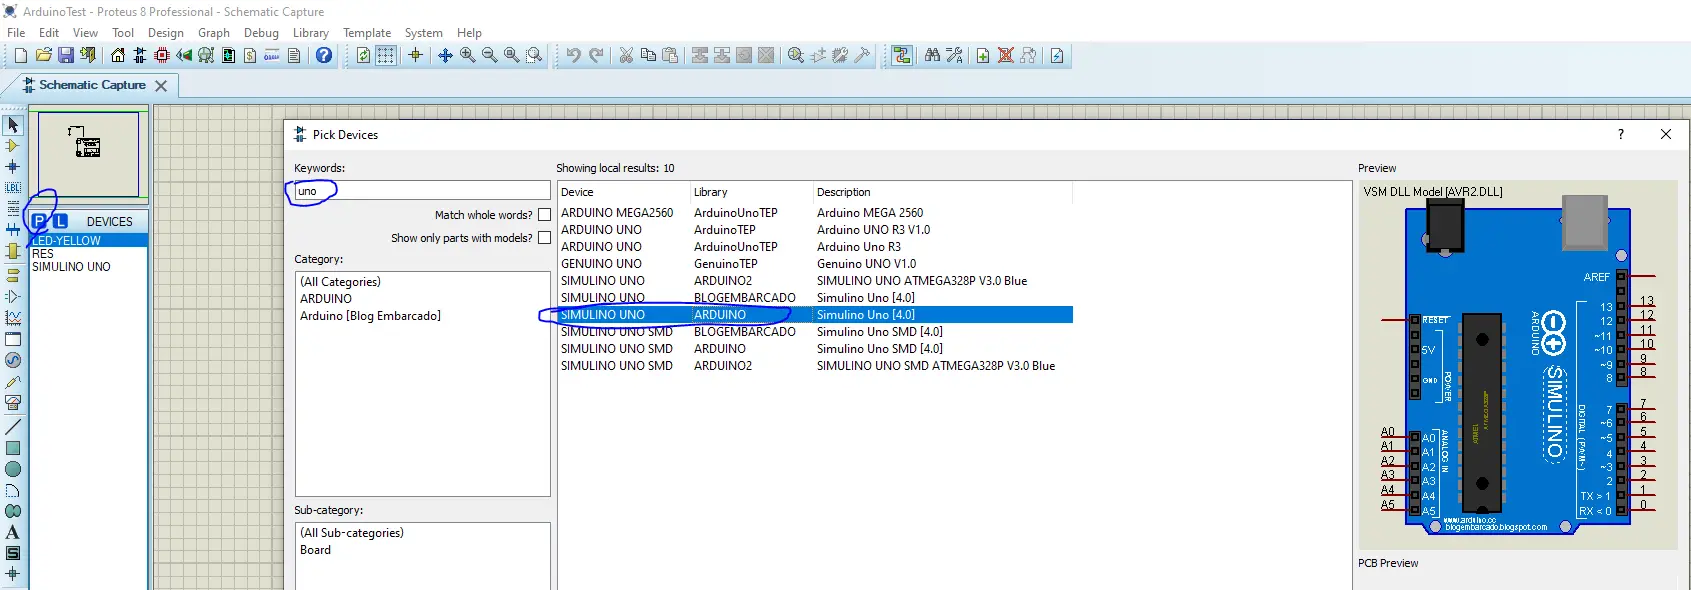
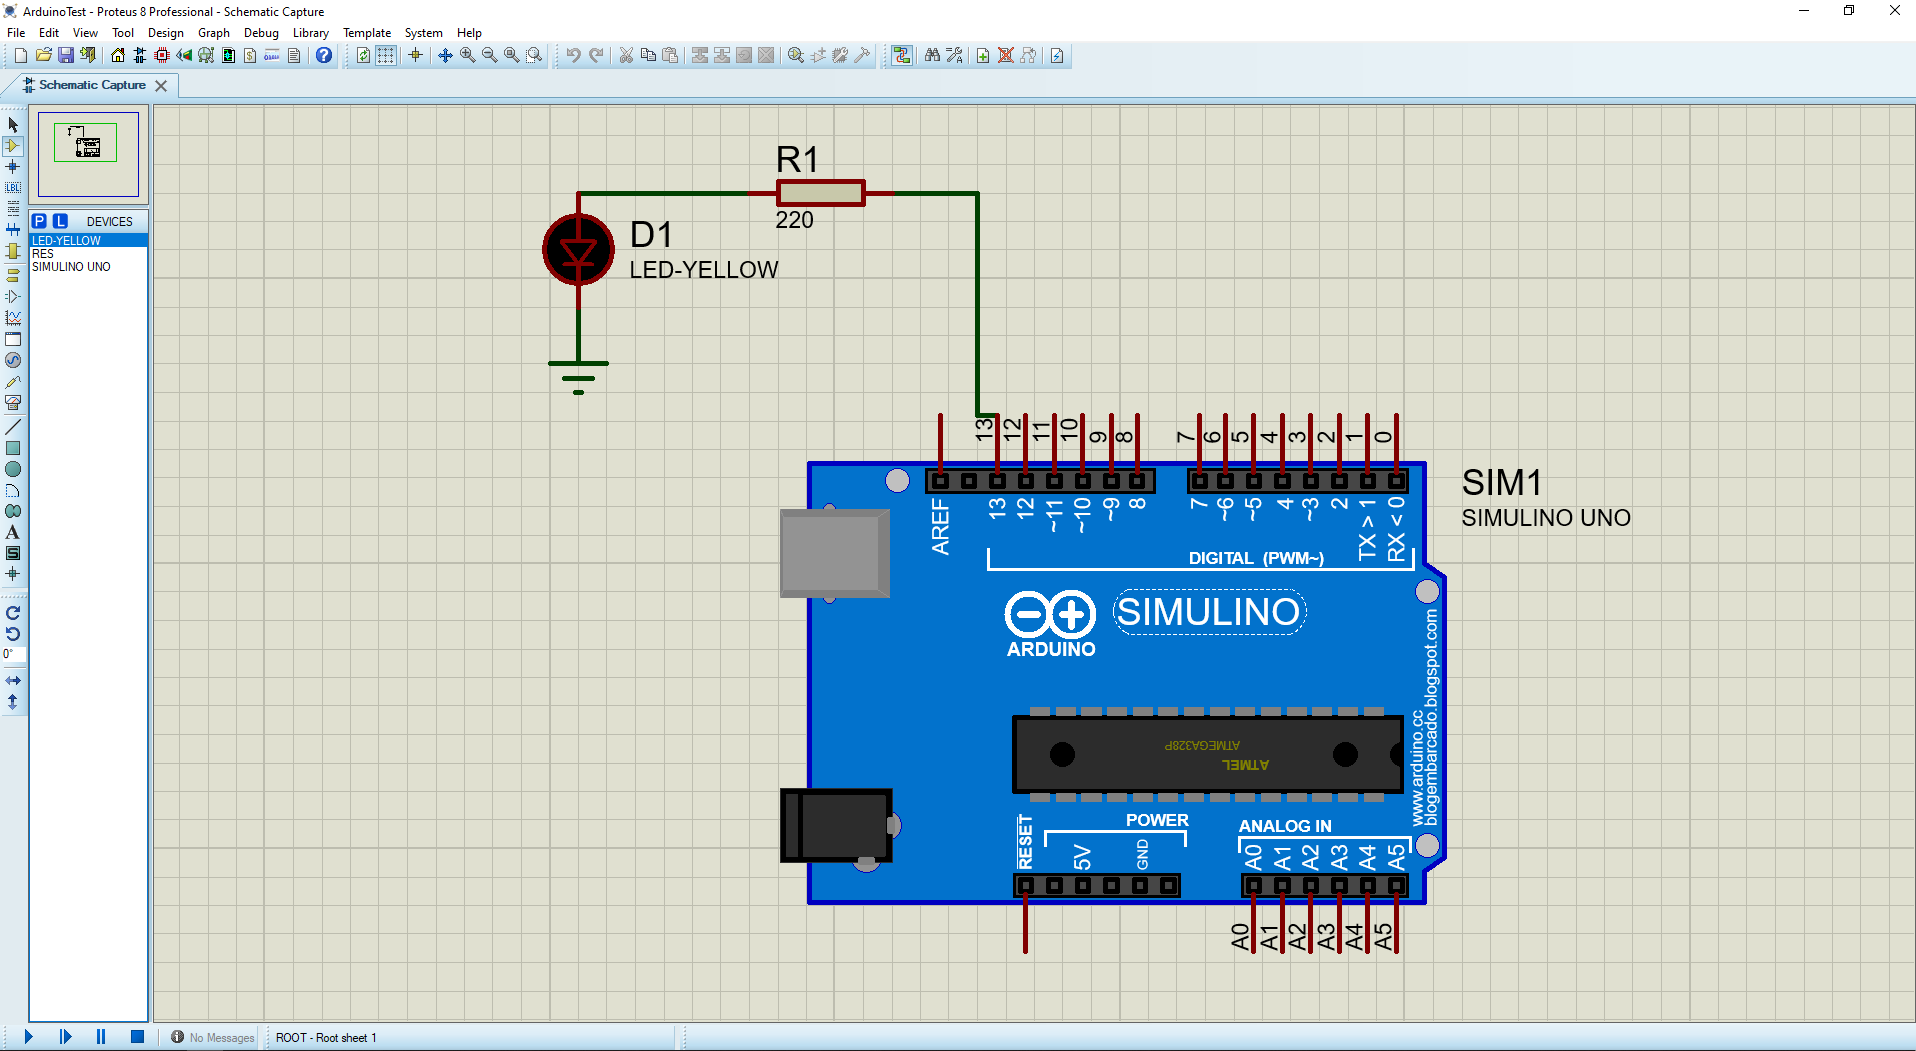
Example Code
Here is the full code listing for this example.
|
1 2 3 4 5 6 7 8 9 10 11 12 13 14 15 16 17 |
/* * LAB Name: Arduino LED Blinking * Author: Khaled Magdy * For More Info Visit: www.DeepBlueMbedded.com */ void setup() { pinMode(LED_BUILTIN, OUTPUT); } void loop() { digitalWrite(LED_BUILTIN, HIGH); delay(1000); // Wait for 1000 millisecond(s) digitalWrite(LED_BUILTIN, LOW); delay(1000); // Wait for 1000 millisecond(s) } |
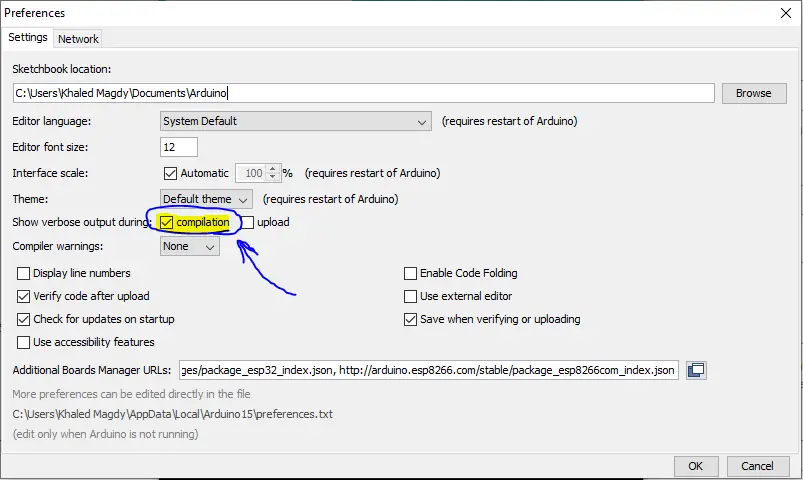
Before building the code example above, you need to modify the Arduino preferences options in order to know the location of the generated ( .hex ) output binary file that we’ll include later in the Proteus simulation project.
Modify Arduino Preference Options
Tick the “compilation” option as shown below.
Now, Click The Build Button in Arduino IDE
And as expected, it did print out the location of the ( .hex ) output binary file.
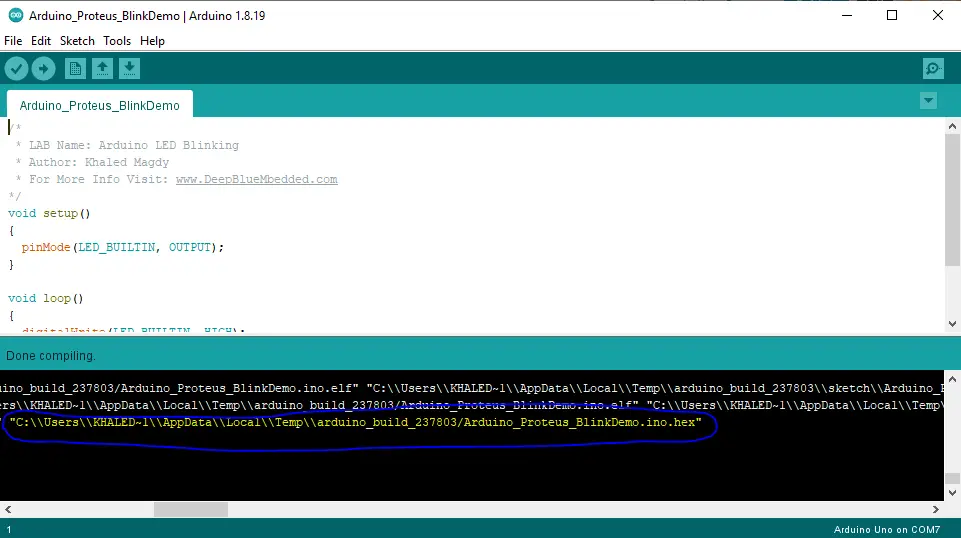
It’s going to be in the temp folder on your C drive. Just order the temp folder contents with the date to see the most recent files on the top of the list, and you’ll easily find the Arduino temp build folder.
C:\Users\YOUR_NAME\AppData\Local\Temp\arduino_build_xxxxxx
Copy the .hex file to a known place like the Arduino Sketch folder of your project for example.
Double-Click on The Arduino UNO Board in Proteus
This will open up the settings dialog for the Arduino UNO board in simulation. We’ll now point to the Hex program file location and start the simulation.
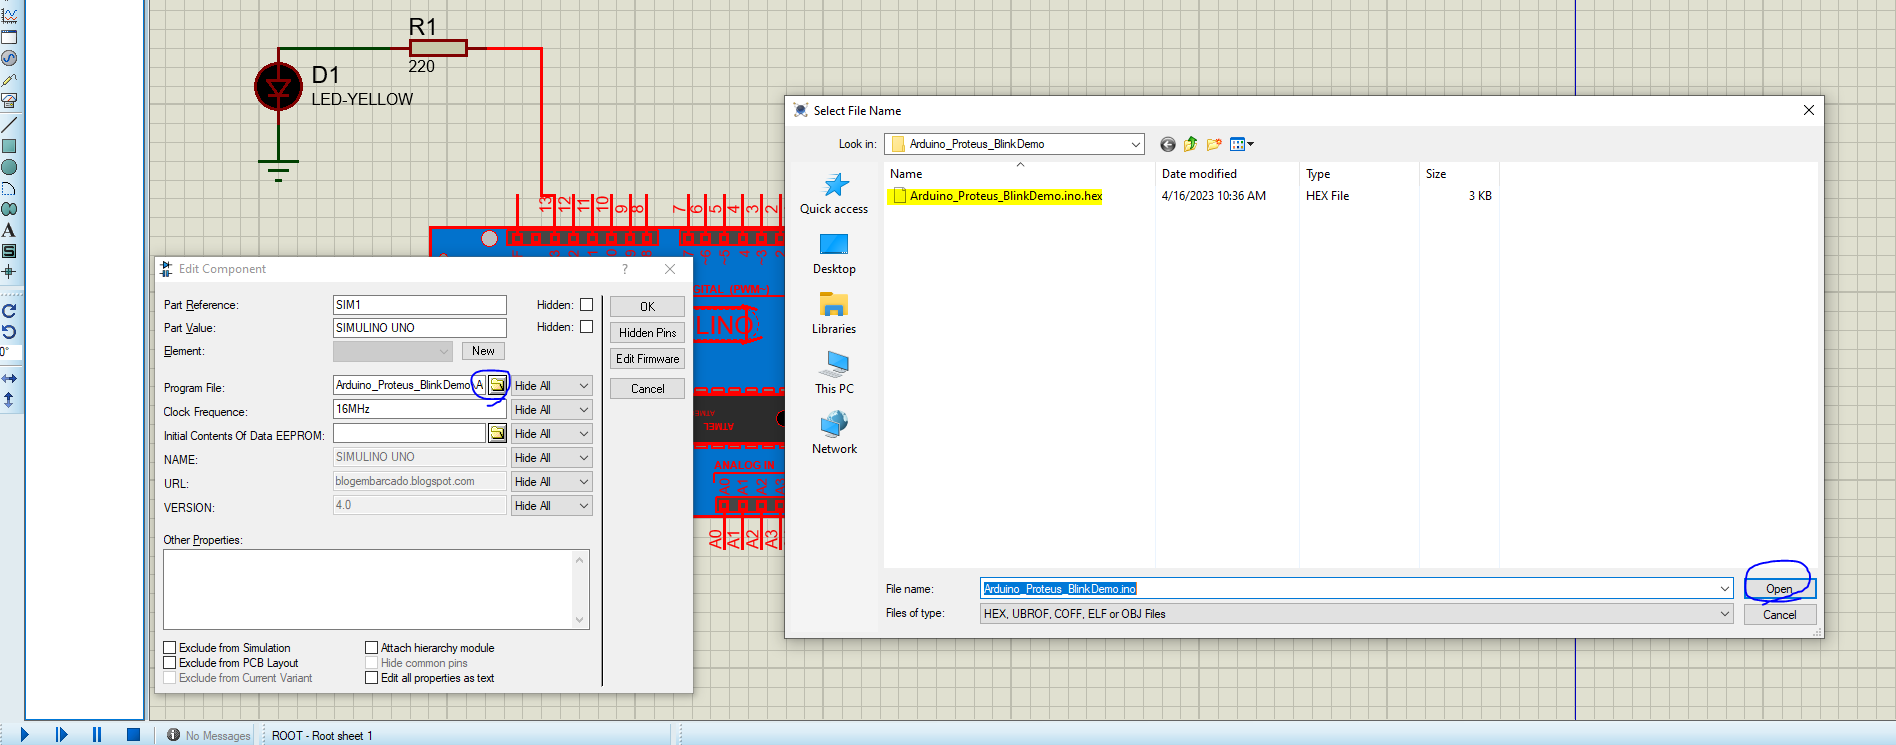
Arduino Proteus Simulation Result
And here is the simulation result for running this example code. You can modify and change it as you want.
Arduino Proteus Simulation Remarks
Simulating your Arduino projects can be really helpful especially when you’re just getting started with Arduino. This step is not mandatory at all, however, running your project in a simulator environment will help you catch and fix some logic errors in the code or in the circuit wiring connections.
If the code doesn’t run logically in simulation, it won’t either do in the real world. However, the opposite is not always true. If your project runs in simulation perfectly, it doesn’t mean it’ll also do in the real world. There are many external factors that can affect the application running on a real Arduino board. Things like noise, bad wiring, damaged parts, and more other obstacles that can’t be predicted by your simulator.
Moreover, the simulation environment will have its own limitations at the end of the day. It’s going to have a limited number of modules and sensors to use with Arduino, not all Arduino boards are included, not sufficient measurement tools are available in simulation, and other limitations.
Also, pay attention to the warning messages that Proteus displays at the bottom of the screen. Always click on it and see what’s going on. It’ll give you a great notification for catastrophic events such as:
- Power Reset
- Watchdog Reset
- Excessive current or voltage
- Wrong or missing circuit connections
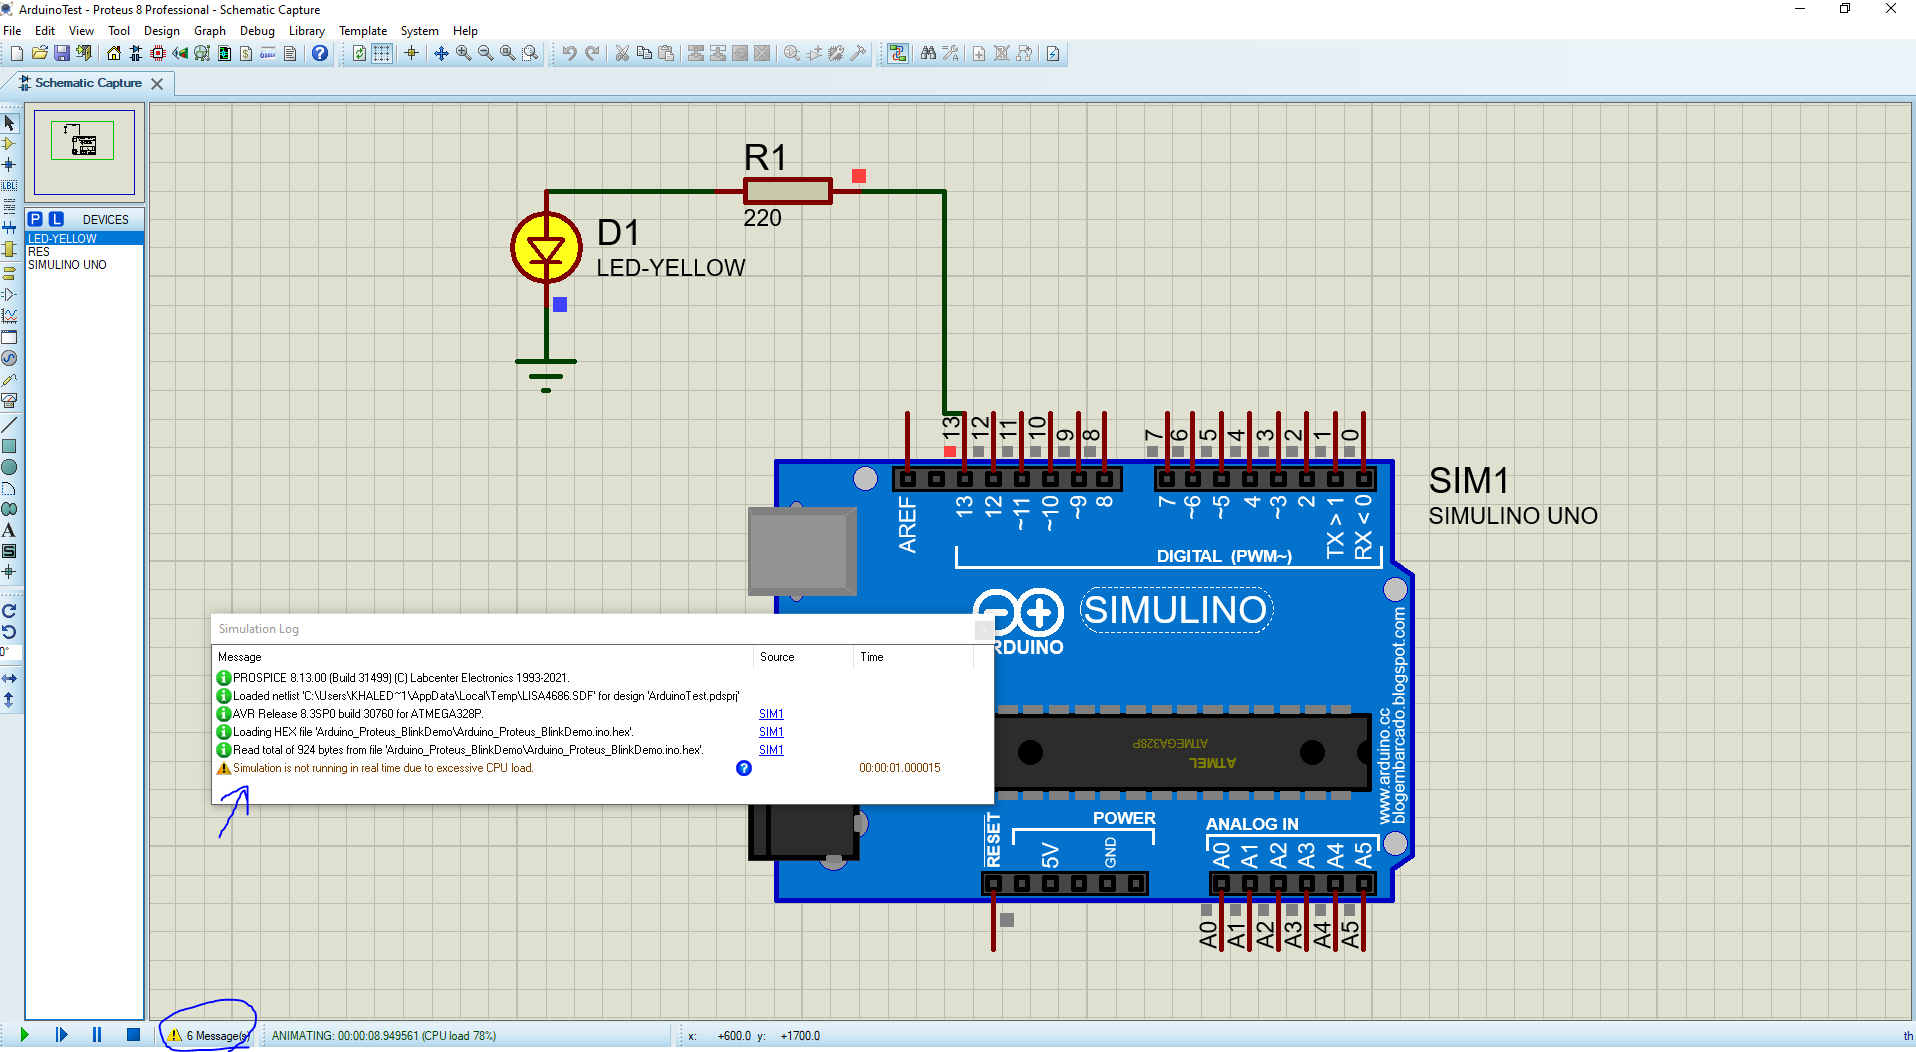
And it’s going to warn you if the simulation is not running in real-time. This means you shouldn’t care too much about any timing behavior you’ll see in the simulation screen like LED blinking time and such. It’s going to take longer than programmed due to excessive CPU loading during simulation, don’t change your code to accommodate for it. It’s a simulation runtime issue not in your Arduino code itself.
But all in all, it’s a great tool for learning and getting started with Arduino even if you don’t have the Arduino board or the hardware kit yet.
Download Attachments
You can download all attachment files for this Article/Tutorial (project files, schematics, code, etc..) using the link below. Please consider supporting my work through the various support options listed in the link down below. Every small donation helps to keep this website up and running and ultimately supports our community.
Conclusion
To conclude this tutorial, we’ll highlight the fact that Arduino simulation is possible with the Arduino Proteus Library which can help you get started with Arduino programming even if you didn’t get your hardware kit yet. There may be some downsides and limitations in some cases but for basic projects simulation, it’s going to help you so well.
If you’re just getting started with Arduino, you need to check out the Arduino Getting Started [Ultimate Guide] here. And follow this Arduino series of tutorials to learn more about Arduino Programming.
This is the ultimate guide for getting started with Arduino for beginners. It’ll help you learn the Arduino fundamentals for Hardware & Software and understand the basics required to accelerate your learning journey with Arduino Programming.
You’ll find the Arduino proteus library files on GitHub and various websites online. Download it, unzip the folder, and copy the .LIB and .IDX files to the proteus libraries directory and it’s done.
You’ll need to copy the .LIB and .IDX files to the libraries folder where proteus is installed on your machine. It’s typically at: C:\Program Files (x86)\Labcenter Electronics\Proteus 8 Professional\DATA\LIBRARY
paste the libraries files there and it’s done.
Yes, but it’s not built-in. You still need to install an add-on library to use the built-in AVR microcontroller model in Proteus and provide you with a functional Arduino board model that you can use for simulating your Arduino projects.
The Free Proteus license is time-limited for you to try the software capabilities. If it’s helpful, you should consider getting a convenient license whether a student version or for your organization.
After copying the Protues library model files, you need to navigate to: C:\Program Files (x86)\Labcenter Electronics\Proteus 8 Professional\DATA\LIBRARY
And paste the library model files right there and re-start the program.
