In this tutorial, we’ll discuss the Arduino I2C Slave Set Up procedure and how to set your Arduino as an I2C Slave device. We’ll start off by discussing some Arduino I2C communication basics and fundamentals as a quick review of what we’ve previously learned in more detail in this previous Arduino I2C Tutorial.
We’ll discuss all 3 possible I2C communication scenarios and create 3 different Arduino I2C Slave Examples to cover them all.
- I2C Slave Receiver <- I2C Master Transmitter
- I2C Slave Transmitter -> I2C Master Receiver
- I2C Slave RxTx <-> I2C Master TxRx
We’ll run the I2C communication between two Arduino boards projects in both the simulation environment and in real life to check how it behaves. Without further ado, let’s get right into it!
Table of Contents
- Set Up Arduino As I2C Slave
- 1. Arduino I2C Slave Receiver Example
- 2. Arduino I2C Slave Transmitter Example
- 3. Arduino I2C Slave Receiver-Transmitter Example
- Wrap Up
Set Up Arduino As I2C Slave
An I2C device (Master or Slave) can be a transmitter or a receiver and it’s up to you, the system designer & programmer, to decide whether a specific I2C device on the bus (Master or Slave) will be a data transmitter or receiver.
Therefore, the I2C communication between two Arduino boards can take one of the following forms:
- I2C Master (Tx) → I2C Slave (Rx)
- I2C Master (Rx) ← I2C Slave (Tx)
- I2C Master (TxRx) ↔︎ I2C Slave (RxTx)
Which depends on your target application and what you’re trying to achieve. This will be the basis on which you’ll choose the most suitable form of communication between the two Arduino boards (I2C devices).
You need to refer to the tutorial below to help you understand the basics of Arduino I2C communication and how to use the Wire.h library functions. It’s a prerequisite for this tutorial so you can smoothly proceed with the example projects we’ll implement hereafter.
This is the ultimate guide for Arduino I2C communication. It’ll give you an in-depth explanation of Arduino I2C fundamentals, wire library functions, Arduino I2C device programming, and a handful of Arduino I2C communication example projects.
Arduino I2C Slave Programming
For an I2C Slave device, you need to initialize the I2C module first. And you also need to assign an address for your I2C slave device. Then, you’re able to do I2C transactions on the bus with any master device.
For data reception, you need to enable the onReceive event and add a handler function for it. In which you’ll be able to check available received data (if any) and read it. For data transmission, you need to enable the onRequest event and add a handler function for it.
If an I2C master device on the bus requested data that you (the I2C slave device) provide, then the onRequest event will trigger and in the handler function you can send the data using the Wire.write() function.
Arduino I2C Slave Receiver Code Example
|
1 2 3 4 5 6 7 8 9 10 11 12 13 14 15 16 17 18 19 |
#include <Wire.h> byte RxByte; void I2C_RxHandler(int numBytes) { while(Wire.available()) { // Read Any Received Data RxByte = Wire.read(); } } void setup() { Wire.begin(0x55); // Initialize I2C (Slave Mode: address=0x55 ) Wire.onReceive(I2C_RxHandler); } void loop() { // Nothing To Be Done Here } |
Arduino I2C Slave Transmitter Code Example
|
1 2 3 4 5 6 7 8 9 10 11 12 13 14 15 16 17 |
#include <Wire.h> byte TxByte = 0xAA; void I2C_TxHandler(void) { Wire.write(TxByte); } void setup() { Wire.begin(0x55); // Initialize I2C (Slave Mode: address=0x55 ) Wire.onRequest(I2C_TxHandler); } void loop() { // Nothing To Be Done Here } |
Next, we’ll implement each of the 3 possible forms of I2C communication between the two Arduino boards that we mentioned earlier. I’ll give you a brief use case for each form of communication to help you make a guided design decision when you’re choosing the configuration that suits the needs of your next projects in the future.
1. Arduino I2C Slave Receiver Example
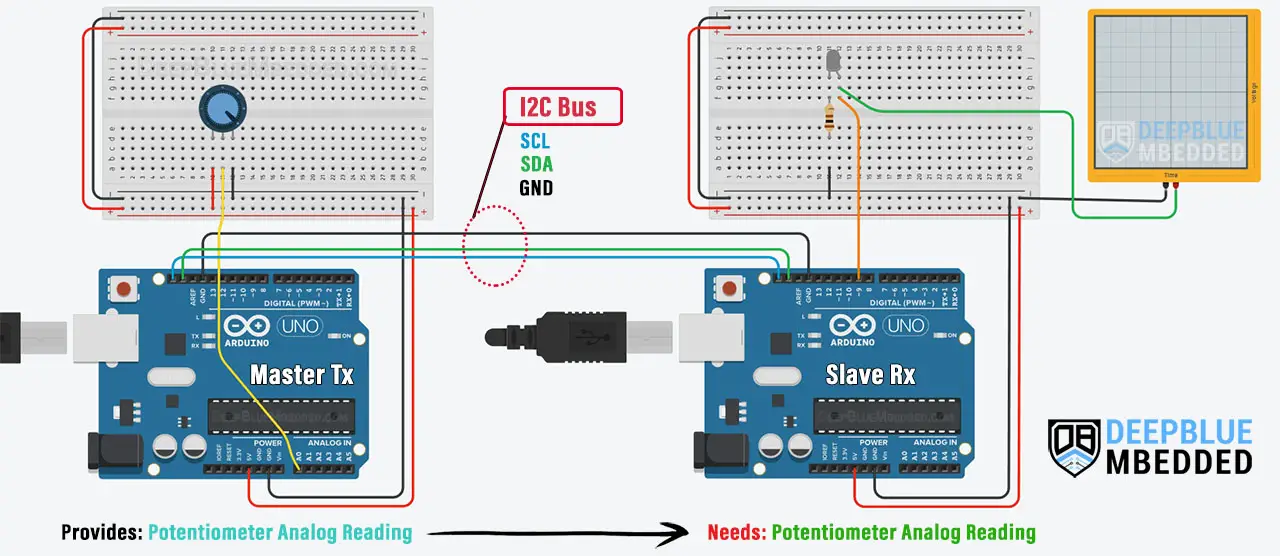
In this example project, we’ll establish serial communication between two Arduino Boards using I2C communication (TWI). One Arduino board will act as an I2C master transmitter that will read a potentiometer analog input and send it to the I2C Slave Arduino board.
The other Arduino board will act as an I2C slave receiver that will read the incoming data from the master device and use it to control a PWM output (LED). This is a one-way communication between (Arduino I2C Master Transmitter) -> (Arduino I2C Slave Receiver).
Use Case (Scenario)
This I2C communication configuration can be really helpful in many situations. When your Arduino board uses most of its IO pins for driving outputs (Motors, LEDs, or whatever. Then, it’d be a good idea to have another board that takes the user inputs (buttons, potentiometers, joysticks, etc) and send the readings to the outputs driver Arduino board.
In this configuration, the I2C slave receiver device needs some information from the master transmitter which reads the user inputs and sends them to the I2C slave receiver device.
For instance, let’s pretend that our Arduino board did run out of ADC (analog input) channels and we need to hook up a potentiometer to accept user input to control the brightness of an output LED (PWM-controlled). We can of course use an analog switch (multiplexer) or external ADC to solve the problem but let’s solve it by I2C communication with another Arduino board.
The solution to this situation is to set the Arduino board that needs extra ADC inputs as an I2C slave receiver and connect another Arduino board on the I2C bus that acts as a master transmitter which will do the potentiometer (analog input) reading and send the results to the other Arduino board (the slave receiver).
And this is what we’re going to do in this example project!
Wiring
Here is the wiring diagram for this example showing how to connect the LED output, and the potentiometer analog input on both Arduino boards (I2C Master Tx & I2C Slave Rx).
Arduino I2C Master Tx Board Code
Here is the complete code listing for the Arduino I2C Master Transmitter Board.
|
1 2 3 4 5 6 7 8 9 10 11 12 13 14 15 16 17 18 19 20 |
/* * LAB Name: Arduino I2C Master(Tx) * Author: Khaled Magdy * For More Info Visit: www.DeepBlueMbedded.com */ #include <Wire.h> int AN_POT; void setup() { Wire.begin(); // Initialize I2C (Master Mode: address is optional) } void loop() { AN_POT = analogRead(A0); Wire.beginTransmission(0x55); // Transmit to device with address 85 (0x55) Wire.write((AN_POT>>2)); // Sends Potentiometer Reading (8Bit) Wire.endTransmission(); // Stop transmitting delay(100); } |
Arduino I2C Slave Rx Board Code
Here is the complete code listing for the Arduino I2C Slave Receiver Board.
|
1 2 3 4 5 6 7 8 9 10 11 12 13 14 15 16 17 18 19 20 21 22 23 24 25 26 27 28 |
/* * LAB Name: Arduino I2C Slave(Rx) * Author: Khaled Magdy * For More Info Visit: www.DeepBlueMbedded.com */ #include <Wire.h> #define LED_PIN 9 byte RxByte; void I2C_RxHandler(int numBytes) { while(Wire.available()) { // Read Any Received Data RxByte = Wire.read(); } } void setup() { pinMode(LED_PIN, OUTPUT); Wire.begin(0x55); // Initialize I2C (Slave Mode: address=0x55 ) Wire.onReceive(I2C_RxHandler); } void loop() { analogWrite(LED_PIN, RxByte); delay(100); } |
Master Code Explanation
First of all, we need to include the Arduino Wire.h library to use the I2C communication module, and define a variable to hold the analog potentiometer reading (10-Bit ADC result).
|
1 2 3 |
#include <Wire.h> int AN_POT; |
setup()
in the setup() function, we’ll initialize the I2C module in master mode (no address is needed).
|
1 |
Wire.begin(); // Initialize I2C (Master Mode: address is optional) |
loop()
in the loop() function, we’ll read the analog potentiometer value and scale it down to 8-Bit range (1 byte) and send it over I2C to the slave device @ address = 0x55, and finally terminate the I2C transaction. This process will repeat 10 times per second, hence the use of delay(100ms).
|
1 2 3 4 5 |
AN_POT = analogRead(A0); Wire.beginTransmission(0x55); // Transmit to device with address 85 (0x55) Wire.write((AN_POT>>2)); // Sends Potentiometer Reading (8Bit) Wire.endTransmission(); // Stop transmitting delay(100); |
Slave Code Explanation
First of all, we need to include the Arduino Wire.h library to use the I2C communication module, define the output PWM pin for the LED, and define a variable to save the received data (byte) from the master Arduino board.
|
1 2 3 4 5 |
#include <Wire.h> #define LED_PIN 9 byte RxByte; |
I2C_RxHandler()
This is the I2C receive event handler function which is automatically called whenever the device receives data over the I2C bus. In which, we’ll read the incoming data byte and store it in a global variable. This will thereafter be used by the main function to set the PWM output duty cycle.
|
1 2 3 4 5 6 |
void I2C_RxHandler(int numBytes) { while(Wire.available()) { // Read Any Received Data RxByte = Wire.read(); } } |
setup()
in the setup() function, we’ll initialize the LED output pin mode, and initialize the I2C module in slave mode with ( address=85 or 0x55). We’ll also assign the event handler function to the I2C onReceive event.
|
1 2 3 |
pinMode(LED_PIN, OUTPUT); Wire.begin(0x55); // Initialize I2C (Slave Mode: address=0x55 ) Wire.onReceive(I2C_RxHandler); |
loop()
in the loop() function, we’ll apply the received duty cycle value to the PWM LED output.
|
1 |
analogWrite(LED_PIN, RxByte); |
And that’s it!
We can test this project’s code example using any available Arduino simulator environment. Here I’ll show you the simulation results for this project on TinkerCAD.
TinkerCAD Simulation
You can check this simulation project on TinkerCAD using this link.
Testing Results
2. Arduino I2C Slave Transmitter Example
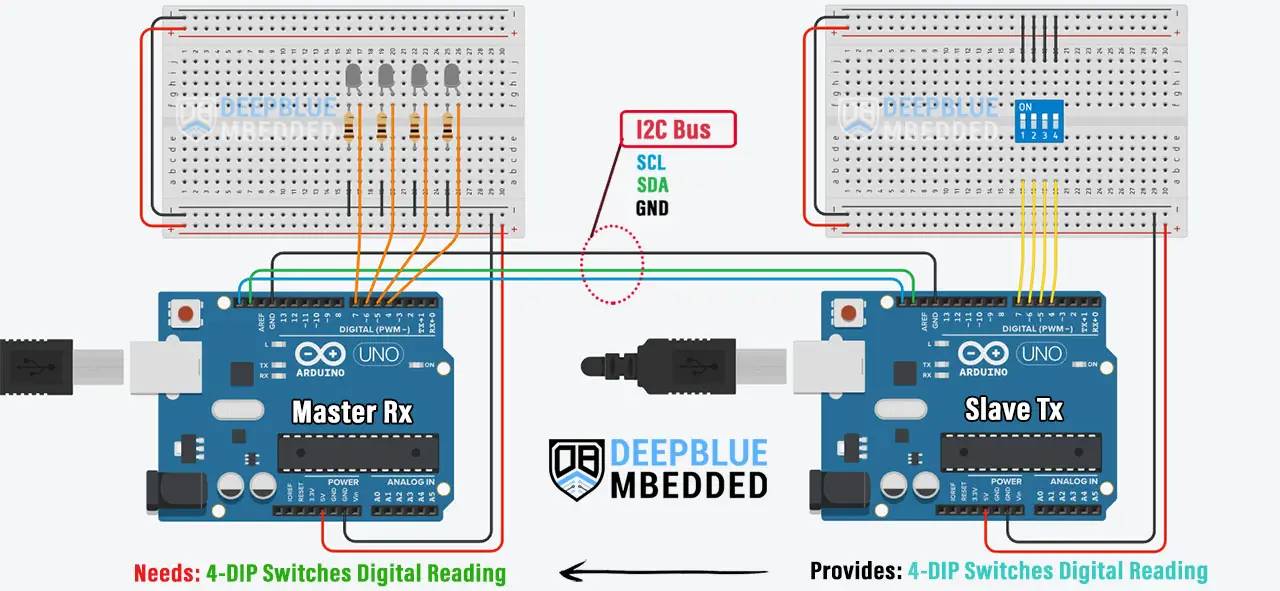
In this example project, we’ll establish serial communication between two Arduino Boards using I2C communication (TWI). One Arduino board will act as an I2C slave transmitter that will read 4-DIP switched (digital input) and send it to the I2C Master receiver Arduino board.
The other Arduino board will act as an I2C Master receiver that will read the incoming data from the slave device and use it to control some output LEDs. This is a one-way communication between (Arduino I2C Master Receiver) <- (Arduino I2C Slave Transmitter).
Use Case (Scenario)
This I2C communication configuration can be really helpful in many situations. When your Arduino board uses most of its IO pins for driving outputs (Motors, LEDs, or whatever. Then, it’d be a good idea to have another board that takes the user inputs (buttons, potentiometers, joysticks, etc) and send the readings to the outputs driver Arduino board.
In this configuration, the I2C master receiver device needs some information from the slave transmitter which reads the user inputs and sends them to the I2C master receiver device.
For instance, let’s pretend that our Arduino board did run out of digital IO pins and we need to hook up 4 DIP switches input to control 4 LEDs On/Off. We can of course use a multiplexer or IO expander to solve the problem but let’s solve it by I2C communication with another Arduino board that has spare IO pins.
The solution to this situation is to set the Arduino board that needs extra digital input pins as an I2C master receiver and connect another Arduino board on the I2C bus that acts as a slave transmitter which will do the digital inputs reading and send the results to the other Arduino board (the master receiver).
And this is what we’re going to do in this example project!
Wiring
Here is the wiring diagram for this example showing how to connect the output LEDs, and the 4-DIP switches input on both Arduino boards (I2C Master Rx & I2C Slave Tx).
Arduino I2C Master Rx Board Code
Here is the complete code listing for the Arduino I2C Master Receiver Board.
|
1 2 3 4 5 6 7 8 9 10 11 12 13 14 15 16 17 18 19 20 21 22 23 24 25 26 27 28 29 30 31 32 33 |
/* * LAB Name: Arduino I2C Master(Rx) * Author: Khaled Magdy * For More Info Visit: www.DeepBlueMbedded.com */ #include <Wire.h> #define LED0_PIN 4 #define LED1_PIN 5 #define LED2_PIN 6 #define LED3_PIN 7 byte RxByte; void setup() { Wire.begin(); // Initialize I2C (Master Mode: address is optional) pinMode(LED0_PIN, OUTPUT); pinMode(LED1_PIN, OUTPUT); pinMode(LED2_PIN, OUTPUT); pinMode(LED3_PIN, OUTPUT); } void loop() { Wire.requestFrom(0x55, 1); // Request From Slave @ 0x55, Data Length = 1Byte while(Wire.available()) { // Read Received Datat From Slave Device RxByte = Wire.read(); } digitalWrite(LED0_PIN, (RxByte&0x01)); digitalWrite(LED1_PIN, (RxByte&0x02)); digitalWrite(LED2_PIN, (RxByte&0x04)); digitalWrite(LED3_PIN, (RxByte&0x08)); delay(100); } |
Arduino I2C Slave Tx Board Code
Here is the complete code listing for the Arduino I2C Slave Transmitter Board.
|
1 2 3 4 5 6 7 8 9 10 11 12 13 14 15 16 17 18 19 20 21 22 23 24 25 26 27 28 29 30 31 32 33 34 35 36 37 |
/* * LAB Name: Arduino I2C Slave(Tx) * Author: Khaled Magdy * For More Info Visit: www.DeepBlueMbedded.com */ #include <Wire.h> #define BTN0_PIN 4 #define BTN1_PIN 5 #define BTN2_PIN 6 #define BTN3_PIN 7 byte TxByte = 0; void I2C_TxHandler(void) { Wire.write(TxByte); } void setup() { pinMode(BTN0_PIN, INPUT_PULLUP); pinMode(BTN1_PIN, INPUT_PULLUP); pinMode(BTN2_PIN, INPUT_PULLUP); pinMode(BTN3_PIN, INPUT_PULLUP); Wire.begin(0x55); // Initialize I2C (Slave Mode: address=0x55 ) Wire.onRequest(I2C_TxHandler); } void loop() { byte BtnsData = 0; BtnsData |= digitalRead(BTN0_PIN) << 0; BtnsData |= digitalRead(BTN1_PIN) << 1; BtnsData |= digitalRead(BTN2_PIN) << 2; BtnsData |= digitalRead(BTN3_PIN) << 3; TxByte = BtnsData; delay(10); } |
Master Code Explanation
First of all, we need to include the Arduino Wire.h library to use the I2C communication module, define the IO pins for output LEDs, and define a variable to hold the received byte from the I2C slave device that holds the 4-DIP switches states.
|
1 2 3 4 5 6 7 8 |
#include <Wire.h> #define LED0_PIN 4 #define LED1_PIN 5 #define LED2_PIN 6 #define LED3_PIN 7 byte RxByte; |
setup()
in the setup() function, we’ll initialize the I2C module in master mode (no address is needed), and we’ll initialize the IO pins used for LEDs as output pins.
|
1 2 3 4 5 |
Wire.begin(); // Initialize I2C (Master Mode: address is optional) pinMode(LED0_PIN, OUTPUT); pinMode(LED1_PIN, OUTPUT); pinMode(LED2_PIN, OUTPUT); pinMode(LED3_PIN, OUTPUT); |
loop()
in the loop() function, we’ll request the 4-DIP switches’ states from the I2C slave device @ the address 0x55. As an I2C master device, we’ll initiate the I2C transaction with the slave device by doing this. After getting the response, we’ll store it in the global RxByte variable.
|
1 2 3 4 |
Wire.requestFrom(0x55, 1); // Request From Slave @ 0x55, Data Length = 1Byte while(Wire.available()) { // Read Received Datat From Slave Device RxByte = Wire.read(); } |
Next, we’ll parse out the individual bits inside the received byte that represents the 4-DIP switches states and control the output LEDs accordingly.
|
1 2 3 4 |
digitalWrite(LED0_PIN, (RxByte&0x01)); digitalWrite(LED1_PIN, (RxByte&0x02)); digitalWrite(LED2_PIN, (RxByte&0x04)); digitalWrite(LED3_PIN, (RxByte&0x08)); |
Slave Code Explanation
First of all, we need to include the Arduino Wire.h library to use the I2C communication module, define the digital input pins for the DIP switches, and define a variable to send the switches’ state data (byte) to the master Arduino board.
|
1 2 3 4 5 6 7 8 |
#include <Wire.h> #define BTN0_PIN 4 #define BTN1_PIN 5 #define BTN2_PIN 6 #define BTN3_PIN 7 byte TxByte = 0; |
I2C_TxHandler()
This is the I2C transmit event handler function which is automatically called whenever the device receives a data request from an I2C master device over the I2C bus. In which, we’ll send out the DIP switches’ states ( TxByte) variable.
|
1 2 3 4 |
void I2C_TxHandler(void) { Wire.write(TxByte); } |
setup()
in the setup() function, we’ll initialize the digital input pins, and initialize the I2C module in slave mode with ( address=85 or 0x55). We’ll also assign the event handler function to the I2C onRequest event.
|
1 2 3 4 5 6 |
pinMode(BTN0_PIN, INPUT_PULLUP); pinMode(BTN1_PIN, INPUT_PULLUP); pinMode(BTN2_PIN, INPUT_PULLUP); pinMode(BTN3_PIN, INPUT_PULLUP); Wire.begin(0x55); // Initialize I2C (Slave Mode: address=0x55 ) Wire.onRequest(I2C_TxHandler); |
loop()
in the loop() function, we’ll read the digital input pins (DIP switches’ states) and save them into the TxByte global variable which will be sent to the master I2C Arduino board whenever it requests it.
|
1 2 3 4 5 6 |
byte BtnsData = 0; BtnsData |= digitalRead(BTN0_PIN) << 0; BtnsData |= digitalRead(BTN1_PIN) << 1; BtnsData |= digitalRead(BTN2_PIN) << 2; BtnsData |= digitalRead(BTN3_PIN) << 3; TxByte = BtnsData; |
And that’s it!
We can test this project’s code example using any available Arduino simulator environment. Here I’ll show you the simulation results for this project on TinkerCAD.
TinkerCAD Simulation
You can check this simulation project on TinkerCAD using this link.
Testing Results
3. Arduino I2C Slave Receiver-Transmitter Example
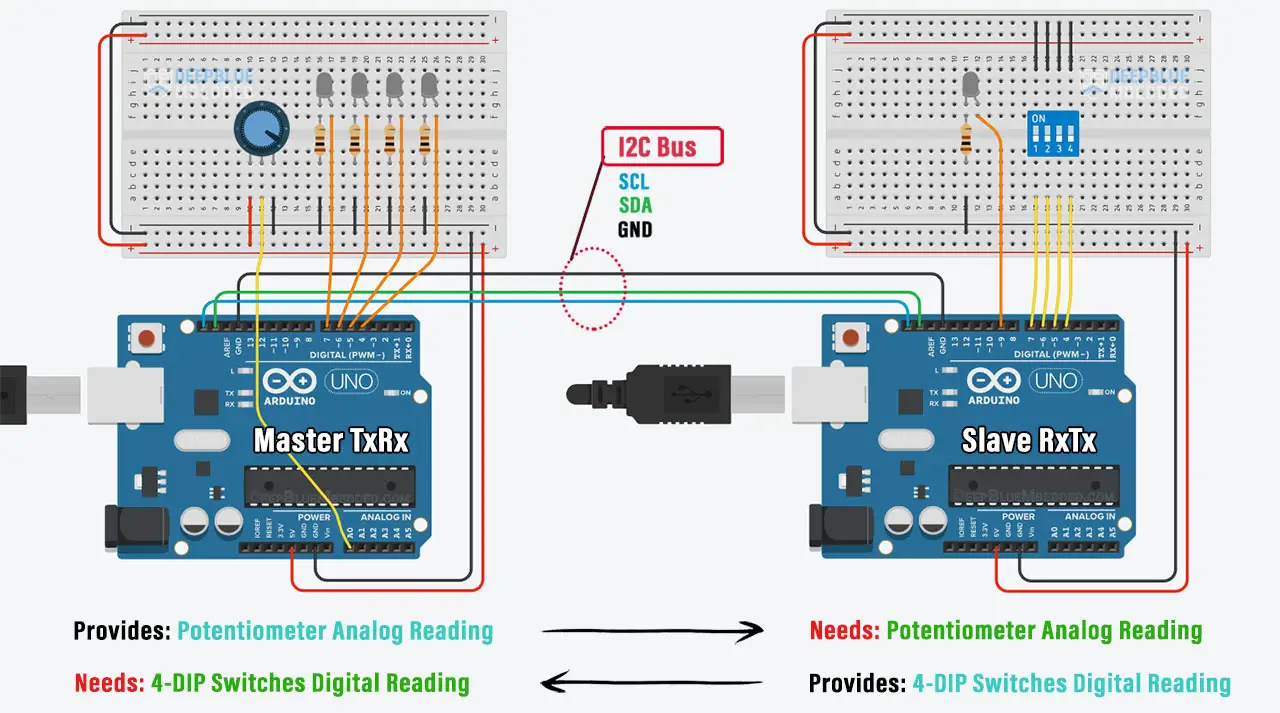
In this example project, we’ll establish serial communication between two Arduino Boards using I2C communication (TWI). One Arduino board will act as an I2C Master transmitter/receiver device, while the other will act as an I2C Slave receiver/transmitter device.
This is going to be two-way communication between (Arduino I2C Master TxRx) <-> (Arduino I2C Slave RxTx). Which is the ultimate I2C data exchange example between two Arduino boards.
Use Case (Scenario)
This I2C communication configuration can be really helpful in many situations. When your Arduino board needs information from another board (like sensor reading, user input, or whatever) while that other board does also need some information from the first board. Therefore, the need for communication arises.
We’ll combine both previous examples we’ve done so far to create this two-way communication project, where the two I2C devices (Arduino Boards) will act as follows:
- I2C Master Board: Will Transmit the reading of analog input (Potentiometer) and request from the slave device to Receive the reading of 4-DIP switches to control the output 4 LEDs.
- I2C Slave Board: Will Receive the analog potentiometer reading from the master device, and respond to the data request by Transmitting the digital states of the 4-DIP input switches.
And this is how both Arduino boards will do I2C data exchange transactions in this project!
Wiring
Here is the wiring diagram for this example showing how to connect the output LEDs, DIP switches, and potentiometer on both Arduino boards (I2C Master TxRx & I2C Slave RxTx).
Arduino I2C Master TxRx Board Code
Here is the complete code listing for the Arduino I2C Master Transmitter-Receiver Board.
|
1 2 3 4 5 6 7 8 9 10 11 12 13 14 15 16 17 18 19 20 21 22 23 24 25 26 27 28 29 30 31 32 33 34 35 36 37 38 39 40 41 |
/* * LAB Name: Arduino I2C Master(TxRx) * Author: Khaled Magdy * For More Info Visit: www.DeepBlueMbedded.com */ #include <Wire.h> #define LED0_PIN 4 #define LED1_PIN 5 #define LED2_PIN 6 #define LED3_PIN 7 int AN_POT; byte RxByte; void setup() { Wire.begin(); // Initialize I2C (Master Mode: address is optional) pinMode(LED0_PIN, OUTPUT); pinMode(LED1_PIN, OUTPUT); pinMode(LED2_PIN, OUTPUT); pinMode(LED3_PIN, OUTPUT); } void loop() { // I2C TX AN_POT = analogRead(A0); Wire.beginTransmission(0x55); // Transmit to device with address 85 (0x55) Wire.write((AN_POT>>2)); // Sends Potentiometer Reading (8Bit) Wire.endTransmission(); // Stop transmitting // I2C RX Wire.requestFrom(0x55, 1); // Request From Slave @ 0x55, Data Length = 1Byte while(Wire.available()) { // Read Received Datat From Slave Device RxByte = Wire.read(); } digitalWrite(LED0_PIN, (RxByte&0x01)); digitalWrite(LED1_PIN, (RxByte&0x02)); digitalWrite(LED2_PIN, (RxByte&0x04)); digitalWrite(LED3_PIN, (RxByte&0x08)); delay(100); } |
Arduino I2C Slave RxTx Board Code
Here is the complete code listing for the Arduino I2C Slave Receiver-Transmitter Board.
|
1 2 3 4 5 6 7 8 9 10 11 12 13 14 15 16 17 18 19 20 21 22 23 24 25 26 27 28 29 30 31 32 33 34 35 36 37 38 39 40 41 42 43 44 45 46 47 48 49 |
/* * LAB Name: Arduino I2C Slave(RxTx) * Author: Khaled Magdy * For More Info Visit: www.DeepBlueMbedded.com */ #include <Wire.h> #define LED_PIN 9 #define BTN0_PIN 4 #define BTN1_PIN 5 #define BTN2_PIN 6 #define BTN3_PIN 7 byte RxByte; byte TxByte = 0; void I2C_RxHandler(int numBytes) { while(Wire.available()) { // Read Any Received Data RxByte = Wire.read(); } } void I2C_TxHandler(void) { Wire.write(TxByte); } void setup() { pinMode(LED_PIN, OUTPUT); pinMode(BTN0_PIN, INPUT_PULLUP); pinMode(BTN1_PIN, INPUT_PULLUP); pinMode(BTN2_PIN, INPUT_PULLUP); pinMode(BTN3_PIN, INPUT_PULLUP); Wire.begin(0x55); // Initialize I2C (Slave Mode: address=0x55 ) Wire.onReceive(I2C_RxHandler); Wire.onRequest(I2C_TxHandler); } void loop() { byte BtnsData = 0; BtnsData |= digitalRead(BTN0_PIN) << 0; BtnsData |= digitalRead(BTN1_PIN) << 1; BtnsData |= digitalRead(BTN2_PIN) << 2; BtnsData |= digitalRead(BTN3_PIN) << 3; TxByte = BtnsData; analogWrite(LED_PIN, RxByte); delay(10); } |
Note That the I2C Slave board’s code is a superset of both example1 & example2 masters’ codes. And the same goes for the I2C Master board’s code as well. It combines the logic implemented in the first and in the second examples together. So both devices can do a two-way I2C communication.
We can test this project’s code example using any available Arduino simulator environment. Here I’ll show you the simulation results for this project on TinkerCAD.
TinkerCAD Simulation
You can check this simulation project on TinkerCAD using this link.
Testing Results
Parts List
Here is the full components list for all parts that you’d need in order to perform the practical LABs mentioned here in this article and for the whole Arduino Programming series of tutorials found here on DeepBlueMbedded. Please, note that those are affiliate links and we’ll receive a small commission on your purchase at no additional cost to you, and it’d definitely support our work.
Download Attachments
You can download all attachment files for this Article/Tutorial (project files, schematics, code, etc..) using the link below. Please consider supporting my work through the various support options listed in the link down below. Every small donation helps to keep this website up and running and ultimately supports our community.
Wrap Up
To conclude this tutorial, we’d like to highlight the fact that I2C serial communication is very flexible and allows multi-master multi-slave devices on the bus. Another upside is that it can run flawlessly even if you kept adding more devices to the two-wire bus, unlike other serial communication ports that are more restricted in this sense.
This tutorial is part of our Arduino Series of Tutorials that you should definitely check out and keep in your bookmarks in case you need to search for something or ask for help. I’ll gladly do my best to help you solve whatever issue you’re up against.
If you’re just starting with Arduino, check out the Arduino Getting Started [Ultimate Guide] here.
This is the ultimate guide for getting started with Arduino for beginners. It’ll help you learn the Arduino fundamentals for Hardware & Software and understand the basics required to accelerate your learning journey with Arduino Programming.
This article will give more in-depth information about Arduino serial communication fundamentals and a general overview of Arduino’s UART, SPI, and I2C serial communication ports (protocol).
