In this tutorial, you’ll learn how to use the Arduino Serial Plotter. We’ll discuss how the Arduino Serial Plotter works and how to use it to show graphical plots of different variables in your Arduino projects. This can be extremely helpful especially for debugging runtime sort of issues.
We’ll also discuss how to use Arduino’s Serial Plotter For Debugging your Arduino projects. Without further ado, let’s get right into it!
Table of Contents
- Arduino Serial Plotter
- Arduino Serial Plotter Sine Wave Example
- Arduino Serial Plotter Multiple Plots Example
- Wrap Up
Arduino Serial Plotter
In a previous guide, we’ve discussed the Arduino Serial Monitor tool that’s already built in the IDE itself. The Arduino serial plotter is another handy tool that’s also built into the Arduino IDE. It enables you to plot variables sent over the serial communication port and have a graphical visualization of the variable’s value over time.

Which can be really helpful for debugging or monitoring the behavior of your code. Especially things that show weird timing behavior or if you’re trying to catch some runtime bugs. Showing a graphical plot for different values & flags can be extremely helpful.
Arduino Serial Plotter Scale
The Arduino Serial Plotter has an auto-scaling feature which means you don’t need to worry about the scale for the Y-Axis (value). No need to do software scaling for your variables in code because the Arduino’s serial plotter will do it on its own. Unless you’d like to plot two quantities together and pre-scaling needs to be done in software.
Arduino Serial Plotter Multiple Plots
The Arduino Serial Plotter tool can also display multiple plots on the same graph grid. You just need to send comma-separated values ',' per line as we’ll see in the second come example hereafter in this tutorial.
Arduino Serial Plotter Labels & Legends
The Arduino serial plotter tools displays color legends by default if you’re plotting multiple variables at the same time and it has no labeling for each plot curve. You have to arrange the data to be plotted on your own and send them in a specific order as we’ll see in the examples hereafter in this tutorial.
Arduino Serial Plotter Sine Wave Example
Here is an example to demonstrate the functionality of this tool. I’ll create a variable and assign to it sinusoidal waveform data points and send them one by one over the serial port. And we’ll plot it graphically on the Arduino IDE’s Serial Plotter Tool.
Code Example
Here is the full code listing for this example.
void setup() {
  Serial.begin(9600);
}

void loop() {
  for (float i = 0; i < 360; i += 1) {
    float Sine1 = 100 * sin(i * M_PI / 180);
    Serial.println(Sine1);
    delay(10);
  }
}
Code Explanation
setup()
in the setup() function, we’ll initialize the UART module & set its baud rate to 9600 bps using the Serial.begin() function.
Serial.begin(9600);
loop()
in the loop() function, create a floating-point variable and assign to it data points of a sine waveform with amplitude of 100 and a rotating angle (0-360). Note that we must send line termination after the serial print of the variable to be plotted. That’s why I’m using the Serial.println() function in this example.
for (float i = 0; i < 360; i += 1)
{
   float Sine1 = 100 * sin(i * M_PI / 180);
   Serial.println(Sine1);
   delay(10);
}
TinkerCAD Simulation
You can check this simulation project on TinkerCAD using this link.
Testing Results
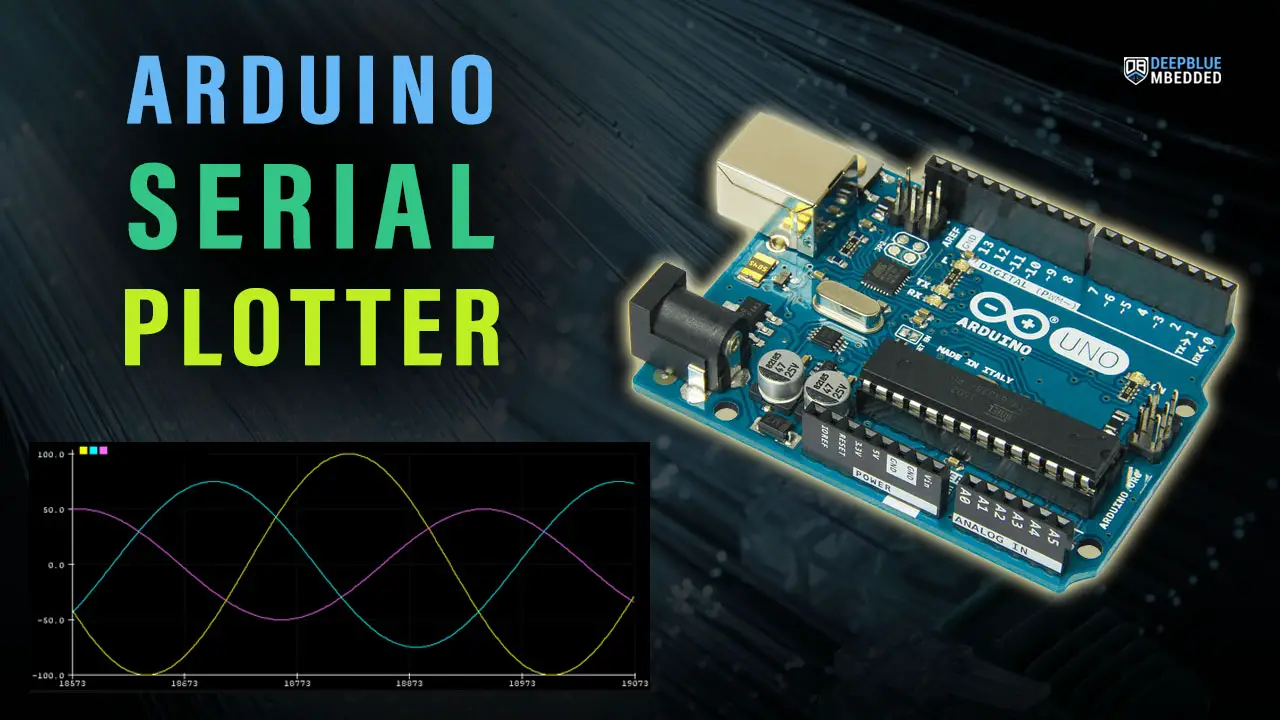
Arduino Serial Plotter Multiple Plots Example
This example is very similar to the previous one expect for one thing which is doing multiple plots in the same graph. Now, we’ll create three variables with different sinusoidal waveform amplitude & 120° of phase shift between them. And we’ll send all 3 variables to be plotted using the Arduino Serial Plotter.
Note that the variables need to be comma-separated and line termination need to be added at the end of the data points to be plotted each time.
Code Example
Here is the full code listing for this example.
void setup() {
  Serial.begin(9600);
}

void loop() {
  for (float i = 0; i < 360; i += 1) {
    float Sine1 = 100 * sin(i * M_PI / 180);
    float Sine2 = 75 * sin((i+120) * M_PI / 180);
    float Sine3 = 50 * sin((i+240) * M_PI / 180);
    Serial.print(Sine1);
    Serial.print(',');
    Serial.print(Sine2);
    Serial.print(',');
    Serial.println(Sine3);
    delay(10);
  }
}
Code Explanation
setup()
in the setup() function, we’ll initialize the UART module & set its baud rate to 9600 bps using the Serial.begin() function.
Serial.begin(9600);
loop()
in the loop() function, we’ll create 3 floating-point variables and assign to them data points of a 3 sine waveforms with amplitudes of (100, 75, and 50), a rotating angle (0-360), and a phase shift of 120° between them.
Note that the values are comma-separated and we send line termination after the serial print of the variable to be plotted.
for (float i = 0; i < 360; i += 1)
{
  float Sine1 = 100 * sin(i * M_PI / 180);
  float Sine2 = 75 * sin((i+120) * M_PI / 180);
  float Sine3 = 50 * sin((i+240) * M_PI / 180);
  Serial.print(Sine1);
  Serial.print(',');
  Serial.print(Sine2);
  Serial.print(',');
  Serial.println(Sine3);
  delay(10);
}
TinkerCAD Simulation
You can check this simulation project on TinkerCAD using this link.
Testing Results
Parts List
Here is the full components list for all parts that you’d need in order to perform the practical LABs mentioned here in this article and for the whole Arduino Programming series of tutorials found here on DeepBlueMbedded. Please, note that those are affiliate links and we’ll receive a small commission on your purchase at no additional cost to you, and it’d definitely support our work.
Download Attachments
You can download all attachment files for this Article/Tutorial (project files, schematics, code, etc..) using the link below. Please consider supporting my work through the various support options listed in the link down below. Every small donation helps to keep this website up and running and ultimately supports our community.
Wrap Up
To conclude this guide tutorial, we can say that using the Arduino Serial Monitor and Serial Plotter tools is crucial for debugging your Arduino projects. We’ll be using them a lot in this series of tutorials and projects. So make sure to try the examples provided in this tutorial to get the hang of it.
If you’re just getting started with Arduino, you need to check out the Arduino Getting Started [Ultimate Guide] here.
And follow this Arduino Series of Tutorials to learn more about Arduino Programming.

This is the ultimate guide for getting started with Arduino for beginners. It’ll help you learn the Arduino fundamentals for Hardware & Software and understand the basics required to accelerate your learning journey with Arduino Programming.