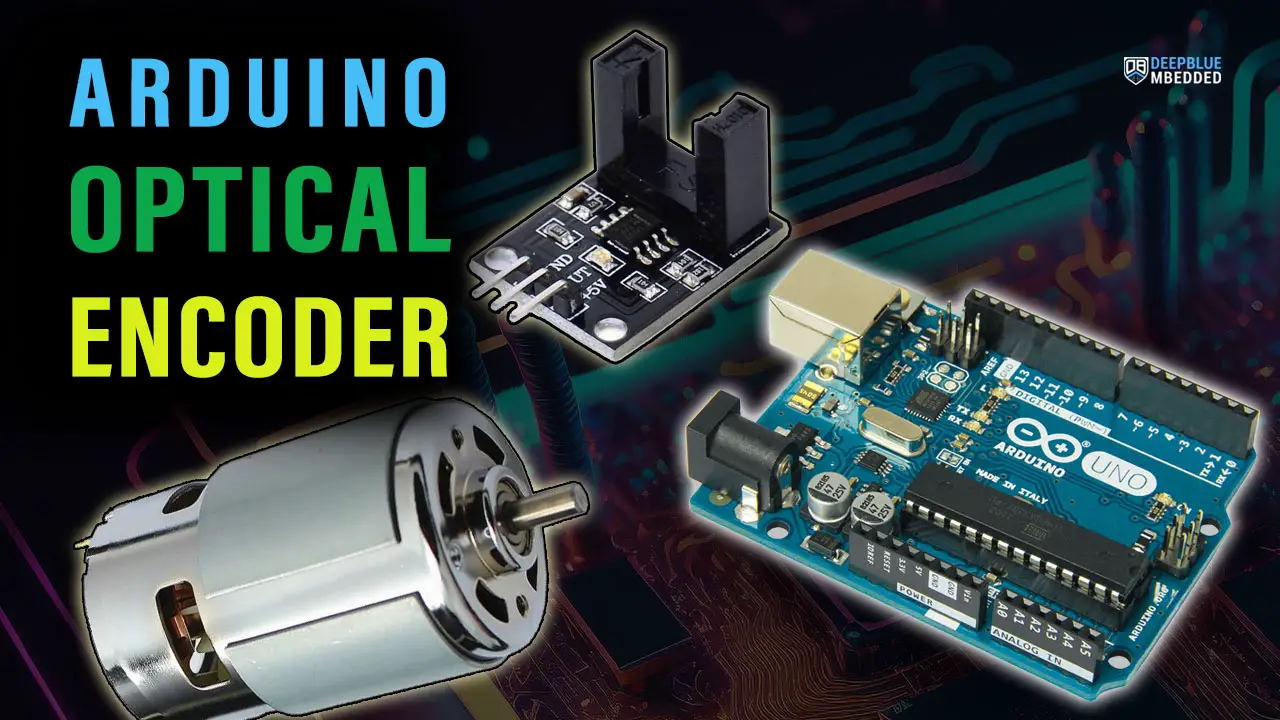
In this tutorial, you’ll learn how to interface Arduino with Motor Encoder (Optical Encoder) RPM Sensor and use it to measure the speed (RPM) of a DC motor. You’ll also learn multiple techniques to measure motor speed with Arduino & motor encoder (optical encoder). We’ll create a couple of Arduino Motor Encoder example projects to practice what we’ll learn in this tutorial.
Table of Contents
- Arduino Motor Encoder (Optical Encoder / Photo Interrupter)
- Arduino Motor Encoder (Optical Encoder) Interfacing
- Arduino Motor Encoder (Photo Interrupter) RPM Measurement
- Arduino Motor Encoder Wrap Up
Arduino Motor Encoder (Optical Encoder / Photo Interrupter)

The optical encoder sensor is also referred to as a photo interrupter sensor which is widely used in motor control applications. You can typically find many of them in laser printer machines, mobile robots, and many other devices.
The optical encoder can be used to measure the speed of a motor and also the mechanical displacement of the motor-based mechanism regardless of its type (linear, rotary, etc). The figure below shows you an example fixture for an optical encoder sensor with its encoder wheel attached to a small DC motor to measure its speed.


During motor rotation, the encoder wheel will block/allow the infrared LED light beam to reach the photo sensor on the other side. Depending on the encoder wheel’s number of windows, we’ll have a certain number of electrical pulses out of the sensor per motor’s shaft complete rotation (revolution).
The encoder wheel shown in the figure above has 20 windows, which means the optical encoder will output 20 pulses/revolution. I’ve got one of these encoder wheels that have 20 windows and will be using it in the example project later on in this tutorial.
It’s worth noting that the more windows in the encoder wheel, the more accurate measurements you’ll get. Especially if you’re using a measurement technique that’s averaging the measured pulses, having more pulses/revolution can be advantageous in that case.
Optical Encoder Module Pinout
This is the pinout diagram for the optical encoder module that you can use with Arduino as a motor encoder to measure its speed or the travel distance of your motor-based mechanism.
It consists of a photo interrupter sensor or a PCB board with power for the IR LED and some signal conditioning and filtering for the phototransistor’s output that goes directly to your Arduino input pin.

Photo Interrupter Pinout
You can use the Arduino Optical Encoder Module or build your own module (circuit) around a low-cost Photo Interrupter Sensor. That you can connect its circuit as shown in the figure below which indicates the photo interrupter sensor’s pinout and typical application circuit diagram.
This is an even lower-cost solution than using the optical encoder module shown earlier and will ultimately give you the same performance as well.

Here is an image showing my DIY photo interrupter circuit solution side by side with the optical encoder module. Both are working in the exact same way with very similar performance. While the DIY solution is 6x times cheaper than the optical encoder module’s PCB.

Arduino Motor Encoder (Optical Encoder) Interfacing
There are so many configurations/techniques that you can use to interface a motor optical encoder with Arduino to measure the motor’s speed (RPM). In this tutorial, we’ll only focus on one way of interfacing a motor optical encoder with Arduino which is an interrupt-based method.
We’ll use an external interrupt pin to trigger an interrupt when the encoder’s output pin state changes. We’ll use a timer-based function [ micros() ] to measure the encoder output signal’s frequency. Using simple arithmetic we can then calculate the motor’s speed (RPM). Given that the encoder wheel attached to the motor has n windows (my encoder wheel has 20 windows).
Arduino Motor Encoder (Optical Encoder) Wiring Circuit Diagram
Here is the wiring diagram for Arduino with the motor optical encoder sensor.
Note that I’m using the INT0 external interrupt pin of the Arduino which is IO pin2.

Note That some optical encoder modules have different pinout orders. You may sometimes find the output pin in the middle or on the left side of the 3-pin header. Anyway, you need to check the module’s pin labeling before powering up your circuit.
Arduino Motor Encoder (Optical Encoder – Photo Interrupter) Code
Here is a test code example that reads the motor optical encoder sensor, calculates the measured motor RPM, and prints the temperature value to the serial monitor over UART. You can use it to check that your wiring and connections are all okay.
/*
 * LAB Name: Arduino Motor Optical Encoder RPM Measurement
 * Author: Khaled Magdy
 * For More Info Visit: www.DeepBlueMbedded.com
*/
#define ENCODER_PIN 2
#define ENCODER_N   20

unsigned long T1 = 0, T2 = 0, T;
bool MeasDone = 0;
int Motor_RPM = 0;

void INT0_ISR(void)
{
  if(MeasDone)
  {
    T2 = micros();
    T = T2 - T1;
    MeasDone = 0;
  }
  else
  {
    T1 = micros();
    MeasDone = 1;
  }
}

void setup()
{
  Serial.begin(9600);
  pinMode(ENCODER_PIN, INPUT);
  attachInterrupt(digitalPinToInterrupt(ENCODER_PIN), INT0_ISR, RISING);
}

void loop()
{
  Motor_RPM = (60000000) / (T * ENCODER_N);
  Serial.print("Motor RPM: ");
  Serial.println(Motor_RPM);
  delay(250);
}
It’s Highly Recommended to check out the tutorials below to learn more about Arduino external interrupt pins and timer-based micros() function for precise time measurement applications. Both tutorials are in-depth explaining the topics with a handful of practical code examples to help you get the hang of it.

This tutorial explains the Arduino External Interrupt Pins. You’ll learn everything about Arduino interrupt pins, how to write ISR handlers, interrupt latency, and many other aspects.

This tutorial explains the Arduino timer-based micros() function. You’ll learn everything about it, how it works, and how to make the best use of it in time measurement & delay applications with a lot of tips and tricks all the way through.
Arduino Motor Encoder (Photo Interrupter) RPM Measurement
In this example project, we’ll use Arduino with Motor Optical Encoder (Photo Interrupter) to measure the speed of a DC Motor (RPM – Revolutions Per Minute). As described earlier, I’ll be using an external interrupt pin & the micros() function to measure the output signal’s frequency of the optical encoder.
Then, we can easily calculate the motor’s speed (RPM) using the measured signal’s frequency and the number of windows in the encoder wheel (20).

This is the ultimate guide for Arduino I2C LCD 16×2 interfacing and library functions explanation. It’ll guide you through everything you’d need to interface Arduino with an I2C LCD display.
Code Example
Here is the complete code listing for this example.
/*
 * LAB Name: Arduino Motor Optical Encoder RPM Measurement
 * Author: Khaled Magdy
 * For More Info Visit: www.DeepBlueMbedded.com
*/
#include <Wire.h>
#include <LiquidCrystal_I2C.h>

#define ENCODER_PIN 2
#define ENCODER_N   20

LiquidCrystal_I2C MyLCD(0x27, 16, 2); // Creates I2C LCD Object With (Address=0x27, Cols=16, Rows=2)

unsigned long T1 = 0, T2 = 0, T;
bool MeasDone = 0;
int Motor_RPM = 0;

void INT0_ISR(void)
{
  if(MeasDone)
  {
    T2 = micros();
    T = T2 - T1;
    MeasDone = 0;
  }
  else
  {
    T1 = micros();
    MeasDone = 1;
  }
}

void setup()
{
  MyLCD.init();
  MyLCD.backlight();
  pinMode(ENCODER_PIN, INPUT);
  attachInterrupt(digitalPinToInterrupt(ENCODER_PIN), INT0_ISR, RISING);
}

void loop()
{
  Motor_RPM = (60000000) / (T * ENCODER_N);
  MyLCD.clear();
  MyLCD.setCursor(0, 0);
  MyLCD.print("Motor RPM:");
  MyLCD.setCursor(0, 1);
  MyLCD.print(Motor_RPM);
  delay(250);
}
Code Explanation
First of all, we should include the Wire.h library for I2C communication and the LiquidCrystal_I2C.h library for the I2C LCD control.
#include <Wire.h>
#include <LiquidCrystal_I2C.h>
Then, we’ll define the encoder’s external interrupt input pin. We’ll also create an instance of the I2C_LCD class, and define some variables to be used in the motor RPM speed measurement & conversion process.
#define ENCODER_PIN 2
#define ENCODER_N   20

LiquidCrystal_I2C MyLCD(0x27, 16, 2); // Creates I2C LCD Object With (Address=0x27, Cols=16, Rows=2)

unsigned long T1 = 0, T2 = 0, T;
bool MeasDone = 0;
int Motor_RPM = 0;
INT0_ISR()
This is the interrupt handler function for the INT0 external interrupt pin which is connected to the optical encoder. In this function, we’ll start the time measurement by taking a timestamp using the micros() function and save it into the variable (T1) at the first rising edge.
At the second rising edge’s interrupt event, we’ll also take another timestamp and save it into the (T2) variable. Now, the encoder signal’s period is (T = T2-T1). This is the end of the measurement cycle, and the flag is reset again to repeat the measurement cycle on the next rising edge interrupt event.
void INT0_ISR(void)
{
  if(MeasDone)
  {
    T2 = micros();
    T = T2 - T1;
    MeasDone = 0;
  }
  else
  {
    T1 = micros();
    MeasDone = 1;
  }
}
setup()
in the setup() function, we’ll initialize the I2C LCD module and turn ON its backlight. We’ll also set the encoder pin as input and enable interrupts on RISING edge events on that pin as well.
MyLCD.init();
MyLCD.backlight();
pinMode(ENCODER_PIN, INPUT);
attachInterrupt(digitalPinToInterrupt(ENCODER_PIN), INT0_ISR, RISING);
loop()
in the loop() function, we’ll take the latest time measurement, convert it to frequency, and calculate the measured motor’s speed (RPM). Which is then written to the LCD screen every 250ms.
void loop()
{
  Motor_RPM = (60000000) / (T * ENCODER_N);
  MyLCD.clear();
  MyLCD.setCursor(0, 0);
  MyLCD.print("Motor RPM:");
  MyLCD.setCursor(0, 1);
  MyLCD.print(Motor_RPM);
  delay(250);
}
Testing Results
Parts List
Here is the full components list for all parts that you’d need in order to perform the practical LABs mentioned here in this article and for the whole Arduino Programming series of tutorials found here on DeepBlueMbedded. Please, note that those are affiliate links and we’ll receive a small commission on your purchase at no additional cost to you, and it’d definitely support our work.
Download Attachments
You can download all attachment files for this Article/Tutorial (project files, schematics, code, etc..) using the link below. Please consider supporting my work through the various support options listed in the link down below. Every small donation helps to keep this website up and running and ultimately supports our community.
Arduino Motor Encoder Wrap Up
To conclude this tutorial, we can say that you can easily interface Arduino with a motor optical encoder sensor to measure the motor’s speed (RPM) or travel distance of your motor-based mechanism. The Arduino optical encoder (photo interrupter) sensor interfacing can be achieved by many other techniques than the one shown in this tutorial. To learn more about the topic, you can check the tutorials linked below.
If you’re just getting started with Arduino, you need to check out the Arduino Getting Started [Ultimate Guide] here.
And follow this Arduino Series of Tutorials to learn more about Arduino Programming.
 Motor Speed Measurement")
This tutorial explains how to measure motor speed (RPM) with Arduino & an Optical Encoder RPM Sensor. You’ll also learn all possible techniques to measure motor speed (RPM) using an optical encoder sensor.

This is the ultimate guide for getting started with Arduino for beginners. It’ll help you learn the Arduino fundamentals for Hardware & Software and understand the basics required to accelerate your learning journey with Arduino Programming.