
In this tutorial, you’ll learn how to interface Arduino with DHT22 Sensor (Humidity & Temperature Sensor) and use it for monitoring humidity and temperature applications. We’ll discuss how to install and use the Arduino DHT22 Library and its functions.
Then, we’ll create a couple of Arduino DHT22 code example projects to practice what we’ll learn in this tutorial. In the first example, we’ll print out the humidity & temperature readings to the serial monitor. And in the second project, we’ll use Arduino DHT22 + LCD 16×2 I2C to print the readings. Without further ado, let’s jump right into it!
Table of Contents
- Arduino DHT22 & DHT11 Sensors
- DHT22 Sensor Working Principles
- DHT22 Sensor Pinout
- Arduino DHT22 Sensor Wiring
- Arduino DHT22 Library – Installation Steps
- Arduino DHT22 Code Example
- Arduino DHT22 With LCD 16×2 I2C (Temperature & Humidity)
- Wrap Up
Arduino DHT22 & DHT11 Sensors
The DHT22 & DHT11 sensors are Digital Humidity & Temperature sensors, hence the name DHTxx. Both sensors do the exact same thing while the DHT22 has some better specs than the DHT11 in terms of accuracy and range. This makes the DHT22 a bit more expensive solution than the DHT11 which is a very low-cost humidity & temperature sensor.
 |  | |
| DHT11 | DHT22 | |
| Operating Voltage | 3.3 – 5.5v | 3.3v – 5v |
| Max Current Consumption | 2.5mA | 2.5mA |
| Temperature Range | 0 – 50°C | -40 to 80°C |
| Temperature Accuracy | ± 2°C | ± 0.5°C |
| Humidity Range | 20 – 95% | 0 – 100% |
| Humidity Accuracy | ± 5% | ± 2-5% |
| Sampling Rate | 1Hz (one reading every 1 second) | 0.5Hz (one reading every 2 seconds) |
| Body Size | 15.5mm x 12mm x 5.5mm | 15.1mm x 25mm x 7.7mm |
| Price | Very Low | More Expensive |
| Advantages | Very Low-Cost Higher Sampling Rate Than DHT22 | Better Measurement Ranges Higher Accuracy |
In this tutorial, we’ll only focus on the DHT22 sensor and learn how to interface it with Arduino. We’ll first discuss how the DHT22 sensor works internally, then we’ll move to install the Arduino DHT22 library and create a couple of example demo projects using Arduino and the DHT22 sensor.
In a previous tutorial, we discussed the DHT11 sensor interfacing with Arduino in detail with some code example projects. If you’d like to check it out, it’s linked below.

This tutorial will give you more in-depth information about the DHT11 sensor, how it works, and how to interface it with Arduino using the DHT11 library. You’ll also find a couple of Arduino DHT11 code example projects using UART and I2C LCD for monitoring Humidity & Temperature.
DHT22 Sensor Working Principles
Inside the DHT22 sensor’s module, you’ll find an NTC thermistor and a humidity-sensing component on one side of the internal board. On the back side of the board, you’ll find a small microcontroller that handles data acquisition, processing, and transmission over the 1-Wire digital protocol as specified in the datasheet of the DHT22 sensor.
DHT22 Temperature Sensor
Temperature Sensing is handled by the integrated NTC thermistor inside the DHT22 module. The NTC (Negative Temperature Coefficient) Thermistor is a resistor that has a negative proportion relationship with the temperature. The resistance of the NTC drops as the temperature increases and vice versa as indicated in the diagram below.

The internal microcontroller is responsible for reading the internal NTC thermistor and calculating the corresponding temperature value using the characteristics curve of the NTC, then it sends the digital temperature value over the 1-Wire data line (once every two seconds).
DHT22 Humidity Sensor
Humidity Sensing is handled by the internal humidity sensing component inside the DHT22 sensor’s module. The humidity sensing component in the DHT22 sensor utilizes a moisture-sensitive capacitor, which changes its capacitance based on the moisture level in the air.
The DHT22 sensor’s built-in microcontroller charges and discharges the moisture-sensitive capacitor and determines its capacitance by measuring the charging/discharging time. Then it converts the capacitance value into a digital signal, which is transmitted over a 1-Wire serial interface.

The DHT22 Humidity Sensor measures and outputs the relative humidity (RH%) of the surrounding environment. The formula (equation) of the relative humidity is as follows:

Where RH is the relative humidity, ρw is the density of water vapor at a certain temperature, and ρs is the density of water vapor at saturation at that temperature.
Relative Humidity is a measure of the amount of water vapor present in the air compared to the maximum amount of water vapor the air can hold at a given temperature. When the air reaches its saturation point, meaning it contains as much water vapor as it can hold, condensation begins to occur, resulting in the formation of dew (moisture) on surfaces.
The saturation point of water vapor in the air is influenced by the temperature. Colder air has a lower capacity to hold water vapor before reaching saturation, while hotter air can hold a higher amount of water vapor before becoming saturated.
Relative Humidity is typically expressed as a percentage (%). When the relative humidity is 100%, the air is fully saturated, leading to condensation. On the other hand, when the relative humidity is 0%, the air is completely dry, indicating the absence of water vapor.
The DHT22 sensor has a sampling rate of 0.5Hz which means that it does update the humidity & temperature readings once every two seconds. However, you can still read the sensor multiple times per second but you’ll still get the same values because the sensor’s internal update rate (sampling) is fixed at 0.5Hz only. Reading the sensor at a higher rate is possible but not beneficial.
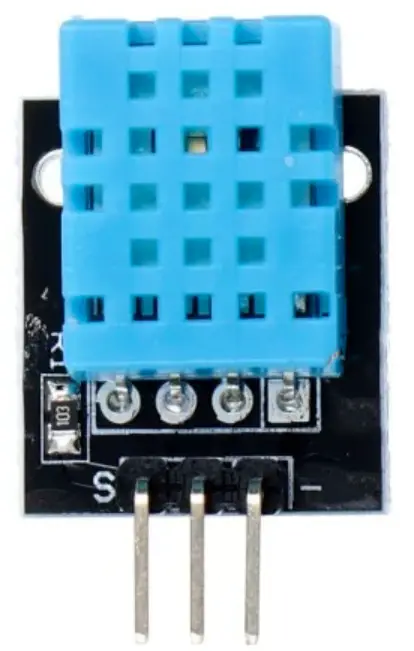
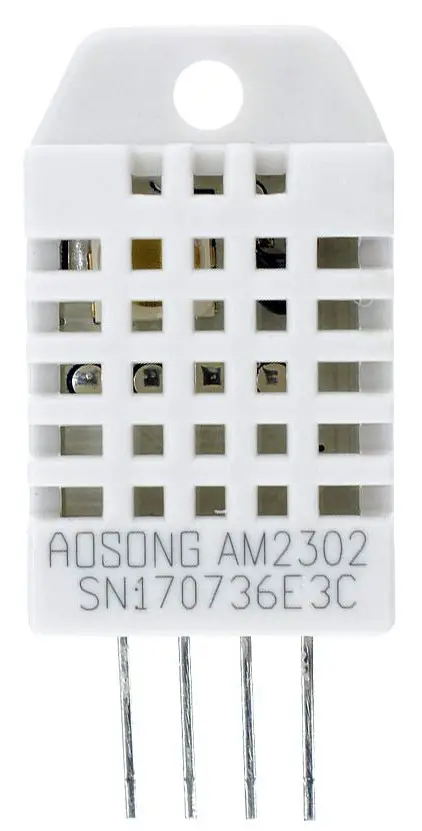
DHT22 Sensor Pinout
There are two versions of the DHT22 sensors in the market. The bare DHT22 sensor (on the right) has 4 pins, and the DHT22 sensor’s module (on the left) has 3 pins. No external pull-up resistor is needed with the data pin of the DHT22 sensor, unlike the DHT11 sensor.

Arduino DHT22 Sensor Wiring
Here is the wiring diagram for the Arduino DHT22 sensor connection. I’m using a 10kΩ pull-up resistor for the pin2 of the DHT22 sensor. And note that the DHT22 sensor’s pin3 is NC (no connection) and is left floating.

For the DHT11 Sensor’s module (that has 3 pins only), it’s basically the same thing but you’ll not have to include an external pull-up resistor. Just hook it up to +5v, GND, and the digital IO pin to read the sensor’s data.
Arduino DHT22 Library – Installation Steps
To use the DHT22 Sensor With Arduino, we’ll need to install the following 2 libraries:
- Adafruit Unified Sensor Library
- DHT Sensor Library
You can download and install the Adafruit Unified Sensor library manually from GitHub, or alternatively, install it within the Arduino IDE itself. Just open the library manager. Tools > Manage Libraries > Search for “Adafruit Unified Sensor”. Then, click Install and let it finish the installation.

Next, you’ll need to install the DHT Sensor Library in a similar way. Just open the library manager in Arduino IDE. Tools > Manage Libraries > Search for “DHT Sensor”. Then, click Install and let it finish the installation.

And now, we’re ready to write some code to test Arduino DHT22 Sensor interfacing to read humidity & temperature values from the sensor. In the following two examples, we’ll interface Arduino with a DHT22 sensor and print the humidity & temperature readings on both the serial monitor and an LCD display.
Arduino DHT22 Code Example
In this example project, we’ll use Arduino with the DHT22 humidity & temperature sensor to take the measurement values and print them on the serial monitor. This is a very basic example to test that your DHT22 sensor is working properly and your connections are okay.
Wiring
Code Example
Here is the full code listing for this example.
/*
 * LAB Name: Arduino DHT22 Humidity & Temperature Sensor
 * Author: Khaled Magdy
 * For More Info Visit: www.DeepBlueMbedded.com
*/
#include <DHT.h>

#define DHT22_PIN 7
#define DHTTYPE DHT22

DHT DHT22_Sensor(DHT22_PIN, DHTTYPE);

void setup() {
  Serial.begin(9600);
  DHT22_Sensor.begin();
}

void loop() {
  float DHT22_Humidity = DHT22_Sensor.readHumidity();
  float DHT22_TempC = DHT22_Sensor.readTemperature(); // Read Temperature(°C)
  float DHT22_TempF = DHT22_Sensor.readTemperature(true);// Read Temperature(°F)

  Serial.print("Humidity: ");
  Serial.print(DHT22_Humidity);
  Serial.print(" % , ");
  Serial.print("Temperature: ");
  Serial.print(DHT22_TempC);
  Serial.print(" °C , ");
  Serial.print(DHT22_TempF);
  Serial.println(" °F");

  delay(1000);
}
Code Explanation
First of all, we should include the DHT.h library.
#include <DHT.h>
Then, we define the IO pin to be used to interface the DHT22 sensor using the 1-Wire protocol. I’ll be using the Arduino pin7 for this. And we’ll also need to specify the DHT sensor’s type (in our case it’s a DHT22 sensor).
#define DHT22_PIN 7
#define DHTTYPE DHT22
And we’ll create an instance of the DHT class (object) and will name it DHT22_Sensor and give it the IO pin number and sensor type.
DHT DHT22_Sensor(DHT22_PIN, DHTTYPE);
setup()
in the setup() function, we’ll initialize the UART serial communication port @ 9600bps and the DHT22_Sensor object.
Serial.begin(9600);
DHT22_Sensor.begin();
loop()
in the loop() function, we’ll call the readHumidity() function to read the relative humidity percentage of the DHT22 sensor. And we’ll also call the readTemperature() function to get the temperature reading of the DHT22 sensor (in °C). Calling the readTemperature(true) function with a true argument will return the temperature value (in °F) instead.
float DHT22_Humidity = DHT22_Sensor.readHumidity();
float DHT22_TempC = DHT22_Sensor.readTemperature(); // Read Temperature(°C)
float DHT22_TempF = DHT22_Sensor.readTemperature(true);// Read Temperature(°F)
Then, we’ll print out the readings on the serial monitor. A delay of 1 second is inserted to slow down the sampling and printing rate but you can sample and print as fast as you can! Just remember that the DHT22 sensor’s output only changes once every 2 seconds. Reducing the delay will speed up the sampling and printing process but at no additional benefit as the sensor’s output stays the same until two whole seconds pass.
Serial.print("Humidity: ");
Serial.print(DHT22_Humidity);
Serial.print(" % , ");
Serial.print("Temperature: ");
Serial.print(DHT22_TempC);
Serial.print(" °C , ");
Serial.print(DHT22_TempF);
Serial.println(" °F");

delay(1000);
Testing Results

Arduino DHT22 With LCD 16×2 I2C (Temperature & Humidity)
In this example project, we’ll use Arduino with the DHT22 humidity & temperature sensor to take the measurement values and print them on an I2C LCD 16×2 display. This example project will use the I2C LCD 16×2 with Arduino which you can learn more about by checking the tutorial linked below.

This is the ultimate guide for Arduino I2C LCD 16×2 interfacing and library functions explanation. It’ll guide you through everything you’d need to interface Arduino with an I2C LCD display.
Wiring
Here is the wiring diagram for Arduino with the DHT22 sensor and the I2C LCD 16×2 display.

Code Example
Here is the full code listing for this example.
/*
 * LAB Name: Arduino DHT22 + I2C LCD 16x2
 * Author: Khaled Magdy
 * For More Info Visit: www.DeepBlueMbedded.com
*/
#include <DHT.h>
#include <Wire.h>
#include <LiquidCrystal_I2C.h>

#define DHT22_PIN 7
#define DHTTYPE DHT22

LiquidCrystal_I2C MyLCD(0x27, 16, 2); // Creates I2C LCD Object With (Address=0x27, Cols=16, Rows=2)
DHT DHT22_Sensor(DHT22_PIN, DHTTYPE);

void setup()
{
  MyLCD.init();
  MyLCD.backlight();
  MyLCD.setCursor(0, 0);
  DHT22_Sensor.begin();
}

void loop()
{
  float DHT22_Humidity = DHT22_Sensor.readHumidity();
  float DHT22_TempC = DHT22_Sensor.readTemperature(); // Read Temperature(°C)
  // Print Temperature Reading To The I2C LCD
  MyLCD.clear();
  MyLCD.print("Humidity: ");
  MyLCD.print((int)DHT22_Humidity);
  MyLCD.print("%");
  MyLCD.setCursor(0, 1);
  MyLCD.print("Temp: ");
  MyLCD.print((int)DHT22_TempC);
  MyLCD.print((char)223); // Show Degree Symbol (º)
  MyLCD.print("C");
  delay(1000);
}
Code Explanation
First of all, we should include the DHT.h library, the I2C library ( wire.h), and the I2C_LCD library as well.
#include <DHT.h>
#include <Wire.h>
#include <LiquidCrystal_I2C.h>
Then, we define the IO pin to be used to interface the DHT22 sensor using the 1-Wire protocol. I’ll be using the Arduino pin7 for this. And we’ll also need to specify the DHT sensor’s type (in our case it’s a DHT22 sensor).
#define DHT22_PIN 7
#define DHTTYPE DHT22
And we’ll create an instance of the DHT class (object) and will name it DHT22_Sensor and give it the IO pin number and sensor type. And we’ll also create an instance of the I2C_LCD class with the I2C LCD’s address and LCD’s character dimensions (16 columns, 2 rows).
LiquidCrystal_I2C MyLCD(0x27, 16, 2); // Creates I2C LCD Object With (Address=0x27, Cols=16, Rows=2)
DHT DHT22_Sensor(DHT22_PIN, DHTTYPE);
setup()
in the setup() function, we’ll initialize the I2C LCD 16×2 display & turn ON its backlight, and also initialize the DHT22_Sensor object.
MyLCD.init();
MyLCD.backlight();
MyLCD.setCursor(0, 0);
DHT22_Sensor.begin();
loop()
in the loop() function, we’ll call the readHumidity() function to read the relative humidity percentage of the DHT22 sensor. And we’ll also call the readTemperature() function to get the temperature reading of the DHT22 sensor (in °C).
float DHT22_Humidity = DHT22_Sensor.readHumidity();
float DHT22_TempC = DHT22_Sensor.readTemperature(); // Read Temperature(°C)
Then, we’ll print out the readings on the I2C LCD 16×2 display. A delay of 1 second is inserted to slow down the sampling and printing rate but you can sample and print as fast as you can! Just remember that the DHT22 sensor’s output only changes once every 2 seconds. Reducing the delay will speed up the sampling and printing process but at no additional benefit as the sensor’s output stays the same until two whole seconds pass.
// Print Temperature Reading To The I2C LCD
MyLCD.clear();
MyLCD.print("Humidity: ");
MyLCD.print((int)DHT22_Humidity);
MyLCD.print("%");
MyLCD.setCursor(0, 1);
MyLCD.print("Temp: ");
MyLCD.print((int)DHT22_TempC);
MyLCD.print((char)223); // Show Degree Symbol (º)
MyLCD.print("C");
delay(1000);
Testing Results

Parts List
Here is the full components list for all parts that you’d need in order to perform the practical LABs mentioned here in this article and for the whole Arduino Programming series of tutorials found here on DeepBlueMbedded. Please, note that those are affiliate links and we’ll receive a small commission on your purchase at no additional cost to you, and it’d definitely support our work.
Download Attachments
You can download all attachment files for this Article/Tutorial (project files, schematics, code, etc..) using the link below. Please consider supporting my work through the various support options listed in the link down below. Every small donation helps to keep this website up and running and ultimately supports our community.
Wrap Up
To conclude this tutorial, we can say that you can easily interface Arduino with the DHT22 sensor to read the relative humidity & temperature and use that information for various Arduino projects. You can build on top of the examples provided here in this tutorial to create so many applications, you’re only limited by your imagination.
If you’re just getting started with Arduino, you need to check out the Arduino Getting Started [Ultimate Guide] here.

This is the ultimate guide for getting started with Arduino for beginners. It’ll help you learn the Arduino fundamentals for Hardware & Software and understand the basics required to accelerate your learning journey with Arduino Programming.
And follow this Arduino Series of Tutorials to learn more about Arduino Programming.
FAQ & Answers
The DHT22 is a digital humidity & temperature sensor that’s used in so many Arduino projects due to its low-cost and decent accuracy.
The DHT22 can measure temperature within the following range (-40 To 80°C) and relative humidity within the range (0-100%). The DHT22 temperature measurement has an accuracy of ± 0.5°C and the humidity measurement’s accuracy is around ± 2-5%.
There are two versions of the DHT22 sensors in the market. The bare DHT22 sensor has 4 pins, and the DHT22 sensor’s module (on a PCB) has 3 pins. No external pull-up resistor is needed with the data pin of the DHT22 sensor, unlike the DHT11 sensor.
So you just need to connect the Vcc pin to +5v, GND to Arduino’s GND, and the data pin to any IO pin on the Arduino board.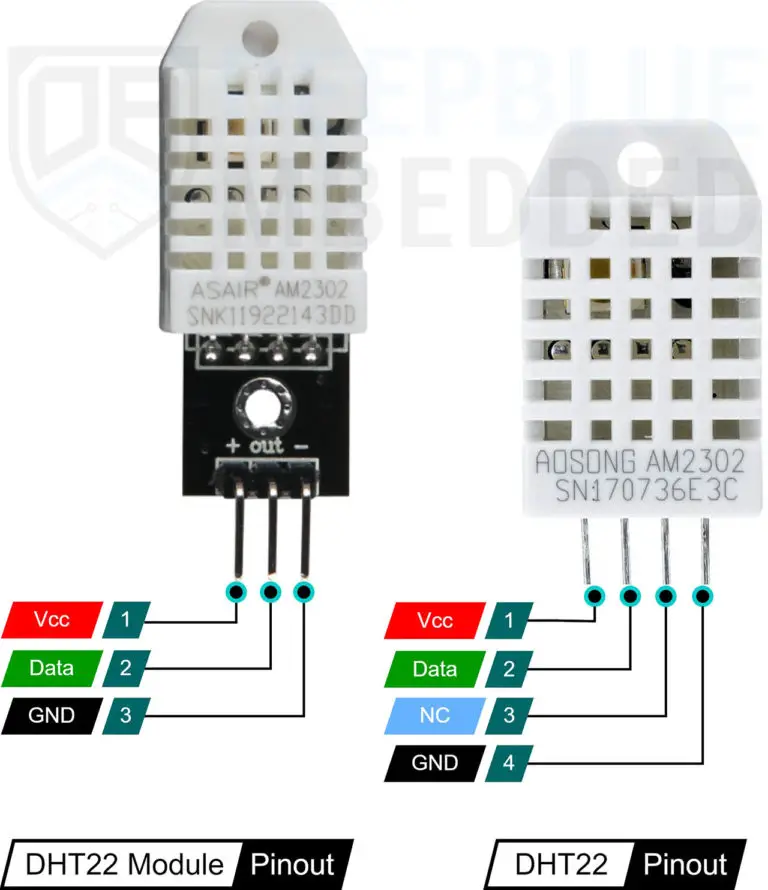
Both sensors do the exact same thing while the DHT22 has some better specs than the DHT11 in terms of accuracy and range. This makes the DHT22 a bit more expensive solution than the DHT11 which is a very low-cost humidity & temperature sensor.
The DHT22 is better than the DHT11 in most aspects like measurement range (for both temperature & humidity) and accuracy. While the DHT11 is a lot cheaper than the DHT22 and has a 1Hz sampling rate compared to the DHT22 which has a lower sampling rate of 0.5Hz.