In this tutorial, you’ll learn how to use the Arduino Serial.print() & Serial.println() Functions. We’ll discuss how the Arduino Serial.print() & Serial.println() functions work and how to use them to print various data types to the serial port.
We’ll also discuss how to use Arduino’s Serial Monitor For Debugging your Arduino projects. Without further ado, let’s get right into it!
Table of Contents
- Arduino Serial.print() Function
- Arduino Serial.println() Function
- Arduino Serial Monitor
- Arduino Serial Print String Example
- Arduino Serial Print String & Variable Example
- Arduino Serial Print Float & Double Example
- Arduino Serial Print Hex & Binary Example
- Wrap Up
Arduino Serial.print() Function
The Serial.print() function is used to send data as human-readable text over the UART interface. It accepts various data types such as integers, floating-point numbers, strings, and characters. It allows you to display information, debug messages, or sensor readings in a readable format. The Serial.print() function does not append a newline character at the end.
|
1 |
Serial.print(val); |
This function can also take another optional argument that specifies the format.
|
1 |
Serial.print(val, format); |
Parameters
val: the value to print. Allowed data types: any data type.
format: format options are BIN(binary, or base 2), OCT(octal, or base 8), DEC(decimal, or base 10), HEX(hexadecimal, or base 16). For floating point numbers, this parameter specifies the number of decimal places to use. For example:
- Serial.print(78, BIN) gives “1001110”
- Serial.print(78, OCT) gives “116”
- Serial.print(78, DEC) gives “78”
- Serial.print(78, HEX) gives “4E”
- Serial.print(1.23456, 0) gives “1”
- Serial.print(1.23456, 2) gives “1.23”
- Serial.print(1.23456, 4) gives “1.2346”
Returns
Serial.print() returns the number of bytes written, though reading that number is optional. Data type: size_t.
Arduino Serial.println() Function
The Serial.println() function is similar to the Serial.print() function with only one difference which is following the printed text with a carriage return character (ASCII 13, or ‘\r’) and a newline character (ASCII 10, or ‘\n’). So it basically, sends whatever text you want with a newline termination special character.
Syntax
|
1 |
Serial.println(val); |
Everything else is exactly the same as the Serial.print() function that we’ve discussed before.
Arduino Serial Monitor
The Arduino IDE is equipped with a graphical interface tool called “Serial Monitor” that you can use to communicate with your Arduino board over the serial port (UART). You just need to set the baud rate to the same value you’re using in your Arduino project and you’re good to go. The received text from the Arduino board will show up in the serial monitor and you can also send text messages over UART using this graphical interface.
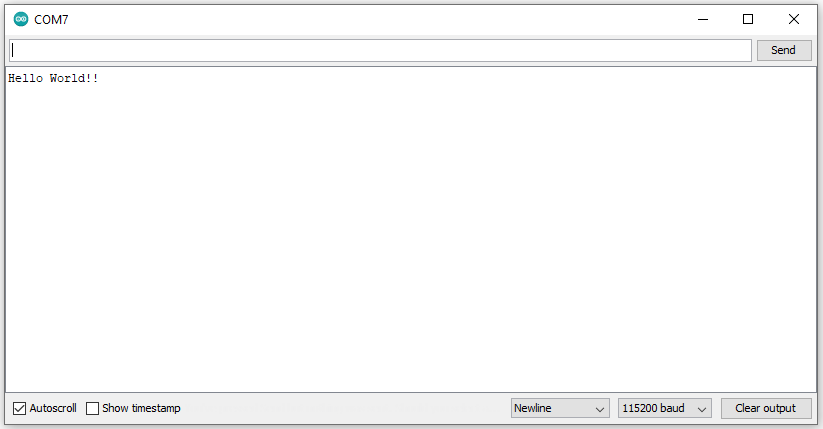
The Arduino Serial Monitor saves you the time and effort to use external serial terminals on your PC. And it’s really helpful for debugging your Arduino projects by sending the value of variables and flags to check them in real time using the serial monitor.
In the next sections, we’ll do some practical examples to test the Serial.print() and Serial.println() functions using the Arduino Serial Monitor to achieve the following tasks:
- Serial Print a string text message
- Serial Print string text & numeric variables
- Serial Print Float & Double variables
- Serial Print Hex & Binary format variables
So, let’s get started with the Arduino serial print code examples!
Arduino Serial Print String Example
This is a simple Arduino example code to print the message “ Hello World!!” over the serial port and we’ll view it on the serial monitor.
Code Example
Here is the full code listing for this example.
|
1 2 3 4 5 6 7 8 9 10 11 12 |
/* * LAB Name: Arduino Serial Print String (Text) * Author: Khaled Magdy * For More Info Visit: www.DeepBlueMbedded.com */ void setup() { Serial.begin(9600); Serial.println("Hello World!!"); } void loop(){ } |
Code Explanation
setup()
in the setup() function, we’ll initialize the UART module & set its baud rate to 9600 bps using the Serial.begin() function. And we’ll also print the string of text “ Hello World!!” which is the message that we’d like to display only once, that’s why we’re sending it in the setup() function not in the loop() function.
|
1 2 |
Serial.begin(9600); Serial.println("Hello World!!"); |
loop()
in the loop() function, nothing needs to be done.
Testing Results
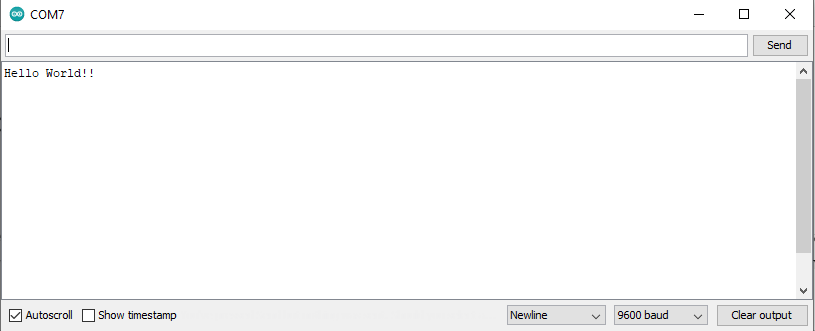
Arduino Serial Print String & Variable Example
In this example, we’ll send a string text message alongside a numeric variable on the same line. We’ll create a counter variable and print its value and keep incrementing it and send the data over UART every 250ms.
Code Example
Here is the full code listing for this example.
|
1 2 3 4 5 6 7 8 9 10 11 12 13 14 15 |
/* * LAB Name: Arduino Serial Print String + Variable * Author: Khaled Magdy * For More Info Visit: www.DeepBlueMbedded.com */ int counter = 0; void setup() { Serial.begin(9600); } void loop(){ Serial.print("Counter = "); Serial.println(counter++); delay(250); } |
Code Explanation
We’ll create a counter variable with an initial value of 0.
|
1 |
int counter = 0; |
setup()
in the setup() function, we’ll initialize the UART module & set its baud rate to 9600 bps using the Serial.begin() function.
|
1 |
Serial.begin(9600); |
loop()
in the loop() function, we’ll print the string of text “ Counter =” which is the message that we’d like to display before the numeric value of the counter variable itself. Then we’ll use the Serial.println() function to print the counter value with a line termination character, increment the counter, insert a small delay, and keep repeating.
|
1 2 3 |
Serial.print("Counter = "); Serial.println(counter++); delay(250); |
Testing Results
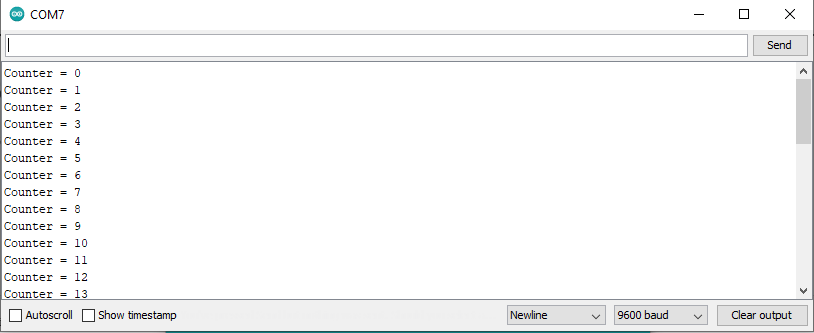
Arduino Serial Print Float & Double Example
In this example, we’ll send a float and double variables with a different number of precision digits (after the decimal point). The floating-point number is chosen to be pi (π).
The float data type has 7 digits of precision, while the double has 15 digits of precision (after the decimal point).
Code Example
Here is the full code listing for this example.
|
1 2 3 4 5 6 7 8 9 10 11 12 13 14 15 16 17 18 19 20 21 22 23 24 25 26 27 28 29 30 |
/* * LAB Name: Arduino Serial Print Float + Double * Author: Khaled Magdy * For More Info Visit: www.DeepBlueMbedded.com */ double trouble = 3.141592653589793; float boat = 3.1415927; void setup() { Serial.begin(9600); Serial.print("Float = "); Serial.println(boat); Serial.print("Float F.3 = "); Serial.println(boat, 3); Serial.print("Float F.7 = "); Serial.println(boat, 7); Serial.print("double = "); Serial.println(trouble); Serial.print("double D.3 = "); Serial.println(trouble, 3); Serial.print("double D.10 = "); Serial.println(trouble, 10); Serial.print("double D.15 = "); Serial.println(trouble, 15); } void loop(){ // Do Nothing! } |
Code Explanation
We’ll create a double variable and a float variable and save into them the pi (π) number.
|
1 2 |
double trouble = 3.141592653589793; float boat = 3.1415927; |
setup()
in the setup() function, we’ll initialize the UART module & set its baud rate to 9600 bps using the Serial.begin() function. And we’ll send both the float and double variables. The first printed value with the default precision, is followed by other print operations with a specific number of precision digits for each.
Print the float variable with default precision, 3 digits, and 7 digits.
|
1 2 3 4 5 6 |
Serial.print("Float = "); Serial.println(boat); Serial.print("Float F.3 = "); Serial.println(boat, 3); Serial.print("Float F.7 = "); Serial.println(boat, 7); |
Print the double variable with the default precision, 3 digits, 10 digits, and 15 digits.
|
1 2 3 4 5 6 7 8 |
Serial.print("double = "); Serial.println(trouble); Serial.print("double D.3 = "); Serial.println(trouble, 3); Serial.print("double D.10 = "); Serial.println(trouble, 10); Serial.print("double D.15 = "); Serial.println(trouble, 15); |
loop()
in the loop() function, nothing to be done.
Testing Results
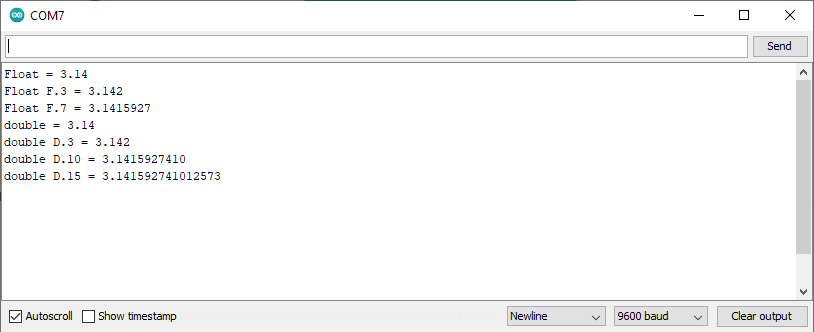
From this example, we conclude that the print function can display the floating-point variables (float & double) with a specific number of precision digits (rounded to the last digit).
And also note that the double-precision variable got rounded at the 7th digit and completely deviated from the original pi (π) number from the 7th digit till the 15th.
Arduino Serial Print Hex & Binary Example
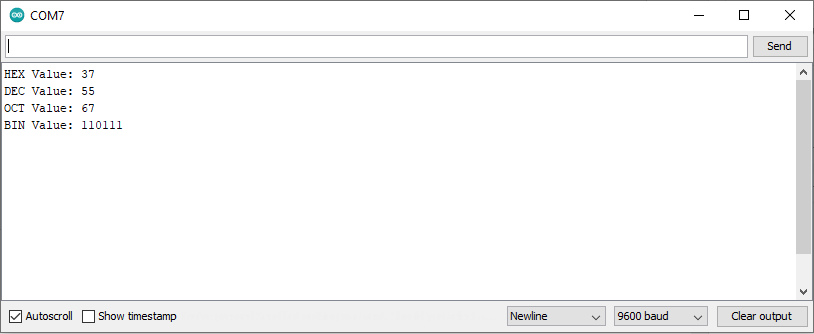
In this example project, we’ll print one variable in different formats (Hexadecimal, Decimal, Octal, and Binary).
Code Example
Here is the full code listing for this example.
|
1 2 3 4 5 6 7 8 9 10 11 12 13 14 15 16 17 18 19 20 21 |
/* * LAB Name: Arduino Serial Print Hex, DEC, OCT, BIN * Author: Khaled Magdy * For More Info Visit: www.DeepBlueMbedded.com */ int Var = 55; void setup() { Serial.begin(9600); Serial.print("HEX Value: "); Serial.println(Var, HEX); Serial.print("DEC Value: "); Serial.println(Var, DEC); Serial.print("OCT Value: "); Serial.println(Var, OCT); Serial.print("BIN Value: "); Serial.println(Var, BIN); } void loop(){ // Do Nothing! } |
Code Explanation
First of all, we’ll an integer variable with a random value, let’s say the following.
|
1 |
int Var = 55; |
setup()
in the setup() function, we’ll initialize the UART module & set its baud rate to 9600 bps using the Serial.begin() function. And we’ll send the variable Var to be printed over the serial port in different formats (Hexadecimal, Decimal, Octal, and Binary).
|
1 2 3 4 5 6 7 8 |
Serial.print("HEX Value: "); Serial.println(Var, HEX); Serial.print("DEC Value: "); Serial.println(Var, DEC); Serial.print("OCT Value: "); Serial.println(Var, OCT); Serial.print("BIN Value: "); Serial.println(Var, BIN); |
loop()
in the loop() function, nothing to be done.
Testing Results
Parts List
Here is the full components list for all parts that you’d need in order to perform the practical LABs mentioned here in this article and for the whole Arduino Programming series of tutorials found here on DeepBlueMbedded. Please, note that those are affiliate links and we’ll receive a small commission on your purchase at no additional cost to you, and it’d definitely support our work.
Download Attachments
You can download all attachment files for this Article/Tutorial (project files, schematics, code, etc..) using the link below. Please consider supporting my work through the various support options listed in the link down below. Every small donation helps to keep this website up and running and ultimately supports our community.
Wrap Up
To conclude this project tutorial, we can say that using the Arduino Serial Monitor and Serial Print function are crucial for debugging your Arduino projects. We’ll be using them a lot in this series of tutorials and projects. So make sure to try the examples provided in this tutorial to get the hang of it.
If you’re just getting started with Arduino, you need to check out the Arduino Getting Started [Ultimate Guide] here.
And follow this Arduino Series of Tutorials to learn more about Arduino Programming.
This is the ultimate guide for getting started with Arduino for beginners. It’ll help you learn the Arduino fundamentals for Hardware & Software and understand the basics required to accelerate your learning journey with Arduino Programming.
