| Previous Tutorial | Tutorial 37 | Next Tutorial | |||||
| STM32 HC-SR04 Ultrasonic Sensor Interfacing Examples & Driver (Library) | |||||||
| STM32 Course Home Page ???? | |||||||
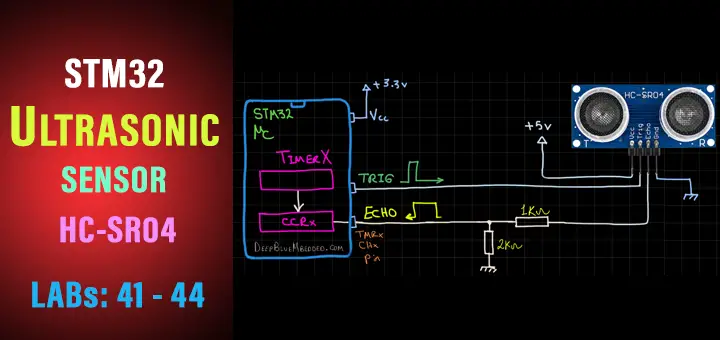
In this tutorial, we’ll be discussing the interfacing of STM32 microcontrollers with HC-SR04 ultrasonic sensors using timer input capture mode with interrupts. I’ll also show you the HC-SR04 library (driver) that I’ve developed for STM32 microcontrollers and discuss how it works and how it’s been built in this way. And we’ll create 4 different example projects with STM32 uC and ultrasonic sensors.
We’ll conclude this tutorial with some tests, measurements, and spot the light on potential improvements and features that you can make and add to this driver library code. But first of all, we’ll discuss how the HC-SR04 ultrasonic sensor works and the possible different procedures for reading the echo pulse width to determine the distance.
In this tutorial: 4 LABs
| LAB 41 | Reading 1 HC-SR04 Ultrasonic Sensor & Print to 1 LCD | ||||||
| LAB 42 | Configure 2 HC-SR04 Sensors to use 2 different timers & Print distance to 1 LCD | ||||||
| LAB 43 | Configure 2 HC-SR04 Sensors to use the same timer as well as 1 more servo with them on that same timer & Print distances to 1 LCD. Just to test our library compatibility with the previously developed servo library | ||||||
| LAB 44 | Read 1 HC-SR04 Ultrasonic Sensor Using Library APIs & Include our MATH/FIR filters to apply a moving average filter to the sensor distance readings. Then send both raw and filtered data to PC over UART to plot and visualize the digital LPF results. | ||||||
[toc]
Required Components For LABs
All the example code/LABs/projects in the course are going to be done using those boards below.
- Nucleo32-L432KC (ARM Cortex-M4 @ 80MHz) or (eBay)
- Blue Pill STM32-F103 (ARM Cortex-M3 @ 72MHz) or (eBay)
- ST-Link v2 Debugger or (eBay)
| QTY | Component Name | ???? Amazon.com | ???? eBay.com |
| 2 | BreadBoard | Amazon | eBay |
| 1 | LEDs Kit | Amazon Amazon | eBay |
| 1 | Resistors Kit | Amazon Amazon | eBay |
| 1 | Capacitors Kit | Amazon Amazon | eBay & eBay |
| 2 | Jumper Wires Pack | Amazon Amazon | eBay & eBay |
| 1 | 9v Battery or DC Power Supply | Amazon Amazon Amazon | eBay |
| 1 | Micro USB Cable | Amazon | eBay |
| 1 | Push Buttons | Amazon Amazon | eBay |
| 2 | HC-04 Ultrasonic Sensor | Amazon | eBay |
| 1 | USB-TTL Converter or FTDI Chip | Amazon Amazon | eBay eBay |
| 1 | Alphanumeric LCD Module | Amazon | eBay |
★ Check The Full Course Complete Kit List
Some Extremely Useful Test Equipment For Troubleshooting:
- My Digital Storage Oscilloscope (DSO): Siglent SDS1104 (on Amazon.com) (on eBay)
- FeelTech DDS Function Generator: KKMoon FY6900 (on Amazon.com) (on eBay)
- Logic Analyzer (on Amazon.com) (on eBay)
Affiliate Disclosure: When you click on links in this section and make a purchase, this can result in this site earning a commission. Affiliate programs and affiliations include, but are not limited to, the eBay Partner Network (EPN) and Amazon.com.
How HC-SR04 Ultrasonic Sensor Works
The HC-SR04 ultrasonic sensor is a very popular and easy-to-use sensor that is commonly used in robotics and simple automation projects. It’s not the best performing sensor in terms of distance measurements and so but it’s a good starting point for the majority of makers and engineering students. You can check out my old article about HC-SR04 Ultrasonic sensor interfacing with microcontrollers. To learn more about the basics of operation and calculations required for distance measurement.
Basically, the ultrasonic sensor is in IDLE mode doing nothing until you actively trigger it. Triggering the sensor to start operation is done by sending a short pulse to the TRIGGER pin and it should be anything wider than 2uS. It can be even a few milliseconds.
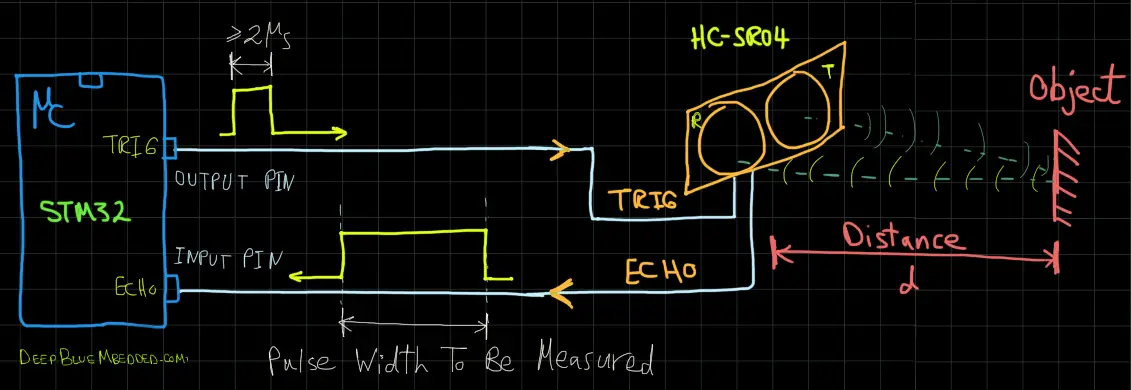
After triggering the ultrasonic sensor, it sends out 8 pulses of sound waves at an ultrasonic frequency of 40KHz. The sound travels in, almost, straight-line path until it hits an object then it reflects back to the sensor module. Which sends out a digital pulse on the echo pin that has a width equal to the travel time of sound going back and forth between the module and the sensed object.
We, system designers, need to take in the incoming echo pulse from the sensor and measure its width to tell the distance value between our sensor and the object in front of it. Which is a pretty easy calculation to carry out, once the echo pulse width is measured. Given that sound travels at a constant speed in the air, we can easily figure out the distance.
There are so many ways to get the distance reading using a microcontroller with the HC-SR04 ultrasonic sensor. You can build your own library based on any technique you see is convenient enough for your application. In the next section, I’ll highlight some of the potential options of techniques that we can use hereafter for designing our ultrasonic driver (library). I’ve made up my mind actually but will show you what other option could possibly be.
Different Techniques & Procedures To Read HC-SR04 Ultrasonic Sensor
GPIO Polling & Timer
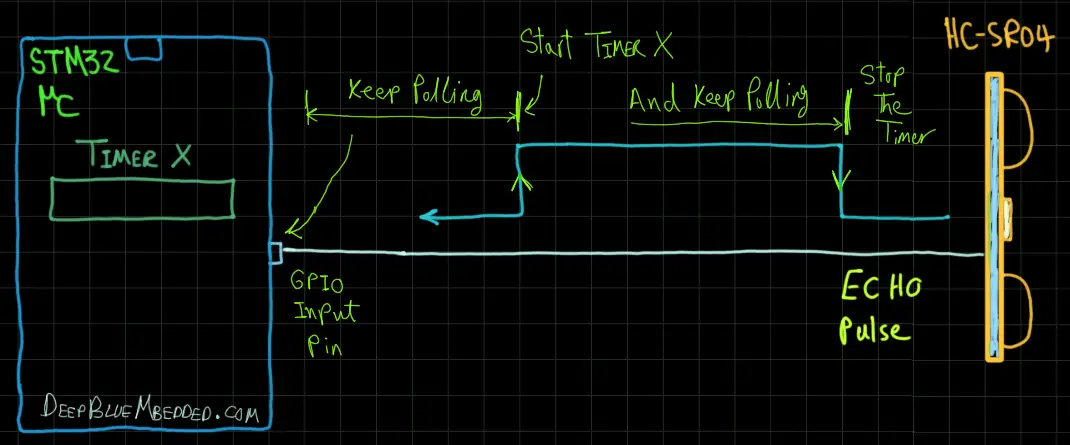
One of the very basic techniques that you can think of is polling a GPIO input pin used to read the echo pulse from the ultrasonic sensor. The MCU will keep waiting until this pin goes HIGH, then it turns ON a timer module to start counting. And keep polling the input pin until it goes LOW, then the timer is turned OFF.
Now, you’ve got the number of ticks that tell you the echo pulse width. So the distance is calculated thereafter easily and repeat the process. This technique is discussed, implemented, and tested in this old ultrasonic sensor article if you’d like to check it out.
Note that: polling the GPIO input pin is a time-wasting procedure that has a potential risk of freezing your entire system in case of sensor failure or whatever.
Ext Interrupt Pin & Timer
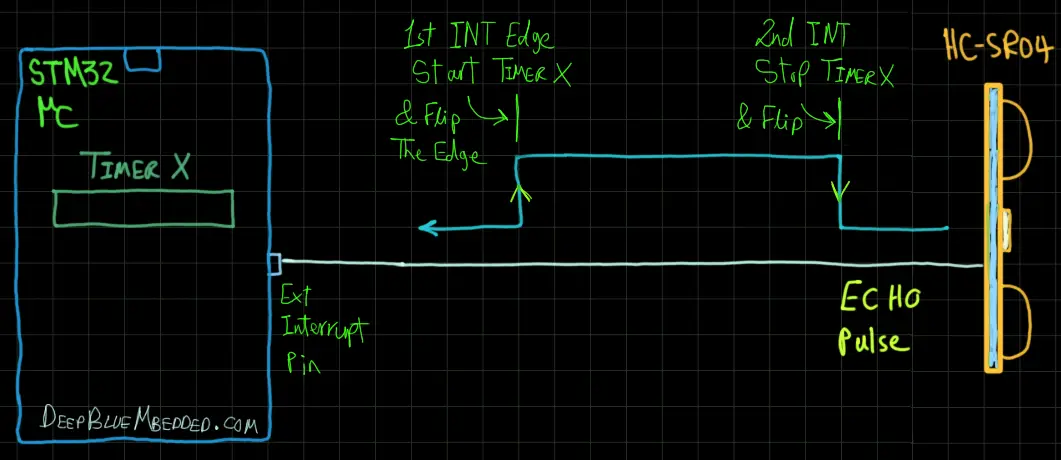
We can also use an external interrupt pin with a timer to measure the sensor echo pulse width as well. In this technique, we program an EXTI pin to fire an interrupt on the rising edge of the input pin. At the first edge, start the timer and flip the trigger edge of the interrupt pin. When the 2nd edge arrives, stop the timer, read the ticks count to find out the pulse width T. Then, flip the edge and get ready to repeat the whole thing for the next measurement cycle.
Apparently, the interrupt latency would affect the time at which you start measuring the time. However. it does add the same little bit of lagging for the 2nd edge as well so there is not much measurement error at all due to interrupt latency. As we’ll investigate more in the future.
Timer Input Capture ICU
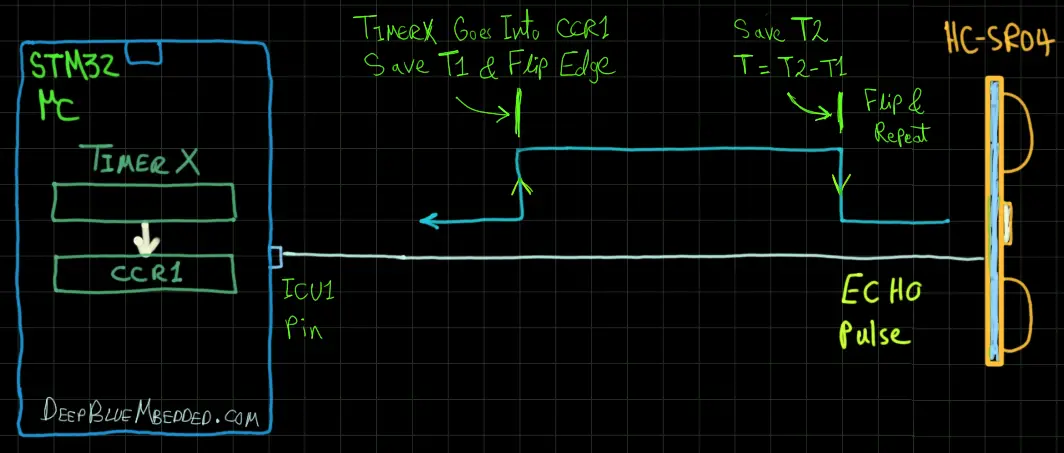
We can also use the input capture unit (mode) of timer modules to capture the time at which the echo pulse goes HIGH and LOW. Start with programming the ICU to capture the TimerX value at the rising edge of the input pin. When the echo pulse arrives, the TimerX value is captured to the CCR1 register, so we’ve T1. The capture event fires an interrupt signal that should be activated because we need to flip the capture edge to be on the falling edge.
When the echo pin goes LOW, the TimerX value is captured and we’ve got T2. Therefore, we can say that the total pulse width T = T2-T1. And use that information to calculate the distance easily.
Differential Double ICU
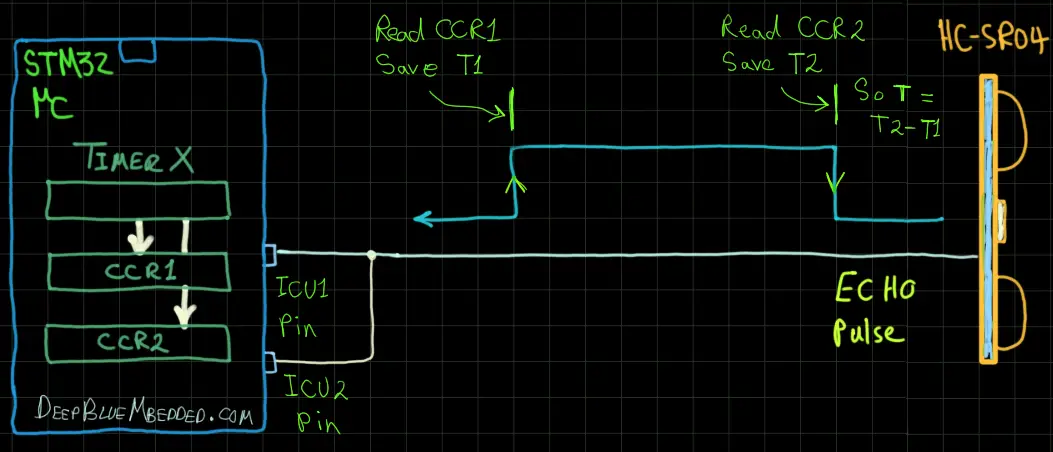
Another technique that could be used is differential double ICU time measurement. This works really well especially when you’re measuring extremely short pulses. You’ll be amazed by the resolution, accuracy, and precision of measurements using this technique.
Start by configuring your TimerX module, 2 ICU channels one triggers on the RISING edge and the other triggers on the FALLING edge. And connect the 2 pins together and hook them to the echo pin of the ultrasonic sensor.
Read T1, T2 from CCR1, CCR2 registers, and subtract to find out the pulse width.
Timer Gate-Controlled
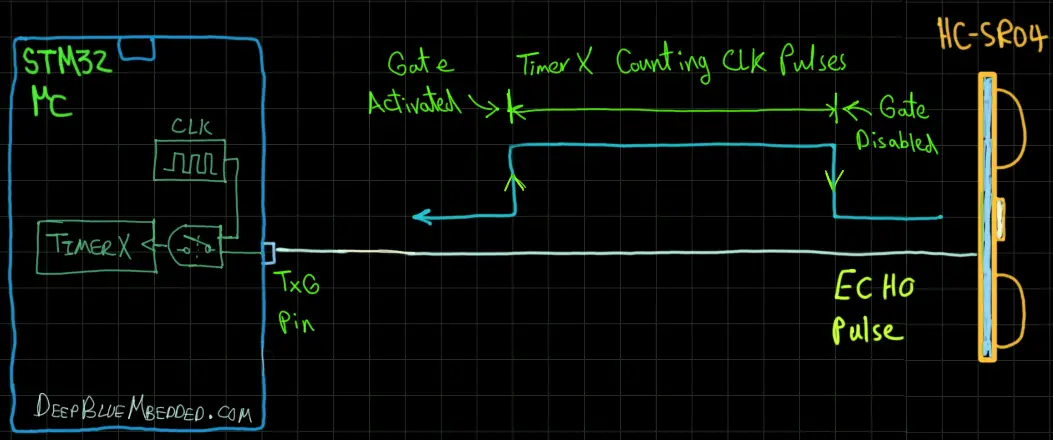
One technique that also works really well in extremely short pulse measurements is timer gate-controlled. In this specific mode, the timer is allowed to count only when the gate is activated.
And as you can see in the diagram down below, the gate is driven by the input pin which we’ll be using for measurement. When the TxG pin goes HIGH, the timer immediately starts counting “by hardware and no software intervention at all”. And when the pin goes LOW, the timer stops counting and you’ve got an interrupt signal to read the results and get ready for the next measurement cycle.
Do you think that’s all? Nope! There still a handful of other unique techniques that could be also used to achieve the exact same task and I’ll be discussing all of them and more with you in the future. Just make sure you’ve subscribed to my DeepBlue YouTube Channel because a lot of ESM episodes are on my to-do list for future spare time!
STM32 HC-SR04 Ultrasonic Sensor Interfacing
Echo Pin Level-Shifting
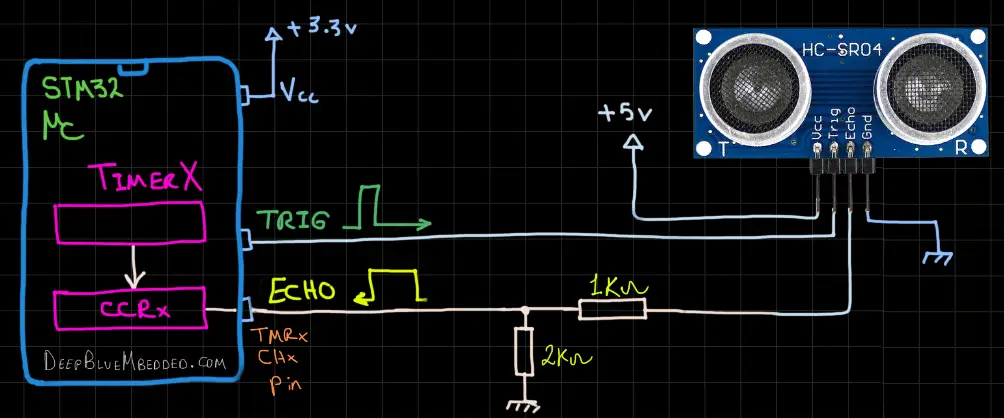
It’s important to note that the TTL logic level of the ultrasonic sensor module HC-SR04 is 5v. However, for STM32 microcontrollers it’s mostly 3.3v and not many GPIO pins are 5v tolerant, so it’s better to assume they are all 3.3v only and apply proper level-shifting for the used signal lines.
The TRIG line is an output from the uC and an input to the Ultrasonic sensor. It’s a 3.3v output level and it’s enough to trigger a HIGH input level read at the sensor end, so it’s ok to directly connect it to our microcontroller. On the other hand, the ECHO line is input at the uC’s end and an output at the Ultrasonic sensor’s end. So this line needs to be level-shifted from 5v down to 3.3v.
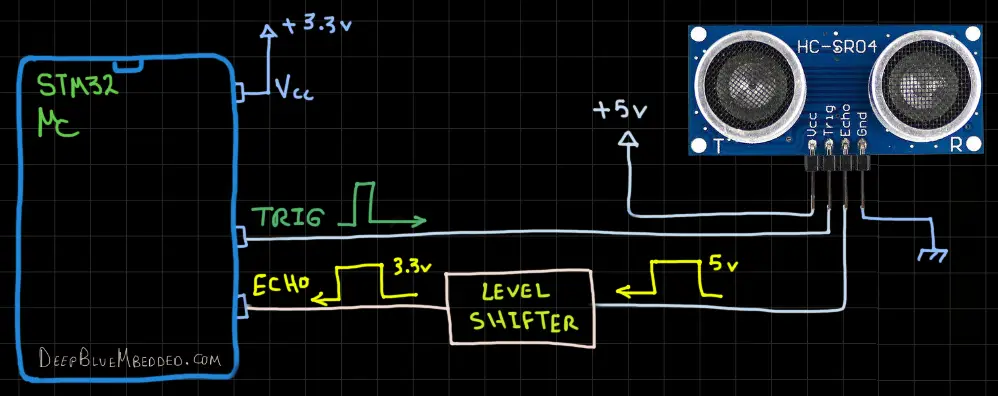
You can use any level-shifting technique using a transistor, diodes, resistors, or whatever. For the sake of simplicity, I’ll be using the voltage divider resistors shown in the connection diagram down below.
Connection Diagram
Echo Pulse Measurement Procedure
The technique we’ll be using for building our Ultrasonic sensor driver library will be the same as the one shown in the previous section called “ICU With Timer”. We’ll use a general-purpose timer module in input capture mode to measure the echo pulse width.
First of all, we’ll be configuring the ICU input pin to trigger a capture event on the rising edge of the incoming pulse. We’ll also configure and start the TIMERx module and that’s it for the configuration part.
Upon receiving the rising edge of the input echo pulse, this triggers a capture, and the TIMERx CNT value is captured to CCRx register and this also fires an interrupt signal. In the ISR callback for the input capture (IC), we’ll save the CCRx value to T1 and flip the capture triggering edge to be falling edge.
Upon receiving the falling edge of the input echo pulse, this triggers a capture, and the TIMERx CNT value is captured to CCRx register and this also fires an interrupt signal. In the ISR callback for the IC, we’ll save CCRx value to T2 and find the total pulse width T = T2-T1. And get the distance from the sound speed equation. And reset state parameters to get ready for the next measurement cycle.
Guidelines For Designing Our HC-SR04 Driver (Library)
Here are some guidelines and requirements that I did consider before designing the HC-SR04 driver library with the current APIs. It can be improved in the future but for the beginning, it should be in line with the following:
- Use The ICU With Timer Measurement Technique
- Has Configurable TIMERx and CHx for each HC-SR04 instance
- Multiple HC-SR04 Instances Should Be Running Smoothly On the Same Timer With No Intervention (don’t play in Prescaler or auto-reload values)
- HC-SR04 Should Be Compatible With Any Old Library That Uses Timers (like servo motors which preset the Prescaler vlaue and ARR to achieve 50Hz PWM)
- Distance measurement should be done in the background and the user can read the most recent value through the provided API at any instance of time
- The User has full control over the measurement cycle at the application level
STM32 HC-SR04 Ultrasonic Driver (Library)
The ECUAL HC-SR04 driver is built for STM32 microcontrollers using ICU with Timer technique dor pulse measurement. You’ll have to configure an instance of it and use the APIs to read your HC-SR04 Ultrasonic sensor and that’s all. The code should be easily ported to any other STM32 microcontroller or reconfigured to use any Timer and Input Capture Channel that you want just as we’ll see in this section. And here is a link for the course’s repo, and you’ll find the HCSR04 driver in the ECUAL directory as usual.
HC-SR04 Driver Code Files
The HC-SE04 driver consists of the following files:
|
 |
You’ll need only to modify the configuration files. The source code for this driver is found in (HCSR04.c) and to use it you’ll include the header (HCSR04.h). Nothing in the source code needs to be changed at all unless you need to add any extra features or customize the driver for your application’s needs. For today’s labs, we’ll only be changing the configuration files to build some test applications.
Therefore, I’ll write here the code listing for the HCSR04.h & HCSR04_cfg.c files.
HCSR04.h File
|
1 2 3 4 5 6 7 8 9 10 11 12 13 14 15 16 17 18 19 20 21 22 23 |
#define HAL_TIM_MODULE_ENABLED #include "stm32f1xx_hal.h" // The Number OF HC-SR04 Sensors To Be Used In The Project #define HCSR04_UNITS 1 typedef struct { GPIO_TypeDef * TRIG_GPIO; uint16_t TRIG_PIN; TIM_TypeDef* TIM_Instance; uint32_t IC_TIM_CH; uint32_t TIM_CLK_MHz; }HCSR04_CfgType; /*-----[ Prototypes For All Functions ]-----*/ void HCSR04_Init(uint8_t au8_HCSR04_Instance, TIM_HandleTypeDef* TMR_Handle); void HCSR04_Trigger(uint8_t au8_HCSR04_Instance); void HCSR04_TMR_OVF_ISR(TIM_HandleTypeDef* htim); void HCSR04_TMR_IC_ISR(TIM_HandleTypeDef* htim); float HCSR04_Read(uint8_t au8_HCSR04_Instance); |
If you’re willing to use multiple ultrasonic sensors, just adjust that number definition (HCSR04_UNITS).
HC-SR04 Ultrasonic Sensor Driver APIs
As you’ve seen in the HCSR04.h file, the provided APIs do all the basic functionalities that you may need from an Ultrasonic driver library.
HCSR04_Init: initializes the required GPIO TRIG pin, the associated Timer with the selected ICU channel.
HCSR04_Trigger: sends a short trigger pulse on the selected TRIG pin to start the sensor’s operation.
HCSR04_Read: reads the distance at any instance of time.
The APIs give the user 2 ISR handlers to be called inside the callback functions for Timer & ICU interrupt events. And the example LABs will put everything under test and you’ll see how and when to use each of these functions.
HCSR04_cfg.c File
|
1 2 3 4 5 6 7 8 9 10 11 12 13 |
#include "../HCSR04/HCSR04.h" const HCSR04_CfgType HCSR04_CfgParam[HCSR04_UNITS] = { // HC-SR04 Sensor Unit 1 Configurations { GPIOB, GPIO_PIN_12, TIM2, TIM_CHANNEL_1, 72 } }; |
I’ll discuss those configuration parameters in the next section down below.
Available Configurations For ECUAL HC-SR04 Driver
From the code above in HCSR04.h & HCSR04_cfg.c you can see that there are not many parameters at all in the configuration structure. The config structure will be used to assign the TRIGGER gpio pin, the associated TIMER peripheral you’ll be using (it can be TIM1, 2, and so on), the ICU_TIMER channel you’ll be using for the ECHO pin, and finally the CLK speed in MHz for that specific TIMER module.
Typical Usage Application Example
Here is a typical usage application for this driver code in order to initialize an Ultrasonic sensor and read the distance to be displayed on PC over UART.
|
1 2 3 4 5 6 7 8 9 10 11 12 13 14 15 16 17 18 19 20 21 22 23 24 25 26 27 28 29 30 31 32 33 34 35 36 37 38 39 40 41 42 43 44 45 46 47 48 49 50 51 |
#include "main.h" #include "stdio.h" #include "../ECUAL/HCSR04/HCSR04.h" void SystemClock_Config(void); static void MX_GPIO_Init(void); static void MX_USART1_UART_Init(void); TIM_HandleTypeDef htim2; UART_HandleTypeDef huart1; uint16_t SysTicks = 0; float Distance = 0.0; char MSG[25] = {0}; int main(void) { HAL_Init(); SystemClock_Config(); MX_GPIO_Init(); MX_USART1_UART_Init(); HCSR04_Init(0, &htim2); while (1) { Distance = HCSR04_Read(0); sprintf(MSG, "%f cm\r\n", Distance); HAL_UART_Transmit(&huart1, MSG, sizeof(MSG), 100); HAL_Delay(25); } } void HAL_TIM_IC_CaptureCallback(TIM_HandleTypeDef *htim) { HCSR04_TMR_IC_ISR(htim); } void HAL_TIM_PeriodElapsedCallback(TIM_HandleTypeDef* htim) { HCSR04_TMR_OVF_ISR(htim); } void SysTick_CallBack(void) { SysTicks++; if(SysTicks == 15) // Each 15msec { HCSR04_Trigger(0); SysTicks = 0; } } |
STM32 HC-SR04 Ultrasonic Read & LCD Print – LAB
| LAB Number | 41 |
| LAB Title | STM32 Reading 1 HC-SR04 Ultrasonic Sensor & Print to 1 LCD |
- Set up a new project as usual with a system clock @ 72MHz or whatever your uC board supports
- Enable TIMERx/CHx For ICU mode with INT enabled in CubeMX
- Add the ECUAL / LCD16x2 driver files to our project. As shown here
- Add the ECUAL / HCSR04 driver files to our project.
- Add the util files to our project.
- Configure 1 LCD instance in LCD16x2_cfg.c file
- Configure 1 HCSR04 instance in HCSR04_cfg.c file
- Initialize the HCSR04 & LCD in the main application, read the distance, convert the digital value to a string, and finally print it out to the LCD. And repeat!
And now, let’s build this system step-by-step
Step1: Open CubeMX & Create New Project
Step2: Choose The Target MCU & Double-Click Its Name
STM32F103C8 (the one I’ll be using) or any other STM32 part you’ve got
Step3: Go To The RCC Clock Configuration
Step4: Set The System Clock To Be 72MHz or whatever your uC board supports
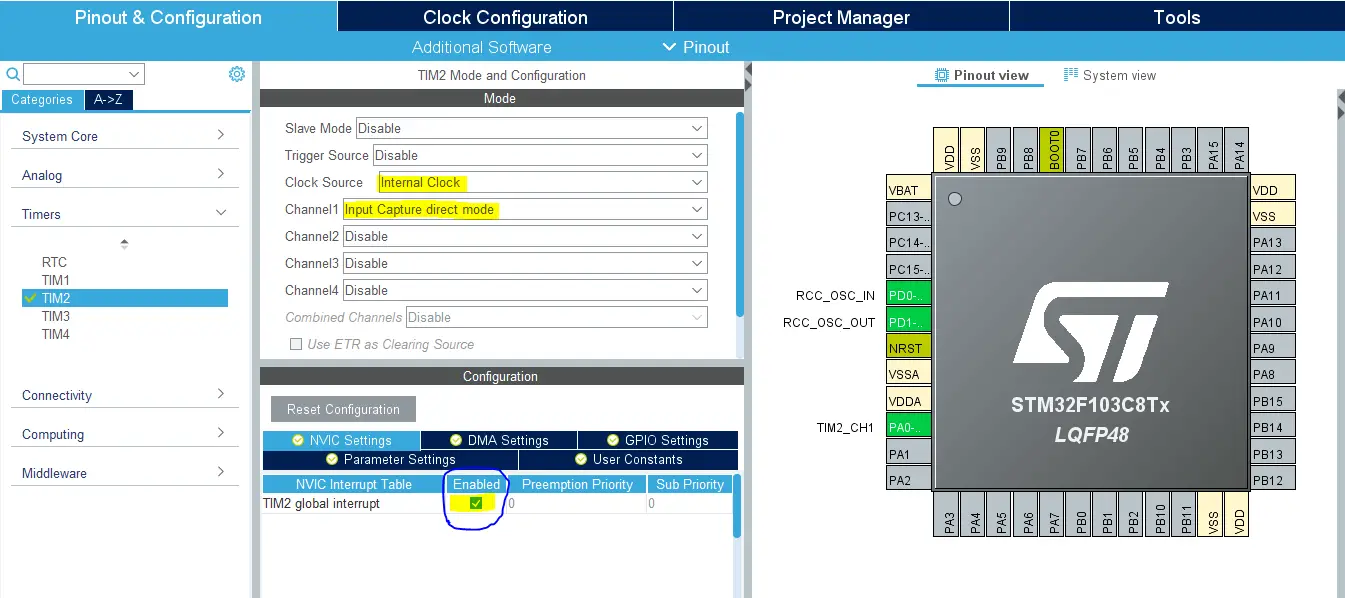
Step5: Enable The TIMERx/CHx ICU With INT That You’ll be using For ECHO signal measurement
We’ll have to do this step just to have the TIM_HAL files added to our project by CubeMX. And also it gives us a startup configuration for the INT of that specific timer module as we’ll see hereafter. This is the best way to keep the code generic and portable to any STM32 microcontroller.
This step will result in adding a TIMER_Init function in our code by CubeMX, but we’ll remove it afterward as the HCSR04 will handle that initialization procedure. But we’ll keep the global TIMERx handler object in the main.c (this line: TIM_HandleTypeDef htim2; )
Step6: Generate The Initialization Code & Open The Project In Your IDE
Step7: Add the ECUAL/ HCSR04 driver files to your project
Follow This Tutorial which shows you How To Add Any ECUAL Driver To An STM32 Project step-by-step.
You basically right-click the project name in the IDE’s navigator and choose to create a new > source folder. And name it ECUAL and go to the GitHub repo, download the files and copy the “HCSR04” folder and back to the IDE, right-click on the ECUAL and paste the library into it.
Step8: Add the ECUAL/ LCD16x2 driver files to your project
As in the previous step, copy and paste the library folder into ECUAL
Step9: Add the util files to your project
You basically right-click the project name in the IDE’s navigator and choose to create a new > source folder. And name it util and go to the GitHub repo, download the files and copy the files inside “util” folder and back to the IDE, right-click on the util and paste them into that folder.
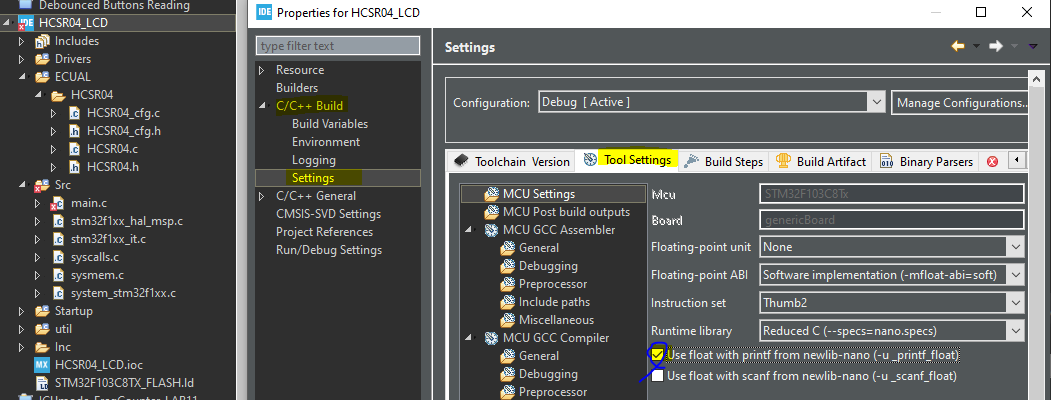
Step10: Enable Sprintf For Floating-Point Numbers
Right-click the project name in the IDE’s navigator and choose properties > c/c++ build > settings > tool settings. Then clock that checkmark, hit apply, and ok!
Now, we can start developing our application in the main.c source file.
Here Are The Drivers Configurations I Used For This LAB
LCD16x2_cfg.c File
|
1 2 3 4 5 6 7 8 9 10 11 12 13 |
#include "LCD16x2.h" const LCD16x2_CfgType LCD16x2_CfgParam = { GPIOB, GPIO_PIN_5, GPIO_PIN_6, GPIO_PIN_7, GPIO_PIN_8, GPIO_PIN_3, GPIO_PIN_4, 20 }; |
HCSR04_cfg.c File
|
1 2 3 4 5 6 7 8 9 10 11 12 13 |
#include "../HCSR04/HCSR04.h" const HCSR04_CfgType HCSR04_CfgParam[HCSR04_UNITS] = { // HC-SR04 Sensor Unit 1 Configurations { GPIOB, GPIO_PIN_12, TIM2, TIM_CHANNEL_1, 72 } }; |
Here is The Application Code For This LAB (main.c)
|
1 2 3 4 5 6 7 8 9 10 11 12 13 14 15 16 17 18 19 20 21 22 23 24 25 26 27 28 29 30 31 32 33 34 35 36 37 38 39 40 41 42 43 44 45 46 47 48 49 50 51 52 53 54 55 56 57 58 59 60 |
#include "main.h" #include "stdio.h" #include "../ECUAL/HCSR04/HCSR04.h" #include "../ECUAL/LCD16x2/LCD16x2.h" #define HCSR04_SENSOR1 0 void SystemClock_Config(void); static void MX_GPIO_Init(void); TIM_HandleTypeDef htim2; uint16_t TRIG_Ticks = 0; uint16_t LCD_Ticks = 0; float Distance = 0.0; char TEXT[16] = {0}; int main(void) { HAL_Init(); SystemClock_Config(); MX_GPIO_Init(); LCD_Init(); HCSR04_Init(HCSR04_SENSOR1, &htim2); while (1) { Distance = HCSR04_Read(HCSR04_SENSOR1); sprintf(TEXT, "Dist= %.2f cm", Distance); HAL_Delay(10); } } void HAL_TIM_IC_CaptureCallback(TIM_HandleTypeDef *htim) { HCSR04_TMR_IC_ISR(htim); } void HAL_TIM_PeriodElapsedCallback(TIM_HandleTypeDef* htim) { HCSR04_TMR_OVF_ISR(htim); } void SysTick_CallBack(void) { TRIG_Ticks++; LCD_Ticks++; if(TRIG_Ticks >= 15) // Each 15msec { HCSR04_Trigger(HCSR04_SENSOR1); TRIG_Ticks = 0; } if(LCD_Ticks >= 200) // Each 200msec { LCD_Clear(); LCD_Set_Cursor(1, 1); LCD_Write_String(TEXT); LCD_Ticks = 0; } } |
Note that: I’ve deleted the auto-generated TIM2 initialization function and its parameter. Since our HCSR04 library will handle that, we don’t need that function at all. However, I did leave the global TIM2 handler (this line: TIM_HandleTypeDef htim2; ).
Because we need that handler for interrupt service routines initialization and also handling. Have a look into stm32f1xx_it.c file. You’ll see that this global handler variable is extern-ed from main.c to that interrupt handlers file at this line ( extern TIM_HandleTypeDef htim2; ). And being used by the TIMER2 global IRQ handler in the same file:
|
1 2 3 4 |
void TIM2_IRQHandler(void) { HAL_TIM_IRQHandler(&htim2); } |
We also need to call our systick callback function within the systick IRQ handler in the same file, it’ll become like this:
|
1 2 3 4 5 |
void SysTick_Handler(void) { HAL_IncTick(); SysTick_CallBack(); } |
Do also look into the stm32f1xx_hal_msp.c file. You’ll find some initialization functions that get called in main.c at this line ( HAL_Init(); ). One of which is the timer2 ICU and INT initializer, here is the function you’ll see:
|
1 2 3 4 5 6 7 8 9 10 11 12 13 14 15 16 17 18 19 20 21 22 23 |
void HAL_TIM_Base_MspInit(TIM_HandleTypeDef* htim_base) { GPIO_InitTypeDef GPIO_InitStruct = {0}; if(htim_base->Instance==TIM2) { /* Peripheral clock enable */ __HAL_RCC_TIM2_CLK_ENABLE(); __HAL_RCC_GPIOA_CLK_ENABLE(); /**TIM2 GPIO Configuration PA0-WKUP ------> TIM2_CH1 */ GPIO_InitStruct.Pin = GPIO_PIN_0; GPIO_InitStruct.Mode = GPIO_MODE_INPUT; GPIO_InitStruct.Pull = GPIO_NOPULL; HAL_GPIO_Init(GPIOA, &GPIO_InitStruct); /* TIM2 interrupt Init */ HAL_NVIC_SetPriority(TIM2_IRQn, 0, 0); HAL_NVIC_EnableIRQ(TIM2_IRQn); } } |
As you can see, it does handle the ICU pin initialization for us and also the TIMER2 interrupt enabling. Which can be tricky to do in our library init function ( HCSR04_Init() ) so I decided to use that within HAL_Init instead to keep the code generic across all STM32 microcontroller.
Download The STM32 HC-SR04 Ultrasonic Read LCD Print LAB41
The Result For This LAB Testing (Video)
STM32 Multi Ultrasonic Read & LCD Print – LAB
| LAB Number | 42 |
| LAB Title | STM32 Configure 2 HC-SR04 Sensors to use 2 different timers & Print distance to 1 LCD |
- Set up a new project as usual with a system clock @ 72MHz or whatever your uC board supports
- Enable 2 TIMERx/CHx For ICU mode with INT enabled in CubeMX
- Add the ECUAL / LCD16x2 driver files to our project. As shown here
- Add the ECUAL / HCSR04 driver files to our project.
- Add the util files to our project.
- Configure 1 LCD instance in LCD16x2_cfg.c file
- Configure 2 HCSR04 instances in HCSR04_cfg.c file
- Initialize the HCSR04 & LCD in the main application, read the distance, convert the digital value to a string, and finally print it out to the LCD. And repeat!
And now, let’s build this system step-by-step
Step1: Open CubeMX & Create New Project
Step2: Choose The Target MCU & Double-Click Its Name
STM32F103C8 (the one I’ll be using) or any other STM32 part you’ve got
Step3: Go To The RCC Clock Configuration
Step4: Set The System Clock To Be 72MHz or whatever your uC board supports
Step5: Enable The TIMERx/CHx ICU With INT That You’ll be using For ECHO signal measurement
We’ll have to do this step just to have the TIM_HAL files added to our project by CubeMX. And also it gives us a startup configuration for the INT of that specific timer module as we’ll see hereafter. This is the best way to keep the code generic and portable to any STM32 microcontroller.
This step will result in adding 2 TIMER_Init functions in our code by CubeMX, but we’ll remove them afterward as the HCSR04 will handle that initialization procedure. But we’ll keep the global TIMERx handler objects in the main.c ( TIM_HandleTypeDef htim2; & 3 )

Step6: Enable The TIMERx/CHx ICU With INT That You’ll be using For The 2nd HC-SR04 Sensor
repeat the previous step by enabling TIMER3/CH1 to be used for the 2nd Ultrasonic sensor
Step7: Generate The Initialization Code & Open The Project In Your IDE
Step8: Add the ECUAL/ HCSR04 driver files to your project
Follow This Tutorial which shows you How To Add Any ECUAL Driver To An STM32 Project step-by-step.
You basically right-click the project name in the IDE’s navigator and choose to create a new > source folder. And name it ECUAL and go to the GitHub repo, download the files and copy the “HCSR04” folder and back to the IDE, right-click on the ECUAL and paste the library into it.
Step9: Add the ECUAL/ LCD16x2 driver files to your project
As in the previous step, copy and paste the library folder into ECUAL
Step10: Add the util files to your project
You basically right-click the project name in the IDE’s navigator and choose to create a new > source folder. And name it util and go to the GitHub repo, download the files and copy the files inside “util” folder and back to the IDE, right-click on the util and paste them into that folder.
Step11: Enable Sprintf For Floating-Point Numbers
Right-click the project name in the IDE’s navigator and choose properties > c/c++ build > settings > tool settings. Then clock that checkmark, hit apply, and ok!
Now, we can start developing our application in the main.c source file.
Here Are The Drivers Configurations I Used For This LAB
LCD16x2_cfg.c File
|
1 2 3 4 5 6 7 8 9 10 11 12 13 |
#include "LCD16x2.h" const LCD16x2_CfgType LCD16x2_CfgParam = { GPIOB, GPIO_PIN_5, GPIO_PIN_6, GPIO_PIN_7, GPIO_PIN_8, GPIO_PIN_3, GPIO_PIN_4, 20 }; |
HCSR04_cfg.c File
The 1st sensor is attached to TIMER2/CH1, the 2nd sensor is attached to TIMER3/CH1
|
1 2 3 4 5 6 7 8 9 10 11 12 13 14 15 16 17 18 19 20 21 |
#include "../HCSR04/HCSR04.h" const HCSR04_CfgType HCSR04_CfgParam[HCSR04_UNITS] = { // HC-SR04 Sensor Unit 1 Configurations { GPIOB, GPIO_PIN_12, TIM2, TIM_CHANNEL_1, 72 }, // HC-SR04 Sensor Unit 2 Configurations { GPIOB, GPIO_PIN_13, TIM3, TIM_CHANNEL_1, 72 } }; |
Here is The Application Code For This LAB (main.c)
|
1 2 3 4 5 6 7 8 9 10 11 12 13 14 15 16 17 18 19 20 21 22 23 24 25 26 27 28 29 30 31 32 33 34 35 36 37 38 39 40 41 42 43 44 45 46 47 48 49 50 51 52 53 54 55 56 57 58 59 60 61 62 63 64 65 66 67 68 69 |
#include "main.h" #include "stdio.h" #include "../ECUAL/HCSR04/HCSR04.h" #include "../ECUAL/LCD16x2/LCD16x2.h" #define HCSR04_SENSOR1 0 #define HCSR04_SENSOR2 1 void SystemClock_Config(void); static void MX_GPIO_Init(void); TIM_HandleTypeDef htim2; TIM_HandleTypeDef htim3; uint16_t TRIG_Ticks = 0; uint16_t LCD_Ticks = 0; float Distance1 = 0.0, Distance2 = 0.0; char TEXT_L1[16] = {0}; char TEXT_L2[16] = {0}; int main(void) { HAL_Init(); SystemClock_Config(); MX_GPIO_Init(); LCD_Init(); HCSR04_Init(HCSR04_SENSOR1, &htim2); HCSR04_Init(HCSR04_SENSOR2, &htim3); while (1) { Distance1 = HCSR04_Read(HCSR04_SENSOR1); Distance2 = HCSR04_Read(HCSR04_SENSOR2); sprintf(TEXT_L1, "Dist= %.2f cm", Distance1); sprintf(TEXT_L2, "Dist= %.2f cm", Distance2); HAL_Delay(10); } } void HAL_TIM_IC_CaptureCallback(TIM_HandleTypeDef *htim) { HCSR04_TMR_IC_ISR(htim); } void HAL_TIM_PeriodElapsedCallback(TIM_HandleTypeDef* htim) { HCSR04_TMR_OVF_ISR(htim); } void SysTick_CallBack(void) { TRIG_Ticks++; LCD_Ticks++; if(TRIG_Ticks >= 15) // Each 15msec { HCSR04_Trigger(HCSR04_SENSOR1); HCSR04_Trigger(HCSR04_SENSOR2); TRIG_Ticks = 0; } if(LCD_Ticks >= 200) // Each 200msec { LCD_Clear(); LCD_Set_Cursor(1, 1); LCD_Write_String(TEXT_L1); LCD_Set_Cursor(2, 1); LCD_Write_String(TEXT_L2); LCD_Ticks = 0; } } |
Note that: I’ve deleted the auto-generated TIM2 & TIM3 initialization functions. Since our HCSR04 library will handle that, we don’t need those functions at all. However, I did leave the global TIM2 & TIM3 handlers
(this line: TIM_HandleTypeDef htim2; and this TIM_HandleTypeDef htim3; ).
Because we need that handler for interrupt service routines initialization and also handling. Have a look into stm32f1xx_it.c file. You’ll see that those global handler variables are extern-ed from main.c to that interrupt handlers file at this line ( extern TIM_HandleTypeDef htim2; ). And being used by the TIMER2 & TIMER3 global IRQ handlers in the same file:
|
1 2 3 4 5 6 7 8 |
void TIM2_IRQHandler(void) { HAL_TIM_IRQHandler(&htim2); } void TIM3_IRQHandler(void) { HAL_TIM_IRQHandler(&htim3); } |
We also need to call our systick callback function within the systick IRQ handler in the same file, it’ll become like this:
|
1 2 3 4 5 |
void SysTick_Handler(void) { HAL_IncTick(); SysTick_CallBack(); } |
Do also look into the stm32f1xx_hal_msp.c file. You’ll find some initialization functions that get called in main.c at this line ( HAL_Init(); ). One of which is the timer2 & timer3 ICU and INT initializer, here is the function you’ll see:
|
1 2 3 4 5 6 7 8 9 10 11 12 13 14 15 16 17 18 19 20 21 22 23 24 25 26 27 28 29 30 31 32 33 34 35 36 37 |
void HAL_TIM_Base_MspInit(TIM_HandleTypeDef* htim_base) { GPIO_InitTypeDef GPIO_InitStruct = {0}; if(htim_base->Instance==TIM2) { /* Peripheral clock enable */ __HAL_RCC_TIM2_CLK_ENABLE(); __HAL_RCC_GPIOA_CLK_ENABLE(); /**TIM2 GPIO Configuration PA0-WKUP ------> TIM2_CH1 */ GPIO_InitStruct.Pin = GPIO_PIN_0; GPIO_InitStruct.Mode = GPIO_MODE_INPUT; GPIO_InitStruct.Pull = GPIO_NOPULL; HAL_GPIO_Init(GPIOA, &GPIO_InitStruct); /* TIM2 interrupt Init */ HAL_NVIC_SetPriority(TIM2_IRQn, 0, 0); HAL_NVIC_EnableIRQ(TIM2_IRQn); } else if(htim_base->Instance==TIM3) { /* Peripheral clock enable */ __HAL_RCC_TIM3_CLK_ENABLE(); __HAL_RCC_GPIOA_CLK_ENABLE(); /**TIM3 GPIO Configuration PA6 ------> TIM3_CH1 */ GPIO_InitStruct.Pin = GPIO_PIN_6; GPIO_InitStruct.Mode = GPIO_MODE_INPUT; GPIO_InitStruct.Pull = GPIO_NOPULL; HAL_GPIO_Init(GPIOA, &GPIO_InitStruct); /* TIM3 interrupt Init */ HAL_NVIC_SetPriority(TIM3_IRQn, 0, 0); HAL_NVIC_EnableIRQ(TIM3_IRQn); } } |
As you can see, it does handle the ICU pin initialization for us and also the TIMER2 & TIMER3 interrupt enabling. Which can be tricky to do in our library init function ( HCSR04_Init() ) so I decided to use that within HAL_Init instead to keep the code generic across all STM32 microcontroller.
Download The STM32 Multi HC-SR04 Ultrasonic Read & LCD Print LAB42
The Result For This LAB Testing (Video)
STM32 Multi Ultrasonic Read, Servo & LCD Print – LAB
| LAB Number | 43 |
| LAB Title | STM32 Configure 2 HC-SR04 Sensors to use the same timer as well as 1 more servo with them on that same timer & Print distances to 1 LCD. Just to test our library compatibility with the previously developed servo library |
- Set up a new project as usual with a system clock @ 72MHz or whatever your uC board supports
- Enable TIMERx/CHx For ICU mode with INT enabled in CubeMX
- Enable ADC / CHx just to be used for controlling the Servo Motor
- Add the ECUAL / LCD16x2 driver files to our project. As shown here
- Add the ECUAL / HCSR04 driver files to our project.
- Add the ECUAL / SERVO driver files to our project.
- Add the util files to our project.
- Configure 1 LCD instance in LCD16x2_cfg.c file
- Configure 1 SERVO instance in SERVO_cfg.c file
- Configure 2 HCSR04 instances in HCSR04_cfg.c file
- Initialize the HCSR04 sensors, the Servo motor, and the LCD in the main application. Then read the distances, convert the digital value to a string, and finally print it out to the LCD. And also read the ADC Channel and use the reading for controlling the Servo motor.
And now, let’s build this system step-by-step
Step1: Open CubeMX & Create New Project
Step2: Choose The Target MCU & Double-Click Its Name
STM32F103C8 (the one I’ll be using) or any other STM32 part you’ve got
Step3: Go To The RCC Clock Configuration
Step4: Set The System Clock To Be 72MHz or whatever your uC board supports
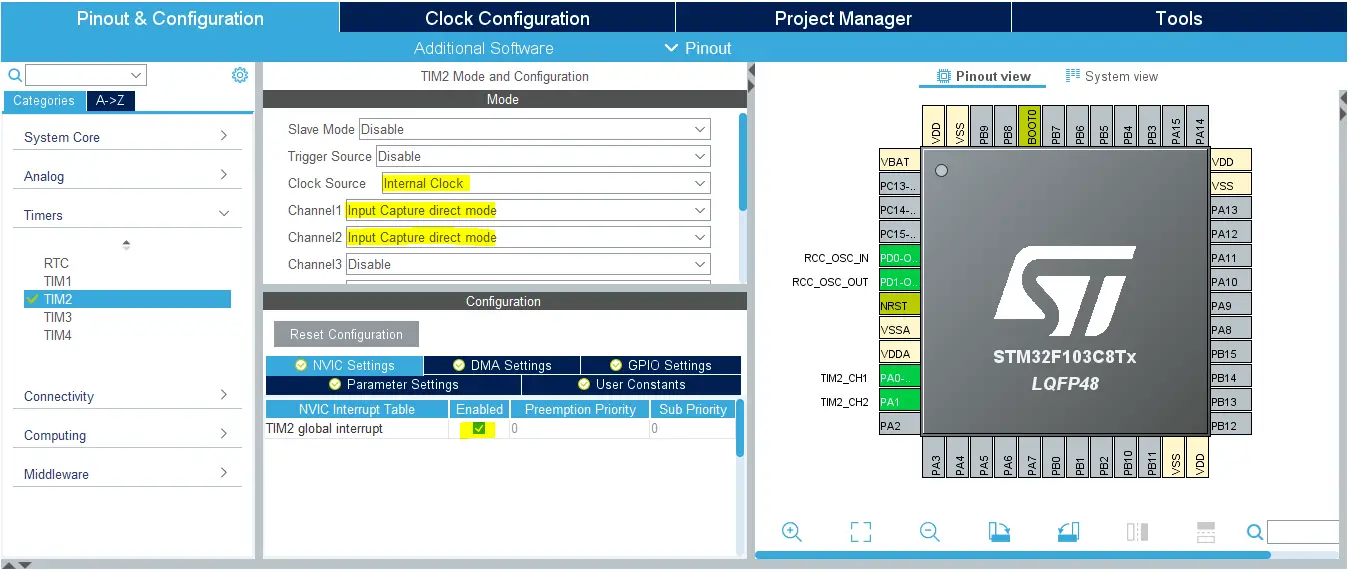
Step5: Enable The TIMERx/CHx ICU With INT That You’ll be using For ECHO signal measurement
We’ll have to do this step just to have the TIM_HAL files added to our project by CubeMX. And also it gives us a startup configuration for the INT of that specific timer module as we’ll see hereafter. This is the best way to keep the code generic and portable to any STM32 microcontroller.
This step will result in adding a TIMER_Init function in our code by CubeMX, but we’ll remove it afterward as the HCSR04 will handle that initialization procedure. But we’ll keep the global TIMERx handler object in the main.c (this line: TIM_HandleTypeDef htim2; )
Step6: Enable Any ADC Channel That Will be Used For Controlling The Servo Motor
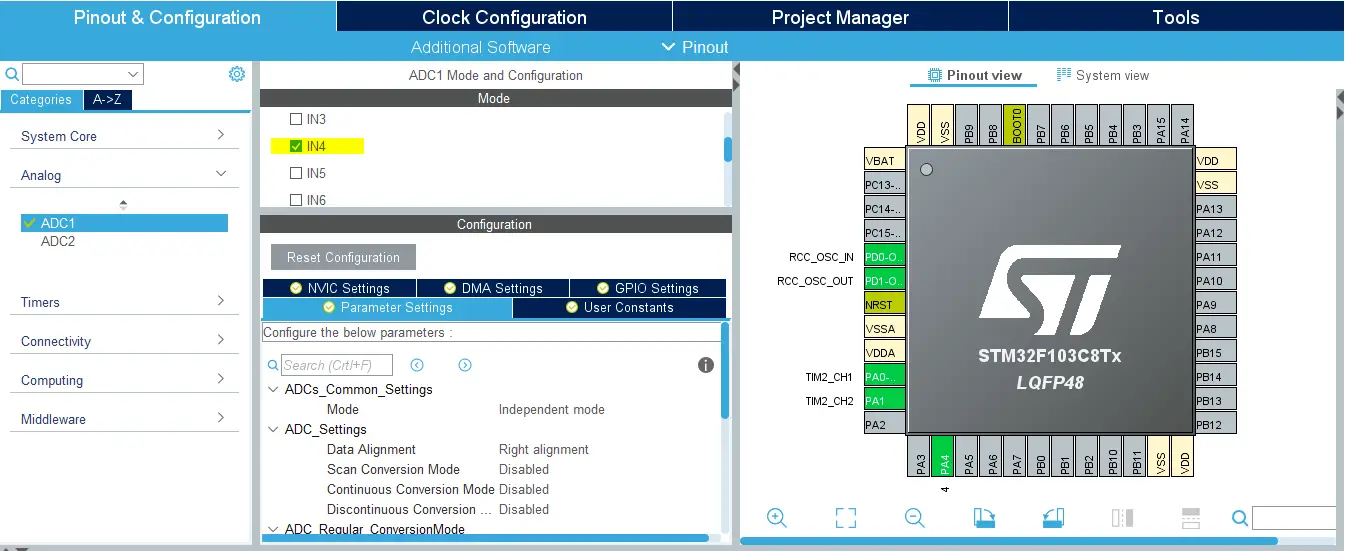
Step7: Generate The Initialization Code & Open The Project In Your IDE
Step8: Add the ECUAL/ HCSR04 driver files to your project
Follow This Tutorial which shows you How To Add Any ECUAL Driver To An STM32 Project step-by-step.
You basically right-click the project name in the IDE’s navigator and choose to create a new > source folder. And name it ECUAL and go to the GitHub repo, download the files and copy the “HCSR04” folder and back to the IDE, right-click on the ECUAL and paste the library into it.
Step9: Add the ECUAL/ LCD16x2 driver files to your project
As in the previous step, copy and paste the library folder into ECUAL
Step10: Add the ECUAL/ SERVO driver files to your project
As in the previous step, copy and paste the library folder into ECUAL
Step11: Add the util files to your project
You basically right-click the project name in the IDE’s navigator and choose to create a new > source folder. And name it util and go to the GitHub repo, download the files and copy the files inside “util” folder and back to the IDE, right-click on the util and paste them into that folder.
Step12: Enable Sprintf For Floating-Point Numbers
Right-click the project name in the IDE’s navigator and choose properties > c/c++ build > settings > tool settings. Then clock that checkmark, hit apply, and ok!
Now, we can start developing our application in the main.c source file.
Here Are The Drivers Configurations I Used For This LAB
LCD16x2_cfg.c File
|
1 2 3 4 5 6 7 8 9 10 11 12 13 |
#include "LCD16x2.h" const LCD16x2_CfgType LCD16x2_CfgParam = { GPIOB, GPIO_PIN_5, GPIO_PIN_6, GPIO_PIN_7, GPIO_PIN_8, GPIO_PIN_3, GPIO_PIN_4, 20 }; |
SERVO_cfg.c File
|
1 2 3 4 5 6 7 8 9 10 11 12 13 14 15 16 |
#include "SERVO.h" const SERVO_CfgType SERVO_CfgParam[SERVO_NUM] = { // Servo Motor 1 Configurations { GPIOA, GPIO_PIN_2, TIM2, &TIM2->CCR3, TIM_CHANNEL_3, 72000000, 0.65, 2.3 } }; |
HCSR04_cfg.c File
|
1 2 3 4 5 6 7 8 9 10 11 12 13 14 15 16 17 18 19 20 21 |
#include "../HCSR04/HCSR04.h" const HCSR04_CfgType HCSR04_CfgParam[HCSR04_UNITS] = { // HC-SR04 Sensor Unit 1 Configurations { GPIOB, GPIO_PIN_12, TIM2, TIM_CHANNEL_1, 72 }, // HC-SR04 Sensor Unit 2 Configurations { GPIOB, GPIO_PIN_13, TIM2, TIM_CHANNEL_2, 72 } }; |
Here is The Application Code For This LAB (main.c)
|
1 2 3 4 5 6 7 8 9 10 11 12 13 14 15 16 17 18 19 20 21 22 23 24 25 26 27 28 29 30 31 32 33 34 35 36 37 38 39 40 41 42 43 44 45 46 47 48 49 50 51 52 53 54 55 56 57 58 59 60 61 62 63 64 65 66 67 68 69 70 71 72 73 74 75 76 77 78 79 80 81 82 83 84 85 86 87 88 89 90 91 92 93 94 95 96 97 |
#include "main.h" #include "stdio.h" #include "../ECUAL/HCSR04/HCSR04.h" #include "../ECUAL/LCD16x2/LCD16x2.h" #include "../ECUAL/SERVO/SERVO.h" #define HCSR04_SENSOR1 0 #define HCSR04_SENSOR2 1 #define SERVO_MOTOR1 0 void SystemClock_Config(void); static void MX_GPIO_Init(void); static void MX_ADC1_Init(void); TIM_HandleTypeDef htim2; TIM_HandleTypeDef htim3; ADC_HandleTypeDef hadc1; uint16_t TRIG_Ticks = 0; uint16_t LCD_Ticks = 0; float Distance1 = 0.0, Distance2 = 0.0; char TEXT_L1[16] = {0}; char TEXT_L2[16] = {0}; int main(void) { uint16_t AD_RES = 0; uint16_t Min_Pulse = 0, Max_Pulse = 0; float temp = 0.0; uint16_t Servo_Pulse = 0; HAL_Init(); SystemClock_Config(); MX_GPIO_Init(); MX_ADC1_Init(); LCD_Init(); SERVO_Init(SERVO_MOTOR1); HCSR04_Init(HCSR04_SENSOR1, &htim2); HCSR04_Init(HCSR04_SENSOR2, &htim3); Min_Pulse = SERVO_Get_MinPulse(SERVO_MOTOR1); Max_Pulse = SERVO_Get_MaxPulse(SERVO_MOTOR1); while (1) { // Start ADC Conversion HAL_ADC_Start(&hadc1); // Poll ADC1 Perihperal & TimeOut = 1mSec HAL_ADC_PollForConversion(&hadc1, 1); // Read The ADC Conversion Result & Map It To PWM DutyCycle AD_RES = HAL_ADC_GetValue(&hadc1); // Map The ADC Result To Servo Pulse Width temp = ((Max_Pulse-Min_Pulse)/4096.0); Servo_Pulse = (uint16_t)(AD_RES*temp) + Min_Pulse; // Send The Raw Servo Pulse Width To The PWM Hardware SERVO_RawMove(SERVO_MOTOR1, Servo_Pulse); // Read The 2 Ultrasonic Sensors Distance1 = HCSR04_Read(HCSR04_SENSOR1); Distance2 = HCSR04_Read(HCSR04_SENSOR2); // Convert Distances From Float To Strings sprintf(TEXT_L1, "Dist1= %.2f cm", Distance1); sprintf(TEXT_L2, "Dist2= %.2f cm", Distance2); HAL_Delay(10); } } void HAL_TIM_IC_CaptureCallback(TIM_HandleTypeDef *htim) { HCSR04_TMR_IC_ISR(htim); } void HAL_TIM_PeriodElapsedCallback(TIM_HandleTypeDef* htim) { HCSR04_TMR_OVF_ISR(htim); } void SysTick_CallBack(void) { TRIG_Ticks++; LCD_Ticks++; if(TRIG_Ticks >= 15) // Each 15msec { HCSR04_Trigger(HCSR04_SENSOR1); HCSR04_Trigger(HCSR04_SENSOR2); TRIG_Ticks = 0; } if(LCD_Ticks >= 200) // Each 200msec { LCD_Clear(); LCD_Set_Cursor(1, 1); LCD_Write_String(TEXT_L1); LCD_Set_Cursor(2, 1); LCD_Write_String(TEXT_L2); LCD_Ticks = 0; } } |
Note that: I’ve deleted the auto-generated TIM2 initialization function and its parameter. Since our HCSR04 library will handle that, we don’t need that function at all. However, I did leave the global TIM2 handler (this line: TIM_HandleTypeDef htim2; ).
We also need to call our systick callback function within the systick IRQ handler in the same file, it’ll become like this:
|
1 2 3 4 5 |
void SysTick_Handler(void) { HAL_IncTick(); SysTick_CallBack(); } |
Download The STM32 Multi HC-SR04 Ultrasonic, Servo & LCD Print LAB43
The Result For This LAB Testing (Video)
There is nothing special about this lab except for being an extreme test for our HC-SR04 ultrasonic library. Because it shows you that it’s compatible with the previous servo motor driver and you can run multiple sensors and servos on the exact same timer module at the same time with no issues. That’s the point of the whole test.
STM32 HC-SR04 Ultrasonic & Digital Filtering – LAB
| LAB Number | 44 |
| LAB Title | STM32 Read 1 HC-SR04 Ultrasonic Sensor Using Library APIs & Apply Digital Filtering on The Readings & Print To PC Over UART & Plot |
- Set up a new project as usual with a system clock @ 72MHz or whatever your uC board supports
- Enable TIMERx/CHx For ICU mode with INT enabled in CubeMX
- Enable UART1 & Set The Baud Rate in CubeMX
- Add the ECUAL / HCSR04 driver files to our project. As shown here
- Add the MATH files to our project.
- Add the util files to our project.
- Configure 1 HCSR04 instance in HCSR04_cfg.c file
- Initialize the HCSR04 in the main application, read the distance & pass it to the moving average filter, convert the digital value to a string, and finally print it out to the UART. And repeat!
Note that: I know that we should be calling the filtering function and send the new reading each measurement cycle (at fixed time intervals that define the sampling frequency Fs). But since we didn’t implement yet a technique to callback the application layer from the HCSR04 driver, I’ll be doing the filtering at a rough estimate of time intervals. It’s not ideal but it just demonstrates the idea.
In the near future, I’ll update the ultrasonic driver to add a “measurement completion callback function”. So we can easily use it to do the filtering as soon as a new value is calculated by the ultrasonic driver. There should also be a way of passing the information of the most recent reading and the associated HCSR04 sensor instance from the driver back to the application. We’ll see how to do it in a future tutorial.
And now, let’s build this system step-by-step
Step1: Open CubeMX & Create New Project
Step2: Choose The Target MCU & Double-Click Its Name
STM32F103C8 (the one I’ll be using) or any other STM32 part you’ve got
Step3: Go To The RCC Clock Configuration
Step4: Set The System Clock To Be 72MHz or whatever your uC board supports
Step5: Enable The TIMERx/CHx ICU With INT That You’ll be using For ECHO signal measurement
We’ll have to do this step just to have the TIM_HAL files added to our project by CubeMX. And also it gives us a startup configuration for the INT of that specific timer module as we’ll see hereafter. This is the best way to keep the code generic and portable to any STM32 microcontroller.
This step will result in adding a TIMER_Init function in our code by CubeMX, but we’ll remove it afterward as the HCSR04 will handle that initialization procedure. But we’ll keep the global TIMERx handler object in the main.c (this line: TIM_HandleTypeDef htim2; )

Step6: Enable The UART1 module & Set The Baud Rate
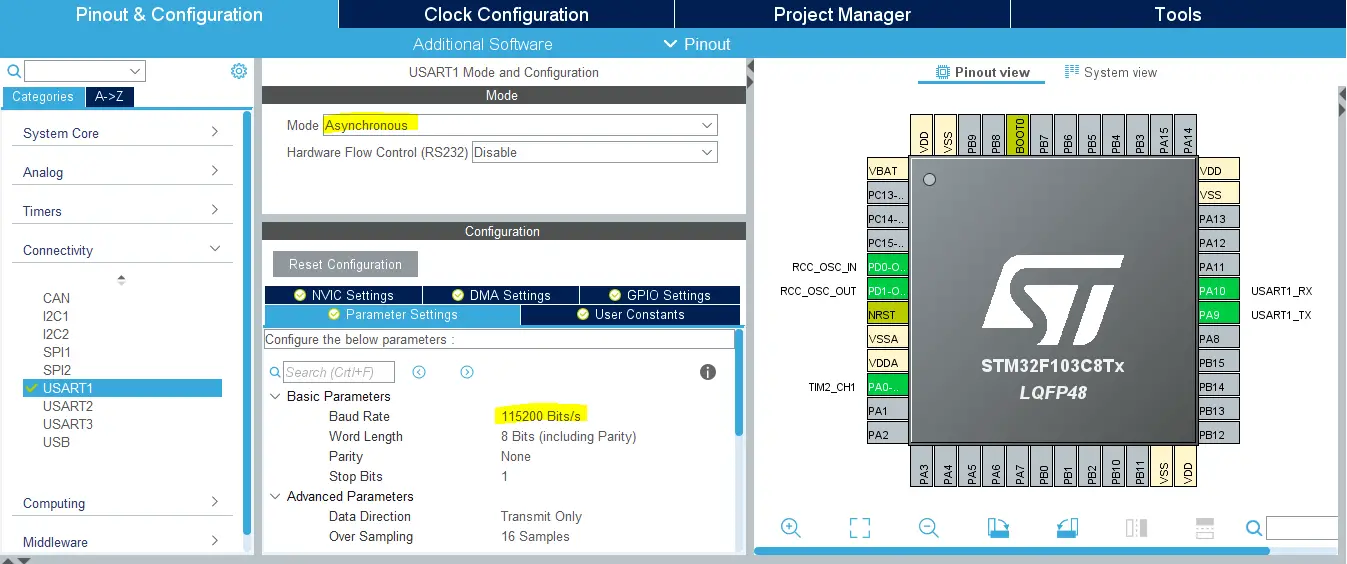
Step7: Generate The Initialization Code & Open The Project In Your IDE
Step8: Add the ECUAL/ HCSR04 driver files to your project
Follow This Tutorial which shows you How To Add Any ECUAL Driver To An STM32 Project step-by-step.
You basically right-click the project name in the IDE’s navigator and choose to create a new > source folder. And name it ECUAL and go to the GitHub repo, download the files and copy the “HCSR04” folder and back to the IDE, right-click on the ECUAL and paste the library into it.
Step9: Add the util files to your project
You basically right-click the project name in the IDE’s navigator and choose to create a new > source folder. And name it util and go to the GitHub repo, download the files and copy the files inside “util” folder and back to the IDE, right-click on the util and paste them into that folder.
Step10: Add the MATH files to your project
You basically right-click the project name in the IDE’s navigator and choose to create a new > source folder. And name it MATH and go to the GitHub repo, download the files and copy the files inside “MATH” folder and back to the IDE, right-click on the util and paste them into that folder.
Step11: Enable Sprintf For Floating-Point Numbers
Right-click the project name in the IDE’s navigator and choose properties > c/c++ build > settings > tool settings. Then clock that checkmark, hit apply, and ok!
Now, we can start developing our application in the main.c source file.
Here Are The Drivers Configurations I Used For This LAB
HCSR04_cfg.c File
|
1 2 3 4 5 6 7 8 9 10 11 12 13 |
#include "../HCSR04/HCSR04.h" const HCSR04_CfgType HCSR04_CfgParam[HCSR04_UNITS] = { // HC-SR04 Sensor Unit 1 Configurations { GPIOB, GPIO_PIN_12, TIM2, TIM_CHANNEL_1, 72 } }; |
Here is The Application Code For This LAB (main.c)
|
1 2 3 4 5 6 7 8 9 10 11 12 13 14 15 16 17 18 19 20 21 22 23 24 25 26 27 28 29 30 31 32 33 34 35 36 37 38 39 40 41 42 43 44 45 46 47 48 49 50 51 52 53 54 55 56 57 58 59 60 |
#include "main.h" #include "stdio.h" #include "../ECUAL/HCSR04/HCSR04.h" #include "../MATH/FIR/FIR.h" #define HCSR04_SENSOR1 0 void SystemClock_Config(void); static void MX_GPIO_Init(void); static void MX_USART1_UART_Init(void); TIM_HandleTypeDef htim2; UART_HandleTypeDef huart1; FIR_Filter_cfg Dist1_Filter; uint16_t TRIG_Ticks = 0; float Dist1 = 0.0, Dist1_Filtered = 0.0; float Dist1_Buffer[15+1] = {0}; char TEXT[25] = {0}; int main(void) { HAL_Init(); SystemClock_Config(); MX_GPIO_Init(); MX_USART1_UART_Init(); HCSR04_Init(HCSR04_SENSOR1, &htim2); Dist1_Filter.Filter_Order = 15; Dist1_Filter.Data_Buffer = Dist1_Buffer; while (1) { Dist1 = HCSR04_Read(HCSR04_SENSOR1); AVG_FIR_LPF(Dist1, &Dist1_Filtered, &Dist1_Filter); sprintf(TEXT, "%.2f, %.2f\r\n", Dist1, Dist1_Filtered); HAL_UART_Transmit(&huart1, TEXT, sizeof(TEXT), 100); HAL_Delay(25); } } void HAL_TIM_IC_CaptureCallback(TIM_HandleTypeDef *htim) { HCSR04_TMR_IC_ISR(htim); } void HAL_TIM_PeriodElapsedCallback(TIM_HandleTypeDef* htim) { HCSR04_TMR_OVF_ISR(htim); } void SysTick_CallBack(void) { TRIG_Ticks++; if(TRIG_Ticks >= 25) // Each 25msec { HCSR04_Trigger(HCSR04_SENSOR1); TRIG_Ticks = 0; } } |
Note that: I’ve deleted the auto-generated TIM2 initialization function and its parameter. Since our HCSR04 library will handle that, we don’t need that function at all. However, I did leave the global TIM2 handler (this line: TIM_HandleTypeDef htim2; ). Because we need that handler for interrupt service routines initialization and also handling.
We also need to call our systick callback function within the systick IRQ handler in the same file, it’ll become like this:
|
1 2 3 4 5 |
void SysTick_Handler(void) { HAL_IncTick(); SysTick_CallBack(); } |
Download The STM32 HC-SR04 Ultrasonic Read & Digital Filtering LAB44
The Result For This LAB Testing (Video)
Digital Filtering & Improvements
As you’ve seen in the last LAB, adding a digital filter will help a lot in order to get some clean data from the HC-SR04 ultrasonic sensor. As it seems to be fluctuating a lot even in stationary environments. The moving average filter is not particularly a very good filter but it’s a good starting point.
We’ll be designing more FIR digital filters with MATLAB in the future and add them to our STM32 MATH libraries. And we also need to improve all sensor drivers (libraries) by adding a Measurement Completion Callback mechanism to all of them.
Filtering requires to be happening at fixed time intervals that define the sampling frequency Fs. And that’s what we’ll be addressing in the future.
This library can be further improved if you can make it run faster by some logic reductions or fixed-point arithmetic and other things. But I’ll show you the current performance measurement in the next section and we’ll settle down for it and maybe improve upon it in the future as we’re progressing.
Final Tests & Measurements For HC-SR04 Driver Code
1- Measurements Validity Over The Entire Input Range
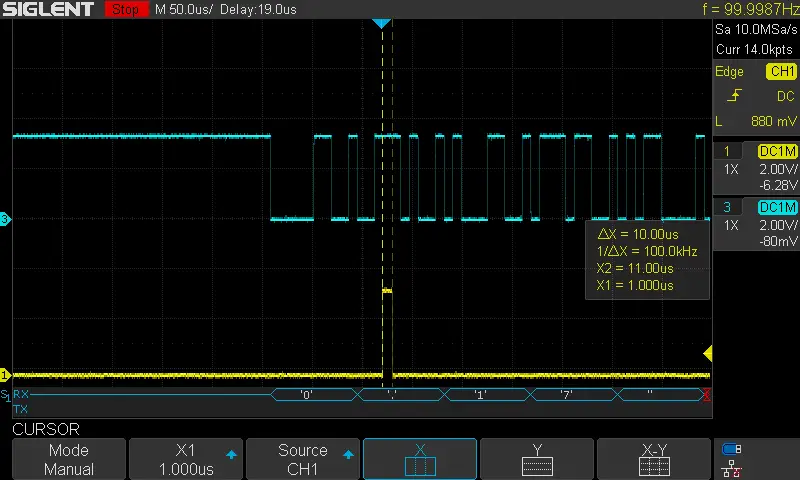
For this test, I disconnected the Ultrasonic sensor and used my function generator to feed in some fixed pulses to the uC and how it’ll end up converting the pulse width to distance. The result is converted from a floating-point number to a string and sent over UART.
The DSO screen shows the input pulse width and the distance reading as a decoded UART message at the bottom. We’d expect nearly 1cm per 58.5µs. For the first test, it was a 56µs pulse and the estimated distance by the microcontroller was very close to what we’d theoretically expect for that input (0.99cm).
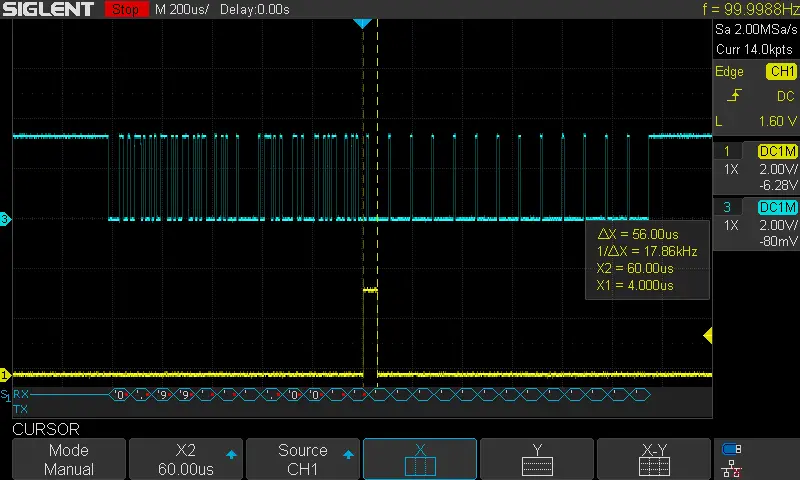
I kept increasing the input pulse width and stopped at 23.3 msec which is the theoretical maximum pulse width at which we’d expect the distance to be 400cm (or 4m). and the result was also very close to that (399.5cm). Note that I just couldn’t show the pulse width on the screen as it’s relatively much larger than the UART message so you’ve to trust me xD!
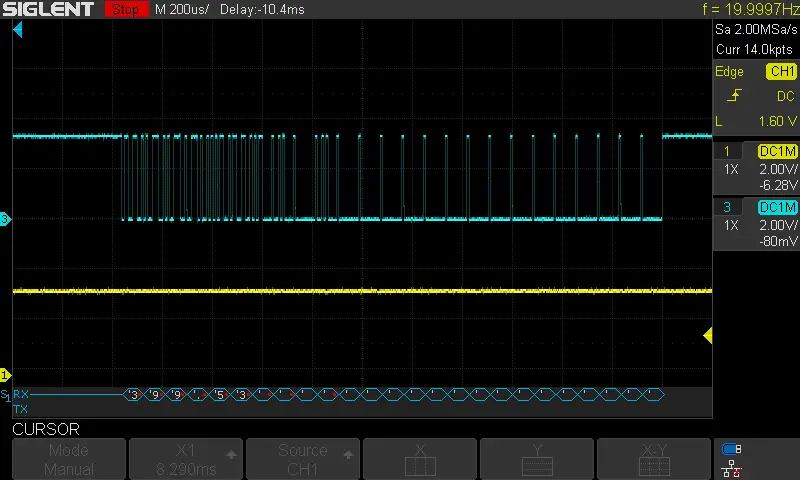
One last test was by injecting in a 10µs pulse which is not practical due to the sensor’s physical blind zone (<4cm) but just for the sake of curiosity, we’d say it should output 10µs/58.5µs = 0.17cm. And it did!
2- ICU Handler Execution Time (The Calculation Logic)
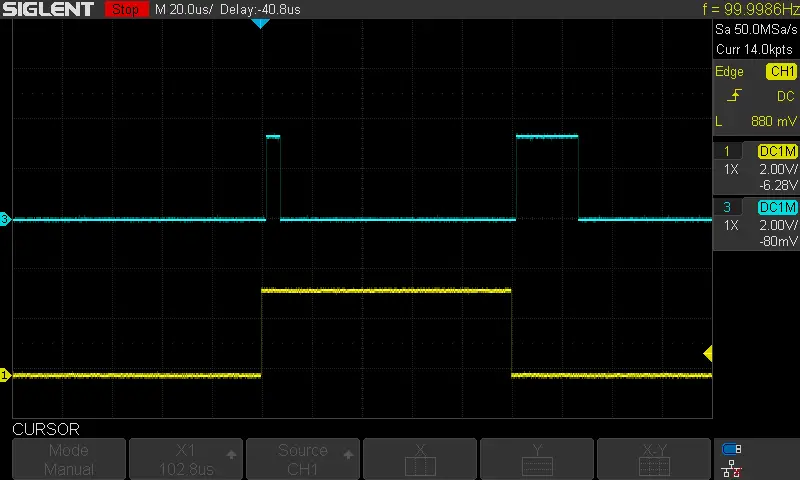
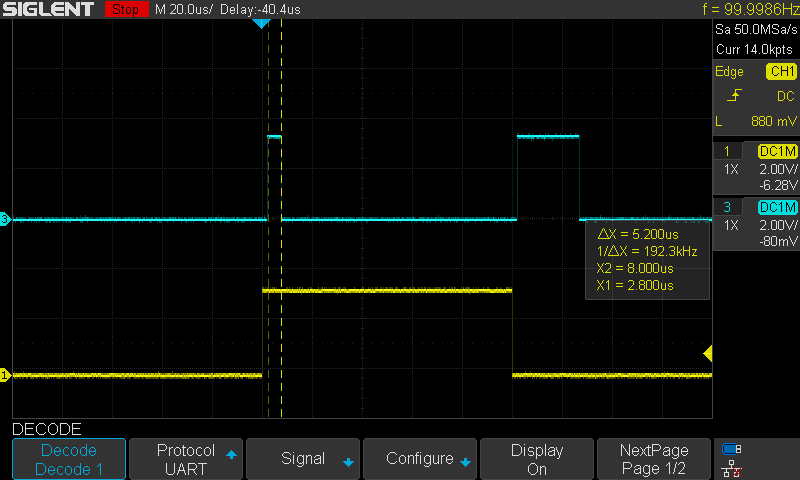
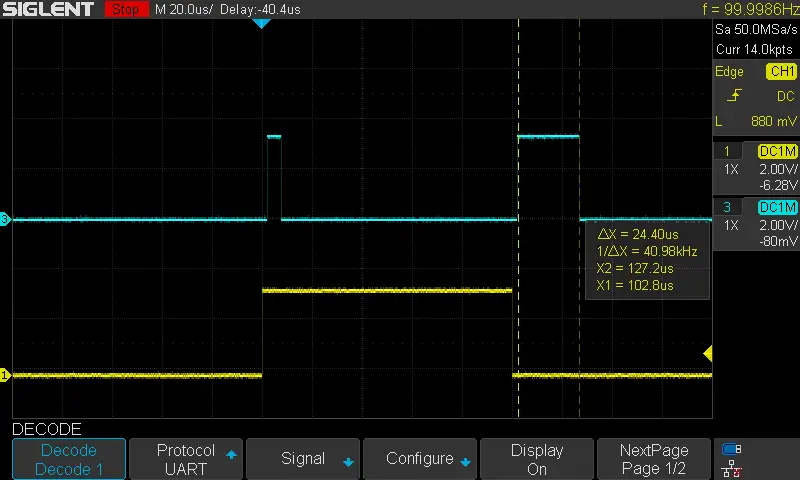
We should also be curious about the execution time of the ICU handler routine that gets executed twice each incoming pulse on the ECHO pin. One for the rising edge (fewer logic operations) and a second time on the falling edge (relatively more logic operations).
This gets more important as we move towards building RTOS-based applications. We’ll need everything to be as deterministic as possible and easy to calculate the CPU time and usage so we plan correspondingly.
The blue trace shows you a GPIO pin that I pull HIGH when the CPU enters the HCSR04_TMR_IC_ISR(htim); function and it goes LOW upon leaving the handler function.
The yellow trace shows you the input echo pulse from the ultrasonic sensor (the signal to be measured).
Questions I Usually Get About HC-SR04 Ultrasonic Sensors
How Often Should I Trigger The Sensor?
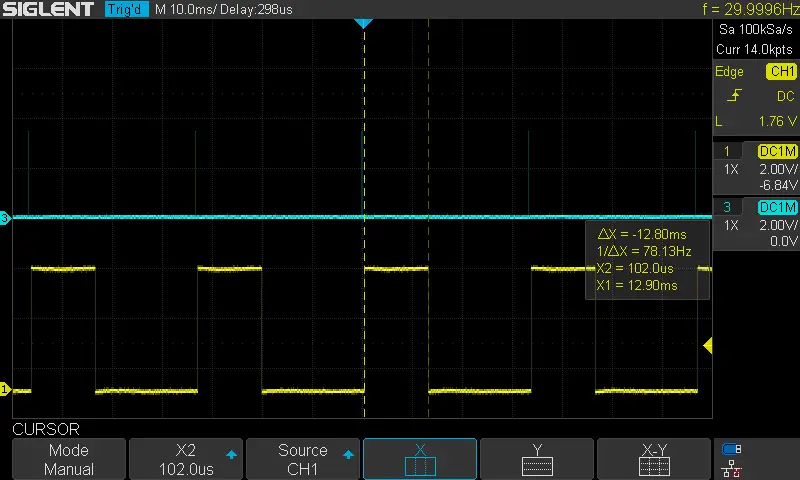
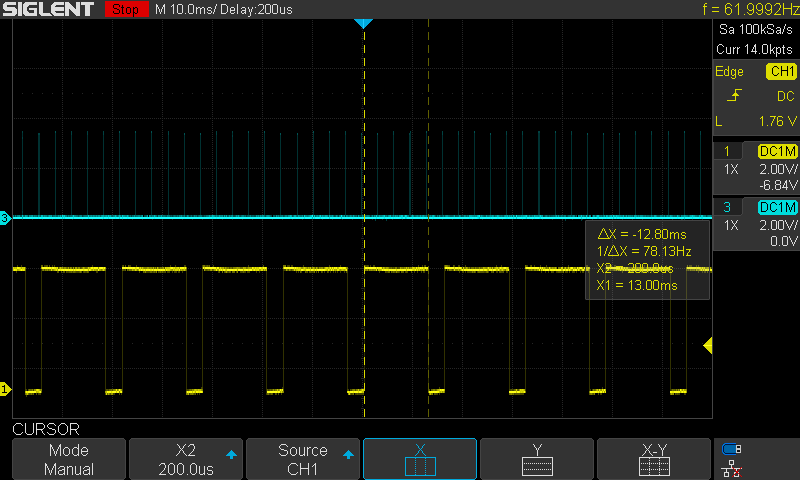
Here are my testing results and hopefully you get the answer you’re looking after. I hooked my function generator’s output to the HC-SR04 trigger pin and started injecting a trigger short pulse with different frequencies and kept an object at a fixed distance from the sensor. Just to see if the triggering rate would affect the sensor’s output or not.
At first, the input trigger was 1Hz (one trigger pulse/second), then increase it to 30Hz, and to 300Hz. The output pulse width did not get affected at all. Does this mean that at the 300Hz triggering rate, I was getting 300 different readings per second? The answer is no. Just look at the output signal frequency and you’ll know that it’s dependent on the distance of the object facing the sensor. The further it’s the more reading/s you get and vice versa.
Blue trace: input trigger pulse
Yellow trace: echo pulse
30Hz Triggering Rate
300Hz Triggering Rate
What’s The Max & Min Output Pulse Widths? Range? Limitations?
The online documents for this sensor’s module claim to be (2cm up to 400cm) in range. Which didn’t prove to be true or at least for me while testing 3 different sensors. Each of them was pointing to a 3m away object and none of them did give a logical output. The maximum pulse width that I could get is shown below (anywhere from 11msec up to 15msec). Sometimes it can shoot up to >100msec pulse.
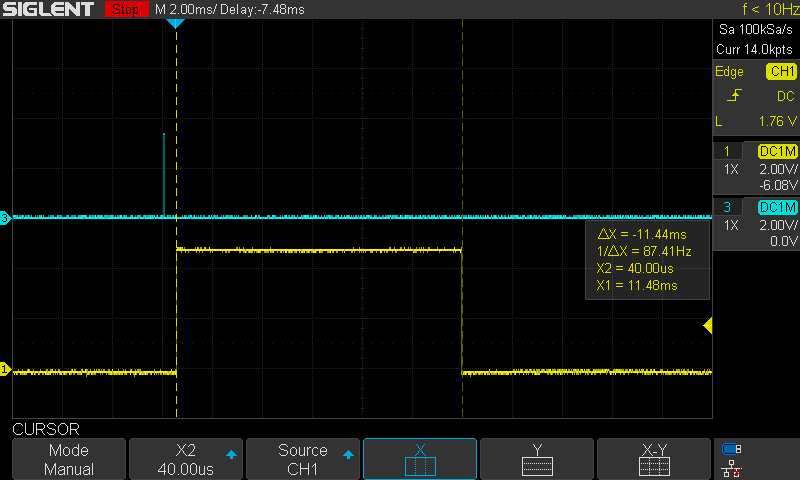
Realistically, you can expect reasonable readings in the range of 4cm up to 2 meters and something. More than that, I didn’t get anything logical.
You should also be aware of the angle at which you’re fixing the sensor in your robot or machine. It does greatly affect the readings you get. Refer to this old article for more info about this issue.
Polling or Interrupt For HC-SR04 Ultrasonic Distance Measurement?
This is a very common question that I’d like to address in a different way. Let’s first ask what’s wrong with using polling?
Nothing is particularly wrong of course except for the fact that it does, unnecessarily, consume a lot of CPU time. Or technically speaking it puts the CPU in a “busy waiting” state (like a delay) for quite a long time. How long is it?
Waiting Time = Sensor’s response time from trigger to echo + Echo pulse width
The Sensor’s Response Time was found to be around (450µs – 500µs) in my testings. And it’s defined to be the time from the end of the trigger pulse to the first edge of the incoming echo pulse.
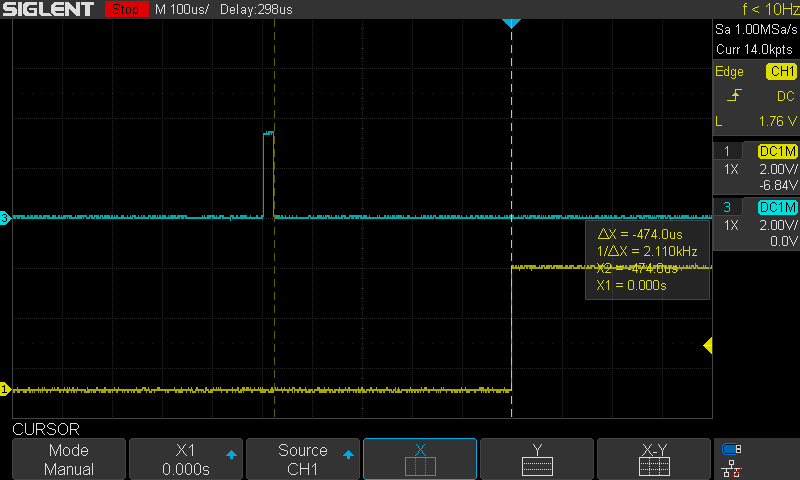
The Echo Pulse Width was found to be (11ms to 15ms) at max or it’s up to the sensor to send out a +100ms pulse and ruin your life xD. That’s probably why we shouldn’t let it decide the CPU time consumption for us.
With that being said, you can still do polling knowing what’s good and bad about it. Just don’t do it without adding a time-out timer so as not to have your system frozen if the HC-SR04 sensor fails. And it can fail for many reasons like “loose connections”. No echo pulse is coming and the CPU is waiting forever. Make sure to have an escaping technique and you’re good to go.
Would you recommend HC-SR04 for safety-critical applications?
The short answer is NO! I’d advise against using this module with large / heavy equipment, robots, or any other expensive or safety-critical application. Better industrial modules do exist even at higher price points they still better solutions. You can still however use the HC-SR04 but place more than one sensor in a convenient arrangement or use other types of sensors to get the data and apply sensor fusion algorithms to get a good reliable estimation. Just try to minimize the risk as much as possible.
Did you find this helpful? If yes, please consider supporting this work and sharing these tutorials!
Stay tuned for the upcoming tutorials and don’t forget to SHARE these tutorials. And consider SUPPORTING this work to keep publishing free content just like this!
| Previous Tutorial | Tutorial 37 | Next Tutorial | |||||

