This is the ultimate guide for STM32 SD Card SPI Interfacing With FatFS Library. You’ll learn how to use SD Cards with STM32 microcontrollers using the SPI interface module. We’ll create some STM32 SD Card Example Test Projects to verify what we’ll be learning in this tutorial.
Table of Contents
- STM32 SD Card Interfacing
- STM32 SD Card SPI Interfacing
- STM32 SD Card FatFS SPI Driver
- STM32 SD Card SPI & FatFS Example Project
- STM32 SD Card SPI Troubleshooting
- Wrap Up
STM32 SD Card Interfacing
Some STM32 microcontroller series have an integrated SDIO (SDMMC) hardware peripheral that’s designed specifically to interface SD cards at the maximum speed.
However, SD cards can still be used over SPI communication which is available in all STM32 microcontrollers and pretty much every single microcontroller in the market. And we’re going to focus on STM32 SD Card SPI interfacing in this tutorial.
STM32 SPI Vs SDIO Vs SDMMC
SPI is a generic serial peripheral interface and can still be used to interface SD cards with low-end microcontrollers at a relatively lower speed of communication and a much simpler software stack. That’s why SPI is the most commonly used interface for SD cards in a lot of projects.
SDIO is a hardware peripheral designed specifically for interfacing (SD Cards, SDIO Cards, and MultiMedia Cards “MMC”) with the APB2 peripheral bus in “some” of the STM32 microcontrollers. Given that it’s dedicated to SD card interfacing, it’s going to be a much faster way of communicating with SD cards (4x the speed you can get with an SPI interface).
SDMMC is a hardware peripheral designed specifically for interfacing (SD memory cards, SDIO cards, and eMMC devices) with the APB2 peripheral bus in “some” of the STM32 microcontrollers. It’s almost identical to the SDIO interface but it supports eMMC devices additionally and can go up to way higher transfer speeds (in 8-Bit mode).
I was able to successfully run this tutorial’s example project @ 18MBits/s SPI speed. However, it’s advisable to start testing your card @ a lower speed of communication (like 2.25MBits/s or 4.5MBits/s) and gradually increase the speed until reaching the limit of your hardware setup.
STM32 SD Card SPI Interfacing
In this section, we’ll discuss how to interface STM32 microcontrollers with SD Cards using the SPI bus.

Preparing The SD Card
Use an SD Card Reader for this step.
Before using your SD card, make sure you’ve Formatted it to the FAT (FAT32/FAT) file system (in your operating system of choice).
Some SD Cards just don’t work with the hardware/firmware setup we’re going to use in this tutorial. I’ve tested a handful of SD cards before reaching this conclusion. The card size is not the only reason for communication failure. In fact, a 16GB card worked well for me while a 2GB card did not. But another 1GB did work properly. Therefore, it’s not 100% about the card size, some SD cards just don’t support SPI.
Hint: smaller-sized SD Cards (<8GB) are more likely to support the SPI interface.
STM32 SD Card Hardware Design
If you’re designing your own STM32-based PCB board project that requires having an SD card memory slot onboard, you’d need to consider a 3.3v voltage regulator IC to provide the necessary power to the SD card. A level shifter IC (like 74LVC125A) is typically used in SD card modules to make sure that the SPI bus lines are all in the 3.3v logic level.
STM32 SD Card Module
For quick prototyping and project idea testing, we commonly use the SD card module shown below which provides a very easy way to interface SD cards with various microcontrollers. And that’s what we’re going to use in this tutorial’s example project.
SD Card Module Pinout Diagram

Buy an SD Card Module (on Amazon)
STM32 SD Card Module SPI Wiring Diagram
This is the wiring diagram for the STM32 blue pill development board with an SD card module using the SPI interface. The USB-TTL Converter is used to send messages to the PC for testing the SD card read/write operations.

The SD card interface requires a bit more current than that can be provided from the USB debugger which will lead to failure in mounting the SD card and all other operations as well. The solution for this issue is to use a decent power source like a power bank to the USB port of the blue pill board, for example.
STM32 SD Card FatFS SPI Driver
Let’s now move on to the FATFS_SD driver that we’ll be using alongside the STM32 auto-generated FatFS library code from the CubeMX tool. This driver has a lot of functions implementations for (SPI interface wrappers, SD card operations, and user_diskio functions). The original driver is not mine, its credit goes to eziya and you can read more about it here.
In the next section, we’ll discuss how to integrate this STM32 FATFS_SD driver into our STM32 CubeIDE project step-by-step.
STM32 FATFS_SD Directory & Files
The STM32 FATFS_SD library is part of the MIDWARE (middleware software layer). The driver consists of 2 core files: (a header file & a source file).
- FATFS_SD.h
- FATFS_SD.c

You can download this driver using the link below as you’ll need to have this folder while implementing the example project in the next section.
Download The MIDWARE/ FATFS_SD Driver Folder
STM32 SD Card SPI & FatFS Example Project
In this example project, our ultimate goal is to test the functionalities provided by the fatfs library and use it to create a text file, write to it, read the file, modify the existing file, and delete the file. We’ll monitor the progress of this test sequence using serial UART messages printed to the serial monitor on the PC.
SD Card Tests Included in This Project:
- Mount The SD Card
- Find and print the card size & free space
- Create a new Text File
- Write to the text file using the f_puts() function
- Write to the text file using the f_write() function
- Read from the text file using the f_gets() function
- Read from the text file using the f_read() function
- Modify (update) an existing file
- Delete the file
- Unmount the SD Card
Please, follow The step-by-step guide below to create the project, configure the needed hardware peripherals in CubeMX, add the FATFS_SD driver folder, and run the test project on your STM32 dev board.
Step #1
Create a New Project in STM32CubeMX
The first step is to head over to STM32CubeMX, create a new project, enable the SWD (serial wire debug), enable the external HSE oscillator, and configure the RCC clock to 72MHz (for the blue pill).
Step #2
Configure 1x UART Port
Enable any UART module to be used as a serial communication with the PC using a USB-TTL converter. For me, I’ve enabled the UART1 module with default configurations.

Step #3
Configure The SPI Module To Be Used For SD Card Interfacing
Here, I’m using the SPI2 module but you can use any other SPI module available in your STM32 target microcontroller. Set the speed prescaler for at least 8 while testing this project for the first time. Gradually Increase the speed if you need later on if everything is working okay.

Add a GPIO Output Pin For The CS control line
In this project, I’m using the pin PB12 for the CS signal.
Step #4
Enable The FatFS Library
Edit the library configurations as shown below.

Once you’re done with CubeMX configurations, generate the project code and head over to STM32CubeIDE.
Step #5
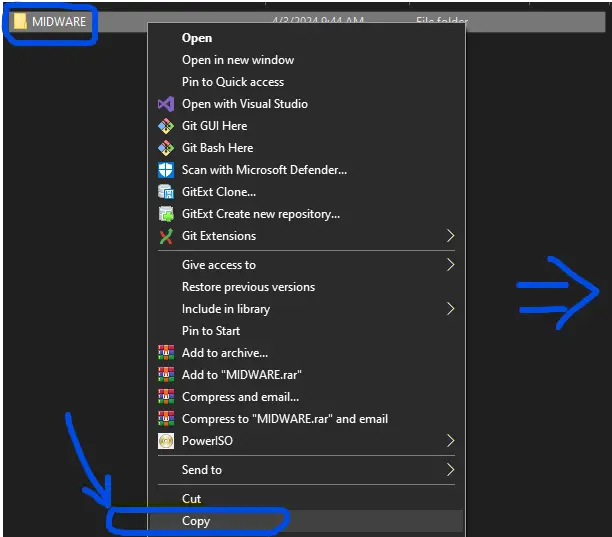
Copy & Paste The FATFS_SD Library Folder
Copy the provided library folder (MIDWARE/FATFS_SD) and open the STM32CubeIDE. In STM32CubeIDE, right-click the project name and paste the library folder.
 | 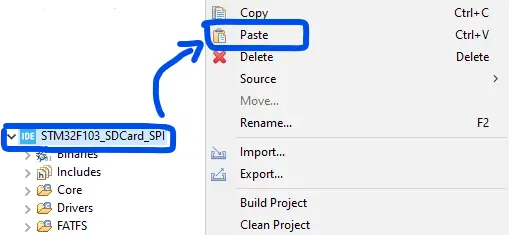 | So it’ll look like this at the end: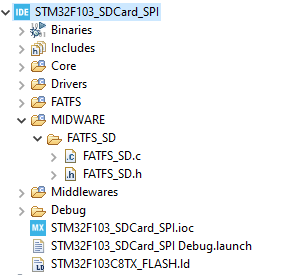 |
Step #6
Add The Library Directory To Paths & Symbols
The FATFS_SD library folder has been added to our project but it’s not yet considered as a source code directory, so it won’t be compiled and give you a linking error in the linking stage if you call any of its functions.
Right-click the project name and click Properties. And navigate to C/C++ paths and symbols, and source locations tab. In the source locations tab, click Add folder and add our library folder (MIDWARE).

Step #7
Configure The FATFS_SD Library Using The Header File
Open the FATFS_SD.h file and modify the configuration parameters to match your hardware settings.
Here are the default settings at the beginning of the FATFS_SD.h file.
|
1 2 3 4 5 6 7 |
//-----[ SD Card SPI Interface Cfgs ]----- extern SPI_HandleTypeDef hspi2; #define HSPI_SDCARD &hspi2 #define SD_CS_PORT GPIOB #define SD_CS_PIN GPIO_PIN_12 #define SPI_TIMEOUT 100 |
You can change the SPI2 module’s number if you’re using another SPI module. And the same goes for the CS GPIO/Pin.
Step #8
Edit The (stm32f1xx_it.c) File
The FATFS_SD driver requires some delays and timing management. The way it handles this task is by using the built-in SysTick Timer interrupt as well as a couple of counter variables.
Open the stm32f1xx_it.c file, or the equivalent file if you’re using another STM32 microcontroller series target. Paste in the following two global variables near the beginning of the file.
|
1 |
extern uint16_t Timer1, Timer2; |
Scroll down the file till you find the SysTick_Handler() function. Paste the following lines of code, so the function will finally look like the one shown below.
|
1 2 3 4 5 6 7 8 9 10 |
void SysTick_Handler(void) { /* USER CODE BEGIN SysTick_IRQn 0 */ if(Timer1 > 0) Timer1--; if(Timer2 > 0) Timer2--; /* USER CODE END SysTick_IRQn 0 */ HAL_IncTick(); } |
And that’s all about it. Let’s move to the next step.
Step #9
Edit The (user_diskio.c) File
Add the following #include line at the beginning of the file.
|
1 |
#include "../../MIDWARE/FATFS_SD/FATFS_SD.h" |
Edit the empty functions you’ll find in this file by adding the appropriate function call inside its implementation, and make it look like the shown below.
|
1 2 3 4 5 6 7 8 9 10 11 12 13 14 15 16 17 18 19 20 21 22 23 24 25 26 27 28 29 30 31 32 33 34 35 36 37 38 39 40 41 42 43 44 45 46 47 48 49 50 51 52 53 54 55 56 57 |
DSTATUS USER_initialize ( BYTE pdrv /* Physical drive nmuber to identify the drive */ ) { /* USER CODE BEGIN INIT */ return SD_disk_initialize(pdrv); /* USER CODE END INIT */ } DSTATUS USER_status ( BYTE pdrv /* Physical drive number to identify the drive */ ) { /* USER CODE BEGIN STATUS */ return SD_disk_status(pdrv); /* USER CODE END STATUS */ } DRESULT USER_read ( BYTE pdrv, /* Physical drive nmuber to identify the drive */ BYTE *buff, /* Data buffer to store read data */ DWORD sector, /* Sector address in LBA */ UINT count /* Number of sectors to read */ ) { /* USER CODE BEGIN READ */ return SD_disk_read(pdrv, buff, sector, count); /* USER CODE END READ */ } #if _USE_WRITE == 1 DRESULT USER_write ( BYTE pdrv, /* Physical drive nmuber to identify the drive */ const BYTE *buff, /* Data to be written */ DWORD sector, /* Sector address in LBA */ UINT count /* Number of sectors to write */ ) { /* USER CODE BEGIN WRITE */ /* USER CODE HERE */ return SD_disk_write(pdrv, buff, sector, count); /* USER CODE END WRITE */ } #endif /* _USE_WRITE == 1 */ #if _USE_IOCTL == 1 DRESULT USER_ioctl ( BYTE pdrv, /* Physical drive nmuber (0..) */ BYTE cmd, /* Control code */ void *buff /* Buffer to send/receive control data */ ) { /* USER CODE BEGIN IOCTL */ return SD_disk_ioctl(pdrv, cmd, buff); /* USER CODE END IOCTL */ } #endif /* _USE_IOCTL == 1 */ |
That’s all about this file. Now, let’s move to the last step!
Step #10
Copy The Project’s Code Below into Your Main.c File
Build The Project, Flash The Code To The STM32 Board, and Start Testing!
STM32 SD Card SPI & FatFS Example Code
The Application Code For This Example (main.c)
|
1 2 3 4 5 6 7 8 9 10 11 12 13 14 15 16 17 18 19 20 21 22 23 24 25 26 27 28 29 30 31 32 33 34 35 36 37 38 39 40 41 42 43 44 45 46 47 48 49 50 51 52 53 54 55 56 57 58 59 60 61 62 63 64 65 66 67 68 69 70 71 72 73 74 75 76 77 78 79 80 81 82 83 84 85 86 87 88 89 90 91 92 93 94 95 96 97 98 99 100 101 102 103 104 105 106 107 108 109 110 111 112 113 114 115 116 117 118 119 120 121 122 123 124 125 126 127 128 129 130 131 132 133 134 135 136 137 138 139 140 141 142 143 144 145 146 147 148 149 150 151 152 153 154 |
/* * LAB Name: STM32 SD Card SPI Interfacing Example * Author: Khaled Magdy * For More Info Visit: www.DeepBlueMbedded.com */ #include "main.h" #include "fatfs.h" #include <stdbool.h> #include <stdio.h> #include <string.h> SPI_HandleTypeDef hspi2; UART_HandleTypeDef huart1; char TxBuffer[250]; void SystemClock_Config(void); static void MX_GPIO_Init(void); static void MX_SPI2_Init(void); static void MX_USART1_UART_Init(void); static void SD_Card_Test(void); static void UART_Print(char* str) { HAL_UART_Transmit(&huart1, (uint8_t *) str, strlen(str), 100); } int main(void) { HAL_Init(); SystemClock_Config(); MX_GPIO_Init(); MX_SPI2_Init(); MX_USART1_UART_Init(); MX_FATFS_Init(); //Test The SD Card SD_Card_Test(); while(1) { // Nothing To Do Here! } } static void SD_Card_Test(void) { FATFS FatFs; FIL Fil; FRESULT FR_Status; FATFS *FS_Ptr; UINT RWC, WWC; // Read/Write Word Counter DWORD FreeClusters; uint32_t TotalSize, FreeSpace; char RW_Buffer[200]; do { //------------------[ Mount The SD Card ]-------------------- FR_Status = f_mount(&FatFs, "", 1); if (FR_Status != FR_OK) { sprintf(TxBuffer, "Error! While Mounting SD Card, Error Code: (%i)\r\n", FR_Status); UART_Print(TxBuffer); break; } sprintf(TxBuffer, "SD Card Mounted Successfully! \r\n\n"); UART_Print(TxBuffer); //------------------[ Get & Print The SD Card Size & Free Space ]-------------------- f_getfree("", &FreeClusters, &FS_Ptr); TotalSize = (uint32_t)((FS_Ptr->n_fatent - 2) * FS_Ptr->csize * 0.5); FreeSpace = (uint32_t)(FreeClusters * FS_Ptr->csize * 0.5); sprintf(TxBuffer, "Total SD Card Size: %lu Bytes\r\n", TotalSize); UART_Print(TxBuffer); sprintf(TxBuffer, "Free SD Card Space: %lu Bytes\r\n\n", FreeSpace); UART_Print(TxBuffer); //------------------[ Open A Text File For Write & Write Data ]-------------------- //Open the file FR_Status = f_open(&Fil, "TextFileWrite.txt", FA_WRITE | FA_READ | FA_CREATE_ALWAYS); if(FR_Status != FR_OK) { sprintf(TxBuffer, "Error! While Creating/Opening A New Text File, Error Code: (%i)\r\n", FR_Status); UART_Print(TxBuffer); break; } sprintf(TxBuffer, "Text File Created & Opened! Writing Data To The Text File..\r\n\n"); UART_Print(TxBuffer); // (1) Write Data To The Text File [ Using f_puts() Function ] f_puts("Hello! From STM32 To SD Card Over SPI, Using f_puts()\n", &Fil); // (2) Write Data To The Text File [ Using f_write() Function ] strcpy(RW_Buffer, "Hello! From STM32 To SD Card Over SPI, Using f_write()\r\n"); f_write(&Fil, RW_Buffer, strlen(RW_Buffer), &WWC); // Close The File f_close(&Fil); //------------------[ Open A Text File For Read & Read Its Data ]-------------------- // Open The File FR_Status = f_open(&Fil, "TextFileWrite.txt", FA_READ); if(FR_Status != FR_OK) { sprintf(TxBuffer, "Error! While Opening (TextFileWrite.txt) File For Read.. \r\n"); UART_Print(TxBuffer); break; } // (1) Read The Text File's Data [ Using f_gets() Function ] f_gets(RW_Buffer, sizeof(RW_Buffer), &Fil); sprintf(TxBuffer, "Data Read From (TextFileWrite.txt) Using f_gets():%s", RW_Buffer); UART_Print(TxBuffer); // (2) Read The Text File's Data [ Using f_read() Function ] f_read(&Fil, RW_Buffer, f_size(&Fil), &RWC); sprintf(TxBuffer, "Data Read From (TextFileWrite.txt) Using f_read():%s", RW_Buffer); UART_Print(TxBuffer); // Close The File f_close(&Fil); sprintf(TxBuffer, "File Closed! \r\n\n"); UART_Print(TxBuffer); //------------------[ Open An Existing Text File, Update Its Content, Read It Back ]-------------------- // (1) Open The Existing File For Write (Update) FR_Status = f_open(&Fil, "TextFileWrite.txt", FA_OPEN_EXISTING | FA_WRITE); FR_Status = f_lseek(&Fil, f_size(&Fil)); // Move The File Pointer To The EOF (End-Of-File) if(FR_Status != FR_OK) { sprintf(TxBuffer, "Error! While Opening (TextFileWrite.txt) File For Update.. \r\n"); UART_Print(TxBuffer); break; } // (2) Write New Line of Text Data To The File FR_Status = f_puts("This New Line Was Added During Update!\r\n", &Fil); f_close(&Fil); memset(RW_Buffer,'\0',sizeof(RW_Buffer)); // Clear The Buffer // (3) Read The Contents of The Text File After The Update FR_Status = f_open(&Fil, "TextFileWrite.txt", FA_READ); // Open The File For Read f_read(&Fil, RW_Buffer, f_size(&Fil), &RWC); sprintf(TxBuffer, "Data Read From (TextFileWrite.txt) After Update:%s", RW_Buffer); UART_Print(TxBuffer); f_close(&Fil); //------------------[ Delete The Text File ]-------------------- // Delete The File /* FR_Status = f_unlink(TextFileWrite.txt); if (FR_Status != FR_OK){ sprintf(TxBuffer, "Error! While Deleting The (TextFileWrite.txt) File.. \r\n"); UART_Print(TxBuffer); } */ } while(0); //------------------[ Test Complete! Unmount The SD Card ]-------------------- FR_Status = f_mount(NULL, "", 0); if (FR_Status != FR_OK) { sprintf(TxBuffer, "Error! While Un-mounting SD Card, Error Code: (%i)\r\n", FR_Status); UART_Print(TxBuffer); } else{ sprintf(TxBuffer, "SD Card Un-mounted Successfully! \r\n"); UART_Print(TxBuffer); } } |
Test Setup
This is my test setup for this example project. I’m using a 16GB SD card as well as a USB-TTL converter to send test result messages to the PC. The SD card module and USB-TTL converter are wired to the STM32 blue pill board according to the wiring diagram shown earlier near the beginning of this tutorial.

Testing Result
Here is the test result that’s printed on the serial monitor.

And this is the content of the SD card after running this example project as shown on my PC file manager.

STM32 SD Card SPI Troubleshooting
1. Use an External Power Source like a power bank or a battery because this project needs a bit more current than what can be delivered using the debugger’s USB and this may be the reason why your SD Card is failing to mount successfully.
2. Start With a Low SPI Speed like 2.25MB for example and see if it works well, you can then increase the speed gradually until it reaches the fundamental limitation of your hardware setup. The High starting speed of SPI can be the reason why the STM32 microcontroller is failing to properly communicate with the SD card.
3. Try Different SD Cards Before Attempting Major Code Changes because some SD cards just do not support communication over SPI at all. And maybe this is the reason why your SD Card is failing to mount successfully and it will never, TBH. Therefore, you need to try a different card before attempting to change your code in the hope that it’ll fix the issue.
4. Make Sure You Didn’t Forget Anything About Steps: (#8 & #9) while following along the implementation steps of the provided example project. The easiest way to know that your problem is related to the user_diskio.c file is by probing the CS pin or any SPI line. If you see nothing, then you’ve missed step #9 of the implementation guide.
Required Parts For STM32 Examples
All the example Code/LABs/Projects in this STM32 Series of Tutorials are done using the Dev boards & Electronic Parts Below:
| QTY. | Component Name | Amazon.com | AliExpress | eBay |
| 1 | SD Card Module | Amazon | AliExpress | eBay |
| 1 | SD Card Reader (For PC) | Amazon | AliExpress | eBay |
| 1 | SD Card 8GB | Amazon | AliExpress | eBay |
| 1 | STM32-F103 BluePill Board (ARM Cortex-M3 @ 72MHz) | Amazon | AliExpress | eBay |
| 1 | Nucleo-L432KC (ARM Cortex-M4 @ 80MHz) | Amazon | AliExpress | eBay |
| 1 | ST-Link V2 Debugger | Amazon | AliExpress | eBay |
| 2 | BreadBoard | Amazon | AliExpress | eBay |
| 1 | LEDs Kit | Amazon & Amazon | AliExpress | eBay |
| 1 | Resistors Kit | Amazon & Amazon | AliExpress | eBay |
| 1 | Capacitors Kit | Amazon & Amazon | AliExpress & AliExpress | eBay & eBay |
| 1 | Jumper Wires Pack | Amazon & Amazon | AliExpress & AliExpress | eBay & eBay |
| 1 | Push Buttons | Amazon & Amazon | AliExpress | eBay |
| 1 | Potentiometers | Amazon | AliExpress | eBay |
| 1 | Micro USB Cable | Amazon | AliExpress | eBay |
★ Check The Links Below For The Full Course Kit List & LAB Test Equipment Required For Debugging ★
Download Attachments
You can download all attachment files for this Article/Tutorial (project files, schematics, code, etc..) using the link below. Please consider supporting our work through the various support options listed in the link down below. Every small donation helps to keep this website up and running and ultimately supports the whole community.
Wrap Up
In conclusion, we’ve discussed how to interface STM32 microcontrollers with SD Card memory over the SPI bus using the FatFS library as well as the FATFS_SD. The provided example project should be a very good starting point for your next STM32 SPI SD Card interfacing project. Make sure to carefully follow the implementation guide step-by-step to get it to work as expected.
You can also explore the other parts of the STM32 SD Card tutorials series for more information about the other STM32 SD Card interfacing options.
![STM32 SD Card SPI & FatFS [Tutorial + Examples]](https://deepbluembedded.com/wp-content/uploads/2024/04/STM32-SD-Card-SPI-FatFS-Tutorial-Examples.jpg "STM32 SD Card SPI & FatFS [Tutorial + Examples]")
![STM32 SDIO SD Card Example With FatFS [Interfacing Tutorial]](https://deepbluembedded.com/wp-content/uploads/2024/04/STM32-SDIO-SD-Card-Example-With-FatFS-Interfacing-Tutorial.jpg "STM32 SDIO SD Card Example With FatFS [Interfacing Tutorial]")


Very helpful, thanks!
I will highly recommend everyone to obtain more sd cards for testing. I owned two old ones and they kinda work, but it was painfull. There was need to insert few us delays between reading/transmitting. Getting newer one and use SDIO instead on black pill (F401/F411) seems more stable to me.
Also worth mentioning, cluster size of SD card needs to be equal or less than 4096. If you have card that has more than 8gb it will not allow you to set clusters less than 8k, you can fool it by creating partition on SD card which will be equal to 8GB and set it to 4096, it will work than with higher capacity cards. Windows disk manager does a job well.
Extremely helpful! Copilot wasn’t able to help me sufficiently, but this well-documented example made it work. Thanks!
Will this configuration be same for STM32H753ZI?