| Previous Tutorial | Tutorial 33 | Next Tutorial | |||||
| Map Function, Constrain, FIR Filters, And Other Math Functions | |||||||
| STM32 Course Home Page ???? | |||||||

In this article, we’ll discuss some math functions like map function, constrain, digital filtering, and how to implement them in Embedded-C. We’ll be using these functions in the upcoming tutorials and you’ll find them in the math directory in the STM32 course repo. So I’ve decided to briefly mention each of them at least the ones we’ll be using in the near future. And let’s dive right in!
Map Function & Implementation In C
Let’s start with the map function which we quite often use in different embedded systems applications. The map function is commonly used as a built-in Arduino C function and it’s very handy in a wide range of applications. Mathematically, the mapping function is to find the corresponding value from a certain domain to another domain. Here is an example of this.
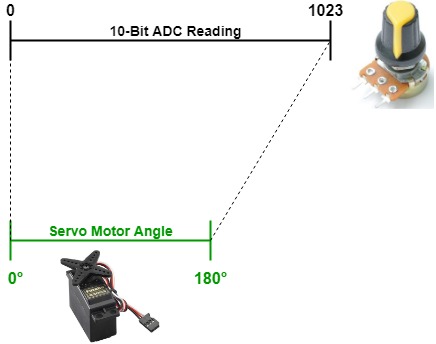
We can use a potentiometer with an ADC to read the analog voltage and if the ADC is 10-Bit in resolution then its digital output is going to be in this range (domain) [0 up to 1023]. If we’re willing to use this value as a control signal to position a servo motor whose angle has a range (domain) of [0° up to 180°], then we need to do a mapping from the first domain to the second one. As you can see in the diagram below.

The map function does this conversion ting from the ADC result to the servo motor angle. The function will simply figure out the conversion ratio from domain1 to domain2, does the arithmetic, and return the result.
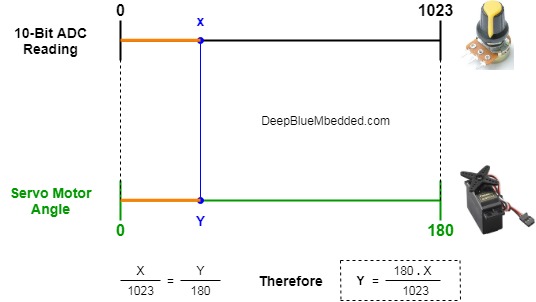
I personally used to do this manually back in the days in process control exams. The procedure was as follows: first of all, I’ll draw both domains and their ranges on top of each other like in the diagram below. The first one (from 0 up to 1023) and the second one (from 0 up to 180). Then, I take an arbitrarily chosen point (x) which represents the ADC reading at any time instance. And define the goal to be finding out the corresponding point (y) in the other domain that maps to the x point.
With keeping in mind the fact that the length of the (orange) bars are equal and the ratio between each one of them to its full domain range is also equal. Therefore, x/1023 = y/180. Which results in the following equation which we also call the (map function) or equation y=(x.180)/1023

Here is an implementation for the map function in C language which we’ll add to our MATH.c source code in the MATH directory. You’ll find it also in the course’s repo on GitHub.
|
1 2 3 4 |
uint32_t MAP(uint32_t au32_IN, uint32_t au32_INmin, uint32_t au32_INmax, uint32_t au32_OUTmin, uint32_t au32_OUTmax) { return ((((au32_IN - au32_INmin)*(au32_OUTmax - au32_OUTmin))/(au32_INmax - au32_INmin)) + au32_OUTmin); } |
We’ll implement this example at the end of this article as well. To give you an example application code for how to include and use the MATH functions that we’ll be implementing today.
Constrain Function
The constrain function is a very simple logical operation. We typically perform this function on sensors’ readings when want to hard-limit or cap the readings of a specific sensor and also define a minimum output value to be accepted by the system.
Using this function guarantees that any digital controller or calculations performing mathematical operations on a specific sensor’s reading would not go wrong. As it’s guaranteed to fall in the specified range by using this function.
Here is a very simple implementation for this function in C language.
|
1 2 3 4 5 6 7 8 9 10 11 12 13 14 15 |
uint32_t Constrain(uint32_t au32_IN, uint32_t au32_MIN, uint32_t au32_MAX) { if(au32_IN < au32_MIN) { return au32_MIN; } else if (au32_IN > au32_MAX) { return au32_MAX; } else { return au32_IN; } } |
Min & Max Functions
The min & max functions are commonly used in different applications. And the task required by each of them is very basic and simple. It’s a searching routine that goes through an array of values to find the maximum or minimum and return it back.
Sometimes you may have a system that records some variables or sensors’ readings and would like to find the maximum or minimum peaks or drops. Or maybe use this information to know if your data needs some sort of digital filtering or not. In case of high spikes in the readings recorded.
Here is an implementation in C for both functions.
|
1 2 3 4 5 6 7 8 9 10 11 12 13 14 15 16 17 18 19 20 21 22 23 24 25 26 27 28 29 |
MATH_DataType MIN(MATH_DataType* IN_Arr, uint32_t au32_LEN) { uint32_t i = 0; MATH_DataType MIN = 0; for(i=0; i<au32_LEN; i++) { if(IN_Arr[i] < MIN) { MIN = IN_Arr[i]; } } return MIN; } MATH_DataType MAX(MATH_DataType* IN_Arr, uint32_t au32_LEN) { uint32_t i = 0; MATH_DataType MAX = 0; for(i=0; i<au32_LEN; i++) { if(IN_Arr[i] > MAX) { MAX = IN_Arr[i]; } } return MAX; } |
Note that the data type being used here is defined so that the user (the programmer) can adjust it if the variable being monitored is a floating-point number of signed values that can go negative. In case of having negative numbers, you have to be careful in the MIN function as defining the min value at the beginning with 0 may not converge to the right result.
|
1 |
typedef uint32_t MATH_DataType; |
Moving Average FIR Digital Filter
I’ll discuss this topic in detail in the next tutorial and show you how to create a simple yet effective digital filter in order to eliminate the push-button bouncing issue. A moving average filter is a very simple special case of the general Finite Impulse Response (FIR) digital filters.
Simple, you’ll save the most recent N values of a sensor’s reading. And constantly add a new reading, remove the oldest one, and calculate the average by summing all readings in the array and divide by N. Now you have got the average value and it’ll be way smoother than the original sensor’s reading.
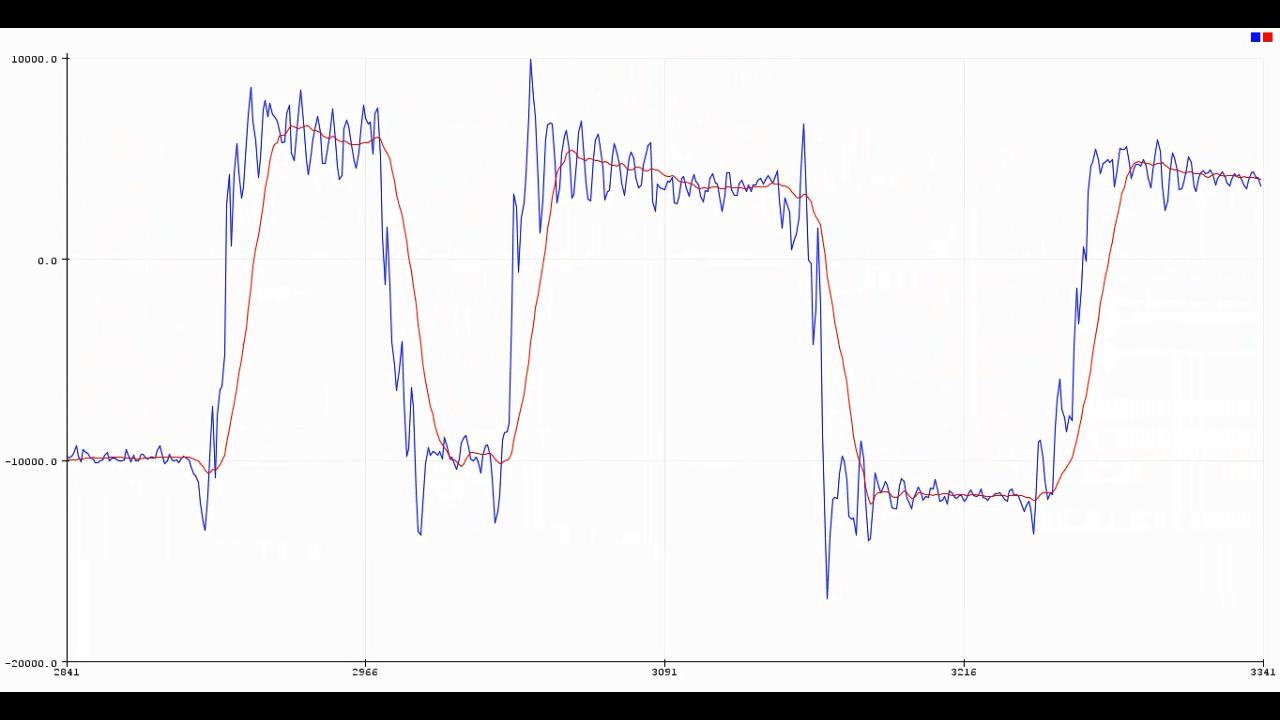
For example, the IMU (gyro + accelerometer) module MPU6050 which we’ve discussed in detail in a previous tutorial. This sensor’s output is very noisy in nature every when you fix the sensor in place with no motion at all. Here is an example for the output data (the raw data from the sensor) and the same data points but after applying this simple moving average filter (with an order of 20).
Raw Data From The Accelerometer Sensor (in Blue)
Filtered Sensor Data with AVG Filter order 20 (in Red)

Map Function Example Application – LAB
In this LAB, we’ll be using the MAP function with the ADC readings from a potentiometer (12-Bit ADC). To control a servo motor’s angle (0 to 180). This example was exactly performed in a previous tutorial (Servo Motor Control) but without having the map function implemented in code. So here is an example application for it.
The Application Code For This LAB (main.c)
|
1 2 3 4 5 6 7 8 9 10 11 12 13 14 15 16 17 18 19 20 21 22 23 24 25 26 27 28 29 30 31 32 33 34 35 36 37 38 |
#include "main.h" #include "../MATH/MATH.h" #include "../ECUAL/SERVO/SERVO.h" #define SERVO_Motor1 0 ADC_HandleTypeDef hadc1; void SystemClock_Config(void); static void MX_GPIO_Init(void); static void MX_ADC1_Init(void); int main(void) { uint16_t AD_RES = 0; uint16_t Angle = 0; HAL_Init(); SystemClock_Config(); MX_GPIO_Init(); MX_ADC1_Init(); SERVO_Init(SERVO_Motor1); while (1) { // Start ADC Conversion HAL_ADC_Start(&hadc1); // Poll ADC1 Perihperal & TimeOut = 1mSec HAL_ADC_PollForConversion(&hadc1, 1); // Read The ADC Conversion Result & Map Servo Motor Angle AD_RES = HAL_ADC_GetValue(&hadc1); // Map The ADC Result To Servo Pulse Width Angle = MAP(AD_RES, 0, 4096, 0, 180); // Move The Servo Motor To The Angle SERVO_MoveTo(SERVO_Motor1, Angle); HAL_Delay(1); } } |
We give the function the input (AD_RES) from the ADC reading that is 12-Bit in resolution so its range is from 0 up to 4096. And the target range from 0 up to 180. And that’s it! the map function will calculate and return the result as Angle and we’ll send it to the Servo_MoveTo function.
Here is the result for this LAB
The same as the previous servo motor LAB that I highly recommend checking it out if you didn’t yet (servo motor control tutorial – LAB27).
Download This LAB Project Folder
Did you find this helpful? If yes, please consider supporting this work and sharing these tutorials!
Stay tuned for the upcoming tutorials and don’t forget to SHARE these tutorials. And consider SUPPORTING this work to keep publishing free content just like this!
| Previous Tutorial | Tutorial 33 | Next Tutorial | |||||
