This is a comprehensive guide for STM32 EEPROM Flash Emulation (FEE). You’ll learn how to use the internal STM32 Flash NVM (Non-Volatile Memory) as EEPROM To Write/Read Variables Permanently. We’ll create some example projects to practice what we’ll be learning in this tutorial.
We’ll start by explaining how the STM32 Flash works, the HAL Flash APIs, and how to read, write, and erase flash pages. The FEE Library provided in this tutorial will make your work with the STM32 NVM a lot easier. Without further ado, let’s get right into it!
Table of Contents
- STM32 EEPROM
- STM32 FEE (Flash EEPROM Emulation)
- STM32 EEPROM FEE Library (Driver)
- STM32 EEPROM (FEE) Library Integration
- STM32 Read/Write into Flash EEPROM (FEE) Examples
- Wrap Up
STM32 EEPROM
STM32 microcontrollers don’t have internal EEPROM memory, unlike smaller old Microchip/AVR microcontrollers that used to have an internal NVM EEPROM memory that we could easily use without needing to add an external NVM/EEPROM unless larger space is needed by the application.
However, we can still use the STM32’s internal FLASH program memory space as an NVM to permanently store some variables & data. This is also known as FEE (Flash EEPROM Emulation). And that’s what we’re going to implement in this tutorial.
X-CUBE-EEPROM Extension
The STM32 X-CUBE-EEPROM is an extension for STM32CubeMX software that adds a lightweight software implementation for EEPROM Emulation. This library organizes flash memory into 2-kilobyte pages, each is further divided into multiple 32-bit blocks. Data is stored in these blocks, each is addressed by a unique address.
When new data is written, the library stores it on the first available flash memory page. Once this page is full, a garbage collection operation is triggered. This operation moves valid data to a second page, making space in the first page for new data. The process involves copying valid data from the first page to the second page and compacting it to reduce free space. After all valid data is transferred, the first page is erased and ready for reuse.
This of course involves a lot of page erase operations that shorten the lifespan of the flash memory which has limited write/erase cycles (endurance) compared to standalone external EEPROM memory chips. Users can, however, set the maximum number of write operations before a garbage collection operation is triggered, giving them control over erase operations.
Below are the STM32 microcontrollers series supported by the X-CUBE-EEPROM library.

STM32 FEE vs External EEPROM
Here is a quick comparison between an external EEPROM (like the I2C 24Cxx chips) and the STM32 FEE (flash EEPROM emulation). This will help you decide whether you should go for an external EEPROM in your project or you can just use an FEE library to have it done without adding any external components to the system.
| External I2C EEPROM (like 24Cxx) | FEE (STM32 Internal Flash) | |
| Memory Access | Byte | Page |
| Memory Size | Fixed (From 1kB up to 2048kB) | Flexible (Can use as much as available from the flash program memory) |
| Read Access | Serial: a hundred µs Random word: 92 µs Page: 22.5 µs per byte | Parallel: the access time is from 6 µs to 592 µs |
| Write Time | Random byte Write in 4ms Word program time = 16ms Page (32 bytes) Write 4ms Consecutive Words program time = 500µs | Word program time: from 90 µs to 838 ms |
| Erase Time | NA | 2Kbytes page-erase time: 22ms |
| Memory Endurance (Write/Erase Cycles) | 4 million cycles at 25°C 1.2 million cycles at 85°C 600 kilocycles at 125°C | 10 kcycles per page @ 105°C. Using multiple on-chip Flash memory pages is equivalent to increasing the number of write cycles |
| Memory Data Retnetion | 50 years at 125°C 100 years at 25°C | 7 years @ 125°C 15 years @ 105°C 30 years @ 85°C |
You need to be very careful when writing to the internal flash memory as it can reduce the lifespan of the entire chip. Try not to write frequently using loops or whatever. Only perform the write operation when needed for storing important data that doesn’t require frequency updates. Things like user configurations, passwords, and device address storage are common use cases for NVM memory.
STM32 FEE (Flash EEPROM Emulation)
In this section, I’ll introduce you to the FEE library that I’ve put together for the sake of demonstrating the topic in this tutorial. It’s more of a wrapper layer on top of the STM32’s HAL FLASH driver to handle the page read/modify/erase/write operations.
As you might have noticed in the previous section, not every STM32 series is supported by the X-CUBE-EEPROM, hence I’ve decided to use the STM32 HAL Flash driver to implement this simple FEE driver.
Disclaimer: this driver is a very basic implementation that is intended to be used in simple applications only. You can’t depend on this for serious work as it doesn’t have any sort of error checking & correction, no interrupt-based operations, no garbage collection, memory wear leveling, or anything fancy. Just the basic Read/Write operations are handled.
STM32 HAL FLASH APIs
For STM32 Flash operations, we’ll use the HAL FLASH APIs that can be categorized as follows:
- Lock and Unlock the FLASH interface
- Flash Erase Functions: Erase page, erase all pages
- Flash Program Functions: half-word, word, and double-word
STM32 HAL FLASH Write
The HAL_FLASH_Program() is used to write to the flash memory.
HAL_StatusTypeDef HAL_FLASH_Program(uint32_t TypeProgram, uint32_t Address, uint64_t Data);
The function HAL_FLASH_Unlock() should be called before to unlock the FLASH interface The function HAL_FLASH_Lock() should be called after to lock the FLASH interface. If an erase and a program operations are requested simultaneously, the erase operation is performed before the program one.
FLASH must be previously erased before any new programmation is possible (the only exception to this is when 0x0000 is programmed).
STM32 HAL FLASH Page Erase
The HAL_FLASHEx_Erase() function is used to mass erase the entire flash memory pages or a specific memory page.
HAL_StatusTypeDef HAL_FLASHEx_Erase (FLASH_EraseInitTypeDef * pEraseInit, uint32_t * PageError);
As stated earlier, the only way to write to a FLASH memory location is to have it erased in the first place, otherwise, any write attempt will fail.
STM32 EEPROM FEE Library (Driver)
Let’s now move on to the FEE driver that we’ll be using in the tutorial examples.
In the next section, we’ll discuss how to integrate this STM32 FEE (Flash EEPROM Emulation) library into your STM32 CubeIDE projects step-by-step.
STM32 FEE Directory & Files
The STM32 FEE library is part of the MIDWARE (middleware software layer). The driver consists of 2 core files: (a header file & a source file).
- FEE.h
- FEE.c

STM32 FEE Library APIs (Functions)
The core header file ( FEE.h) has all functions’ declarations (APIs) that we’ll be using in our application layer.
FEE.h File
#define FEE_START_ADDRESS	((uint32_t)0x0800F000)  // FEE Start Address (in Flash Memory)
#define FEE_PAGE_SIZE		((uint32_t)0x400)       // FEE Page Size = 1kB (Default Page Size For STM32F103)
#define FEE_BUFFER_LEN		(FEE_PAGE_SIZE / 2U)

//-----[ Prototypes For All User External Functions ]-----

HAL_StatusTypeDef FEE_Write(uint32_t address, uint16_t *data, uint32_t dataSize);
void FEE_Read(uint32_t address, uint16_t *data, uint32_t dataSize);

// Generic APIs For Any Data Type
void FEE_WriteData(uint32_t address, void *data, size_t dataSize);
void FEE_ReadData(uint32_t address, void *data, size_t dataSize);
FEE.c File
// Too long to paste here, but it has the definition of all API functions declared in the header file
// + any internal supplementary static functions
Download The MIDWARE/ FEE Driver Folder
STM32 EEPROM (FEE) Library Integration
In this section, we’ll discuss integrating the STM32 FEE library into your projects step-by-step. Assuming you’ve downloaded the provided library files from the links in this tutorial or from the GitHub Repo for this STM32 Tutorials Series, here is how you can use it in action.
The steps below apply to any other driver (library) in the ECUAL software components directory that we’ve been developing through this STM32 Series of Tutorials.
Step #1
Configure The Required Hardware Peripherals in STM32CubeMX
The first step is to head over to STM32CubeMX, create a new project, and configure the hardware needed for the library.
FEE Library HW Requirements
- Nothing!
No specific hardware configurations are required in CubeMX, however, you can add a USB CDC (virtual COM port) or UART for serial data printing so we can test the FEE driver more easily.
I’ve enabled the USB CDC for the test demo project attached in this tutorial’s download section. You can also use USB or alternatively use a UART module with a USB-TTL converter chip.
Add any other peripherals you need in your project and configure the RCC clock however you want. There is no conflict between the FEE library and any other hardware configurations you may do in CubeMX.
Once you’re done with CubeMX configurations, generate the project code and head over to STM32CubeIDE.
Step #2
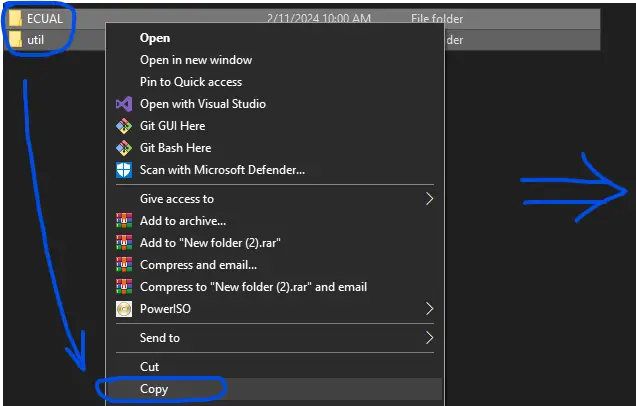
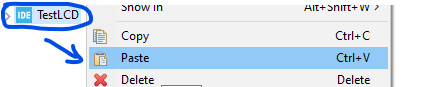
Copy & Paste The Library Folders
Copy the provided library folders (MIDWARE/FEE) and open the STM32CubeIDE.
In STM32CubeIDE, right-click the project name and paste the library folders. (The images show how to copy a driver folder, it’s for LCD16X2 but the same goes for MIDWARE/FEE folder as well).
 |  | So it’ll look like this at the end: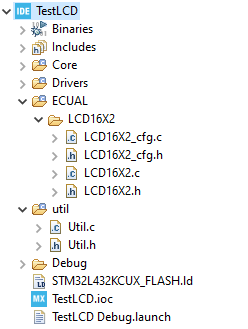 |
Step #3
Add The Library Directories To Paths & Symbols
The library folders have been added to our project but it’s not yet considered as a source code directory, so it won’t be compiled and give you a linking error in the linking stage if you call any of its functions.
Right-click the project name and click Properties. And navigate to C/C++ paths and symbols, and source locations tab. In the source locations tab, click Add folder and add our library folder (MIDWARE). The image below shows how to add the (ECUAL/16X2 + util folders but the same goes for the MIDWARE/FEE folder as well).

Step #4
Configure The FEE Library Using The Header File
Open the FEE.h file and modify the configuration parameters to match your needs.
For the STM32F103C8T6 device, it’s a 64kB flash device with an application code taking up to 50% of the memory (due to using USB CDC software stack). That’s why I’ve set the FEE_START_ADDRESS near the end of the flash memory space to stay away from my application code & memory sections.
#define FEE_START_ADDRESS ((uint32_t)0x0800F000) // FEE Start Address (in Flash Memory)
After a successful building for your project, you can check the Build Analyzer to see the memory sections of the target application as allocated by the auto-generated linker script in your STM32CubeIDE project.
Memory Regions: Show you the start, end address, and total size for the Flash memory as well as the RAM. And also the percentage of memory utilization by your application.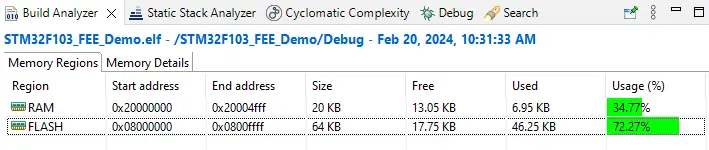 | Memory Details: Show you the memory layout for all sections of your application after being allocated to the target’s physical memory addresses.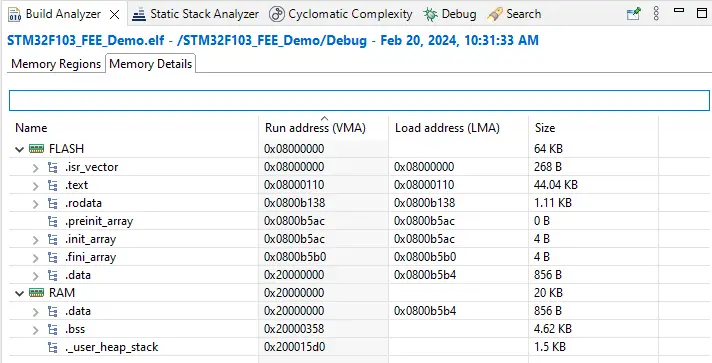 |
Step #5
Include The Library Header File & Use it!
Now you’re ready to use the STM32 FEE library, just include the header file as shown in the test code example in the following section.
STM32 Read/Write into Flash EEPROM (FEE) Examples
In this example project, our goal is to test the functionalities provided by the FEE library and use it to write and read various data types to/from the flash memory.
Please, follow The step-by-step Library Integration Guide shown earlier to create the project and add the FEE library folder. Copy the example application code below, build the project, and flash it to your STM32 blue pill board.
STM32 Read/Write Int32 into Flash EEPROM (FEE) Example Code
The Application Code For This Example (main.c) – Signed Int32
/*
 * LAB Name: STM32F103 FEE Demo
 * Author: Khaled Magdy
 * For More Info Visit: www.DeepBlueMbedded.com
*/
#include "main.h"
#include "usb_device.h"
#include "usbd_cdc_if.h"
#include "stdio.h"
#include "../../MIDWARE/FEE/FEE.h"

char buffer[60];
int32_t LongInteger_W = 123456789, LongInteger_R;

void SystemClock_Config(void);
static void MX_GPIO_Init(void);

int main(void)
{
  HAL_Init();
  SystemClock_Config();
  MX_GPIO_Init();
  MX_USB_DEVICE_Init();

  FEE_WriteData(FEE_START_ADDRESS, &LongInteger_W, sizeof(int32_t));
  FEE_ReadData(FEE_START_ADDRESS, &LongInteger_R, sizeof(int32_t));

  while (1)
  {
	  sprintf(buffer, "Read = %ld\r\n", LongInteger_R);
	  CDC_Transmit_FS((uint8_t *)buffer, strlen(buffer));
	  HAL_Delay(500);
  }
}
Testing Result

STM32 Read/Write Float into Flash EEPROM (FEE) Example Code
The Application Code For This Example (main.c) – Float
/*
 * LAB Name: STM32F103 FEE Demo
 * Author: Khaled Magdy
 * For More Info Visit: www.DeepBlueMbedded.com
*/
#include "main.h"
#include "usb_device.h"
#include "usbd_cdc_if.h"
#include "stdio.h"
#include "../../MIDWARE/FEE/FEE.h"

char buffer[60];
float pi_w = 3.141592, pi_r;

void SystemClock_Config(void);
static void MX_GPIO_Init(void);

int main(void)
{
  HAL_Init();
  SystemClock_Config();
  MX_GPIO_Init();
  MX_USB_DEVICE_Init();

  FEE_WriteData(FEE_START_ADDRESS, &pi_w, sizeof(float));
  FEE_ReadData(FEE_START_ADDRESS, &pi_r, sizeof(float));

  while (1)
  {
	  sprintf(buffer, "Pi_Read = %f\r\n", pi_r);
	  CDC_Transmit_FS((uint8_t *)buffer, strlen(buffer));
	  HAL_Delay(500);
  }
}
Testing Result
 Float Variable Read-Write Example")
STM32 Read/Write Float Array into Flash EEPROM (FEE) Example Code
The Application Code For This Example (main.c) – Float Array
/*
 * LAB Name: STM32F103 FEE Demo
 * Author: Khaled Magdy
 * For More Info Visit: www.DeepBlueMbedded.com
*/
#include "main.h"
#include "usb_device.h"
#include "usbd_cdc_if.h"
#include "stdio.h"
#include "../../MIDWARE/FEE/FEE.h"

float FloatArr_W[4] = {1.2345, 2.3456, 3.4567, 4.5678};
float FloatArr_R[4];
char buffer[60];

void SystemClock_Config(void);
static void MX_GPIO_Init(void);

int main(void)
{
  HAL_Init();
  SystemClock_Config();
  MX_GPIO_Init();
  MX_USB_DEVICE_Init();

  FEE_Write(FEE_START_ADDRESS, (uint16_t*)FloatArr_W, sizeof(float)*4);
  FEE_Read(FEE_START_ADDRESS, (uint16_t*)FloatArr_R, sizeof(float)*4);

  while (1)
  {
	  sprintf(buffer, "Read= %f, %f, %f, %f\r\n", FloatArr_R[0], FloatArr_R[1], FloatArr_R[2], FloatArr_R[3]);
	  CDC_Transmit_FS((uint8_t *)buffer, strlen(buffer));
	  HAL_Delay(500);
  }
}
Testing Result
 Float Array Example Read-Write")
STM32 Read/Write String into Flash EEPROM (FEE) Example Code
The Application Code For This Example (main.c) – String
/*
 * LAB Name: STM32F103 FEE Demo
 * Author: Khaled Magdy
 * For More Info Visit: www.DeepBlueMbedded.com
*/
#include "main.h"
#include "usb_device.h"
#include "usbd_cdc_if.h"
#include "stdio.h"
#include "../../MIDWARE/FEE/FEE.h"

char PassWord_W[9] = {"ABC123xyz"};
char PassWord_R[9];
char buffer[60];

void SystemClock_Config(void);
static void MX_GPIO_Init(void);

int main(void)
{
  HAL_Init();
  SystemClock_Config();
  MX_GPIO_Init();
  MX_USB_DEVICE_Init();

  FEE_Write(FEE_START_ADDRESS, (uint16_t*)PassWord_W, sizeof(char)*9);
  FEE_Read(FEE_START_ADDRESS, (uint16_t*)PassWord_R, sizeof(char)*9);

  while (1)
  {
	  sprintf(buffer, "Read= %s\r\n", PassWord_R);
	  CDC_Transmit_FS((uint8_t *)buffer, strlen(buffer));
	  HAL_Delay(500);
  }
}
Testing Result
 String Example Read-Write")
STM32 Read/Write MAC Address (Struct) into Flash (FEE) Example Code
The Application Code For This Example (main.c) – MAC Address Struct (Custom Data Type)
/*
 * LAB Name: STM32F103 FEE Demo
 * Author: Khaled Magdy
 * For More Info Visit: www.DeepBlueMbedded.com
*/
#include "main.h"
#include "usb_device.h"
#include "usbd_cdc_if.h"
#include "stdio.h"
#include "../../MIDWARE/FEE/FEE.h"

typedef struct {
    uint16_t octet[6];
} MACAddress;

MACAddress macAddress_W = {{0xA1, 0xB2, 0xC3, 0xD4, 0xE5, 0xF6}};
MACAddress macAddress_R;
char buffer[60];

void SystemClock_Config(void);
static void MX_GPIO_Init(void);
void printMACAddress(MACAddress addr);

int main(void)
{
  HAL_Init();
  SystemClock_Config();
  MX_GPIO_Init();
  MX_USB_DEVICE_Init();
  // Write MAC Address From macAddress_W To EEPROM
  FEE_Write(FEE_START_ADDRESS, macAddress_W.octet, sizeof(macAddress_W));
  // Read MAC Address From EEPROM into macAddress_R
  FEE_Read(FEE_START_ADDRESS, macAddress_R.octet, sizeof(macAddress_R));

  while (1)
  {
	  // Print MAC Address After Read Completion
	  printMACAddress(macAddress_R);
	  HAL_Delay(500);
  }
}

void printMACAddress(MACAddress addr) {
    sprintf(buffer, "MAC Address: %02X:%02X:%02X:%02X:%02X:%02X\r\n", addr.octet[0], addr.octet[1], addr.octet[2], addr.octet[3], addr.octet[4], addr.octet[5]);
    CDC_Transmit_FS((uint8_t *)buffer, strlen(buffer));
}
Testing Result
 MAC Address Custom Data Type Read-Write Example")
Required Parts For STM32 Examples
All the example Code/LABs/Projects in this STM32 Series of Tutorials are done using the Dev boards & Electronic Parts Below:
| QTY. | Component Name | Amazon.com | AliExpress | eBay |
| 1 | STM32-F103 BluePill Board (ARM Cortex-M3 @ 72MHz) | Amazon | AliExpress | eBay |
| 1 | Nucleo-L432KC (ARM Cortex-M4 @ 80MHz) | Amazon | AliExpress | eBay |
| 1 | ST-Link V2 Debugger | Amazon | AliExpress | eBay |
| 2 | BreadBoard | Amazon | AliExpress | eBay |
| 1 | LEDs Kit | Amazon & Amazon | AliExpress | eBay |
| 1 | Resistors Kit | Amazon & Amazon | AliExpress | eBay |
| 1 | Capacitors Kit | Amazon & Amazon | AliExpress & AliExpress | eBay & eBay |
| 1 | Jumper Wires Pack | Amazon & Amazon | AliExpress & AliExpress | eBay & eBay |
| 1 | Push Buttons | Amazon & Amazon | AliExpress | eBay |
| 1 | Potentiometers | Amazon | AliExpress | eBay |
| 1 | Micro USB Cable | Amazon | AliExpress | eBay |
★ Check The Links Below For The Full Course Kit List & LAB Test Equipment Required For Debugging ★
Download Attachments
You can download all attachment files for this Article/Tutorial (project files, schematics, code, etc..) using the link below. Please consider supporting our work through the various support options listed in the link down below. Every small donation helps to keep this website up and running and ultimately supports the whole community.
Wrap Up
In conclusion, we’ve discussed how the STM32 FEE (Flash EEPROM Emulation) library works and how to integrate it into your projects and use it to permanently save various data types & variables into the flash memory. You may consider using an external EEPROM memory for more serious applications as it has a much better endurance (write/erase cycles) and can be easily replaced when completely damaged, unlike the internal STM32’s flash.
You can check the following application notes for Flash EEPROM Emulation on different series of STM32 microcontrollers:
- STM32F0 series: EEPROM emulation in STM32F0xx microcontrollers (AN4061)
- STM32F1 series: EEPROM emulation in STM32F10x microcontrollers (AN2594)
- STM32F2 series: EEPROM emulation in STM32F2xx microcontrollers (AN3390)
- STM32F3 series: EEPROM emulation in STM32F30x/STM32F31x STM32F37x/STM32F38x microcontrollers (AN4056)
- STM32F4 series: EEPROM emulation in STM32F40x/STM32F41x microcontrollers (AN3969)
There is so much good information in those application notes, specifically the AN4894. The STM32F1 app note (AN2594) however wasn’t very useful in my case as the code provided didn’t help me by any means and it hasn’t been updated for more than 15 years at least. If your STM32 target microcontroller is supported by the X-CUBE-EEPROM, you should also check out its documentation for more details about using it. The library has so many good features that will save you a ton of time & effort.
If you’re just getting started with STM32, you need to check out the STM32 Getting Started Tutorial here.
Follow this STM32 Series of Tutorials to learn more about STM32 Microcontrollers Programming.
Hi,Khaled Magdy
can you send me your FEE project to my email liuxinyuande@hotmail.com
I’m in Japan, but I can not download your project by goole . can you send me by my email, that will be thank your a lot. my email address is
liuxinyuande@hotmail.com