In this tutorial, we’ll explore How To use the STM32 USB CDC Virtual COM Port (VCP) to transmit & receive data from a PC without using the STM32 UART module. The examples provided in this tutorial will help you set up the STM32 USB CDC device properly and use it to send data to a PC, receive data of unknown length, and route the STM32 USB CDC to Printf() function to use it for printing data over USB.
Table of Contents
- STM32 USB CDC & VCP
- STM32 USB Virtual COM Port Example
- STM32 USB CDC Transmit Example
- STM32 USB CDC Read Example
- STM32 USB CDC Printf() Example
- STM32 USB CDC Troubleshooting
- Wrap Up
STM32 USB CDC & VCP
USB CDC (Communication Device Class) is a protocol specification for USB communication. There are many other USB classes that specify various protocols over the USB physical layer to enable communication of (data, audio, video devices, HID devices, mass storage, wireless controllers, and much more).
Virtual COM Port (VCP) is a Microsoft Windows interface to access different communication channels (e.g. Serial RS232, USB, etc) as if they were connected to a physical COM port. Therefore, the baud rate value in a serial terminal is meaningless for VCP.
| Virtual COM Port (VCP) | USB CDC (Communication Device Class) |
| is a Microsoft Windows interface to access different communication channels (e.g. Serial RS232, USB, etc) | is a protocol specification for USB communication |
In this tutorial, we’ll set up our STM32 board’s hardware USB to operate as a CDC device and connect it to a VCP on a PC to communicate data back and forth between a PC and an STM32 microcontroller over USB FS (Full-Speed). This is an alternative way of using the STM32 serial UART ports for communication with a PC.
STM32 USB Virtual COM Port Example
In this example project, we’ll configure the USB hardware on the Blue Pill’s STM32F103 target microcontroller to operate in the USB CDC class as a device.
Therefore, we’ll be able to connect our STM32 microcontroller to any PC and get it detected as a USB CDC device that communicates with the PC over a VCP (Virtual COM Port).
Step #1
Open STM32CubeMX, create a new project, and select the target microcontroller.
Step #2
Enable The USB FS (Device) Hardware Peripheral
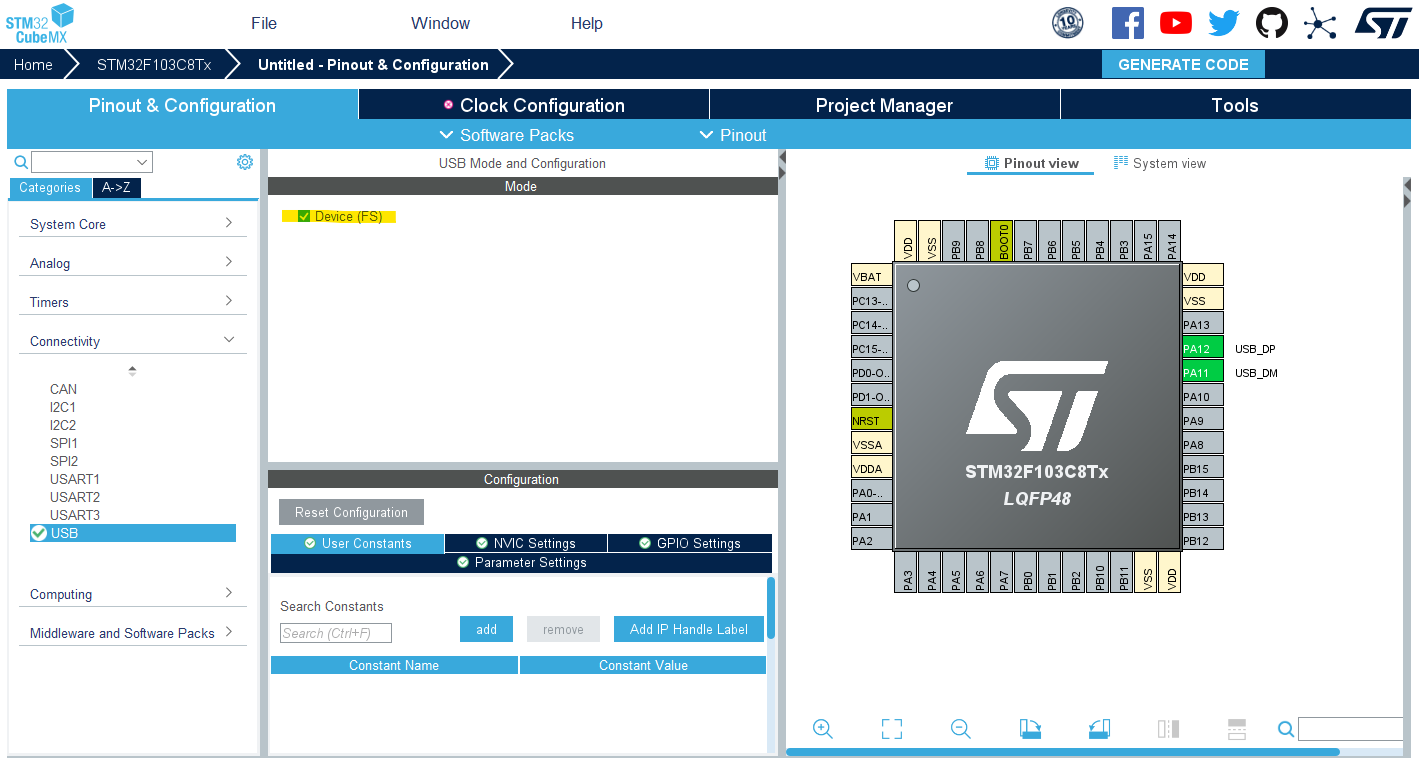
Step #3
Enable The USB CDC (VCP) Middleware Software Stack
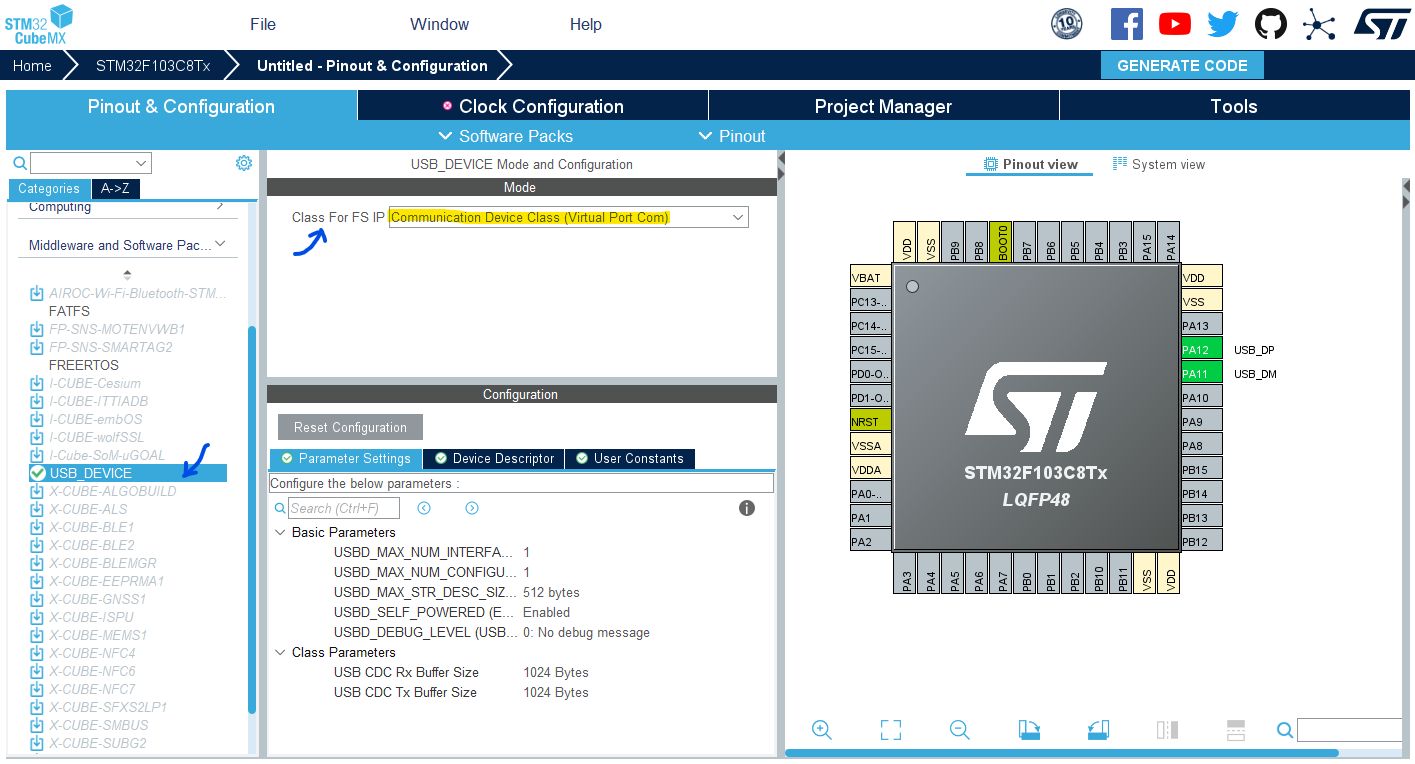
Step #4
Go to the RCC clock configuration page and enable the HSE external crystal oscillator input.
Go to the SYS configurations and enable SWD (Serial Wire Debug).
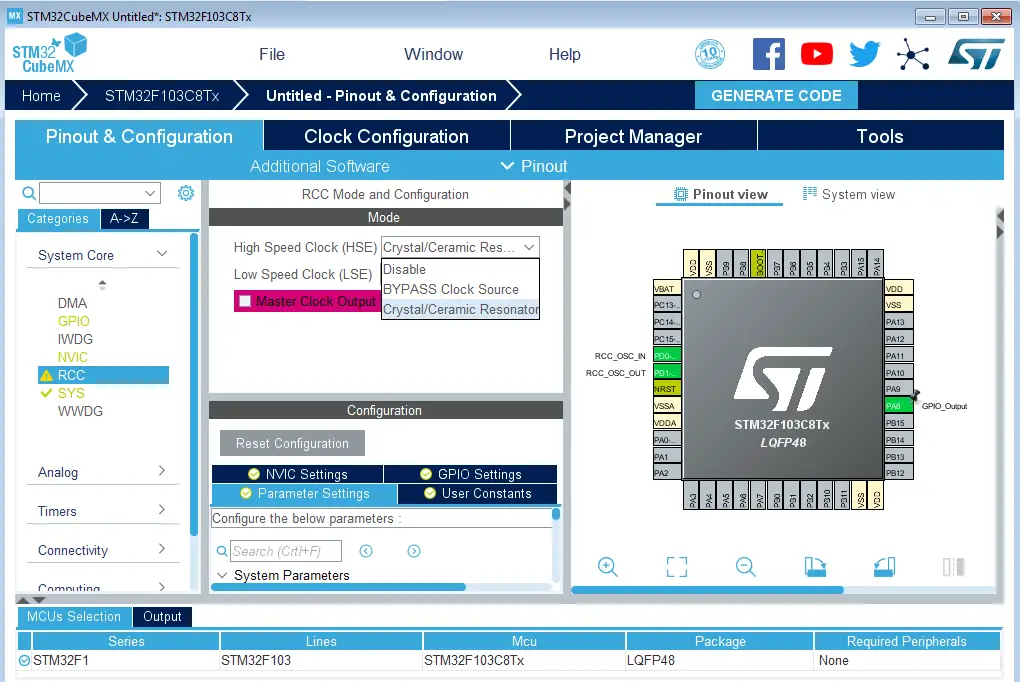
Step #5
Go to the clock configurations page, and select the HSE as a clock source, PLL output, and type in 72MHz for the desired output system frequency. Hit the “ Enter” key, and let the application solve for the required PLL dividers/multipliers to achieve the desired clock rate.
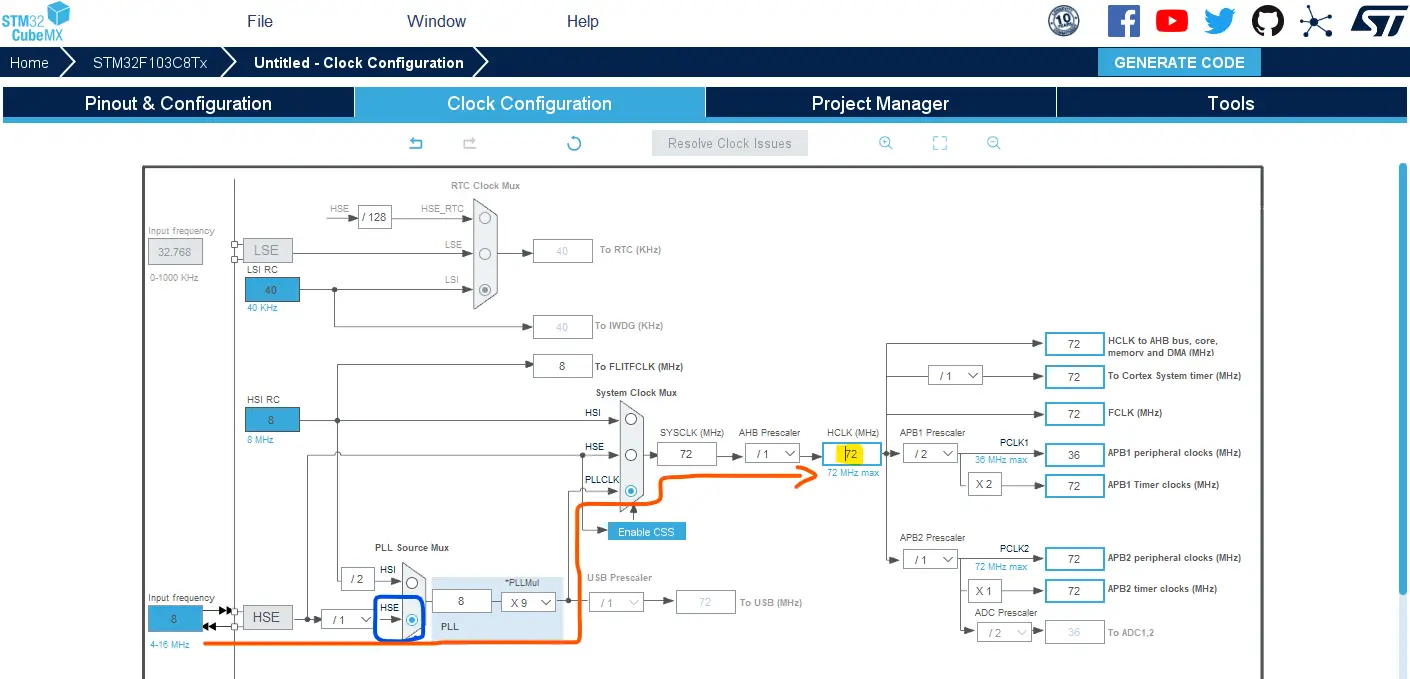
Step #6
Name & Generate The Project Initialization Code For CubeIDE or The IDE You’re Using.
STM32 USB CDC Transmit Example
After configuring & generating the USB CDC project initialization code, let’s now create a USB CDC Transmit example. We’ll send out a buffer (string message) to the PC over a virtual COM port every 100ms.
We’ll use the CDC_Transmit_FS(uint8_t* Buf, uint16_t Len) function that you can find at this location: USB_DEVICE/ App/ usbd_cdc_if.h
The 2 parameters of this function are: Buf which is a pointer to the buffer of data to be transmitted, and Len which is the length of the data buffer.
The Application Code For This Test Example
|
1 2 3 4 5 6 7 8 9 10 11 12 13 14 15 16 17 18 19 20 21 22 23 24 25 26 27 28 |
/* * LAB Name: STM32 USB CDC Device (VCP) Demo * Author: Khaled Magdy * For More Info Visit: www.DeepBlueMbedded.com */ #include "main.h" #include "usb_device.h" #include "usbd_cdc_if.h" uint8_t TxBuffer[] = "Hello World! From STM32 USB CDC Device To Virtual COM Port\r\n"; uint8_t TxBufferLen = sizeof(TxBuffer); void SystemClock_Config(void); static void MX_GPIO_Init(void); int main(void) { HAL_Init(); SystemClock_Config(); MX_GPIO_Init(); MX_USB_DEVICE_Init(); while (1) { CDC_Transmit_FS(TxBuffer, TxBufferLen); HAL_Delay(100); } } |
STM32 USB CDC Transmit Example Test Result
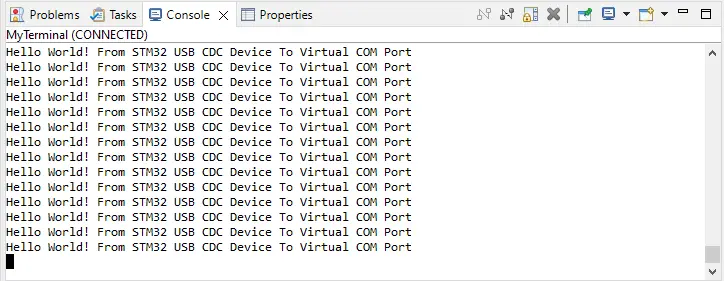
After flashing the code to the Blue Pill board, I’ve connected the USB port to my host PC which could easily recognize and enumerate the STM32 USB CDC device. In my case, it’s assigned to the COM11 port.

Therefore, I’ll open a serial terminal on the COM11 port with any baud rate (keep in mind that it doesn’t affect the speed or anything).
STM32 USB CDC Read Example
The next example is to receive data over USB CDC of unknown length. We’ll use the exact same project configurations as the previous example but some modifications should be done.
The CDC_Receive_FS() function is defined as a static function in the usbd_cdc_if.h file. This means we can’t use it externally outside of that file (like in main.c file, for example). And this is actually intuitive, as we can’t just trigger the USB_CDC_Receive operation manually. And here is why!
The USB CDC software stack handles the data reception for us, so we don’t need to “manually start” a data read operation. Instead, we’ll add a callback function that notifies our application whenever a USB CDC data packet is received. Inside the callback function, I’ll send the received data again over USB CDC as a loopback so we can debug the behavior of our system.
Here are the steps that you need to follow to implement an STM32 USB CDC Receive data (of unknown length):
Step #1
Add the following function declaration to the main.h file
|
1 |
void USB_CDC_RxHandler(uint8_t*, uint32_t); |
Step #2
Add the following RxHandler function’s implementation to the main.c file
|
1 2 3 4 |
void USB_CDC_RxHandler(uint8_t* Buf, uint32_t Len) { CDC_Transmit_FS(Buf, Len); } |
Step #3
Go to the usbd_cdc_if.h file, and add the following two lines of code inside the CDC_Receive_FS() function.
|
1 2 |
USB_CDC_RxHandler(UserRxBufferFS, *Len); memset(UserRxBufferFS, '\0', *Len); |
At the end, it becomes as follows :
|
1 2 3 4 5 6 7 8 9 |
static int8_t CDC_Receive_FS(uint8_t* Buf, uint32_t *Len) { USBD_CDC_SetRxBuffer(&hUsbDeviceFS, &Buf[0]); USBD_CDC_ReceivePacket(&hUsbDeviceFS); USB_CDC_RxHandler(UserRxBufferFS, *Len); memset(UserRxBufferFS, '\0', *Len); return (USBD_OK); } |
And that’s all what you need to do. Below is the full application code in the main.c file. Of course, you can do whatever you want with the received data instead of sending it back to the PC as I’ve done for the sake of testing.
The Application Code For This Test Example
|
1 2 3 4 5 6 7 8 9 10 11 12 13 14 15 16 17 18 19 20 21 22 23 24 25 26 27 28 29 |
/* * LAB Name: STM32 USB CDC Device (VCP) Demo * Author: Khaled Magdy * For More Info Visit: www.DeepBlueMbedded.com */ #include "main.h" #include "usb_device.h" #include "usbd_cdc_if.h" void SystemClock_Config(void); static void MX_GPIO_Init(void); int main(void) { HAL_Init(); SystemClock_Config(); MX_GPIO_Init(); MX_USB_DEVICE_Init(); while (1) { // Nothing To Do Here! } } void USB_CDC_RxHandler(uint8_t* Buf, uint32_t Len) { CDC_Transmit_FS(Buf, Len); } |
STM32 USB CDC Receive Example Test Result
I’ve placed one breakpoint at line #28 as you can see in the test demo video below. Whenever a message is sent from the terminal to the STM32 board, the handler function is called and we can see that the received data inside the Buf array is exactly what we’ve sent from the PC.
After clicking the resume button, the STM21 executes the code starting from line #28 which sends the received data back to the PC and we can see that data on the serial terminal as well. So everything works as expected!
STM32 USB CDC Printf() Example
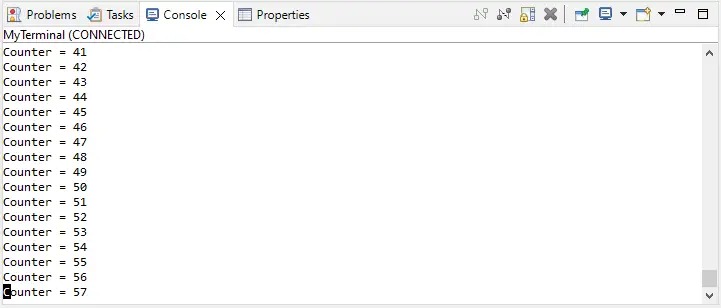
One last application before concluding this tutorial, we’ll route the Printf() function to the USB CDC transmit function. In this way, you can use the Printf() function in your project to send data over the USB CDC directly (just like a wrapper layer for the USB CDC).
The Application Code For This Test Example
|
1 2 3 4 5 6 7 8 9 10 11 12 13 14 15 16 17 18 19 20 21 22 23 24 25 26 27 28 29 30 31 32 33 |
/* * LAB Name: STM32 USB CDC Device (VCP) Demo * Author: Khaled Magdy * For More Info Visit: www.DeepBlueMbedded.com */ #include "main.h" #include "usb_device.h" #include "usbd_cdc_if.h" #include <stdio.h> uint8_t Counter = 0; void SystemClock_Config(void); static void MX_GPIO_Init(void); int _write(int file, char *ptr, int len) { CDC_Transmit_FS((uint8_t*) ptr, len); return len; } int main(void) { HAL_Init(); SystemClock_Config(); MX_GPIO_Init(); MX_USB_DEVICE_Init(); while (1) { printf("Counter = %d \r\n", Counter++); HAL_Delay(100); } } |
STM32 USB CDC Prinf() Example Test Result
STM32 USB CDC Troubleshooting
Here are some common issues that you might encounter while working with the STM32 USB CDC in different projects and how you can mitigate those issues to achieve your system’s desired behavior.
1. Transmitting Big Chunks of Data
If you’re sending big chunks of data in your application, make sure that you give the transmit function enough time before attempting to transmit data again. You can implement this logic by monitoring the USB CDC transmit completion flag for example.
2. Excessive Memory Utilization
The USB software stack in the HAL libraries has a pretty large memory footprint. To put it in context, let’s consider the example provided in this tutorial. By checking the build analyzer, you can see that it’s taking up to 45% of the program memory space and 32% of the RAM memory. Which is quite a big space for what the application is doing.

This can be optimized by reducing the buffer sizes in the USB CDC header files as long as your application doesn’t require large data buffers. Alternatively, you might consider checking out external libraries like the tinyUSB for example.
Required Parts For STM32 Examples
All the example Code/LABs/Projects in this STM32 Series of Tutorials are done using the Dev boards & Electronic Parts Below:
| QTY. | Component Name | Amazon.com | AliExpress | eBay |
| 1 | STM32-F103 BluePill Board (ARM Cortex-M3 @ 72MHz) | Amazon | AliExpress | eBay |
| 1 | Nucleo-L432KC (ARM Cortex-M4 @ 80MHz) | Amazon | AliExpress | eBay |
| 1 | ST-Link V2 Debugger | Amazon | AliExpress | eBay |
| 2 | BreadBoard | Amazon | AliExpress | eBay |
| 1 | LEDs Kit | Amazon & Amazon | AliExpress | eBay |
| 1 | Resistors Kit | Amazon & Amazon | AliExpress | eBay |
| 1 | Capacitors Kit | Amazon & Amazon | AliExpress & AliExpress | eBay & eBay |
| 1 | Jumper Wires Pack | Amazon & Amazon | AliExpress & AliExpress | eBay & eBay |
| 1 | Push Buttons | Amazon & Amazon | AliExpress | eBay |
| 1 | Potentiometers | Amazon | AliExpress | eBay |
| 1 | Micro USB Cable | Amazon | AliExpress | eBay |
★ Check The Links Below For The Full Course Kit List & LAB Test Equipment Required For Debugging ★
Download Attachments
You can download all attachment files for this Article/Tutorial (project files, schematics, code, etc..) using the link below. Please consider supporting our work through the various support options listed in the link down below. Every small donation helps to keep this website up and running and ultimately supports the whole community.
Wrap Up
In conclusion, we’ve discussed how to use the STM32 USB CDC for transmitting & receiving data to/from a PC without using the STM32 UART peripheral. The Printf() function can also be routed to the USB CDC for directly printing messages over USB. The provided examples should be a good starting point for your next STM32 USB CDC project.
If you’re just getting started with STM32, you need to check out the STM32 Getting Started Tutorial here.
Follow this STM32 Series of Tutorials to learn more about STM32 Microcontrollers Programming.

very helpful, thanks so much!
Glad you found it helpful!