| Previous Tutorial | Tutorial 12 | Next Tutorial | |||||
| STM32 Timers Tutorial | |||||||
| STM32 Course Home Page ???? | |||||||
In this tutorial, we’ll be discussing the STM32 timers modules in STM32 microcontrollers. There are different hardware timers in STM32 microcontrollers each can operate in multiple modes and perform so many tasks. You’ll get to know these different hardware variants and their application use cases. And we’ll start with the timer mode in this tutorial, other modes are to be discussed later on.
[toc]
1. Introduction To Timers Modules
A Timer Module in its most basic form is a digital logic circuit that counts up every clock cycle. More functionalities are implemented in hardware to support the timer module so it can count up or down. It can have a Prescaler to divide the input clock frequency by a selectable value. It can also have circuitry for input capture, PWM signal generation, and much more as we’ll see in this tutorial.
Let’s consider a basic 16-Bit timer like the one shown below. As a 16-Bit time, it can count from 0 up to 65535. Every clock cycle, the value of the timer is incremented by 1. And as you can see, the Fsys is not the frequency that is incrementing the timer module. But it gets divided by the Prescaler, then it gets fed to the timer.

Basically, in timer mode, the TCNT register is incremented by 1 each clock cycle @ the following frequency (Fsys/PSC). This means if the Fsys is 80MHz & PSC is 1:1024, the TCNT gets incremented by 1 every 12.8μSec. Therefore, if you start this timer to count from 0 until it reaches overflow (at 65535), it will give you an interrupt signal once every 0.839 Second.
What if I need to set up this timer to give me an interrupt signal once per 1 second? I don’t want this 0.839Sec time interval in fact. Well, for this reason, there exists a possible hardware feature called preload register that forces the timer to count from any arbitrarily chosen value up to the overflow. So, you no longer have to start counting from zero. Hence, any time interval can be obtained with a timer module.
A timer module can also operate in a counter mode where the clock source is not known, it’s actually an external signal. Maybe from a push button, so the counter gets incremented every rising or falling edge from the button press. This mode can be advantageous in numerous applications as we’ll discuss hereafter. But for now, consider the following diagram.

Where you can see, the clock signal is now driven from the push button and gets to the timer clock input through the Prescaler. And you can capture the information of how many times the button is pressed by simply reading the TCNT register’s value.
For more introductory information about Timers Modules & Timer Preloading
2. STM32 Timers Hardware
STMicroelectronics provides some different versions or variants for the hardware timer modules. STM32 microcontrollers usually have a handful of each type, however, some parts may lack one or more of these hardware timers. So, in this section, I’ll highlight those timer modules and their main features, block diagram, and things like that.
Just to give you an overview of the different available hardware timers in STM32 microcontrollers. So, you can have a better understanding of which type fits in which kind of applications. Which in turn helps you better pick the right MCU part for your project.
2.1 Basic Timers Modules
The basic timers consist of a 16-bit auto-reload counter driven by a programmable Prescaler. They may be used as generic timers for time-base generation but they are also specifically used to drive the digital-to-analog converter (DAC). In fact, the timers are internally connected to the DAC and are able to drive it through their trigger outputs. The timers are completely independent and do not share any resources.
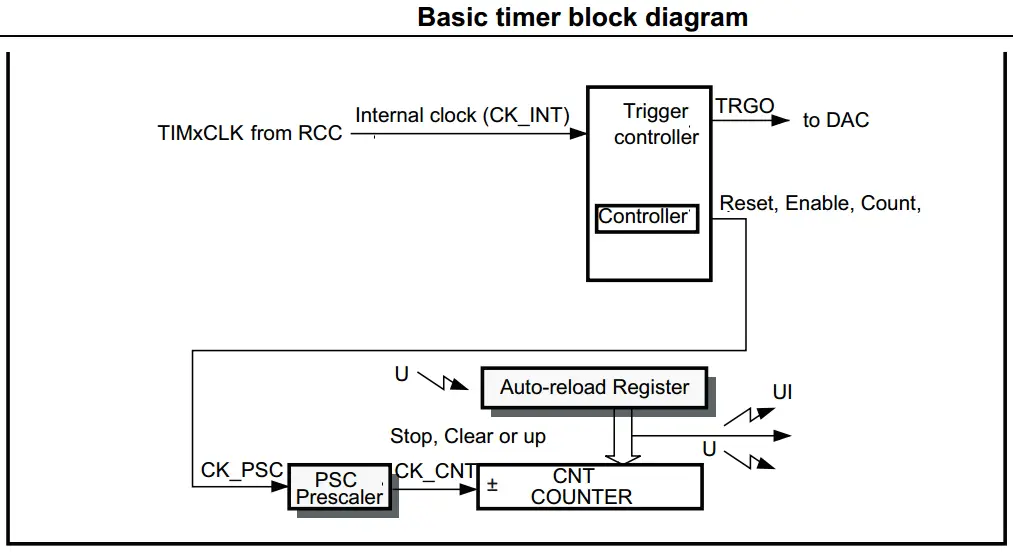
Basic timer features include:
- 16-bit auto-reload up-counter
- 16-bit programmable Prescaler used to divide (also “on the fly”) the counter clock frequency by any factor between 1 and 65536
- Synchronization circuit to trigger the DAC
- Interrupt/DMA generation on the update event: counter overflow
The main block of the programmable timer is a 16-bit up-counter with its related auto-reload register. The counter clock can be divided by a Prescaler. The counter, the auto-reload register, and the Prescaler register can be written or read by software. This is true even when the counter is running. The time-base unit includes:
- Counter Register (TIMx_CNT)
- Prescaler Register (TIMx_PSC)
- Auto-Reload Register (TIMx_ARR)
The auto-reload register is preloaded. The preload register is accessed each time an attempt is made to write or read the auto-reload register. The contents of the preload register are transferred into the shadow register permanently or at each update event UEV, depending on the auto-reload preload enable bit (ARPE).
In counter mode, the counter counts from 0 to the auto-reload value (contents of the TIMx_ARR register), then restarts from 0 and generates a counter overflow event. An update event can be generated at each counter overflow or by setting the UG bit in the TIMx_EGR register (by software or by using the slave mode controller).
2.2 Low-Power Timers Modules
The LPTIM is a 16-bit timer that benefits from the ultimate developments in power consumption reduction. Thanks to its diversity of clock sources, the LPTIM is able to keep running in all power modes except for Standby mode. Given its capability to run even with no internal clock source, the LPTIM can be used as a “Pulse Counter” which can be useful in some applications.
Also, the LPTIM capability to wake up the system from low-power modes makes it suitable to realize “Timeout functions” with extremely low power consumption. The LPTIM introduces a flexible clock scheme that provides the needed functionalities and performance while minimizing power consumption.
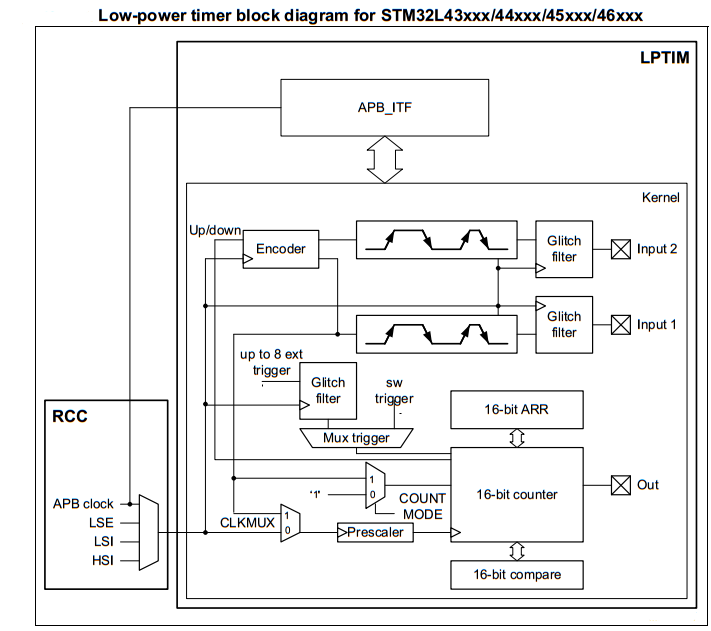
The Low-Power Timers (LPTIM) Main Features:
- 16-bit up-counter
- 3-bit Prescaler with 8 possible dividing factors (1,2,4,8,16,32,64,128)
- Selectable clock
– Internal clock sources: LSE, LSI, HSI16 or APB clock
– External clock source over LPTIM input (working with no LP oscillator running, used by Pulse Counter application) - 16 bit ARR auto-reload register
- 16 bit compare register
- Continuous/One-shot mode
- Selectable software/hardware input trigger
- Programmable Digital Glitch filter
- Configurable output: Pulse, PWM
- Configurable I/O polarity
- Encoder mode
- Repetition counter
2.3 General-Purpose Timers Modules
The general-purpose timers consist of a 16-bit auto-reload counter driven by a programmable Prescaler. They may be used for a variety of purposes, including measuring the pulse lengths of input signals (input capture) or generating output waveforms (output compare and PWM). Pulse lengths and waveform periods can be modulated from a few microseconds to several milliseconds using the timer Prescaler and the RCC clock controller Prescalers. The timers are completely independent and do not share any resources. They can be synchronized together as well.
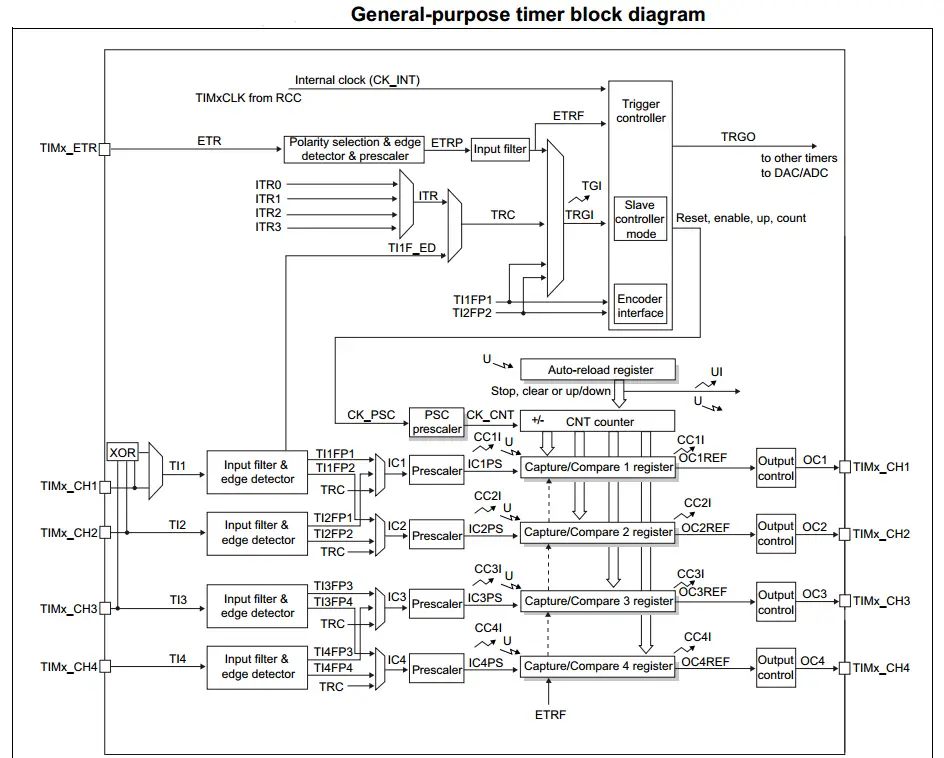
General-purpose TIMx timer features include:
- 16-bit up, down, up/down auto-reload counter.
- 16-bit programmable Prescaler used to divide (also “on the fly”) the counter clock frequency by any factor between 1 and 65536.
- Up to 4 independent channels for:
– Input capture
– Output compare
– PWM generation (Edge- and Center-aligned modes)
– One-pulse mode output - Synchronization circuit to control the timer with external signals and to interconnect several timers.
- Interrupt/DMA generation on the following events:
– Update: counter overflow/underflow, counter initialization (by software or internal/external trigger)
– Trigger event (counter start, stop, initialization or count by internal/external trigger)
– Input capture
– Output compare - Supports incremental (quadrature) encoder and hall-sensor circuitry for positioning purposes
- Trigger input for an external clock or cycle-by-cycle current management
2.4 Advanced-Control Timers Modules
The advanced-control timers consist of a 16-bit auto-reload counter driven by a programmable Prescaler. It may be used for a variety of purposes, including measuring the pulse lengths of input signals (input capture), or generating output waveforms (output compare, PWM, complementary PWM with dead-time insertion). Pulse lengths and waveform periods can be modulated from a few microseconds to several milliseconds using the timer Prescaler and the RCC clock controller Prescalers. The advanced-control and general-purpose timers are completely independent and do not share any resources. They can be synchronized together as well.
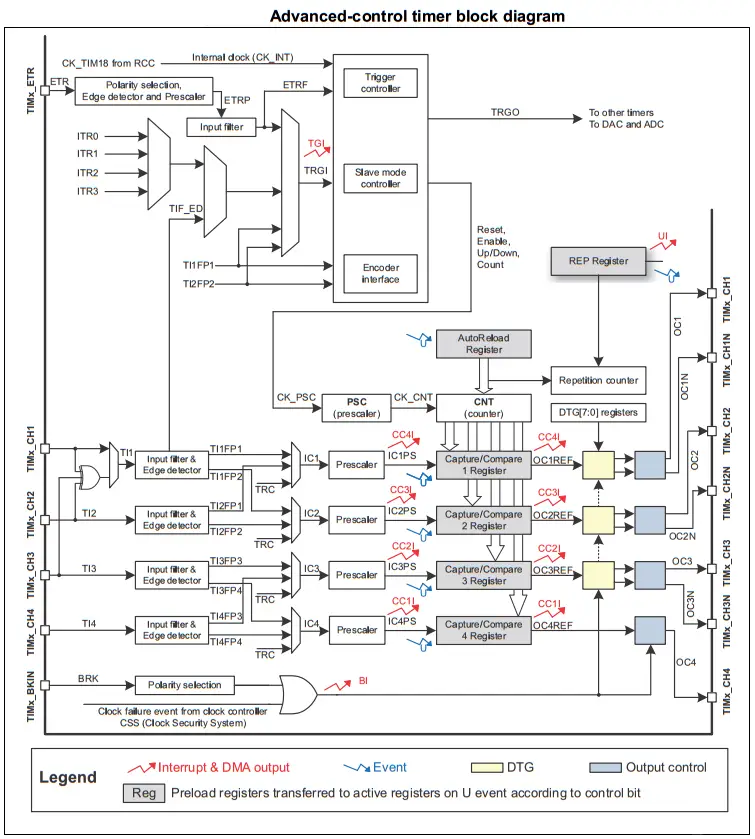
Advanced-Control Timers Features:
- 16-bit up, down, up/down auto-reload counter.
- 16-bit programmable Prescaler allowing dividing (also “on the fly”) the counter clock frequency either by any factor between 1 and 65536.
- Up to 4 independent channels for:
– Input Capture
– Output Compare
– PWM generation (Edge and Center-aligned Mode)
– One-pulse mode output - Complementary outputs with programmable dead-time
- Synchronization circuit to control the timer with external signals and to interconnect several timers together.
- Repetition counter to update the timer registers only after a given number of cycles of the counter.
- Break input to put the timer’s output signals in a reset state or in a known state.
- Interrupt/DMA generation on the following events:
– Update: counter overflow/underflow, counter initialization (by software or internal/external trigger)
– Trigger event (counter start, stop, initialization or count by internal/external trigger)
– Input capture
– Output compare
– Break input - Supports incremental (quadrature) encoder and hall-sensor circuitry for positioning purposes
- Trigger input for an external clock or cycle-by-cycle current management
2.5 High-Resolution Timers Modules
The high-resolution timer can generate up to 10 digital signals with highly accurate timings. It is primarily intended to drive power conversion systems such as switch-mode power supplies or lighting systems but can be of general-purpose usage, whenever a very fine timing resolution is expected (up to 217pSec).
For control and monitoring purposes, the timer has also timing measure capabilities and links to built-in ADC and DAC converters. Last, it features a light-load management mode and is able to handle various fault schemes for safe shut-down purposes.
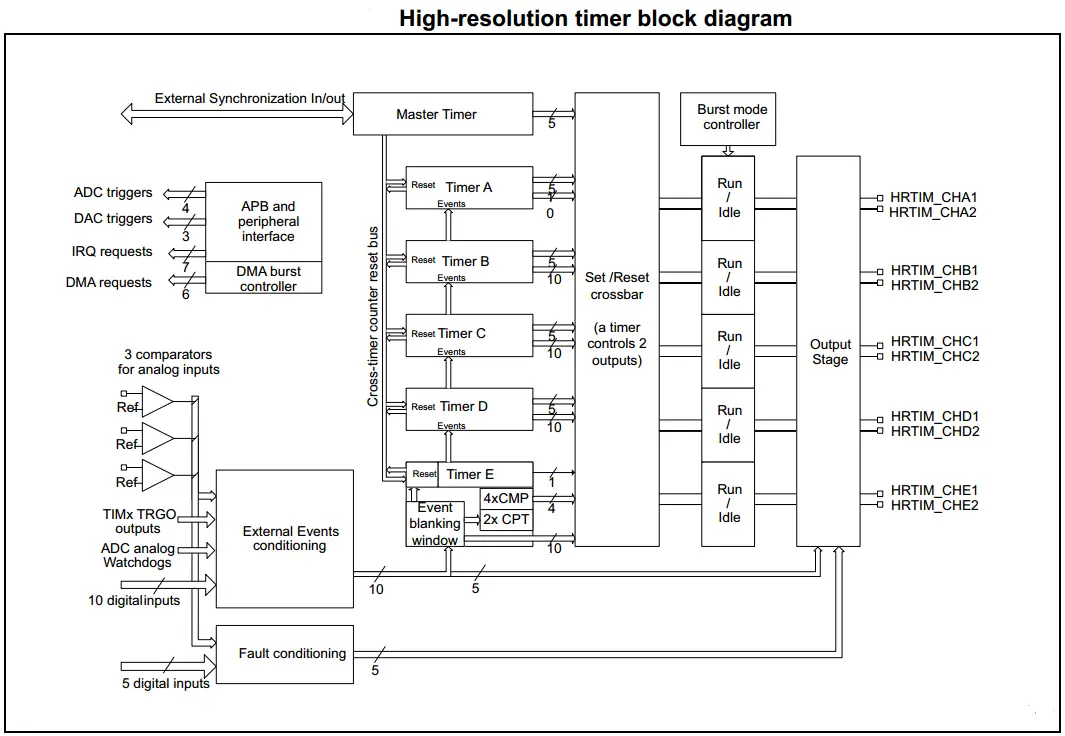
High-Resolution Timers (HRTIM) Features Include:
- High-resolution timing units
– 217 ps resolution, compensated against voltage and temperature variations
– High-resolution available on all outputs, possibility to adjust duty-cycle, frequency and pulse width in the triggered one-pulse mode
– 6 16-bit timing units (each one with an independent counter and 4 compare units)
– 10 outputs that can be controlled by any timing unit, up to 32 set/reset sources per channel
– Modular architecture to address either multiple independent converters with 1 or 2 switches or few large multi-switch topologies - Multiple links to built-in analog peripherals
– 4 triggers to ADC converters
– 3 triggers to DAC converters
– 3 comparators for analog signal conditioning - Multiple HRTIM instances can be synchronized with external synchronization inputs/outputs
- Versatile output stage
– High-resolution Deadtime insertion (down to 868 pSec)
– Programmable output polarity
– Chopper mode - Burst mode controller to handle light-load operation synchronously on multiple converters
- 7 interrupt vectors, each one with up to 14 sources
- 6 DMA requests with up to 14 sources, with a burst mode for multiple registers update
3. STM32 Timers Modes OF Operation
An STM32 timer module can operate in any of the following modes, however, you should not assume that a given timer does support all of these modes. Instead, you’ll have to check the datasheet to figure out which modes are supported by which timers. As we’ve seen earlier, there are many groups of timers which include: General-Purpose, Low-Power, High-Resolution, Advanced-Control timers. Each of which does support a multiple of the following modes, however, some timers do support most of the operating modes.
In this section, we’ll get just a brief description of each mode of operation. How it works and what sort of applications it fits for. Each mode will be discussed in-depth with practical LAB experiments in future tutorials. But for today, we’ll get into Timer Mode in section4 and do its LAB in the next tutorial. Other modes will be coming later on in this series of tutorials.
3.1 Timer Mode
In timer mode, the timer module gets clocked from an internal clock source with a known frequency. Hence the clocking frequency is known, the overflow time can also be calculated and controlled by the preload register to get any arbitrarily chosen time interval. Each timer overflow, the timer signals the CPU with an interrupt that indicates the end of the specified time interval.
This mode of operation is usually used to get a specific operation done each specific time interval. And to achieve timing & sync between various tasks and events in the system. It can also replace delays in various situations for better system response.

3.2 Counter Mode
In counter mode, the timer module gets clocked from an external source (timer input pin). So the timer counts up or down on each rising or falling edge of the external input. This mode is really helpful in numerous situations when you need to implement a digital counter without polling input pins or periodically reading a GPIO or continuously interrupt the CPU if you’ve chosen to hook it up to an EXTI pin.
You can actually monitor the counter value difference each time interval to tell how many pulses did occur or what was the frequency of it. Such a mode can be advantageous in many situations like this. And more examples are to come in upcoming tutorials.

3.3 PWM Mode
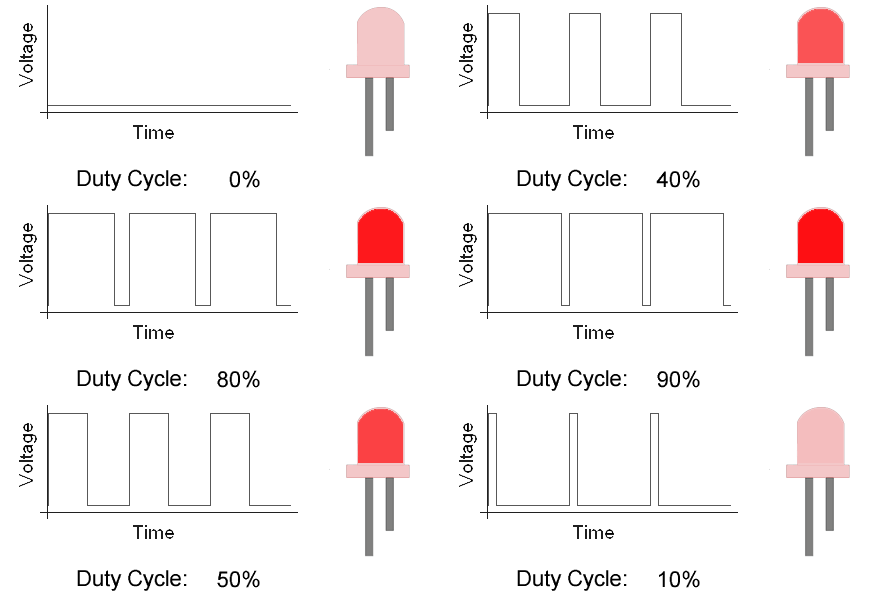
In PWM mode, the timer module is clocked from an internal clock source and produces a digital waveform on the output channel pin called the PWM signal. By using output compare registers (OCR), the incrementing timer’s register value is constantly compared against this OCR register. When a match occurs the output pin state is flipped until the end of the period and the whole process is repeated.
The timer in PWM mode will produce a PWM signal at the specified frequency the user chose. The duty cycle is also programmatically controlled by its register. The PWM resolution is affected by the desired FPWM and other factors as we’ll see in the dedicated tutorials for PWM generation.
3.4 Advanced PWM Mode
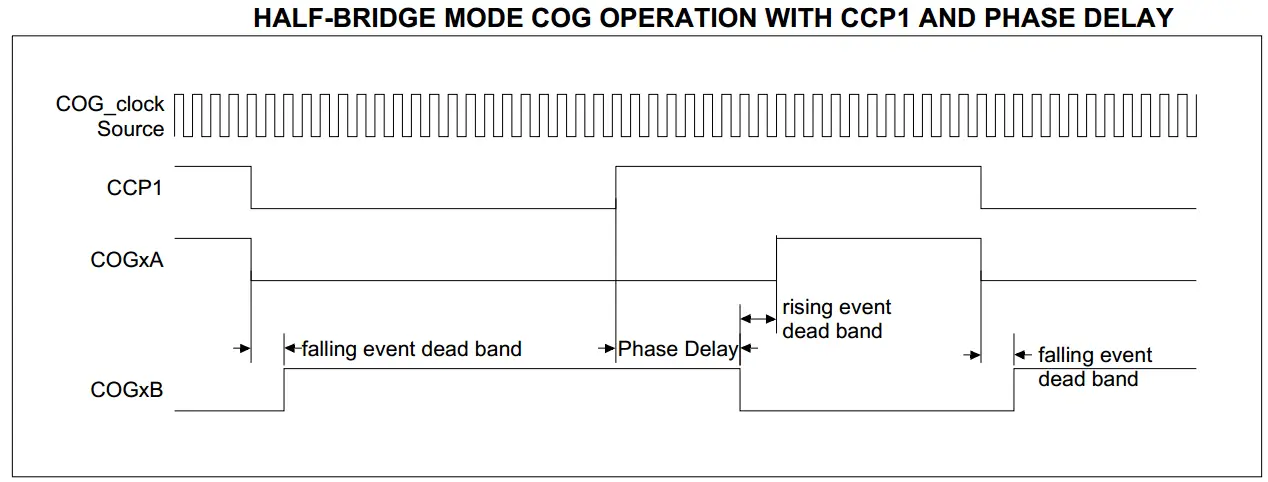
The advanced PWM signal generation refers to the hardware ability to control more parameters and add some hardware circuitry to support extra features for the PWM signal generation. Which includes:
- The ability to produce a complementary PWM signal that is typically the same as the PWM on the main channel but logically inverted (high portion becomes low and vice versa).
- The ability to inject dead-time band in the PWM signal for motor driving applications to prevent shoot-through currents that result from PWM signals overlapping.
- The ability to perform auto-shutdown for the PWM signal, it’s also called “auto brake” which an important feature for safety-critical applications.
- And the ability to phase-adjust the PWM signal, and much more! All of this is referred to as advanced-PWM control.
Here is an example for PWM channels with complementary waveform output, with dead-band inserted, and phase-delay adjustment. A typical control signal in half-bridge mode.
3.5 Output Compare Mode
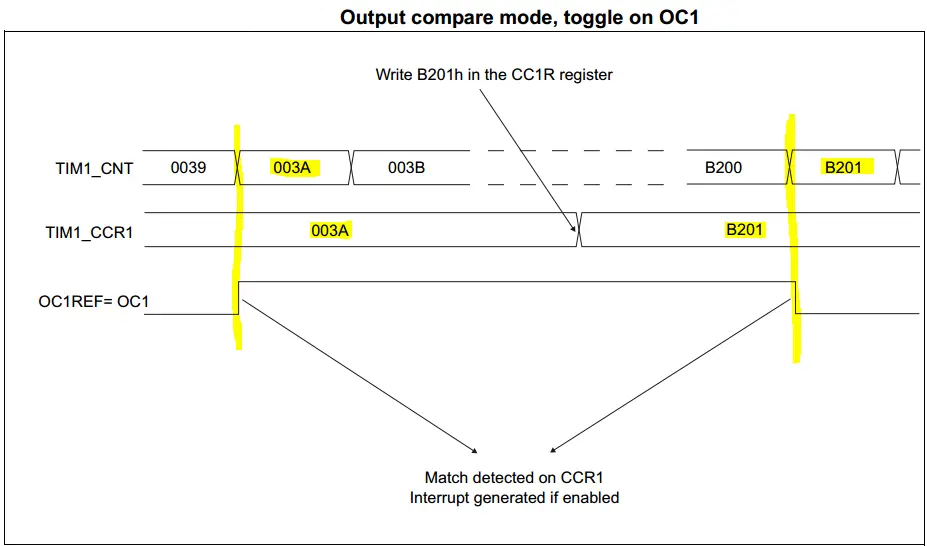
In output compare mode, a timer module controls an output waveform or indicates when a period of time has elapsed. When a match is detected between the output compare register (OCR) and the counter, the output compare function assigns the corresponding output pin to a programmable value defined by the output
compare mode defined by the programmer.
The output compare pin can be driven high, low, toggles its sate, or stay unchanged. This is determined by the programmer as per the application requirements. This mode of operation can be extremely advantageous for generating timing signals and output driving in many applications as we’ll see in future tutorials.
Here is an example for a counting timer in output compare mode. Note when the output state is changed (toggled) and the value in the OCR (compare register TIM1_CCR1).
3.6 One-Pulse Mode
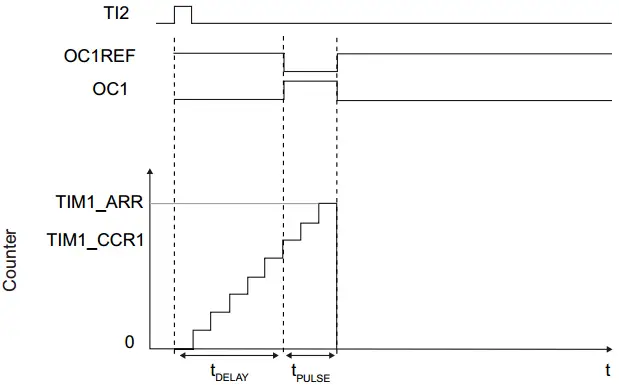
One-pulse mode (OPM) is a particular case of the previous modes. It allows the counter to be started in response to a stimulus and to generate a pulse with a programmable length after a programmable delay. Starting the counter can be controlled through the slave mode controller. Generating the waveform can be done in output compare mode or PWM mode.
A pulse can be correctly generated only if the compare value is different from the counter initial value. Before starting (when the timer is waiting for the trigger), the configuration must be CNT<CCRx ≤ ARR (in particular, 0<CCRx). For example, you may want to generate a positive pulse on OC1 with a length of tPULSE and after a delay of tDELAY as soon as a positive edge is detected on the TI2 input pin.
3.7 Input Capture Mode
In Input capture mode, the Capture/Compare Registers (TIMx_CCRx) are used to latch the value of the counter after a transition detected by the corresponding ICx signal. When a capture occurs, the corresponding CCXIF flag (TIMx_SR register) is set and an interrupt or a DMA request can be sent if they are enabled.
This mode is extremely important for external signal measurement or external event timing detection. The current value of the timer counts is captured when an external event occurs and an interrupt is fired. So, we can use this feature for a wide range of measurement applications.
An application example is an ultrasonic sensor that measures the distance and sends the information as a pulse to your microcontroller. By measuring the pulse width time, you can find out the distance reading. This can be achieved by using the input capture unit (ICU) within the timer module.
3.8 Encoder Mode
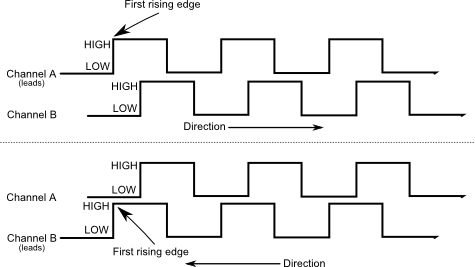
In the encoder interface mode, the timer module operates as a digital counter with two inputs. The counter is clocked by each valid transition on both input pins. The sequence of transitions of the two inputs is evaluated and generates count pulses as well as the direction signal. Depending on the sequence the counter counts up or down. So you don’t have to detect these pulses individually and see which came first to detect rotation direction and this kind of work. Now, all of this is done by hardware thanks to the encoder mode hardware support.
The timer, when configured in Encoder Interface mode provides information on the sensor’s current position. The user can obtain dynamic information (speed, acceleration, deceleration) by measuring the period between two encoder events using a second timer configured in capture mode. The output of the encoder which indicates the mechanical zero can be used for this purpose. Depending on the time between two events, the counter can also be read at regular times.
 |
 |
3.9 Timer Gate Mode
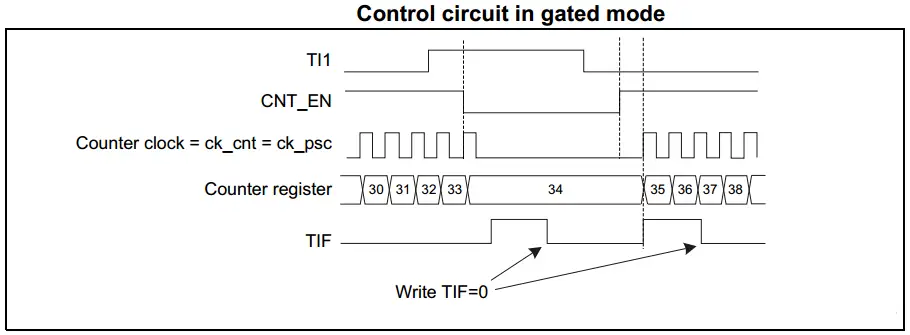
In timer gated mode, a timer module is also said to be working in “slave mode”. Where it only counts as long as an external input pin is held high or low. This input pin is said to be the timer gate that allows the timer to count or not at all.
This mode can be used in a wide range of applications and signal measurements. It can help you measure extremely short pulses with a very high resolution. And also trigger the timer to count on external events from sensors or other MCUs.
The counter starts counting on the internal clock as long as TI1 is low and stops as soon as TI1 becomes high. The TIF flag in the TIMx_SR register is set both when the counter starts or stops. The delay between the rising edge on TI1 and the actual stop of the counter is due to the resynchronization circuit on TI1 input.
3.10 Timer DMA Burst Mode
The STM32 timers, not all of them, have the capability to generate multiple DMA requests upon a single event. The main purpose is to be able to re-program part of the timer multiple times without software overhead, but it can also be used to read several registers in a row, at regular intervals.
3.11 IRTIM Infrared Mode
An infrared interface (IRTIM) for remote control can be used with an infrared LED to perform remote control functions. It uses internal connections with TIM15 and TIM16 as shown in the diagram down below. To generate the infrared remote control signals, the IR interface must be enabled and TIM15 channel 1 (TIM15_OC1) and TIM16 channel 1 (TIM16_OC1) must be properly configured to generate correct waveforms. The infrared receiver can be implemented easily through a basic input capture mode.
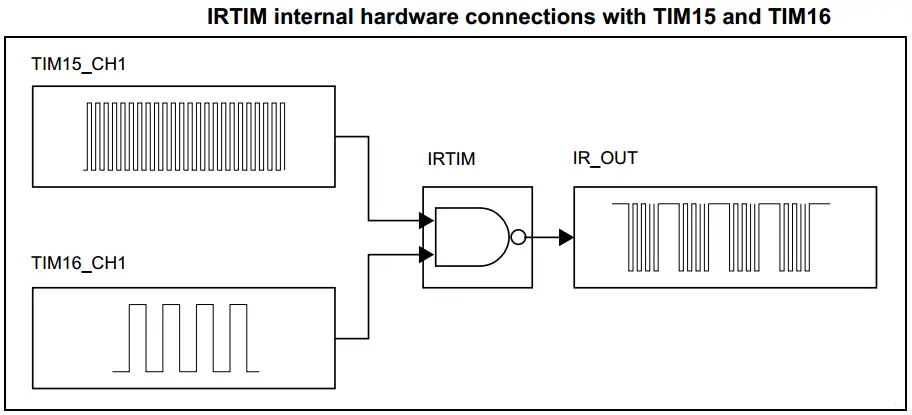
All standard IR pulse modulation modes can be obtained by programming the two-timer output compare channels. TIM15 is used to generate the high-frequency carrier signal, while TIM16 generates the modulation envelope. The infrared function is output on the IR_OUT pin. The activation of this function is done through the GPIOx_AFRx register by enabling the related alternate function bit.
4. STM32 Timers – Timer Mode
After this long overview of the STM32 timers hardware variants and the timers’ possible modes of operations, we’ll just focus on one of them for the rest of this tutorial. Which is going to be the very basic one, the “timer mode”. So, we’ll discuss the timer mode operation in-depth and we’ll follow this up by a practical LAB in the next tutorial. Afterward, we can move on to another mode of operation (counter, ICU, PWM, etc).
4.1 Block Diagram
For this tutorial, we’ll be working with a gerneral-purpose timer. And here is its logic block diagram.

4.2 Functional Description
4.2.1 Time-Base Unit
The main block of the programmable timer is a 16-bit counter with its related auto-reload register. The counter can count up, down, or both up and down. The counter clock can be divided by a Prescaler. The counter, the auto-reload register, and the Prescaler register can be written or read by software. This is true even when the counter is running. The time-base unit includes:
- Counter Register (TIMx_CNT)
- Prescaler Register (TIMx_PSC):
- Auto-Reload Register (TIMx_ARR)
The auto-reload register is preloaded. Writing to or reading from the auto-reload register accesses the preload register. The content of the preload register is transferred into the shadow register permanently or at each update event (UEV), depending on the auto-reload preload enable bit (ARPE) in the TIMx_CR1 register. The update event is sent when the counter reaches the overflow.
4.2.2 Timer Prescaler
The Prescaler can divide the counter clock frequency by any factor between 1 and 65536. It is based on a 16-bit counter controlled through a 16-bit register (in the TIMx_PSC register). It can be changed on the fly as this control register is buffered. The new Prescaler ratio is taken into account at the next update event.
4.3 Applications Examples
The timer module in timer mode can be used to generate a time delay interval between specific events. Or to repeatedly perform a specific task each specific time interval. And also to measure the time between predefined events. So, a timer can generate or measure time intervals based on the internal clock and the Prescaler which together defines the resolution of the timer tick time.
4.4 Different Possible Configurations
When you’re configuring a timer module to operate in timer mode, you should be concerned to set the following configurations as per your application requirements.
The timer time interval, which is a combination of the following settings:
- The timer clock source frequency
- The Prescaler value
- The time counting mode (up or down)
- Auto-Reload register value
- Autor preload enable/disable
- Overflow interrupt enable/disable
4.5 CubeMX Timer Configurations Options
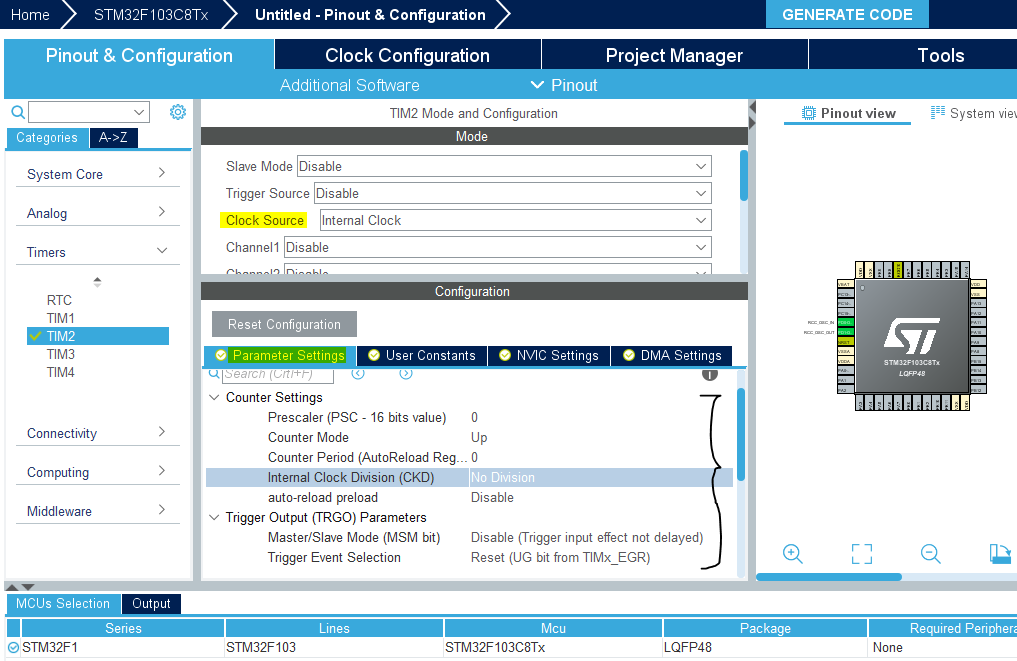
Here is a screenshot from the CubeMX software tool indicating the possible configurations for the TIM2 module which is a general-purpose timer module. And this is the one we’ll be using in the next practical LAB and will write application code to test it.
4.6 STM32 Timer Interrupts
General-Purpose STM32 Timers can generate an Interrupt/DMA signal on the following events:
- Update: counter overflow/underflow, counter initialization (by software or internal/external trigger)
- Trigger event (counter start, stop, initialization or count by internal/external trigger)
- Input capture
- Output compare
For our applications in the following tutorial/LAB, we’ll be using the overflow interrupt signal to toggle an LED or whatever to test the timer functionality and timing correctness.
And That’s it For This Tutorial .. In The Next Few Tutorials, We’ll Do Some LABs To Test all other modes of operation for STM32 Timers modules (counter, input capture, PWM, etc). So, Get Ready For That!
And Please, Consider Supporting The Content By SHARING It On Socials Or Via Patreon.
| Previous Tutorial | Tutorial 12 | Next Tutorial | |||||
