In this tutorial, we’ll use the STM32 SysTick Timer to create Microseconds delay_us & Milliseconds delay_ms functions. You’ll learn how to use the STM32 Systick timer to implement delay microseconds function and test its accuracy using a GPIO pin. Without further ado, let’s get right into it!
Table of Contents
- STM32 SysTick Timer
- STM32 SysTick Delay_us (Delay Microseconds)
- STM32 SysTick Delay_ms (Delay Milliseconds)
- STM32 SysTick Delay Accuracy Testing
- Wrap Up
STM32 SysTick Timer
All STM32 ARM Cortex-M processors have an internal SysTick (System Tick) timer which is a 24-bit down-counting timer. This timer is usually set up in such a way that it’s initially loaded with a value that keeps decrementing until the timer reaches 0 and fires an interrupt every 1ms. The time base can be programmatically changed but normally it’s 1ms as the systick timer is intended to be used as a time base for RTOS and scheduling algorithms.
In STM32 projects, we usually use the HAL_Delay() function. Which uses the systick timer interrupt under the hood. This delay function blocks the CPU until a systick interrupt increments the systick counter variable. Therefore, it’s desirable to use the HAL_Delay() function inside ISRs unless the systick interrupt is configured to have the highest priority so it can increment the counter variable. Otherwise, the CPU will be blocked for a longer time which is undeterministic.
There is no need to manually configure the SysTick timer in STM32 projects as it’s by default enabled and configured to generate a 1ms periodic interrupts. It’s configured and started upon calling the HAL_Init() function at the beginning of the main() function of every project you generate from STM32CubeMX.
Using the SysTick timer in STM32 microcontrollers to create time delays can and will save you a hardware timer resource that could have been used instead.
Below is another STM32 Delay tutorial that shows you how to use the DWT (Data watchpoint trigger) in ARM Cortex-M processors to create delay functions as well as how to configure hardware timers in STM32 to achieve the same goal.
This article will give more in-depth information about creating STM32 delay microseconds & milliseconds functions using the DWT (Data Watchpoint Trigger) inside the ARM Cortex-M processors and also using the STM32 hardware Timers with HAL functions.
STM32 SysTick Delay_us (Delay Microseconds)
The STM32 Systick timer has a reload register that’s written to during initialization time in order to set the timer to generate 1ms periodic interrupts. We can access this reload register by reading/writing the SysTick->LOAD variable. The Systick timer’s counter register can be found as SysTick->VAL in the core_cm3.h header file.
Using the information I’ve presented to you up till now, I cam up with the following macro (function) to create a systick delay in microseconds.
|
1 2 3 4 5 6 7 8 9 |
#define SYSTICK_LOAD (SystemCoreClock/1000000U) #define SYSTICK_DELAY_CALIB (SYSTICK_LOAD >> 1) #define DELAY_US(us) \ do { \ uint32_t start = SysTick->VAL; \ uint32_t ticks = (us * SYSTICK_LOAD)-SYSTICK_DELAY_CALIB; \ while((start - SysTick->VAL) < ticks); \ } while (0) |
Which can be used by calling the DELAY_US() function wherever you want in the code as shown below.
|
1 |
DELAY_US(10); // Delay 10us |
For delay periods greater than > 1000µs, you should use the DELAY_MS() function instead. The systick timer is 24 bits only and it can’t keep track of long periods before overflowing.
STM32 SysTick Delay_ms (Delay Milliseconds)
Based on the systick delay microseconds shown earlier, I’ve implemented the following DELAY_MS() macro to create a delay in milliseconds by calling the DELAY_US() in a loop for as long as required by the user.
Here is the DELAY_MS() function’s code.
|
1 2 3 4 5 6 |
#define DELAY_MS(ms) \ do { \ for (uint32_t i = 0; i < ms; ++i) { \ DELAY_US(1000); \ } \ } while (0) |
Which can be used by calling the DELAY_MS() function wherever you want in the code as shown below.
|
1 |
DELAY_MS(100); // Delay 100ms |
STM32 SysTick Delay Accuracy Testing
To test the proposed STM32 systick timer based delay functions, I’ve created a demo project that has a GPIO output pin (PB0). In the test project, we’ll drive the output GPIO pin HIGH, use the delay_us or delay_ms function, drive the pin LOW, add another delay, and keep repeating.
By using a DSO (digital storage oscilliscope), we can take the measurement of the resulting pulse width to make sure it’s accurate enough. For this testing procedure to be as accurate as possible, I had to avoid using the HAL_GPIO_WritePin function, instead I’ve used my own GPIO direct register access macros that take less than 500ns to execute.
1) STM32 Microseconds delay_us() With SysTick
Here are the test results for the STM32 SysTick Microseconds Delay function:
| 1µs Delay | 10µs Delay |
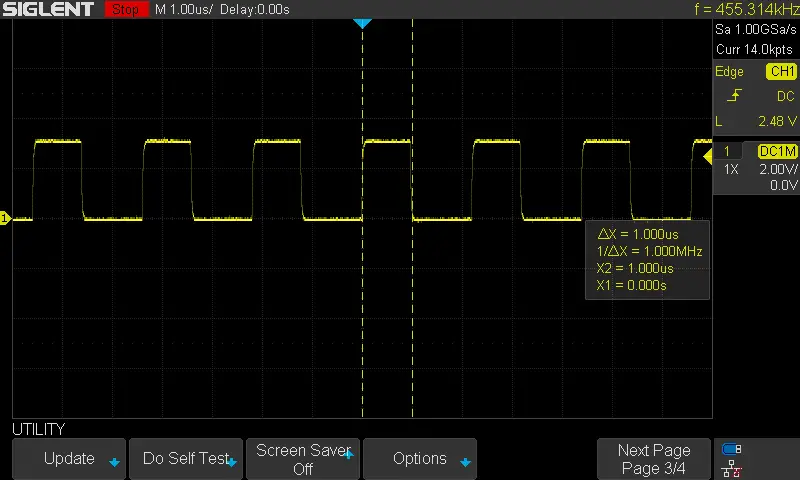 | 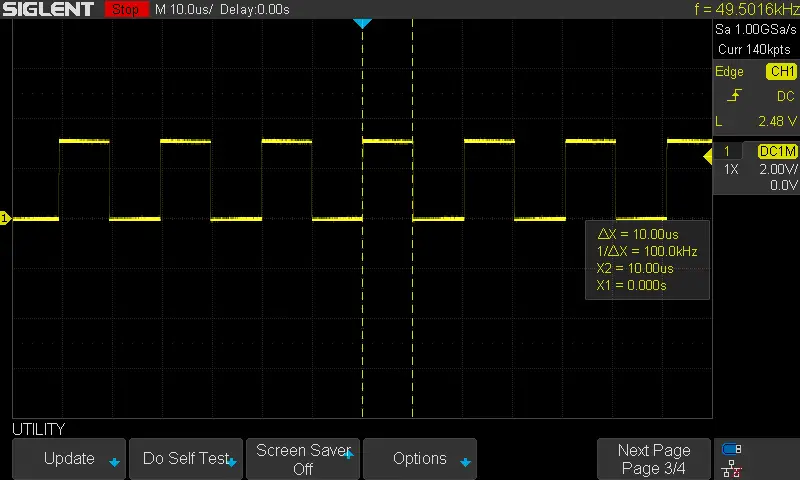 |
2) STM32 Milliseconds delay_ms() With SysTick
Here are the test results for the STM32 SysTick Milliseconds Delay function:
| 1ms Delay | 50ms Delay |
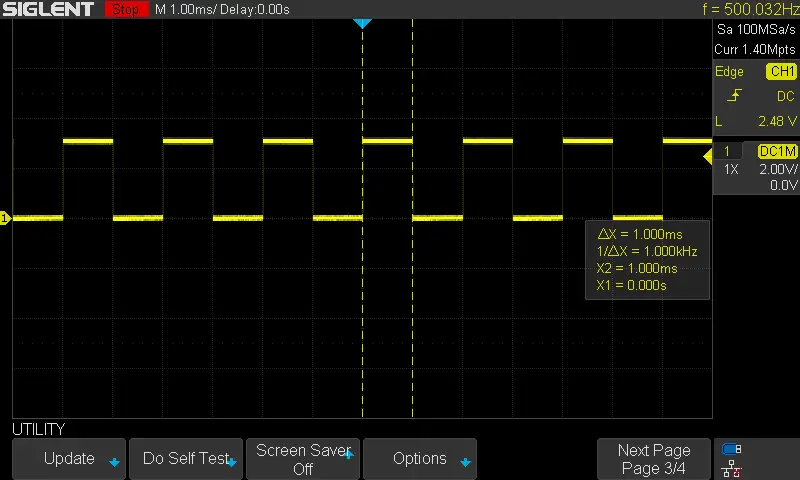 | 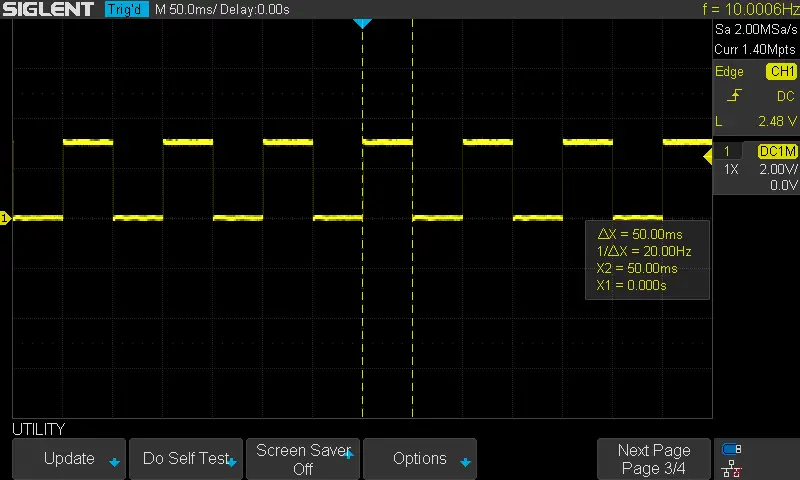 |
STM32 SysTick Delay Microseconds/Milliseconds [Full Test Code]
Here is the complete code listing for the STM32 systick microseconds/milliseconds delay test project. You can create a new STM32 project with any GPIO pin set as an output pin and copy the following code into your main.c file and start testing the provided delay functions on your own.
|
1 2 3 4 5 6 7 8 9 10 11 12 13 14 15 16 17 18 19 20 21 22 23 24 25 26 27 28 29 30 31 32 33 34 35 36 37 38 39 40 41 42 43 44 |
/* * LAB Name: STM32 SysTick Timer Delay Example * Author: Khaled Magdy * For More Info Visit: www.DeepBlueMbedded.com */ #include "main.h" #define GPIO_SET_PIN(port, pin) ((port)->BSRR = (pin)) #define GPIO_CLEAR_PIN(port, pin) ((port)->BSRR = (pin << 16u)) #define SYSTICK_LOAD (SystemCoreClock/1000000U) #define SYSTICK_DELAY_CALIB (SYSTICK_LOAD >> 1) #define DELAY_US(us) \ do { \ uint32_t start = SysTick->VAL; \ uint32_t ticks = (us * SYSTICK_LOAD)-SYSTICK_DELAY_CALIB; \ while((start - SysTick->VAL) < ticks); \ } while (0) #define DELAY_MS(ms) \ do { \ for (uint32_t i = 0; i < ms; ++i) { \ DELAY_US(1000); \ } \ } while (0) void SystemClock_Config(void); static void MX_GPIO_Init(void); int main(void) { HAL_Init(); SystemClock_Config(); MX_GPIO_Init(); while (1) { GPIO_SET_PIN(GPIOB, GPIO_PIN_0); DELAY_MS(50); GPIO_CLEAR_PIN(GPIOB, GPIO_PIN_0); DELAY_MS(50); } } |
The GPIO Direct Register Access Macros used in the testing of the systick delay functions above are illustrated in more detail in the tutorial linked below. It’s highly recommended to check it out so you can use it in your projects for testing the execution time of functions or anywhere you need to control the STM32 GPIO pins faster than using the HAL_GPIO function.
This article will give more in-depth information about the STM32 GPIO registers and how to access the GPIO pins way faster than using the HAL_GPIO functions.
Required Parts For STM32 Examples
All the example Code/LABs/Projects in this STM32 Series of Tutorials are done using the Dev boards & Electronic Parts Below:
| QTY. | Component Name | Amazon.com | AliExpress | eBay |
| 1 | STM32-F103 BluePill Board (ARM Cortex-M3 @ 72MHz) | Amazon | AliExpress | eBay |
| 1 | Nucleo-L432KC (ARM Cortex-M4 @ 80MHz) | Amazon | AliExpress | eBay |
| 1 | ST-Link V2 Debugger | Amazon | AliExpress | eBay |
| 2 | BreadBoard | Amazon | AliExpress | eBay |
| 1 | LEDs Kit | Amazon & Amazon | AliExpress | eBay |
| 1 | Resistors Kit | Amazon & Amazon | AliExpress | eBay |
| 1 | Capacitors Kit | Amazon & Amazon | AliExpress & AliExpress | eBay & eBay |
| 1 | Jumper Wires Pack | Amazon & Amazon | AliExpress & AliExpress | eBay & eBay |
| 1 | Push Buttons | Amazon & Amazon | AliExpress | eBay |
| 1 | Potentiometers | Amazon | AliExpress | eBay |
| 1 | Micro USB Cable | Amazon | AliExpress | eBay |
★ Check The Links Below For The Full Course Kit List & LAB Test Equipment Required For Debugging ★
Download Attachments
You can download all attachment files for this Article/Tutorial (project files, schematics, code, etc..) using the link below. Please consider supporting our work through the various support options listed in the link down below. Every small donation helps to keep this website up and running and ultimately supports the whole community.
Wrap Up
In conclusion, it was quite easy to use the STM32 Systick timer to create delay microseconds & milliseconds functions based on it. The code example provided in this tutorial should be generic enough to work just as fine on any STM32 target microcontroller, unlike the DWT-based delay function that’s not available in old Cortex-M processors.
If you’re just getting started with STM32, you need to check out the STM32 Getting Started Tutorial here.
Follow this STM32 Series of Tutorials to learn more about STM32 Microcontrollers Programming.


Can we use the HAL_Delay() function along with above delay function??
Absolutely, yes. This code doesn’t affect the configurations of the SysTick timer at all, therefore, the HAL_Delay() and any built-in timing functions will still be working just as fine.
Looks Good, Will try it.
I just discovered this website, Looks like just what I need . I have no clue why didn’t come across it till now.