| Previous Tutorial | Tutorial 39 | Next Tutorial | |||||
| STM32 Stepper Motor Control Library – Unipolar Examples [PART-1] | |||||||
| STM32 Course Home Page ???? | |||||||
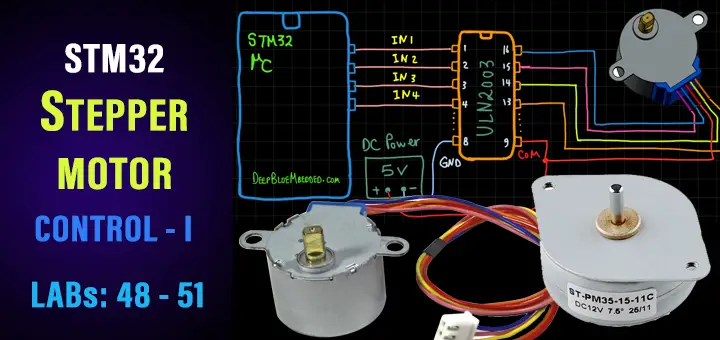
In this tutorial, we’ll be discussing Stepper Motor control with STM32 microcontrollers and ULN2003 motor driver IC. I’ll also show you the STM32 Stepper Motor library (driver) that I’ve developed for STM32 microcontrollers and discuss how it works and how it’s been built in this way. Including Stepper Motor Speed Control, Stepper Motor Direction Control, and Stepper Drive Modes (Full-Step, Half-Step, Wave Drive). For both Unipolar and Bipolar Stepper Motors all of which are supported by my library.
Through this tutorial, we’ll be creating 4 different example projects with STM32 uC (Nucleo32-L432KC board) and Unipolar stepper motors. Note that: part-2 of this tutorial will be released in the future to cover the bipolar stepper motors control using the same library after it gets implemented in the next version on GitHub.
We’ll conclude this tutorial with some tests, measurements, and spot the light on potential improvements and features that you can make and add to this driver library code. But first of all, we’ll discuss how the Stepper Motors work and how to control the Stepper Motor’s Speed, Torque via changing the drive mode, and finally the Direction of rotation.
In this tutorial: 4 LABs
| LAB 48 | 1 Unipolar Motor Full-Step Drive – Blocking Mode – Testing Our Stepper Library | ||||||
| LAB 49 | 1 Unipolar Motor Full-Step Drive + Speed & Direction Control – Non-Blocking Mode | ||||||
| LAB 50 | 1 Unipolar Motor Half-Step Drive + Speed & Direction Control – Non-Blocking Mode | ||||||
| LAB 51 | 2 Different Unipolar Motors Full-Step Drive + Speed Control – Non-Blocking Mode | ||||||
[toc]
Required Components For LABs
All the example code/LABs/projects in the course are going to be done using those boards below.
- Nucleo32-L432KC (ARM Cortex-M4 @ 80MHz) or (eBay)
- Blue Pill STM32-F103 (ARM Cortex-M3 @ 72MHz) or (eBay)
- ST-Link v2 Debugger or (eBay)
| QTY | Component Name | ???? Amazon.com | ???? eBay.com |
| 2 | BreadBoard | Amazon | eBay |
| 1 | LEDs Kit | Amazon Amazon | eBay |
| 1 | Resistors Kit | Amazon Amazon | eBay |
| 1 | Capacitors Kit | Amazon Amazon | eBay & eBay |
| 2 | Jumper Wires Pack | Amazon Amazon | eBay & eBay |
| 1 | 9v Battery or DC Power Supply | Amazon Amazon Amazon | eBay |
| 1 | Micro USB Cable | Amazon | eBay |
| 2 | Push Buttons | Amazon Amazon | eBay |
| 2 | Stepper Motor (Unipolar or Bipolar) | Amazon Amazon | eBay |
| 2 | ULN2804A Stepper Motor Driver IC (or A988) | Amazon | eBay |
| 1 | Potentiometers | Amazon Amazon | eBay |
★ Check The Full Course Complete Kit List
Some Extremely Useful Test Equipment For Troubleshooting:
- My Digital Storage Oscilloscope (DSO): Siglent SDS1104 (on Amazon.com) (on eBay)
- FeelTech DDS Function Generator: KKMoon FY6900 (on Amazon.com) (on eBay)
- Logic Analyzer (on Amazon.com) (on eBay)
Affiliate Disclosure: When you click on links in this section and make a purchase, this can result in this site earning a commission. Affiliate programs and affiliations include, but are not limited to, the eBay Partner Network (EPN) and Amazon.com.
Stepper Motors Control & Working Principles
At the beginning of this tutorial, I’d like to make sure that all of you have the basic concepts behind stepper motors operation and how we control the direction and speed of a stepper motor. Using a Darlington transistors array IC as a motor driver like the ULN2003 or ULN2804. All of that and more are discussed in this previous tutorial about Stepper motor control with ULN2003 driver. Check it out and come back to resume developing our stepper motor driver library for STM32 microcontrollers.
Unipolar VS Bipolar Stepper Motors
Generally speaking, there are 2 main internal configurations for stepper motors each of them is controlled (driven) in a uniquely different way. First of which is the unipolar stepper motors shown in the article above and also will be the topic of this tutorial as we’ll be controlling unipolar stepper motors with STM32 microcontrollers. The second configuration is called bipolar stepper motors to be discussed in part 2 of this tutorial.
However, we’ll be developing our stepper motor driver library in such a way that makes it very easy for the user to switch the configuration of his/her motor and still use the same API functions to control the stepper motor whether it’s unipolar or bipolar.
| Unipolar Stepper | Bipolar Stepper |
| Lower Torque | Higher Torque |
| Two Windings Per Phase | Single Winding Per Phase |
| Much Easier To Driver (requires 4 transistors array) | A little bit harder to drive (Needs polarity inversion with an H-Bridge) |
Stepper Motors Drive Modes
To drive a stepper motor (make it rotate), you need to activate the coils in a certain pattern to have the motor’s shaft rotating. This is called stepping, each step of the pattern sequence results in a step made by the motor’s rotor part. There are 4 different ways or patterns to drive stepper motors: [ Full-Step Drive, Half-Step Drive, Wave Drive, and Microstepping ].
In this tutorial, we’ll be focusing on the first 3 (Full-Step, Half-Step, and Wave Drive). And the option will be implemented into our library so the user can easily change the drive mode for a specific stepper motor in his/her application. Down below are the bit-patterns or sequences for the 3 stepper drive modes.
Wave Drive
| index | IN1 | IN2 | IN3 | IN4 |
| 0 | 1 | 0 | 0 | 0 |
| 1 | 0 | 1 | 0 | 0 |
| 2 | 0 | 0 | 1 | 0 |
| 3 | 0 | 0 | 0 | 1 |
Full-Step Drive
| index | IN1 | IN2 | IN3 | IN4 |
| 0 | 1 | 1 | 0 | 0 |
| 1 | 0 | 1 | 1 | 0 |
| 2 | 0 | 0 | 1 | 1 |
| 3 | 1 | 0 | 0 | 1 |
Half-Step Drive
| index | IN1 | IN2 | IN3 | IN4 |
| 0 | 1 | 0 | 0 | 0 |
| 1 | 1 | 1 | 0 | 0 |
| 2 | 0 | 1 | 0 | 0 |
| 3 | 0 | 1 | 1 | 0 |
| 4 | 0 | 0 | 1 | 0 |
| 5 | 0 | 0 | 1 | 1 |
| 6 | 0 | 0 | 0 | 1 |
| 7 | 1 | 0 | 0 | 1 |
Stepper Motors Driver ICs
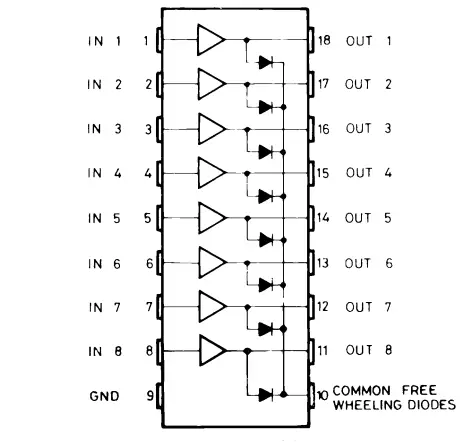
As we’ve stated earlier, the way we’re going to drive a stepper motor depends on the internal winding configuration. Whether it’s a Unipolar stepper motor or a Bipolar stepper motor. For unipolar stepper motors, we’ll be using ULN2003 or ULN2804 IC which is an array of Darlington transistors. Rated for 0.5A of continuous current per transistor unit and output voltage up to 50v.
This file is the datasheet for this IC and here is how it looks like internally. In the next section, we’ll see how to connect it to STM32 microcontrollers for doing the practical 5 LAB examples.
For Bipolar transistors, we’ll be using the same H-Bridge IC used for controlling DC Motors which is L293D. And of course any equivalent driver IC will work just as fine. It all depends on your motor’s model and its current consumption so you should pick the driver that can handle that amount of current.
STM32 Stepper Motor Control (28BYJ-48)
In this section, I’ll show you the specifications of the stepper motors we’ll be using in the LAB examples. Mainly, we’ll be using the 28BYJ-48 model but at the final LAB, we’ll use another very common model of unipolar stepper motors rated at 12v as shown below.
Unipolar Stepper Motor 7.5° (12v)
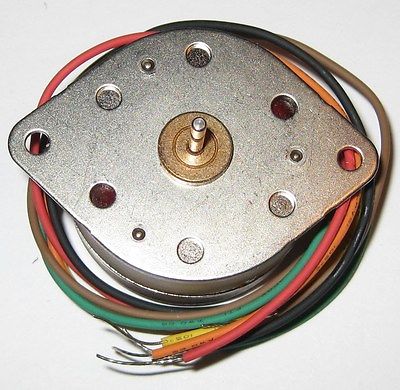
Technical Specs
- Rated Voltage: 12 Vdc
- Rated Current/Phase: 259 mA
- No. of Phase: 4
- DC Coil Resistance: 50Ω / phase ±7% (100Ω / coil)
- Step Angle: 7.5° / phase

As stated in its Datasheet
28BYJ-48 Unipolar Stepper Motor (5v)
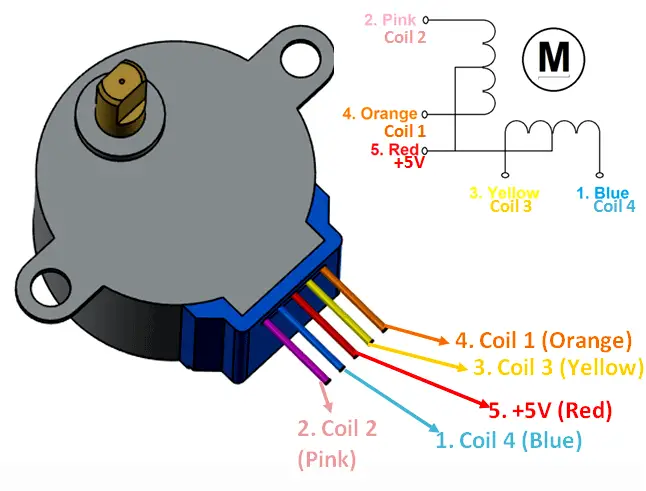
As stated in the datasheet, the 28BYJ-48 motor has a step angle of 11.25°. That means there are 32 steps per revolution (360°/11.25° = 32). Note that this is a revolution of the main rotor, not the final shaft as this motor has an internal small gearbox. The gear ratio is about 1/63.68, hence we can say that there are 63.68×32 = 2038 steps per revolution for the motor’s shaft.
The rated operating voltage is 5v and make sure to use an external power supply to drive the motor not to power it from the microcontroller’s board.
What’s the maximum speed for the 28BYJ-48 stepper motor? it’s around 10-15 RPM as I managed to get from testing.
More info can be found in the datasheet
STM32 & Unipolar Stepper Motor Connection Diagram
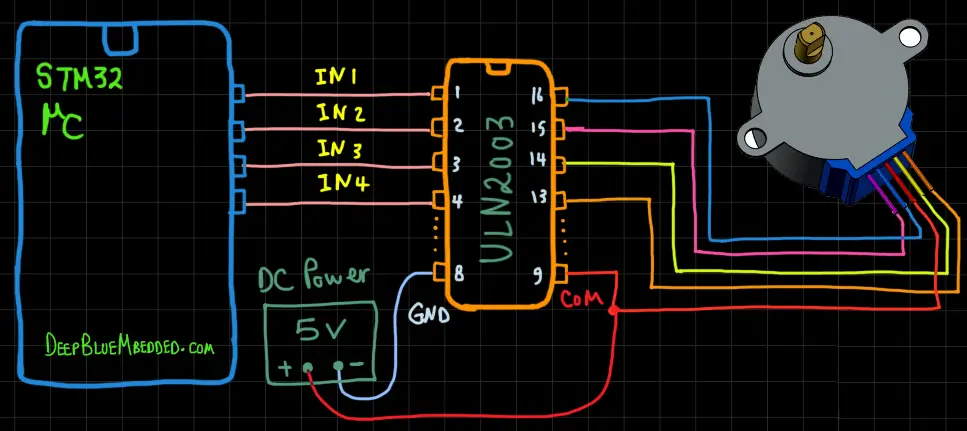
Guidelines For Designing Our STM32 Stepper Motor Driver (Library)
Here are some guidelines and requirements that I did consider before designing the STEPPER driver library with the current APIs. It can be improved in the future but for the beginning, it should be in line with the following:
- Has Configurable TIMERx For Providing The Timing Control
- Has Configurable Drive Mode For Each Stepper Motor Instance [ Full-Step, Half-Step, Wave Drive ]
- Support Both Unipolar And Bipolar Motors. (Bipolar won’ be implemented in this tutorial)
- Step Function That Runs in Blocking Mode
- Step Function That Runs in Non-Blocking Mode
- Individual Speed Control For All Stepper Motor Instances
- Individual Direction Control For All Stepper Motor Instances
- Any Number of Stepper Motors Shall Be Running Simultaneously With The Least CPU Time Consumption As Possible
- Has a Stop Function That Immediately Stops The Specified Motor Even if it hasn’t completed the last remaining steps
STM32 Stepper Motor Library (Driver)
The ECUAL STEPPER driver is built for STM32 microcontrollers using one Timer for all timing purposes and 4 GPIO pins / Motor. You’ll have to configure an instance of it and use the APIs to initialize, start, change speed or direction, stop your motor, and that’s all. The code should be easily ported to any other STM32 microcontroller or reconfigured to use any Timer and GPIO pins that you want just as we’ll see in this section. And here is a link for the course’s repo, and you’ll find the STEPPER driver in the ECUAL directory as usual.
STEPPER MOTOR Driver Code Files
The STEPPER driver consists of the following files:
|
 |
You’ll need only to modify the configuration files. The source code for this driver is found in (STEPPER.c) and to use it you’ll include the header (STEPPER.h). Nothing in the source code needs to be changed at all unless you need to add any extra features or customize the driver for your application’s needs. For today’s LABs, we’ll only be changing the configuration files to build some test applications.
Therefore, I’ll write here the code listing for the STEPPER.h & STEPPER_cfg.c files.
STEPPER.h File
|
1 2 3 4 5 6 7 8 9 10 11 12 13 14 15 16 17 18 19 20 21 22 23 24 25 26 27 28 29 30 31 32 33 34 35 36 37 38 39 40 41 |
// Replace The "#include" File Below With The CPU Relevant One For Your Board #include "stm32l4xx.h" // The Number OF Stepper Motors To Be Used In The Project #define STEPPER_UNITS 1 // Stepper Timer Base Options #define STEPPER_TIMER_EN 1 #define STEPPER_TIMER TIM15 #define STEPPER_TIMER_CLK 80 #define STEPPER_TIME_BASE 1 // Stepper Motor Configurations & Mode #define WAVE_DRIVE 0 #define FULL_STEP_DRIVE 1 #define HALF_STEP_DRIVE 2 #define STEPPER_UNIPOLAR 0 #define STEPPER_BIPOLAR 1 #define DIR_CW 0 #define DIR_CCW 1 // Stepper Configuration Parameter Structure typedef struct { GPIO_TypeDef * IN_GPIO[4]; uint16_t IN_PIN[4]; uint16_t STEPS_PER_REV; uint8_t STEPPER_Cfg; uint8_t STEPPING_Mode; }STEPPER_CfgType; /*-----[ Prototypes For All Functions ]-----*/ void STEPPERS_Init(void); void STEPPERS_Init_TMR(TIM_HandleTypeDef* TMR_Handle); void STEPPER_SetSpeed(uint8_t au8_STEPPER_Instance, uint16_t au16_RPM); void STEPPER_Step_Blocking(uint8_t au8_STEPPER_Instance, uint32_t au32_Steps, uint8_t au8_DIR); void STEPPER_Step_NonBlocking(uint8_t au8_STEPPER_Instance, uint32_t au32_Steps, uint8_t au8_DIR); void STEPPER_Stop(uint8_t au8_STEPPER_Instance); void STEPPER_Main(void); void STEPPER_TMR_OVF_ISR(TIM_HandleTypeDef* htim); |
If you’re willing to use multiple Stepper Motors, just adjust that number definition (STEPPER_UNITS). Other parameters will be detailed later in the next sections.
STEPPER_cfg.c File
|
1 2 3 4 5 6 7 8 9 10 11 12 13 |
#include "STEPPER.h" const STEPPER_CfgType STEPPER_CfgParam[STEPPER_UNITS] = { // Stepper Motor 1 Configurations { {GPIOA, GPIOA, GPIOB, GPIOB}, {GPIO_PIN_8, GPIO_PIN_11, GPIO_PIN_5, GPIO_PIN_4}, 2038, STEPPER_UNIPOLAR, WAVE_DRIVE } }; |
I’ll discuss those configuration parameters in the next section down below.
Available Configurations For STEPPER Motor Driver
From the code above in STEPPER.h & STEPPER_cfg.c you can see that there are a handful of parameters in the configuration structure. The config structure will be used to assign the four IN1:4 GPIO pins, the associated TIMER peripheral you’ll be using (it can be TIM1, 2, and so on), the motor’s Steps Per Revolution, the motor internal configuration (unipolar or bipolar), and finally the drive mode for that specific stepper motor instance (Full-Step, Half-Step, Wave Drive).
STEPPER MOTOR Driver APIs
As you’ve seen in the STEPPER.h file, the provided APIs do all the basic functionalities that you may need from a Stepper Motor driver library.
STEPPERS_Init: initializes the required GPIO pins for IN1:4 pins without a timer.
STEPPERS_Init_TMR: initializes the required GPIO pins for IN1:4 pins and the selected timer with the defined time base.
STEPPER_Step_Blocking: Moves the stepper motor a certain amount of steps in the selected direction in a blocking mode
STEPPER_Step_NonBlocking: Moves the stepper motor a certain amount of steps in the selected direction in a non-blocking mode
STEPPER_SetSpeed: Sets the speed of the motor
STEPPER_Stop: Stops the selected motor immediately
STEPPER_Main: Handles the main logic for all of your stepper motors. To be called within your OS or any timing generator event.
STEPPER_TMR_OVF_ISR: Handles the main logic of all your stepper motors exactly like the previous main function but it’s going to be used as an ISR for the timer you’ve selected to generate the time base.
The example LABs will put everything under test and you’ll see how and when to use each of these functions.
Typical Usage Application Example
Here is a typical usage application for this driver code in order to initialize a Stepper Motor with Timer15 as a time base generator, Set the motor’s speed to 14 RPM, and commanding it to perform 5000 steps in Clock-Wise direction in a non-blocking way (with timer base not delay).
Just to show you how easy it is to use the library in your application layer without having any hard-coupled software component to the underlying hardware with no dependencies at all.
|
1 2 3 4 5 6 7 8 9 10 11 12 13 14 15 16 17 18 19 20 21 22 23 24 25 26 27 |
#include "main.h" #include "../ECUAL/STEPPER/STEPPER.h" #define STEPPER_MOTOR1 0 TIM_HandleTypeDef htim15; void SystemClock_Config(void); int main(void) { HAL_Init(); SystemClock_Config(); STEPPERS_Init_TMR(&htim15); STEPPER_SetSpeed(STEPPER_MOTOR1, 14); STEPPER_Step_NonBlocking(STEPPER_MOTOR1, 5000, DIR_CW); while (1) { } } void HAL_TIM_PeriodElapsedCallback(TIM_HandleTypeDef* htim) { STEPPER_TMR_OVF_ISR(htim); } |
How My STM32 Stepper Motor Library Works?
In this section, I’ll detail the operation of the STM32 stepper motor library and discuss the design goals and decisions made to achieve those goals. And to see how the current version of the library covers the basic functionalities we need. So you can at least use it with ease in your applications or ultimately, hopefully, you can learn how to create something better on your own from scratch or snipe anything that could be done in a better way.
Available Configurations
There are some parameters that you can configure in this library located in the header file (STEPPER.h) and the configuration source file (STEPPER_cfg.c) as it used to be in all of my drivers in this series of tutorials. Let’s start with the config parameters in the main header file.
|
1 2 3 4 5 6 7 8 9 10 11 |
// Replace The "#include" File Below With The CPU Relevant One For Your Board #include "stm32l4xx.h" // The Number OF Stepper Motors To Be Used In The Project #define STEPPER_UNITS 1 // Stepper Timer Base Options #define STEPPER_TIMER_EN 1 #define STEPPER_TIMER TIM15 #define STEPPER_TIMER_CLK 80 #define STEPPER_TIME_BASE 1 |
Note: you need to replace the first include line with the specific processor file for your CPU. It can be easily found in the project files generated by CubeMX depending on your STM32 microcontroller’s family.
You can theoretically use this driver library to control any number of stepper motors simultaneously. Just don’t forget to adjust the STEPPER_UNITS define line to reflect the number of stepper motors to be used in your project.
Next, we have the time base control parameters. You need to adjust them to match your needs, like the TIMERx selection, time base, and so on.
STEPPER_TIMER_EN should be set to 1 in order to enable the stepper motor library in timer mode, otherwise, you can make it 0 to disable the timer and operate in blocking mode using delays (not recommended).
STEPPER_TIMER_CLK is the clock you’re providing for that specific timer module in MHz.
STEPPER_TIME_BASE is the time base for the selected timer module in mSec. You can leave it as it’s (1ms) or make it larger or smaller. But note that, at 1ms the CPU receives and handles 1000 timer interrupts per second. And if you set it to 0.1, the CPU will have to handle 10000 timer interrupts per second which is quite a lot and unnecessary. A lower time-base gives you more precise speed control but the CPU time consumption will be too much to justify.
Those configurations are global as per the Stepper motor library which uses only one timer for all timing tasks. Now, let’s move to the individual stepper motor instances configurations file (STEPPER_cfg.c).
|
1 2 3 4 5 6 7 8 9 10 11 12 13 14 15 16 17 18 19 |
const STEPPER_CfgType STEPPER_CfgParam[STEPPER_UNITS] = { // Stepper Motor 1 Configurations { {GPIOA, GPIOA, GPIOB, GPIOB}, {GPIO_PIN_8, GPIO_PIN_11, GPIO_PIN_5, GPIO_PIN_4}, 2038, STEPPER_UNIPOLAR, HALF_STEP_DRIVE }, // Stepper Motor 2 Configurations { {GPIOA, GPIOA, GPIOA, GPIOA}, {GPIO_PIN_4, GPIO_PIN_5, GPIO_PIN_6, GPIO_PIN_7}, 48, STEPPER_UNIPOLAR, FULL_STEP_DRIVE } }; |
As you can see in the configuration file code example above, there are 2 stepper motor instances created. The first one has the defined 4 GPIO pins, 2038 steps per revolution, unipolar configuration, and the drive mode is Half-Step.
The second motor has similar configurations but it’s going to be driven in Full-Step mode and it has a different number of steps per revolution. And you can still have them running at the exact same speed (if you want to) using the provided APIs.
Initialization Procedure
You’ve got 2 functions to initialize the stepper motors in the project. Both of which will initialize the GPIO pins required to control all the defined motors in your project all at once in a single call. But one of them is meant to be used in a blocking system where there is no timer defined.
|
1 |
void STEPPERS_Init(void); |
And the other is meant to be used in a non-blocking system where you’ve chosen a specific timer module to provide the time base we want. The init function will calculate and set both PSC and ARR to achieve your desired time base value (in ms).
|
1 |
void STEPPERS_Init_TMR(TIM_HandleTypeDef* TMR_Handle); |
Stepper Motor Blocking Step
Each stepper motor in your project has a static global structure in the source code file for the stepper library that keeps track of the stepping information. Steps count, current index, speed, remaining ticks, etc.
The motor step function in the blocking mode uses that information and sends the control signals to the driver IC with fixed unit time delays depending on the selected motor speed which is affected by the steps per revolution count for that specific motor. The equations are derived by hand first and then implemented in C. Here is the function definition and note that the step function is the one that handles most of the logic operations.
|
1 2 3 4 5 6 7 8 9 10 11 12 13 14 15 |
void STEPPER_Step_Blocking(uint8_t au8_STEPPER_Instance, uint32_t au32_Steps, uint8_t au8_DIR) { uint32_t i = 0; uint32_t DelayTimeMs = 0; gs_STEPPER_info[au8_STEPPER_Instance].Blocked = 1; DelayTimeMs = (60000/(gs_STEPPER_info[au8_STEPPER_Instance].RPM * STEPPER_CfgParam[au8_STEPPER_Instance].STEPS_PER_REV)); // Send The Control Signals for(i=0; i<au32_Steps; i++) { STEPPER_One_Step(au8_STEPPER_Instance); DWT_Delay_ms(DelayTimeMs); } gs_STEPPER_info[au8_STEPPER_Instance].Blocked = 0; } |
Stepper Motor Non-Blocking Step
Each stepper motor in your project has a static global structure in the source code file for the stepper library that keeps track of the stepping information. Steps count, current index, speed, remaining ticks, etc.
The motor step function in the non-blocking mode has only to update the steps count by adding on the existing current steps count. And the actual stepping logic is handled in the timer interrupt service routine (ISR). Here is the function definition:
|
1 2 3 4 5 |
void STEPPER_Step_NonBlocking(uint8_t au8_STEPPER_Instance, uint32_t au32_Steps, uint8_t au8_DIR) { gs_STEPPER_info[au8_STEPPER_Instance].Steps += au32_Steps; gs_STEPPER_info[au8_STEPPER_Instance].Dir = au8_DIR; } |
As you can see, it just adds to the steps count and that’s all.
Stepper Motor Speed Control
Using the provided APIs, you can easily control the RPM (rotations per minute) speed of each individual stepper motor in your system. This is achieved by a Tick system implemented in the library itself to keep track of each individual motor tick count and when it needs to proceed to the next step sequence. The MaxTicks count defines that period, provided that each tick time is the actual time-base you’ve chosen for your timer (by default it’s 1ms).
Keep in mind that in half-step mode the motor needs to do twice as many steps compared to other drive modes in order to maintain the same speed desired by the user. That’s why I did left-shift (equals multiplying by 2) the steps per revolution. And then plug that in the final equation as shown below.
|
1 2 3 4 5 6 7 8 9 10 11 12 13 14 15 |
void STEPPER_SetSpeed(uint8_t au8_STEPPER_Instance, uint16_t au16_RPM) { uint32_t Total_Steps = 0; gs_STEPPER_info[au8_STEPPER_Instance].RPM = au16_RPM; if(STEPPER_CfgParam[au8_STEPPER_Instance].STEPPING_Mode == HALF_STEP_DRIVE) { Total_Steps = STEPPER_CfgParam[au8_STEPPER_Instance].STEPS_PER_REV << 1; } else { Total_Steps = STEPPER_CfgParam[au8_STEPPER_Instance].STEPS_PER_REV; } gs_STEPPER_info[au8_STEPPER_Instance].Max_Ticks = (60000.0)/(STEPPER_TIME_BASE * Total_Steps * au16_RPM); } |
Stepper Motor Direction Control
To control the stepper motor rotation direction, you’ll have to change the way you cycle through the sequence tables shown earlier in this tutorial (for full-step, half-step, wave drive). Changing the order of those bit patterns will result in reversing the motor rotation direction.
This is being handled by the single-step function which is defined as a static function in the library source code file (STEPPER.c).
Stepper Motor Drive Mode Control
The user can easily switch the motor drive mode by reconfiguring the stepper motor structure in the (STEPPER_cfg.c) file. The supported drive modes are (Full-Step, Half-Step, Wave Drive). Each of them has a static global table to save the bit patterns to be sent over to the corresponding GPIO pins.
|
1 2 3 4 5 6 7 8 9 10 11 12 13 14 15 16 17 18 19 20 21 22 |
static uint8_t UNIPOLAR_WD_PATTERN[4][4] = { {1, 0, 0, 0}, {0, 1, 0, 0}, {0, 0, 1, 0}, {0, 0, 0, 1} }; static uint8_t UNIPOLAR_FS_PATTERN[4][4] = { {1, 1, 0, 0}, {0, 1, 1, 0}, {0, 0, 1, 1}, {1, 0, 0, 1} }; static uint8_t UNIPOLAR_HS_PATTERN[8][4] = { {1, 0, 0, 0}, {1, 1, 0, 0}, {0, 1, 0, 0}, {0, 1, 1, 0}, {0, 0, 1, 0}, {0, 0, 1, 1}, {0, 0, 0, 1}, {1, 0, 0, 1} }; |
STM32 Unipolar Stepper Motor Control (Blocking) – LAB
| LAB Number | 48 |
| LAB Title | 1 Unipolar Motor Full-Step Drive – Blocking Mode – Testing Our Stepper Library |
- Set up a new project as usual with a system clock @ 80MHz (STM32L432KC) or whatever your uC board supports
- Add the ECUAL / STEPPER driver files to our project. As shown here
- Configure 1 STEPPER motor instance in STEPPER_cfg.c file
- Initialize the STEPPER motor in the main application, set the speed to 10 RPM, make it go for 6000 steps (about 3 complete revolutions nearly)

And now, let’s build this system step-by-step
Step1: Open CubeMX & Create New Project
Step2: Choose The Target MCU & Double-Click Its Name
STM32L432KC (the one I’ll be using) or any other STM32 part you’ve got
Step3: Go To The RCC Clock Configuration
Step4: Set The System Clock To Be 80MHz or whatever your uC board supports
Step5: Enable Any TIMERx
We’ll have to do this step just to have the TIM_HAL files added to our project by CubeMX. Those files are required by the stepper motor library even though we’ll not be using a timer for this lab. As we’re going to operate in the blocking mode.
This step will result in adding a TIMER_Init function in our code by CubeMX, but we’ll remove it afterward as well as the timer handler global variable.
Step6: Generate The Initialization Code & Open The Project In Your IDE
Step7: Add the ECUAL/ STEPPER driver files to your project
Follow This Tutorial which shows you How To Add Any ECUAL Driver To An STM32 Project step-by-step.
You basically right-click the project name in the IDE’s navigator and choose to create a new > source folder. And name it ECUAL and go to the GitHub repo, download the files and copy the “STEPPER” folder and back to the IDE, right-click on the ECUAL and paste the library into it.
Step8: Add the util files to your project
Now, we can start developing our application in the main.c source file.
Here Are The Drivers Configurations I Used For This LAB
STEPPER_cfg.c File
|
1 2 3 4 5 6 7 8 9 10 11 |
const STEPPER_CfgType STEPPER_CfgParam[STEPPER_UNITS] = { // Stepper Motor 1 Configurations { {GPIOA, GPIOA, GPIOB, GPIOB}, {GPIO_PIN_8, GPIO_PIN_11, GPIO_PIN_5, GPIO_PIN_4}, 2038, STEPPER_UNIPOLAR, WAVE_DRIVE } }; |
STEPPER.h File
|
1 2 3 4 5 6 7 8 |
// The Number OF Stepper Motors To Be Used In The Project #define STEPPER_UNITS 1 // Stepper Timer Base Options #define STEPPER_TIMER_EN 0 #define STEPPER_TIMER TIM15 #define STEPPER_TIMER_CLK 80 #define STEPPER_TIME_BASE 1 |
Here is The Application Code For This LAB (main.c)
|
1 2 3 4 5 6 7 8 9 10 11 12 13 14 15 16 17 18 19 20 |
#include "main.h" #include "../ECUAL/STEPPER/STEPPER.h" #define STEPPER_MOTOR1 0 void SystemClock_Config(void); int main(void) { HAL_Init(); SystemClock_Config(); STEPPERS_Init(); STEPPER_SetSpeed(STEPPER_MOTOR1, 10); STEPPER_Step_Blocking(STEPPER_MOTOR1, 6000, DIR_CW); while (1) { } } |
Download The STM32 Stepper Motor Unipolar Control – Blocking – LAB48
The Result For This LAB Testing (Video)
STM32 Stepper Motor Control Speed & Direction Full-Step – LAB
| LAB Number | 49 |
| LAB Title | 1 Unipolar Motor Full-Step Drive + Speed & Direction Control – Non-Blocking Mode |
- Set up a new project as usual with a system clock @ 80MHz (STM32L432KC) or whatever your uC board supports
- Enable TIMERx in CubeMX
- Enable Any ADC Channel (For Potentiometer) in CubeMX
- Enable Any GPIO Input pin (For Button)l in CubeMX
- Add the ECUAL / STEPPER driver files to our project. As shown here
- Add the util files to our project
- Configure 1 Stepper Motor instance in STEPPER_cfg.c file
- Initialize the Stepper Motor in the main application, read an analog potentiometer with ADC. And use that reading to control the motor speed in the main loop of the system. Read the button and use it to flip the direction of motor rotation. Repeat!
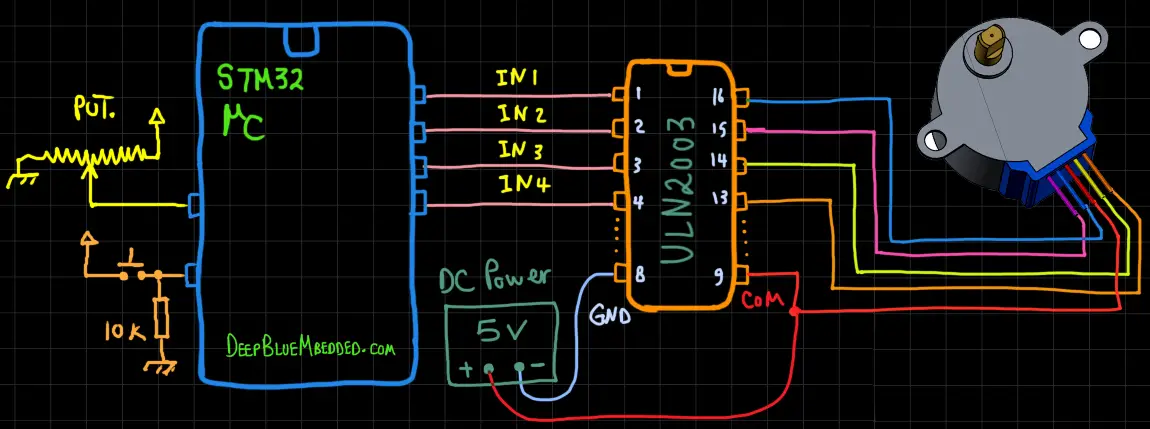
And now, let’s build this system step-by-step
Step1: Open CubeMX & Create New Project
Step2: Choose The Target MCU & Double-Click Its Name
STM32L432KC (the one I’ll be using) or any other STM32 part you’ve got
Step3: Go To The RCC Clock Configuration
Step4: Set The System Clock To Be 80MHz or whatever your uC board supports
Step5: Enable Any TIMERx + Enable its NVIC Global Interrupt Signal
We’ll have to do this step just to have the TIM_HAL files added to our project by CubeMX. Those files are required by the stepper motor library which will handle the timer initialization instead of the auto-generated function.
This step will result in adding a TIMER_Init function in our code by CubeMX, but we’ll remove it afterward. However, we’ll keep the global timer handler variable which you should pass to the Stepper initialization function as you’ll see in the project application source code down below.
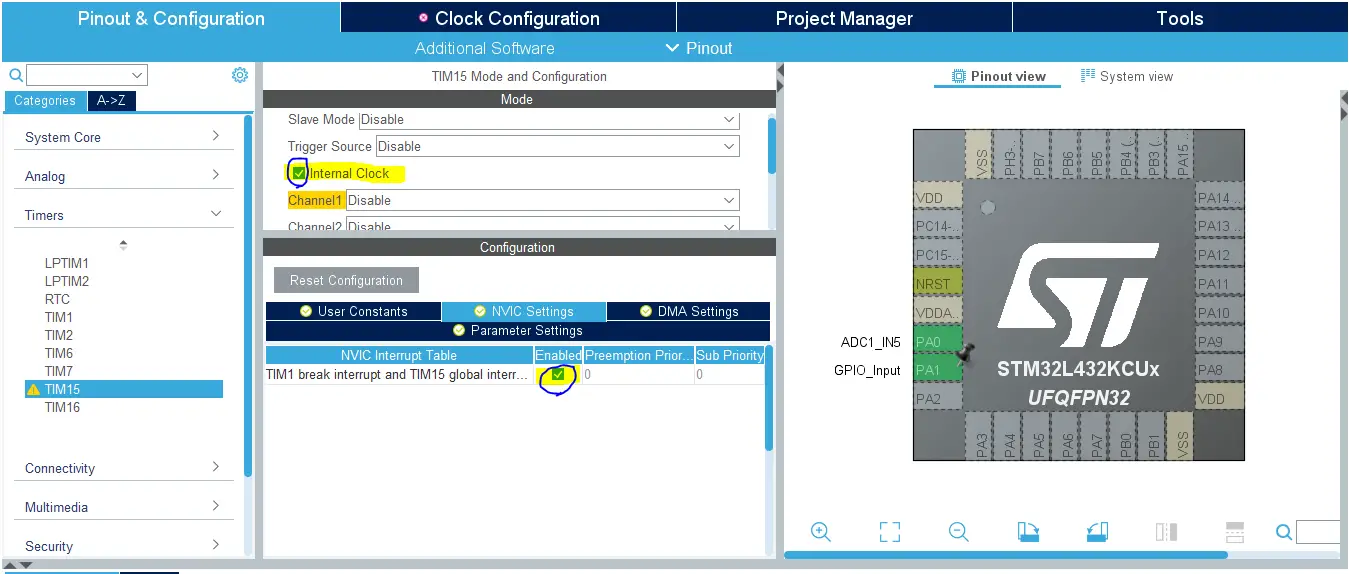
Step6: Enable The ADCx / CHx That You’ll Be Using For The Potentiometer
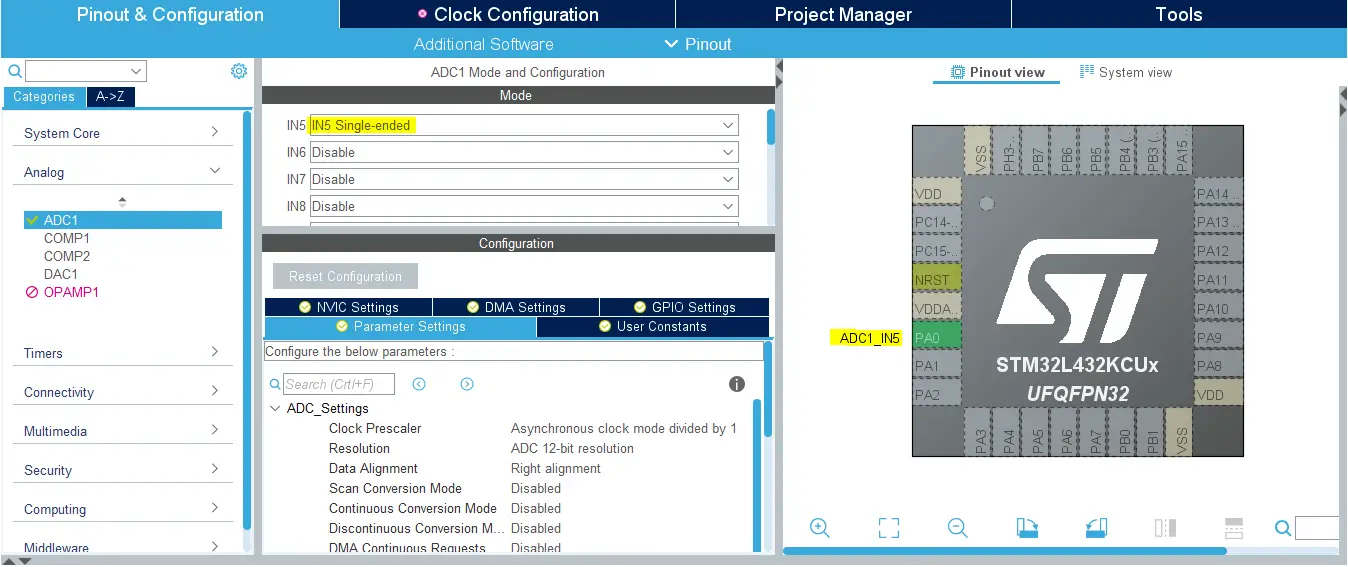
Step7: Enable Any GPIO Pin That You’ll Be Using For The Push Button
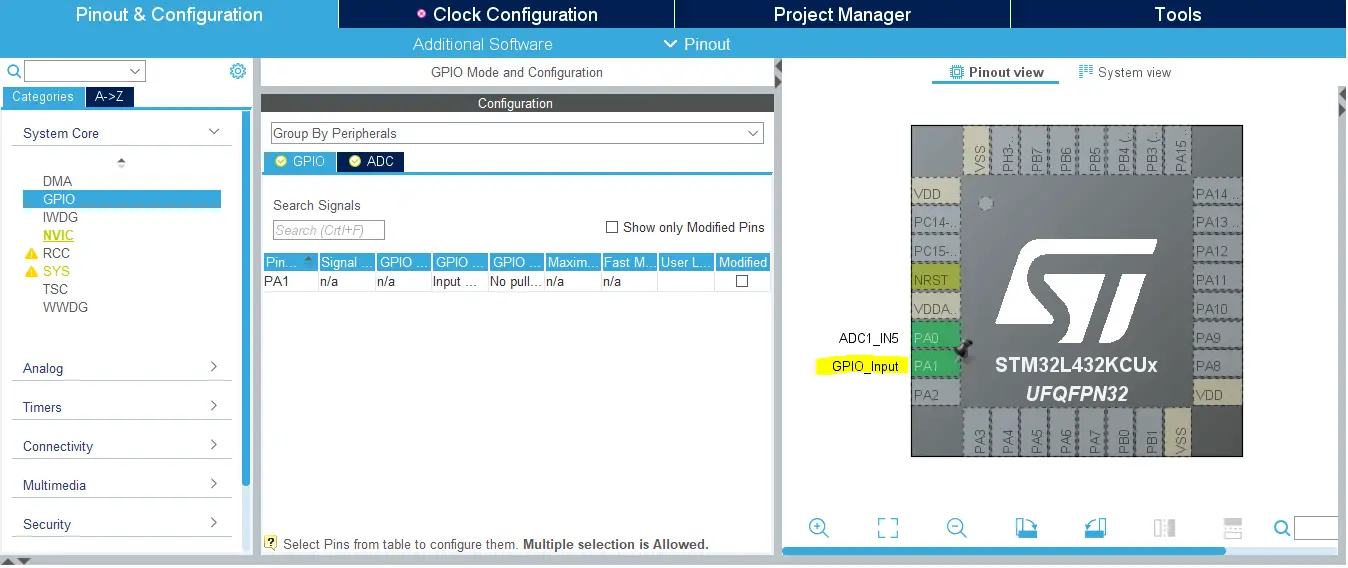
Step8: Generate The Initialization Code & Open The Project In Your IDE
Step9: Add the ECUAL/ STEPPER driver files to your project
Follow This Tutorial which shows you How To Add Any ECUAL Driver To An STM32 Project step-by-step.
You basically right-click the project name in the IDE’s navigator and choose to create a new > source folder. And name it ECUAL and go to the GitHub repo, download the files and copy the “STEPPER” folder and back to the IDE, right-click on the ECUAL and paste the library into it.
Step10: Add the util files to your project
Now, we can start developing our application in the main.c source file.
Here Are The Drivers Configurations I Used For This LAB
STEPPER_cfg.c File
|
1 2 3 4 5 6 7 8 9 10 11 |
const STEPPER_CfgType STEPPER_CfgParam[STEPPER_UNITS] = { // Stepper Motor 1 Configurations { {GPIOA, GPIOA, GPIOB, GPIOB}, {GPIO_PIN_8, GPIO_PIN_11, GPIO_PIN_5, GPIO_PIN_4}, 2038, STEPPER_UNIPOLAR, FULL_STEP_DRIVE } }; |
STEPPER.h File
|
1 2 3 4 5 6 7 8 |
// The Number OF Stepper Motors To Be Used In The Project #define STEPPER_UNITS 1 // Stepper Timer Base Options #define STEPPER_TIMER_EN 1 #define STEPPER_TIMER TIM15 #define STEPPER_TIMER_CLK 80 #define STEPPER_TIME_BASE 1 |
Here is The Application Code For This LAB (main.c)
|
1 2 3 4 5 6 7 8 9 10 11 12 13 14 15 16 17 18 19 20 21 22 23 24 25 26 27 28 29 30 31 32 33 34 35 36 37 38 39 40 41 42 43 44 45 46 47 48 49 50 51 |
#include "main.h" #include "../ECUAL/STEPPER/STEPPER.h" #define STEPPER_MOTOR1 0 TIM_HandleTypeDef htim15; ADC_HandleTypeDef hadc1; void SystemClock_Config(void); static void MX_GPIO_Init(void); static void MX_ADC1_Init(void); int main(void) { uint16_t AD_RES = 0; uint8_t Stepper1_Dir = DIR_CW; HAL_Init(); SystemClock_Config(); MX_GPIO_Init(); MX_ADC1_Init(); STEPPERS_Init_TMR(&htim15); STEPPER_Step_NonBlocking(STEPPER_MOTOR1, 200000, Stepper1_Dir); while (1) { HAL_ADC_Start(&hadc1); HAL_ADC_PollForConversion(&hadc1, 1); AD_RES = HAL_ADC_GetValue(&hadc1); STEPPER_SetSpeed(STEPPER_MOTOR1, AD_RES>>8); if(HAL_GPIO_ReadPin (GPIOA, GPIO_PIN_1)) { if(Stepper1_Dir == DIR_CW) { Stepper1_Dir = DIR_CCW; } else { Stepper1_Dir = DIR_CW; } STEPPER_Step_NonBlocking(STEPPER_MOTOR1, 1000, Stepper1_Dir); while(HAL_GPIO_ReadPin (GPIOA, GPIO_PIN_1)); } HAL_Delay(1); } } void HAL_TIM_PeriodElapsedCallback(TIM_HandleTypeDef* htim) { STEPPER_TMR_OVF_ISR(htim); } |
Download The STM32 Stepper Motor Speed + Direction Control Full-Step – NonBlocking – LAB49
The Result For This LAB Testing (Video)
STM32 Stepper Motor Control Half-Step – LAB
| LAB Number | 50 |
| LAB Title | 1 Unipolar Motor Half-Step Drive + Speed & Direction Control – Non-Blocking Mode |
Exactly the same as the previous LAB (49), the only difference is the drive mode option selected in the STEPPER_cfg.c file. Here it’s Half-Step.
STEPPER_cfg.c File
|
1 2 3 4 5 6 7 8 9 10 11 |
const STEPPER_CfgType STEPPER_CfgParam[STEPPER_UNITS] = { // Stepper Motor 1 Configurations { {GPIOA, GPIOA, GPIOB, GPIOB}, {GPIO_PIN_8, GPIO_PIN_11, GPIO_PIN_5, GPIO_PIN_4}, 2038, STEPPER_UNIPOLAR, HALF_STEP_DRIVE } }; |
STM32 Multiple Unipolar Stepper Motors Control – LAB
| LAB Number | 51 |
| LAB Title | 2 Different Unipolar Motors Full-Step Drive + Speed Control – Non-Blocking Mode |
- Set up a new project as usual with a system clock @ 80MHz (STM32L432KC) or whatever your uC board supports
- Enable TIMERx in CubeMX
- Enable Any ADC Channel (For Potentiometer) in CubeMX
- Enable Any GPIO Input pin (For Button)l in CubeMX
- Add the ECUAL / STEPPER driver files to our project. As shown here
- Add the util files to our project
- Configure 2 Stepper Motor instances in STEPPER_cfg.c file
- Initialize the Stepper Motors in the main application, read an analog potentiometer with ADC. And use that reading to control the 2 motors speed in the main loop of the system. Read the button and use it to flip the direction of the motors’ rotation. Repeat!
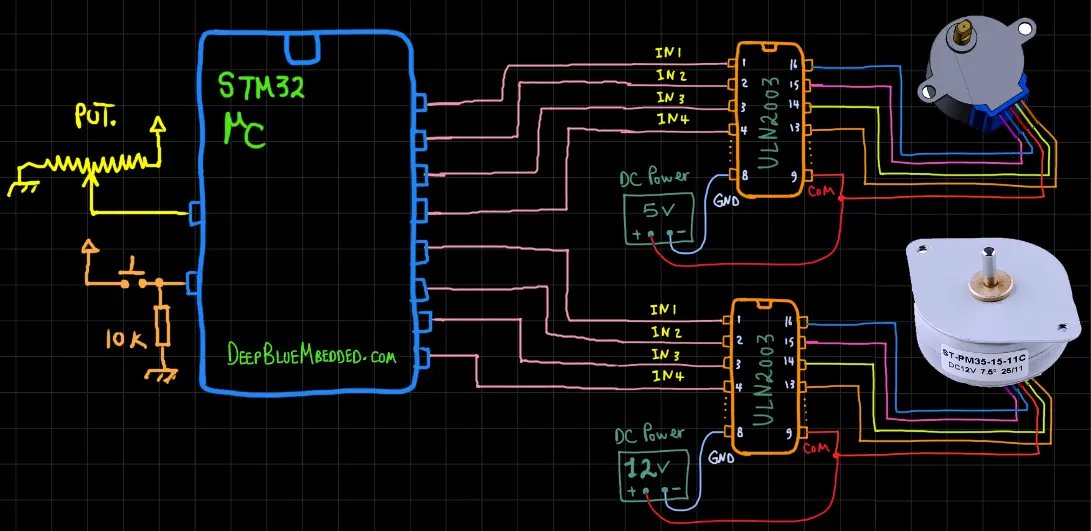
And now, let’s build this system step-by-step
Step1: Open CubeMX & Create New Project
Step2: Choose The Target MCU & Double-Click Its Name
STM32L432KC (the one I’ll be using) or any other STM32 part you’ve got
Step3: Go To The RCC Clock Configuration
Step4: Set The System Clock To Be 80MHz or whatever your uC board supports
Step5: Enable Any TIMERx + Enable its NVIC Global Interrupt Signal
We’ll have to do this step just to have the TIM_HAL files added to our project by CubeMX. Those files are required by the stepper motor library which will handle the timer initialization instead of the auto-generated function.
This step will result in adding a TIMER_Init function in our code by CubeMX, but we’ll remove it afterward. However, we’ll keep the global timer handler variable which you should pass to the Stepper initialization function as you’ll see in the project application source code down below.

Step6: Enable The ADCx / CHx That You’ll Be Using For The Potentiometer

Step7: Enable Any GPIO Pin That You’ll Be Using For The Push Button

Step8: Generate The Initialization Code & Open The Project In Your IDE
Step9: Add the ECUAL/ STEPPER driver files to your project
Follow This Tutorial which shows you How To Add Any ECUAL Driver To An STM32 Project step-by-step.
You basically right-click the project name in the IDE’s navigator and choose to create a new > source folder. And name it ECUAL and go to the GitHub repo, download the files and copy the “STEPPER” folder and back to the IDE, right-click on the ECUAL and paste the library into it.
Step10: Add the util files to your project
Now, we can start developing our application in the main.c source file.
Here Are The Drivers Configurations I Used For This LAB
STEPPER_cfg.c File
|
1 2 3 4 5 6 7 8 9 10 11 12 13 14 15 16 17 18 19 |
const STEPPER_CfgType STEPPER_CfgParam[STEPPER_UNITS] = { // Stepper Motor 1 Configurations { {GPIOA, GPIOA, GPIOB, GPIOB}, {GPIO_PIN_8, GPIO_PIN_11, GPIO_PIN_5, GPIO_PIN_4}, 2038, STEPPER_UNIPOLAR, FULL_STEP_DRIVE }, // Stepper Motor 2 Configurations { {GPIOA, GPIOA, GPIOA, GPIOA}, {GPIO_PIN_4, GPIO_PIN_5, GPIO_PIN_6, GPIO_PIN_7}, 48, STEPPER_UNIPOLAR, FULL_STEP_DRIVE } }; |
STEPPER.h File
|
1 2 3 4 5 6 7 8 |
// The Number OF Stepper Motors To Be Used In The Project #define STEPPER_UNITS 2 // Stepper Timer Base Options #define STEPPER_TIMER_EN 1 #define STEPPER_TIMER TIM15 #define STEPPER_TIMER_CLK 80 #define STEPPER_TIME_BASE 1 |
Here is The Application Code For This LAB (main.c)
|
1 2 3 4 5 6 7 8 9 10 11 12 13 14 15 16 17 18 19 20 21 22 23 24 25 26 27 28 29 30 31 32 33 34 35 36 37 38 39 40 41 42 43 44 45 46 47 48 49 50 51 52 53 54 55 |
#include "main.h" #include "../ECUAL/STEPPER/STEPPER.h" #define STEPPER_MOTOR1 0 #define STEPPER_MOTOR2 1 TIM_HandleTypeDef htim15; ADC_HandleTypeDef hadc1; void SystemClock_Config(void); static void MX_GPIO_Init(void); static void MX_ADC1_Init(void); int main(void) { uint16_t AD_RES = 0; uint8_t Steppers_Dir = DIR_CW; HAL_Init(); SystemClock_Config(); MX_GPIO_Init(); MX_ADC1_Init(); STEPPERS_Init_TMR(&htim15); STEPPER_Step_NonBlocking(STEPPER_MOTOR1, 200000, Steppers_Dir); STEPPER_Step_NonBlocking(STEPPER_MOTOR2, 200000, Steppers_Dir); while (1) { HAL_ADC_Start(&hadc1); HAL_ADC_PollForConversion(&hadc1, 1); AD_RES = HAL_ADC_GetValue(&hadc1); STEPPER_SetSpeed(STEPPER_MOTOR1, AD_RES>>8); STEPPER_SetSpeed(STEPPER_MOTOR2, AD_RES>>8); if(HAL_GPIO_ReadPin (GPIOA, GPIO_PIN_1)) { if(Steppers_Dir == DIR_CW) { Steppers_Dir = DIR_CCW; } else { Steppers_Dir = DIR_CW; } STEPPER_Step_NonBlocking(STEPPER_MOTOR1, 1000, Steppers_Dir); STEPPER_Step_NonBlocking(STEPPER_MOTOR2, 1000, Steppers_Dir); while(HAL_GPIO_ReadPin (GPIOA, GPIO_PIN_1)); } HAL_Delay(1); } } void HAL_TIM_PeriodElapsedCallback(TIM_HandleTypeDef* htim) { STEPPER_TMR_OVF_ISR(htim); } |
Download The STM32 Multi Stepper Motors Speed + Direction Control Full-Step – NonBlocking – LAB51
The Result For This LAB Testing (Video)
Measurements & Final Tests
For this stepper motor library (driver), I just wanted to test out and measure the execution time of the ISR handler function which is very similar to the Stepper_main routine. The execution time for this single function is very critical as it’s going to be called a lot.
Depending on the time base you’ve selected, this function will be called correspondingly. For a 1ms time base, it’s going to be called 1000 times per second. If not motor has to move at all, in other words, all motors are stopped, the execution time will be minimal. Because no logical operations have to be done other than the steps count check. And it’s going to find the steps = 0 and branch out of the function.
Execution time if no motor is being rotated was found to be only 2.25µs.
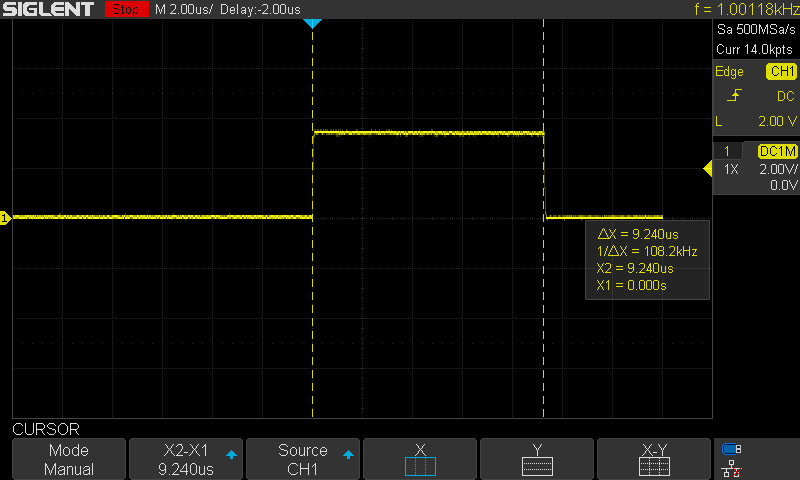
If one stepper motor is being rotated, the execution time gets up to 9.25µs.
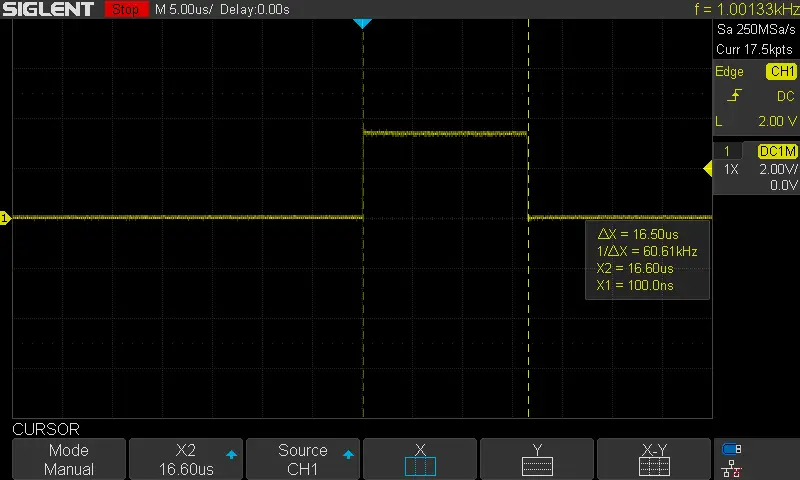
If 2 stepper motors are being rotated at the same time, the execution time gets up to 16.5µs.
The time was measured by driving a GPIO pin HIGH before calling the ISR Handler ( STEPPER_TMR_OVF_ISR(htim); ). And pulling that pin LOW after returning from the function. Note that: this test was performed on an ARM CORTEX-M4 CPU @ 80MHz.
No motor is rotating
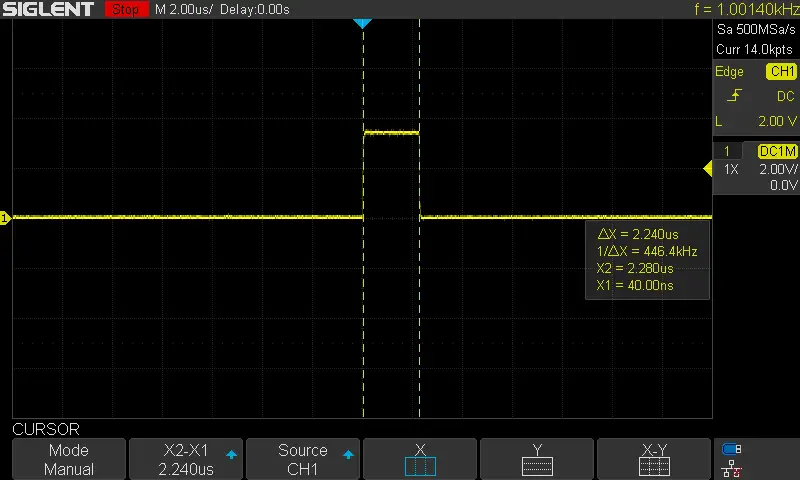
One motor is rotating
Two motors are rotating at the same time
Which I consider being amazing results. As the CPU load turns out to be less than 0.1% per each extra stepper motor added to the system.
Did you find this helpful? If yes, please consider supporting this work and sharing these tutorials!
Stay tuned for the upcoming tutorials and don’t forget to SHARE these tutorials. And consider SUPPORTING this work to keep publishing free content just like this!
| Previous Tutorial | Tutorial 39 | Next Tutorial | |||||
