In this tutorial, we’ll learn how to interface STM32 With Buzzer both Active & Passive Buzzers. We’ll also develop an STM32 PWM-based Tone() and noTone() functions to generate melody tones with STM32 and Passive buzzers.
We’ll start with the differences between Active Buzzers vs Passive Buzzers. Then, we’ll discuss how to interface each of them with STM32 microcontrollers with a couple of code examples to practice what we’ll learn. Without further ado, let’s jump right into it!
Table of Contents
- STM32 Buzzer Interfacing
- STM32 Active Buzzer Example
- STM32 Buzzer Tone Function
- STM32 Passive Buzzer Example
- Wrap Up
STM32 Buzzer Interfacing
Piezo buzzers are a type of audio transducer that can be used to generate sound. They are a popular choice for simple sound effects, alarms, and tone-generation applications due to their small size, low cost, and ease of use. Here is an interactive tool that you can play with to experience what a buzzer sounds like!
A piezo buzzer is a polarized electronic device which means it has a positive lead & a negative lead. It needs a voltage of 3.3v up to 12v to work, the working voltage is stated on the manufacturer page so make sure you get a 5v buzzer which is going to work just as fine with all microcontrollers.
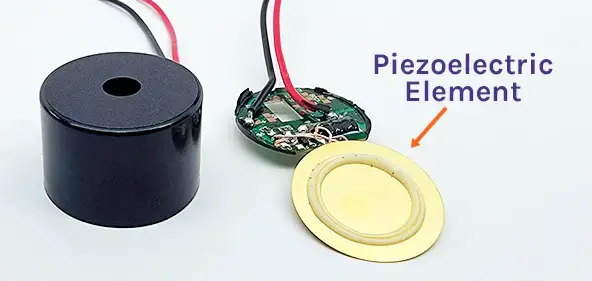
Applying voltage to the piezo buzzer terminals will cause a slight deformation in the piezo disc and by changing this voltage the piezo disc will vibrate and produce the buzzer sound we all know. This is called a Passive Buzzer.
Another type of buzzer doesn’t need a varying voltage, you just give it constant voltage and it has an internal chopper (oscillator) circuit that turns the constant voltage to a square wave and feeds that to the piezo disc to generate a fixed-frequency tone. This type is called an Active Buzzer.
This tutorial will provide you with more in-depth information about the differences between Active Buzzers & Passive Buzzers and the technical specs and construction for each type.
STM32 With Active & Passive Buzzers
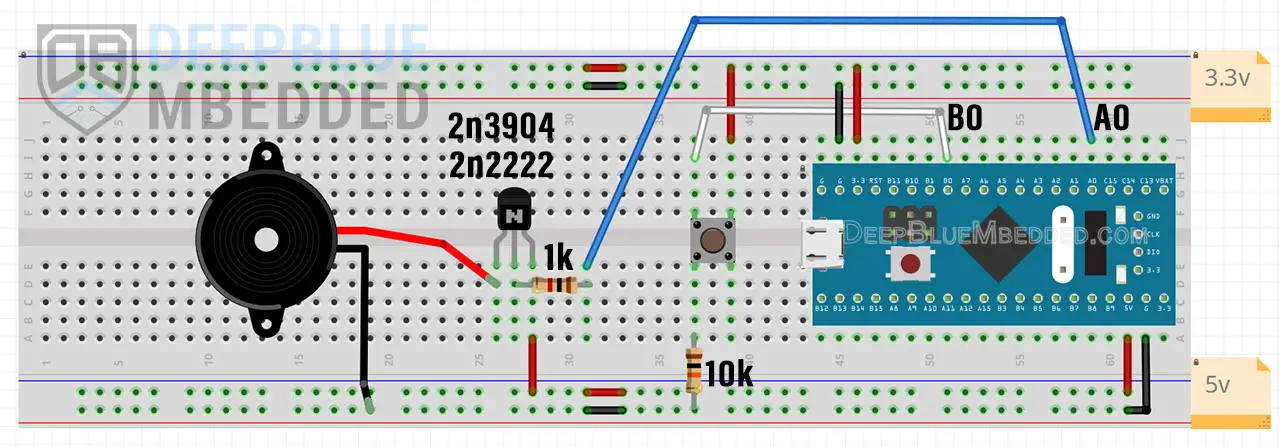
To interface our STM32 microcontroller with a buzzer (active or passive), we’ll use an NPN transistor (2n2222, 2n3904, or any NPN BJT). The transistor’s base will be connected to a GPIO output pin of the STM32 microcontroller for driving an Active Buzzer, or a PWM pin for driving a Passive Buzzer.
The wiring diagram that we’ll use for the two example projects hereafter in this tutorial is shown below.
STM32 Active Buzzer Example
In this example, we’ll interface an Active Buzzer With STM32 using a GPIO output pin. An active buzzer generates a fixed tone as long as it’s driven HIGH. Therefore, we’ll only need 2x GPIO pins for this example. One GPIO pin is configured as an input pin to read a push button and the other GPIO pin is configured as an output pin to drive the buzzer.
Step #1
Open STM32CubeMX, create a new project, and select the target microcontroller.
Step #2
Configure the GPIO Pin A0 as an Output pin.
Configure the GPIO Pin B0 as an Input pin.
Step #3
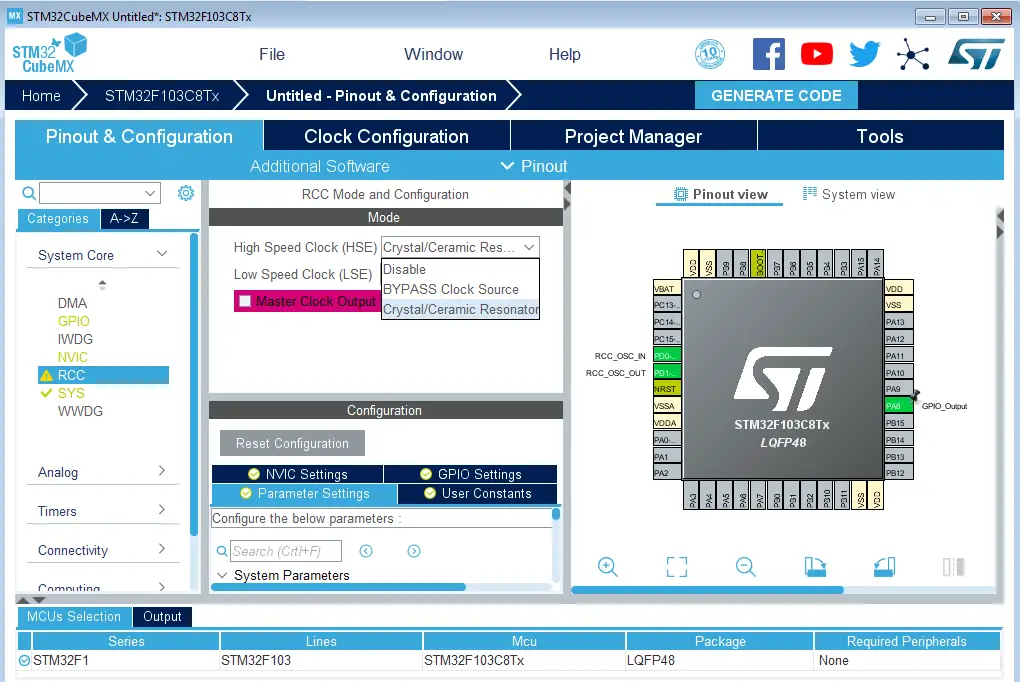
Go to the RCC clock configuration page and enable the HSE external crystal oscillator input.
Step #4
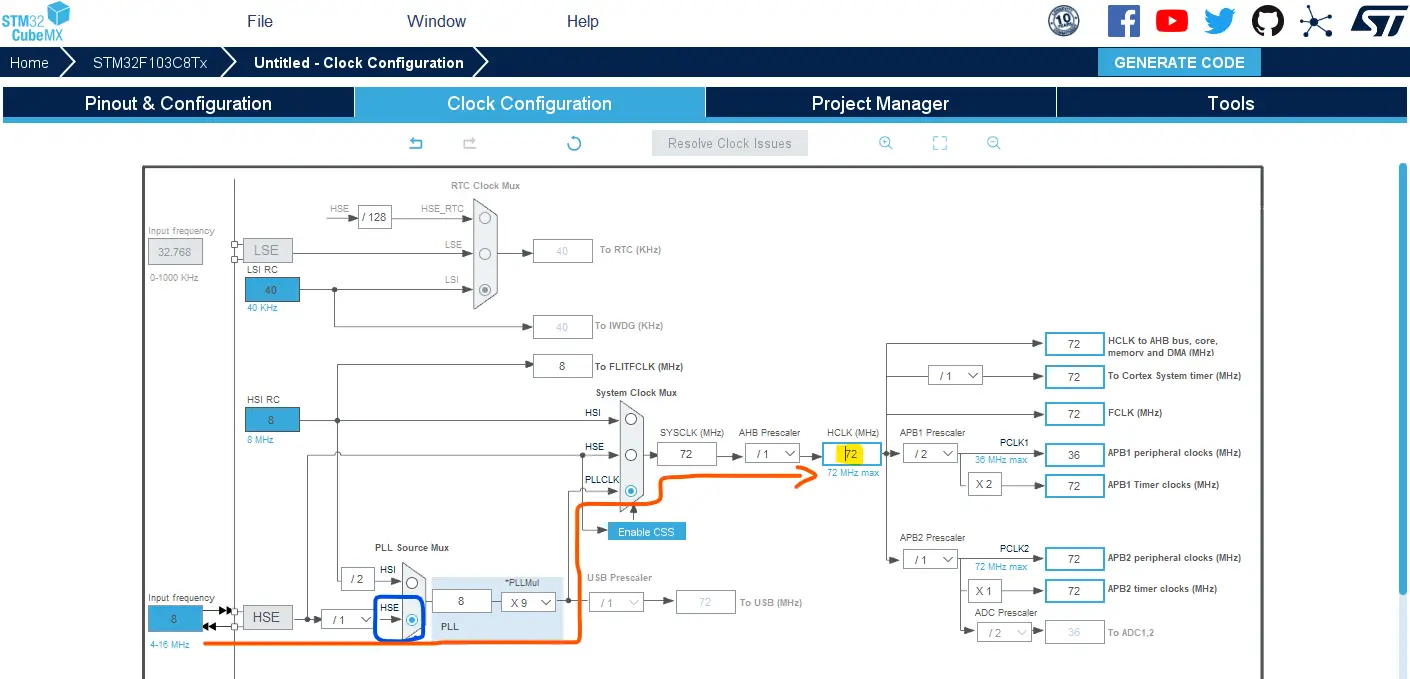
Go to the clock configurations page, and select the HSE as a clock source, PLL output, and type in 72MHz for the desired output system frequency. Hit the “ Enter” key, and let the application solve for the required PLL dividers/multipliers to achieve the desired clock rate.
Step #5
Name & Generate The Project Initialization Code For CubeIDE or The IDE You’re Using.
STM32 Buzzer Example Code
Here is The Application Code For This LAB (main.c)
|
1 2 3 4 5 6 7 8 9 10 11 12 13 14 15 16 17 18 19 20 21 22 23 24 25 26 27 28 |
/* * LAB Name: STM32 Active Buzzer Example * Author: Khaled Magdy * For More Info Visit: www.DeepBlueMbedded.com */ #include "main.h" void SystemClock_Config(void); static void MX_GPIO_Init(void); int main(void) { HAL_Init(); SystemClock_Config(); MX_GPIO_Init(); while (1) { if(HAL_GPIO_ReadPin (GPIOB, GPIO_PIN_0)) { HAL_GPIO_WritePin(GPIOA, GPIO_PIN_0, GPIO_PIN_SET); } else { HAL_GPIO_WritePin(GPIOA, GPIO_PIN_0, GPIO_PIN_RESET); } } } |
Wiring
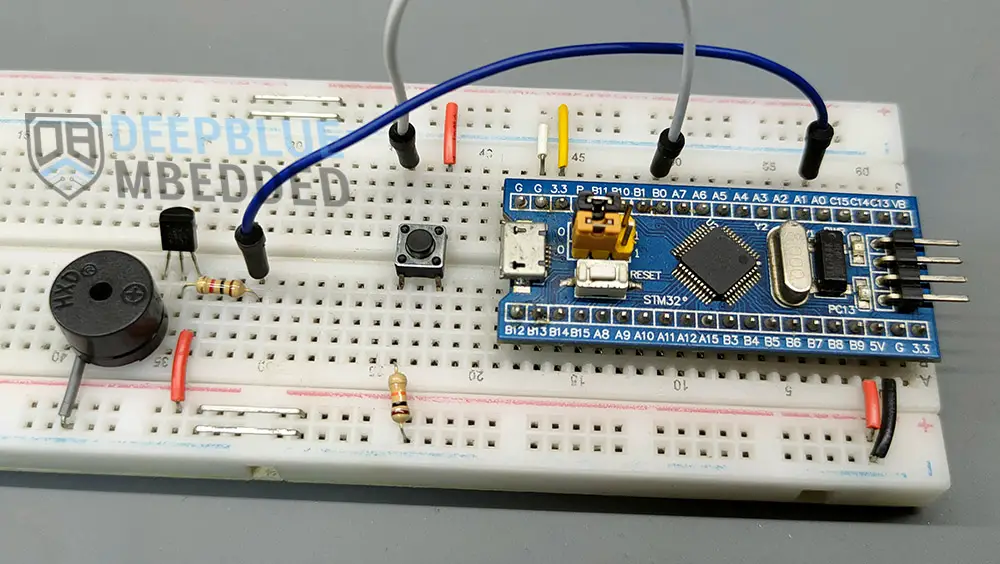
STM32 Active Buzzer Example Testing Demo
STM32 Buzzer Tone Function
As stated earlier in this tutorial, the passive buzzers need to be driven with an AC signal to generate sound. Therefore, we’ll develop a Tone() function to generate variable frequency & duration tones with STM32’s PWM output.
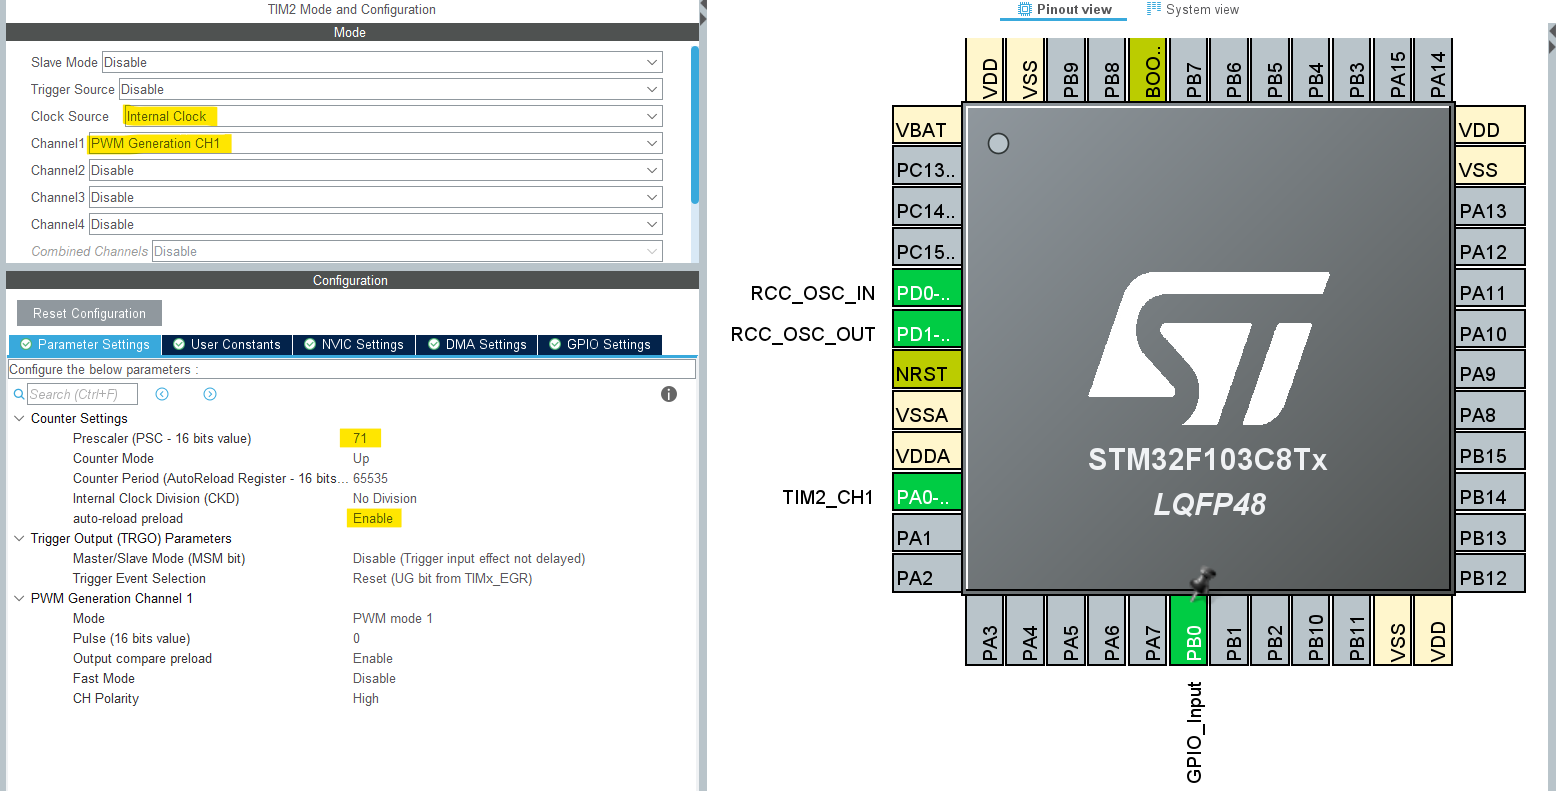
This function assumes that the PWM hardware is configured in such a way that a single timer tick has a period of 1µs. For example, the STM32F103 (BluePill) is configured to operate at a 72MHz system clock. Therefore, the PWM timer has an input clock of 72MHz as well. So, we need to set the timer’s prescaler to 71 so that the system clock is divided by (PSC+1) or (71+1). Now, the single timer tick time is 72MHz/72 = 1µs.

For other STM32 microcontrollers with different system clock frequencies, you need to do the same and set the PWM Timer’s prescaler in such a way that guarantees a timer single tick time of 1µs.
Now, it’s easy to control the output FPWM by only changing one parameter which is the ARR (auto-reload register) as shown in the equation above. The OCR register of the PWM channel will always be half of the ARR value to achieve a 50% duty cycle for the output PWM waveform.
Here is the final Tone() function’s implementation.
|
1 2 3 4 5 6 |
static void Tone(uint32_t Frequency, uint32_t Duration) { TIM2->ARR = (1000000UL / Frequency) - 1; // Set The PWM Frequency TIM2->CCR1 = (TIM2->ARR >> 1); // Set Duty Cycle 50% HAL_Delay(Duration); // Wait For The Tone Duration } |
And this is the noTone() function’s implementation.
|
1 2 3 4 |
static void noTone() { TIM2->CCR1 = 0; // Set Duty Cycle 0% } |
We’ll use both functions in the next example for interfacing passive buzzers with the STM32 microcontroller.
STM32 Passive Buzzer Example
In this example, we’ll interface a Passive Buzzer With STM32 using a PWM output pin. We’ll configure one GPIO pin as an input pin to read a push button and a PWM output channel to drive the passive buzzer.
Step #1
Open STM32CubeMX, create a new project, and select the target microcontroller.
Step #2
Configure the GPIO Pin B0 as an Input pin.
Step #3
Configure Timer2 PWM With Output On CH1 with the following settings
Step #4
Go to the RCC clock configuration page and enable the HSE external crystal oscillator input.

Step #5
Go to the clock configurations page, and select the HSE as a clock source, PLL output, and type in 72MHz for the desired output system frequency. Hit the “ Enter” key, and let the application solve for the required PLL dividers/multipliers to achieve the desired clock rate.

Step #6
Name & Generate The Project Initialization Code For CubeIDE or The IDE You’re Using.
STM32 Piezo Buzzer Example Code
Here is The Application Code For This LAB (main.c)
|
1 2 3 4 5 6 7 8 9 10 11 12 13 14 15 16 17 18 19 20 21 22 23 24 25 26 27 28 29 30 31 32 33 34 35 36 37 38 39 40 41 42 43 44 45 46 47 48 49 50 51 52 53 |
/* * LAB Name: STM32 Passive Buzzer Example * Author: Khaled Magdy * For More Info Visit: www.DeepBlueMbedded.com */ #include "main.h" TIM_HandleTypeDef htim2; uint32_t OctaveFour[7] = {262, 294, 330, 349, 392, 440, 493}; // Ocatve_4 Frequencies (C4->B4) uint8_t NoteIndex = 0; void SystemClock_Config(void); static void MX_GPIO_Init(void); static void MX_TIM2_Init(void); static void Tone(uint32_t Frequency, uint32_t Duration); static void noTone(); int main(void) { HAL_Init(); SystemClock_Config(); MX_GPIO_Init(); MX_TIM2_Init(); HAL_TIM_PWM_Start(&htim2, TIM_CHANNEL_1); while (1) { if(HAL_GPIO_ReadPin(GPIOB, GPIO_PIN_0)) { Tone(OctaveFour[NoteIndex++], 250); if(NoteIndex == 7){ NoteIndex = 0; } } else { noTone(); } } } static void Tone(uint32_t Frequency, uint32_t Duration) { TIM2->ARR = (1000000UL / Frequency) - 1; // Set The PWM Frequency TIM2->CCR1 = (TIM2->ARR >> 1); // Set Duty Cycle 50% HAL_Delay(Duration); // Wait For The Tone Duration } static void noTone() { TIM2->CCR1 = 0; // Set Duty Cycle 0% } |
Wiring

STM32 Passive Buzzer Example Testing Demo
Required Parts For STM32 Examples
All the example Code/LABs/Projects in this STM32 Series of Tutorials are done using the Dev boards & Electronic Parts Below:
| QTY. | Component Name | Amazon.com | AliExpress | eBay |
| 1 | STM32-F103 BluePill Board (ARM Cortex-M3 @ 72MHz) | Amazon | AliExpress | eBay |
| 1 | Nucleo-L432KC (ARM Cortex-M4 @ 80MHz) | Amazon | AliExpress | eBay |
| 1 | ST-Link V2 Debugger | Amazon | AliExpress | eBay |
| 2 | BreadBoard | Amazon | AliExpress | eBay |
| 1 | LEDs Kit | Amazon & Amazon | AliExpress | eBay |
| 1 | Resistors Kit | Amazon & Amazon | AliExpress | eBay |
| 1 | Capacitors Kit | Amazon & Amazon | AliExpress & AliExpress | eBay & eBay |
| 1 | Jumper Wires Pack | Amazon & Amazon | AliExpress & AliExpress | eBay & eBay |
| 1 | Push Buttons | Amazon & Amazon | AliExpress | eBay |
| 1 | Potentiometers | Amazon | AliExpress | eBay |
| 1 | Micro USB Cable | Amazon | AliExpress | eBay |
★ Check The Links Below For The Full Course Kit List & LAB Test Equipment Required For Debugging ★
Download Attachments
You can download all attachment files for this Article/Tutorial (project files, schematics, code, etc..) using the link below. Please consider supporting our work through the various support options listed in the link down below. Every small donation helps to keep this website up and running and ultimately supports the whole community.
Wrap Up
In conclusion, we’ve explored different types of buzzers (active & passive) and how to interface STM32 with Buzzers using a BJT transistor. We’ve also developed a Tone() function to generate variable frequency melody tones with passive buzzers.
You can build on top of the examples provided in this tutorial and/or explore the other STM32 Tutorials on our website.
![STM32 Buzzer Piezo Buzzer Example + Tone [Active & Passive]](https://deepbluembedded.com/wp-content/uploads/2024/06/STM32-Buzzer-Piezo-Buzzer-Example-Tone-Active-Passive.jpg)

