| Previous Tutorial | Tutorial 21 | Next Tutorial | |||||
| STM32 DMA Tutorial – Using Direct Memory Access (DMA) In STM32 | |||||||
| STM32 Course Home Page ???? | |||||||
In this tutorial, we’ll discuss the direct memory access unit (DMA) in STM32 microcontrollers. We’ll begin with an introduction for what is a DMA unit, when, and why to use it. Afterward, we’ll start discussing the STM32 DMA hardware, its features, and how to configure it in your projects. And some example applications that we’ll be building throughout this course.
[toc]
What Is Direct Memory Access (DMA)?
A Direct Memory Access (DMA) unit is a digital logic element in computer architecture that can be used in conjunction with the main microprocessor on the same chip in order to offload the memory transfer operations. This significantly reduces the CPU load. As the DMA controller can perform memory to memory data transfers as well as peripheral to memory data transfers or vice versa. The existence of DMA with a CPU can accelerate its throughput by orders of magnitude.
In no-DMA computer architecture, you’d find it looking something like this shown in the diagram below.
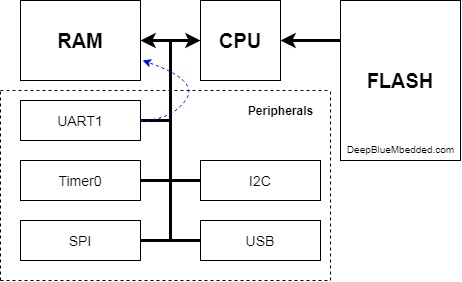
As you can see, the CPU (main processor) has to do all the work of fetching instructions (code) from flash, executing the decoded instructions, and move data to and from peripherals and memory. Imagine having a UART1 data receiver that gets a stream of data that the CPU has to immediately transfer to a local buffer in memory so as not to lose any data packet. This translates into an insane number of interrupts per second being fired by different peripherals like UART, SPI, ADC, etc. And the CPU has to juggle everything and lose more and more time.
The fact that switching the context to and from interrupt handlers takes up some cycles that are completely wasted and periodically happens as interrupt signals are getting fired continuously is what makes this architecture problematic to an extent. Having a data stream of 10kB/s can make a CPU without a DMA be so busy and miss up the timing constraints for the application. The CPU can be seen as if it’s suppressed, and to unleash its full working power this data transfer task has to be handed over to another unit and here it comes the DMA unit to offload these exhausting data transactions from the CPU.
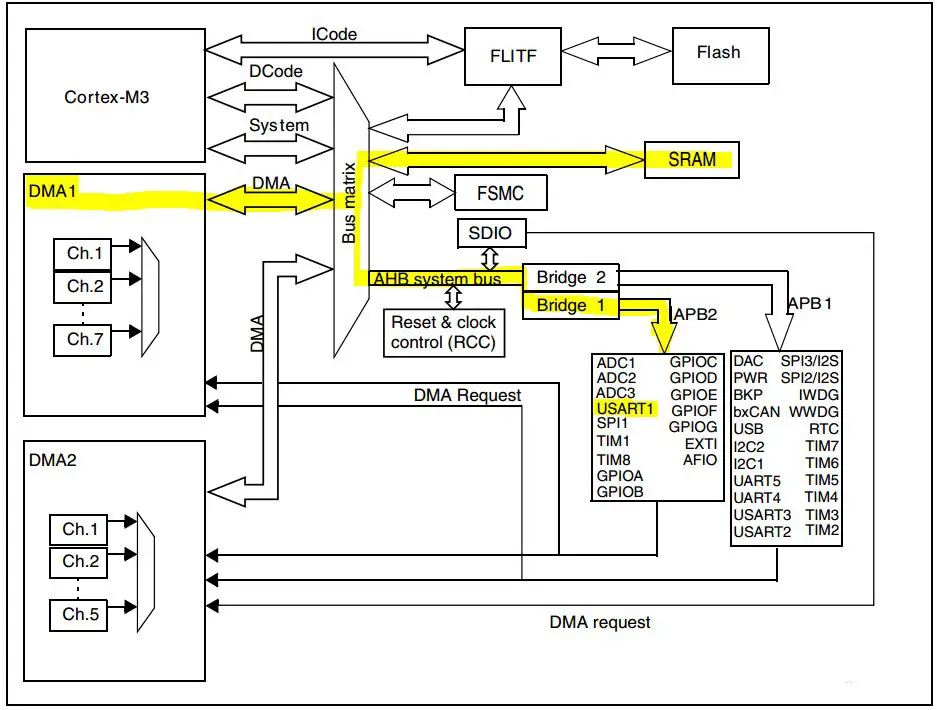
As you can see in the diagram above, the existence of the DMA unit can now direct the data stream coming from the UART peripheral directly to the memory while the CPU doing other stuff and calculations. This parallel cooperation between the CPU and the DMA is where the acceleration stems from.
The existence of the DMA unit can sometimes introduce some issues. For example, in an architecture that has a CPU cache when the DMA unit accesses the data memory and writes to a location that is also mirrored in the cache, this will invalidate the data in cache memory. This a challenge to overcome, and there are other but it’ll be a topic for a future article. I just wanted to spot some light on this point, besides being advantageous the DMA can also introduce some issues.
STM32 DMA Hardware
For STM32F103C8T6 (The Blue Pill MCU)
Direct memory access (DMA) is used in order to provide high-speed data transfer between peripherals and memory as well as memory to memory. Data can be quickly moved by DMA without any CPU actions. This keeps CPU resources free for other operations.
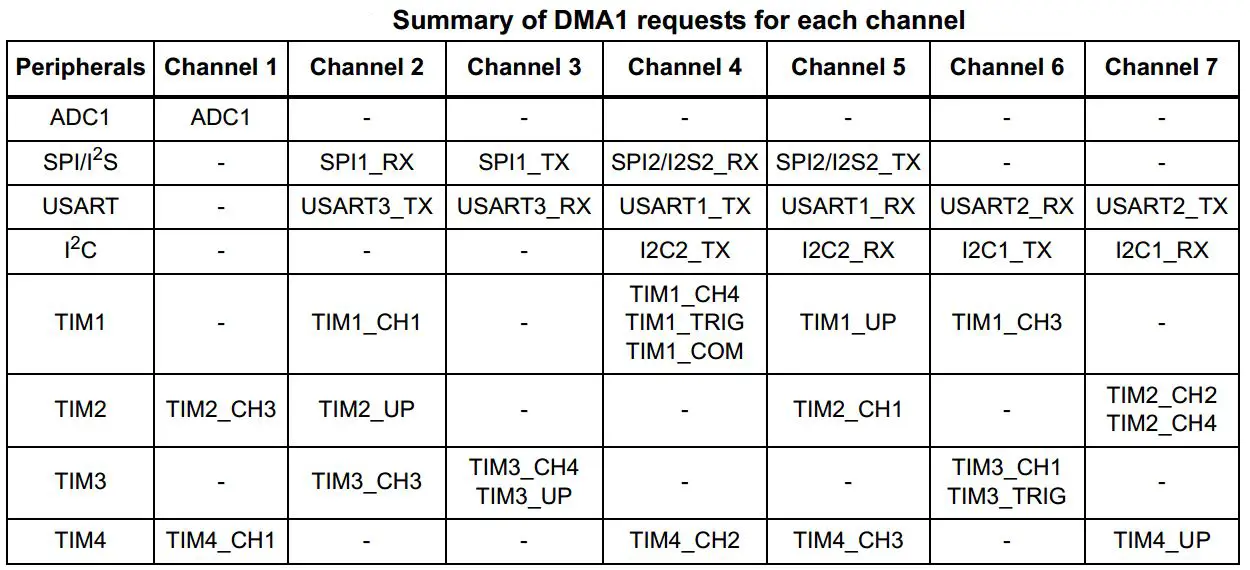
The two DMA controllers have 12 channels in total (7 for DMA1 and 5 for DMA2), each dedicated to managing memory access requests from one or more peripherals. It has an arbiter for handling the priority between DMA requests.
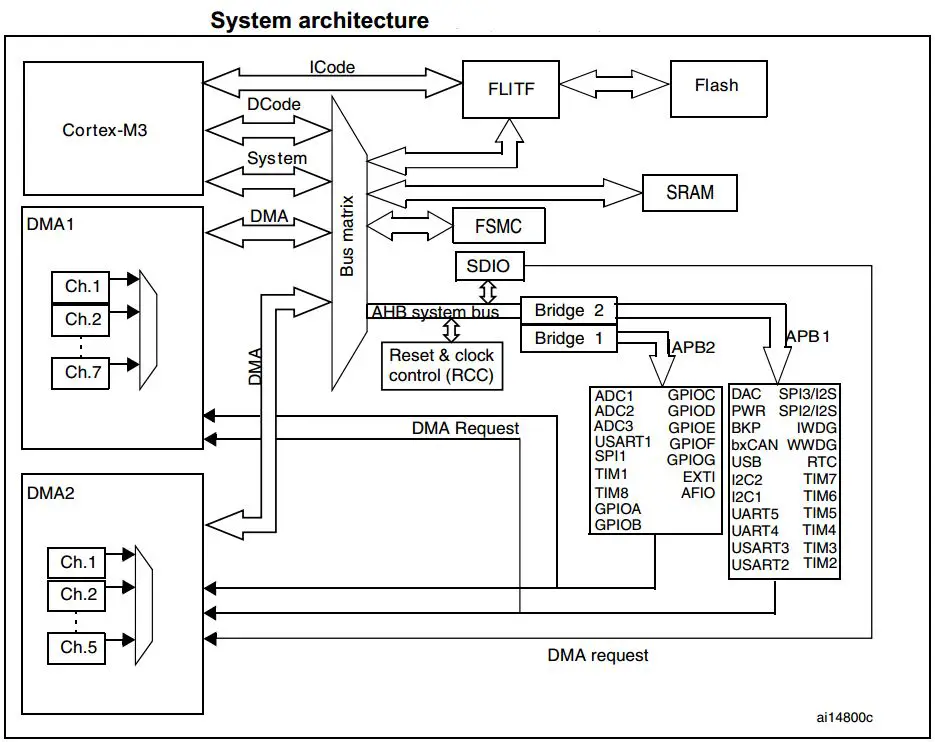
The DMA controller performs direct memory transfer by sharing the system bus with the Cortex®-M3 core. The DMA request may stop the CPU access to the system bus for some bus cycles when the CPU and DMA are targeting the same destination (memory or peripheral). The bus matrix implements round-robin scheduling, thus ensuring at least half of the system bus bandwidth (both to memory and peripheral) for the CPU.
The DMA Units In STM32F103 Have The Following Features
- 12 independently configurable channels (requests): 7 for DMA1 and 5 for DMA2
- Each of the 12 channels is connected to dedicated hardware DMA requests, software trigger is also supported on each channel. This configuration is done by software.
- Priorities between requests from channels of one DMA are software programmable (4 levels consisting of very high, high, medium, low) or hardware in case of equality (request 1 has priority over request 2, etc.)
- Independent source and destination transfer size (byte, half-word, word), emulating packing, and unpacking. Source/destination addresses must be aligned on the data size.
- Support for circular buffer management
- 3 event flags (DMA Half Transfer, DMA Transfer complete and DMA Transfer Error) logically ORed together in a single interrupt request for each channel
- Memory-to-memory transfer
- Peripheral-to-memory and memory-to-peripheral, and peripheral-to-peripheral transfers
- Access to Flash, SRAM, APB1, APB2 and AHB peripherals as source and destination
- Programmable number of data to be transferred: up to 65536
DMA Data Transactions
After an event, the peripheral sends a request signal to the DMA Controller. The DMA controller serves the request depending on the channel priorities. As soon as the DMA Controller accesses the peripheral, an Acknowledge is sent to the peripheral by the DMA Controller. The peripheral releases its request as soon as it gets the Acknowledge from the DMA Controller. Once the request is de-asserted by the peripheral, the DMA Controller releases the Acknowledge. If there are more requests, the peripheral can initiate the next transaction.
In summary, each DMA transfer consists of three operations:
- The loading of data from the peripheral data register or a location in memory addressed through an internal current peripheral/memory address register. The start address used for the first transfer is the base peripheral/memory address programmed in the DMA_CPARx or DMA_CMARx register
- The storage of the data loaded to the peripheral data register or a location in memory addressed through an internal current peripheral/memory address register. The start address used for the first transfer is the base peripheral/memory address programmed in the DMA_CPARx or DMA_CMARx register
- The post-decrementing of the DMA_CNDTRx register, which contains the number of transactions that have still to be performed.
DMA Arbiter
The arbiter manages the channel requests based on their priority and launches the peripheral/memory access sequences. The priorities are managed in two stages:
- Software: each channel priority can be configured in the DMA_CCRx register. There are four levels:
– Very high priority
– High priority
– Medium priority
– Low priority - Hardware: if 2 requests have the same software priority level, the channel with the lowest number will get priority versus the channel with the highest number. For example, channel 2 gets priority over channel 4.
DMA Channels
Each channel can handle DMA transfer between a peripheral register located at a fixed address and a memory address. The amount of data to be transferred (up to 65535) is programmable. The register which contains the amount of data items to be transferred is decremented after each transaction.
The transfer data sizes of the peripheral and memory are fully programmable through the PSIZE and MSIZE bits in the DMA_CCRx register.
Peripheral and memory pointers can optionally be automatically post-incremented after each transaction depending on the PINC and MINC bits in the DMA_CCRx register. If incremented mode is enabled, the address of the next transfer will be the address of the previous one incremented by 1, 2, or 4 depending on the chosen data size.
DMA Circular Mode
The circular mode is available to handle circular buffers and continuous data flows (e.g. ADC scan mode). This feature can be enabled using the CIRC bit in the DMA_CCRx register. When the circular mode is activated, the number of data to be transferred is automatically reloaded with the initial value programmed during the channel configuration phase, and the DMA requests continue to be served.
DMA Memory-To-Memory Mode
The DMA channels can also work without being triggered by a request from a peripheral. This mode is called Memory to Memory mode. Memory to Memory mode may not be used at the same time as Circular mode.
STM32 DMA Interrupts
An interrupt can be produced on a Half-transfer, Transfer complete, or Transfer error for each DMA channel. Separate interrupt enable bits are available for flexibility.
DMA Request Mapping
The peripheral DMA requests can be independently activated/de-activated by programming the DMA control bit in the registers of the corresponding peripheral.
STM32 DMA Configuration
The following sequence should be followed to configure a DMA CHANNELx (where x is the channel number).
- Set the peripheral register address in the DMA_CPARx register. The data will be moved from/ to this address to/ from the memory after the peripheral event.
- Set the memory address in the DMA_CMARx register. The data will be written to or read from this memory after the peripheral event.
- Configure the total number of data to be transferred in the DMA_CNDTRx register. After each peripheral event, this value will be decremented.
- Configure the channel priority using the PL[1:0] bits in the DMA_CCRx register
- Configure data transfer direction, circular mode, peripheral & memory incremented mode, peripheral & memory data size, and interrupt after half and/or full transfer in the DMA_CCRx register
- Activate the channel by setting the ENABLE bit in the DMA_CCRx register.
As soon as the channel is enabled, it can serve any DMA request from the peripheral connected on the channel. Once half of the bytes are transferred, the half-transfer flag (HTIF) is set and an interrupt is generated if the Half Transfer Interrupt Enable bit (HTIE) is set. At the end of the transfer, the Transfer Complete Flag (TCIF) is set and an interrupt is generated if the Transfer Complete Interrupt Enable bit (TCIE) is set.
We’ll be using the CubeMX software tool and the HAL APIs in order to configure the DMA units and programmatically set the buffer lengths, DMA source, destination, and all that stuff. The exact steps for each configuration will be discussed later on in the future tutorials in which DMA will be used.
STM32 DMA Examples
There are several use cases for the DMA units in STM32 microcontrollers. We’ll implement some of them in the upcoming tutorials’ LABs and projects. However, here are a handful of possible scenarios:
- UART data reception from a terminal to a local buffer.
- ADC circular buffer conversions for multiple channels with capacitive touchPADs connected.
- SPI external memory interfacing for high-speed data logging.
- SPI camera interfacing.
- and much more…
Stay tuned for the upcoming tutorials and don’t forget to SHARE these tutorials. And consider SUPPORTING this work to keep publishing free content just like this!
| Previous Tutorial | Tutorial 21 | Next Tutorial | |||||

Thank you for sharing your knowledge!