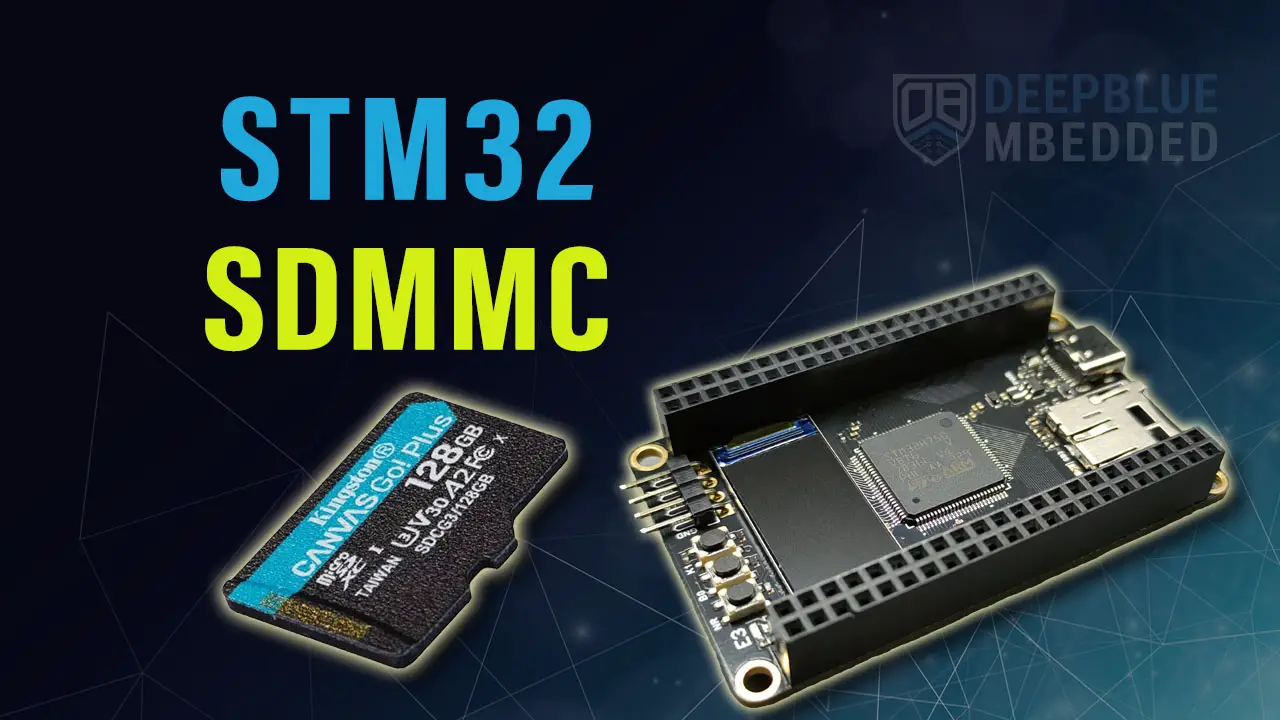
In this tutorial, we’ll learn how to use STM32 SDIO + DMA With FatFS Library For SD Card Interfacing. You’ll learn how to configure the STM32 SDIO With DMA enabled for faster data read/write operations with less CPU intervention. Without further ado, let’s get right into it!
Table of Contents
STM32 SDIO (Secure Digital IO)
In this previous tutorial, we discussed the STM32 SDIO interface in detail and created an example project for STM32 SD card interfacing using the SDIO interface with CPU-blocking read/write operations. Therefore, in this tutorial, we’ll expand more on the topic by adding DMA Rx/Tx channels for both read/write operations of the SDIO to accelerate the performance and also save as much CPU time as possible.
It’s highly recommended to check out the previous STM32 SDIO Tutorial as a starting point (if you’ve not already completed it).
This tutorial will give you more in-depth information about the STM32 SDIO interface and how to use it with FatFS for SD Card interfacing with a handful of test examples.
STM32 SDIO DMA Example
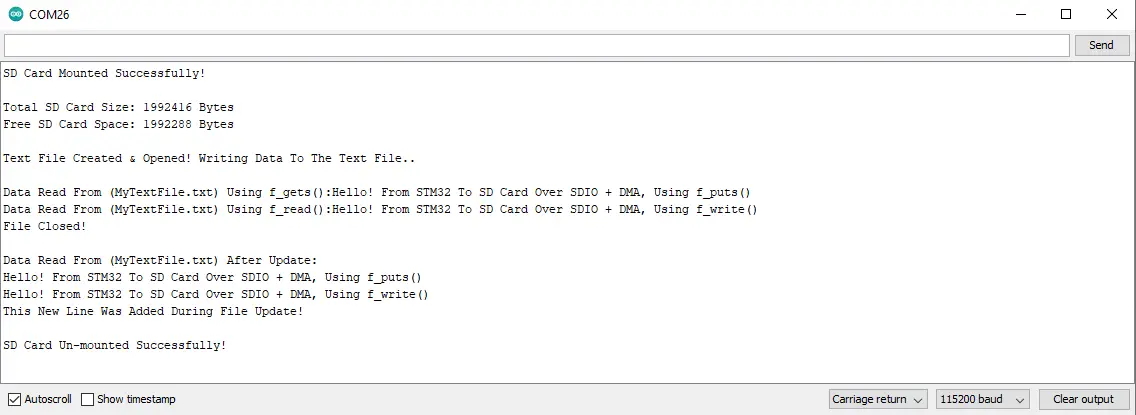
In this example project, we’ll test the STM32 SDIO + DMA interface with an SD Card and also test the functionalities provided by the FatFS library and use it to create a text file, write to it, read the file, modify the existing file, and delete the file. We’ll monitor the progress of this test sequence using USB CDC (VCP) messages printed to the serial monitor on the PC.
SD Card Tests Included in This Project:
- Mount The SD Card
- Find and print the card size & free space
- Create a new Text File
- Write to the text file using the f_puts() function
- Write to the text file using the f_write() function
- Read from the text file using the f_gets() function
- Read from the text file using the f_read() function
- Modify (update) an existing file
- Delete the file
- Unmount the SD Card
Please, follow The step-by-step guide below to create the project, configure the needed hardware peripherals in CubeMX, and run the test project on your STM32 dev board.
Step #1
Create a New Project in STM32CubeMX
The first step is to head over to STM32CubeMX, create a new project, enable the SWD (serial wire debug), enable the external HSE oscillator, and configure the RCC clock.
Step #2
Configure 1x USB CDC Device
Enable a USB CDC device to be used as a serial communication with the PC through a Windows virtual COM port (VCP). Leave the default settings as is, no need to change them.
Step #3
Configure The SDIO Module To Be Used For SD Card Interfacing
Here, I’m using the SDIO 1-Bit mode while the rest of the settings are left as default.
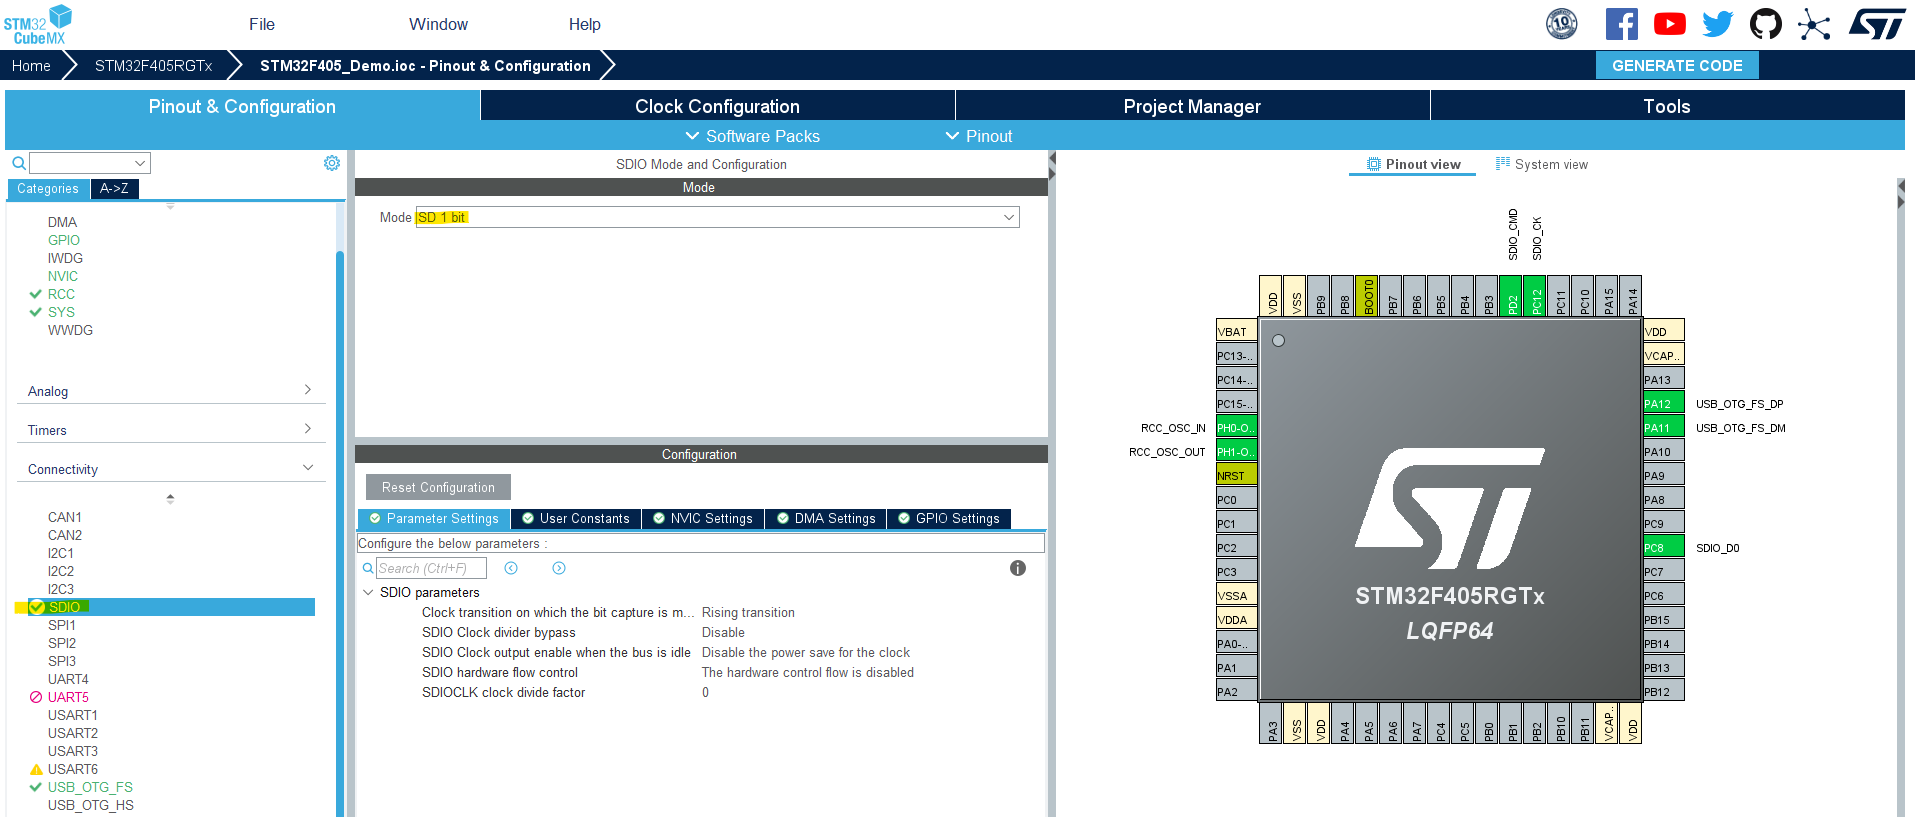
Make sure that all SDIO GPIO pins are internally, or externally, pulled-up except for the CLK line.

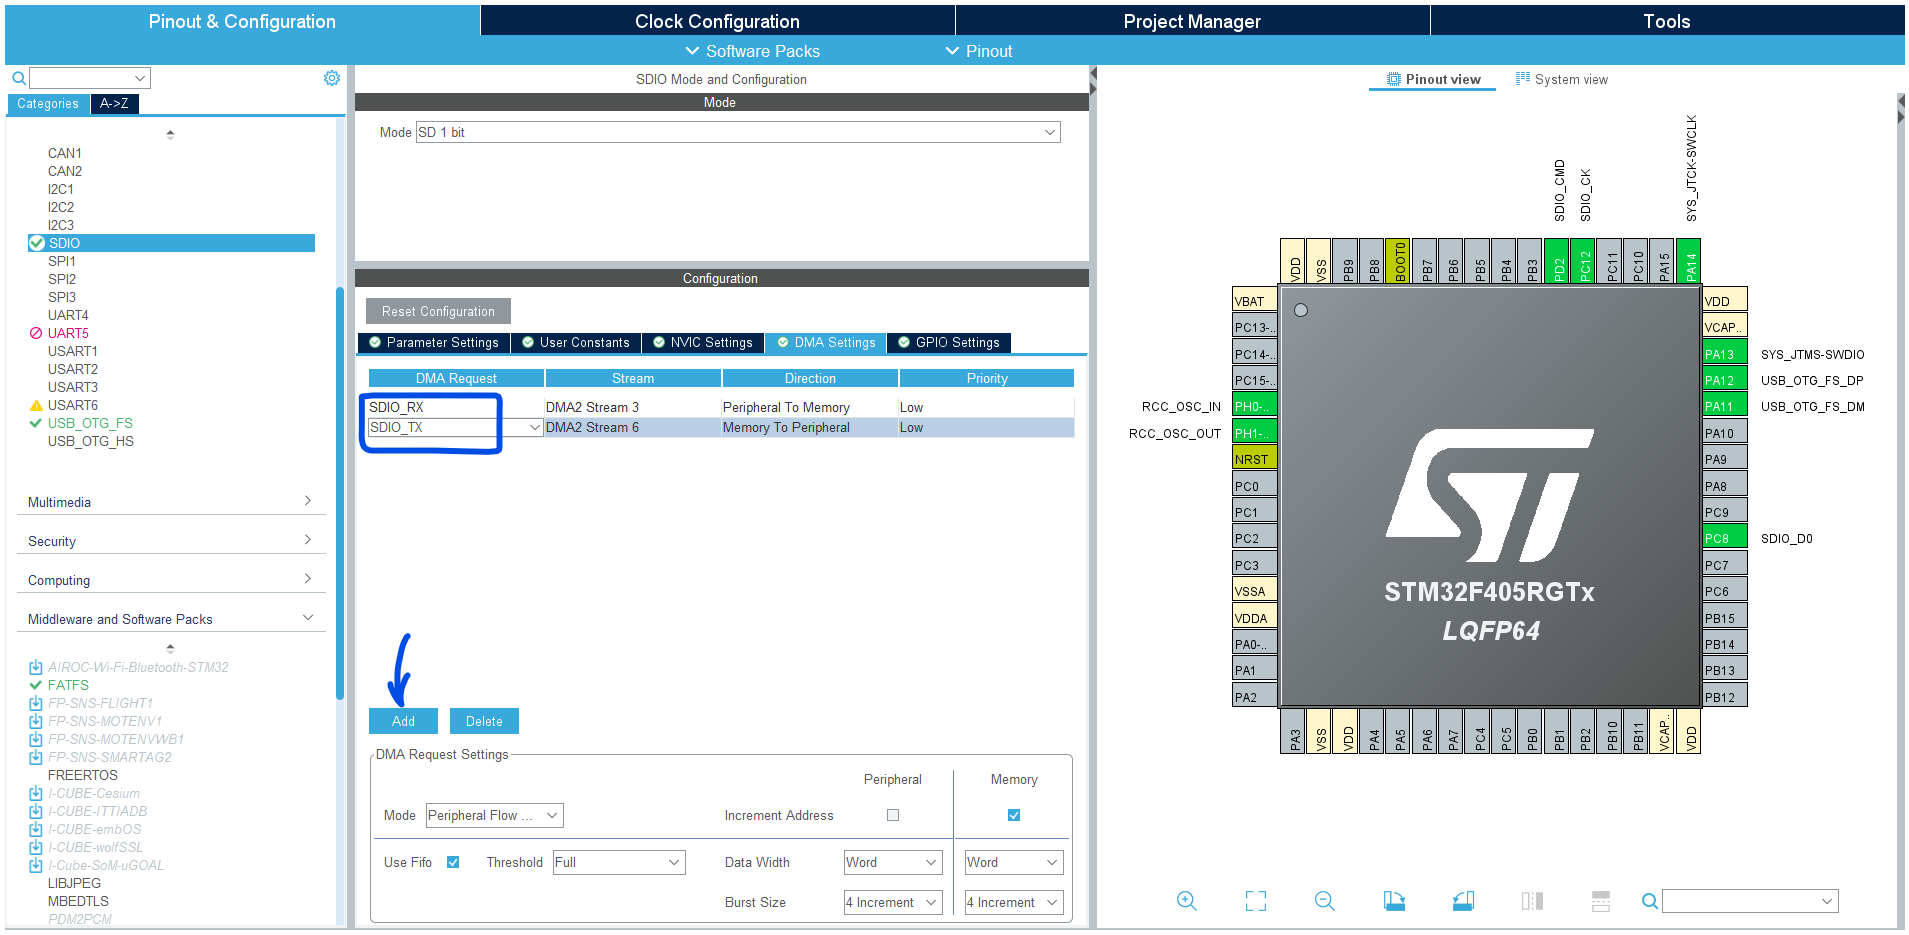
In the SDIO DMA settings tab, add 2x DMA channels for (Rx & Tx) as shown below.
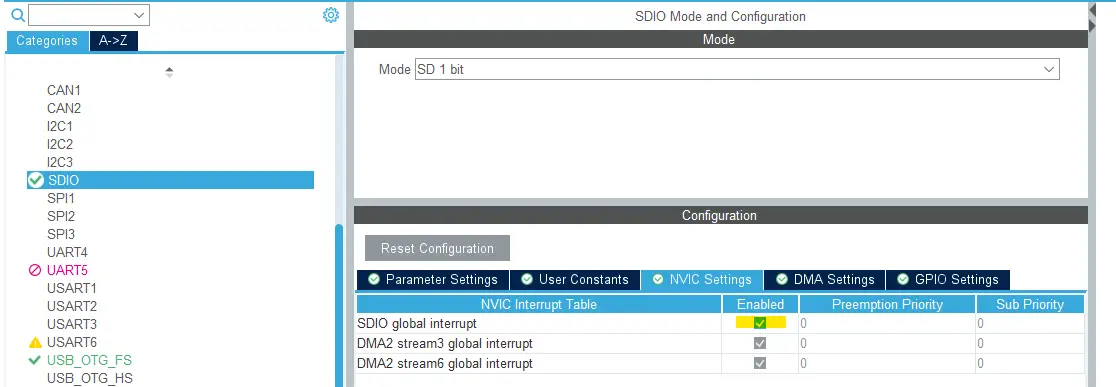
In the SDIO NVIC tab, enable the SDIO global interrupt as shown below.
Step #4
Enable The FatFS Library
Edit the library configurations as shown below.
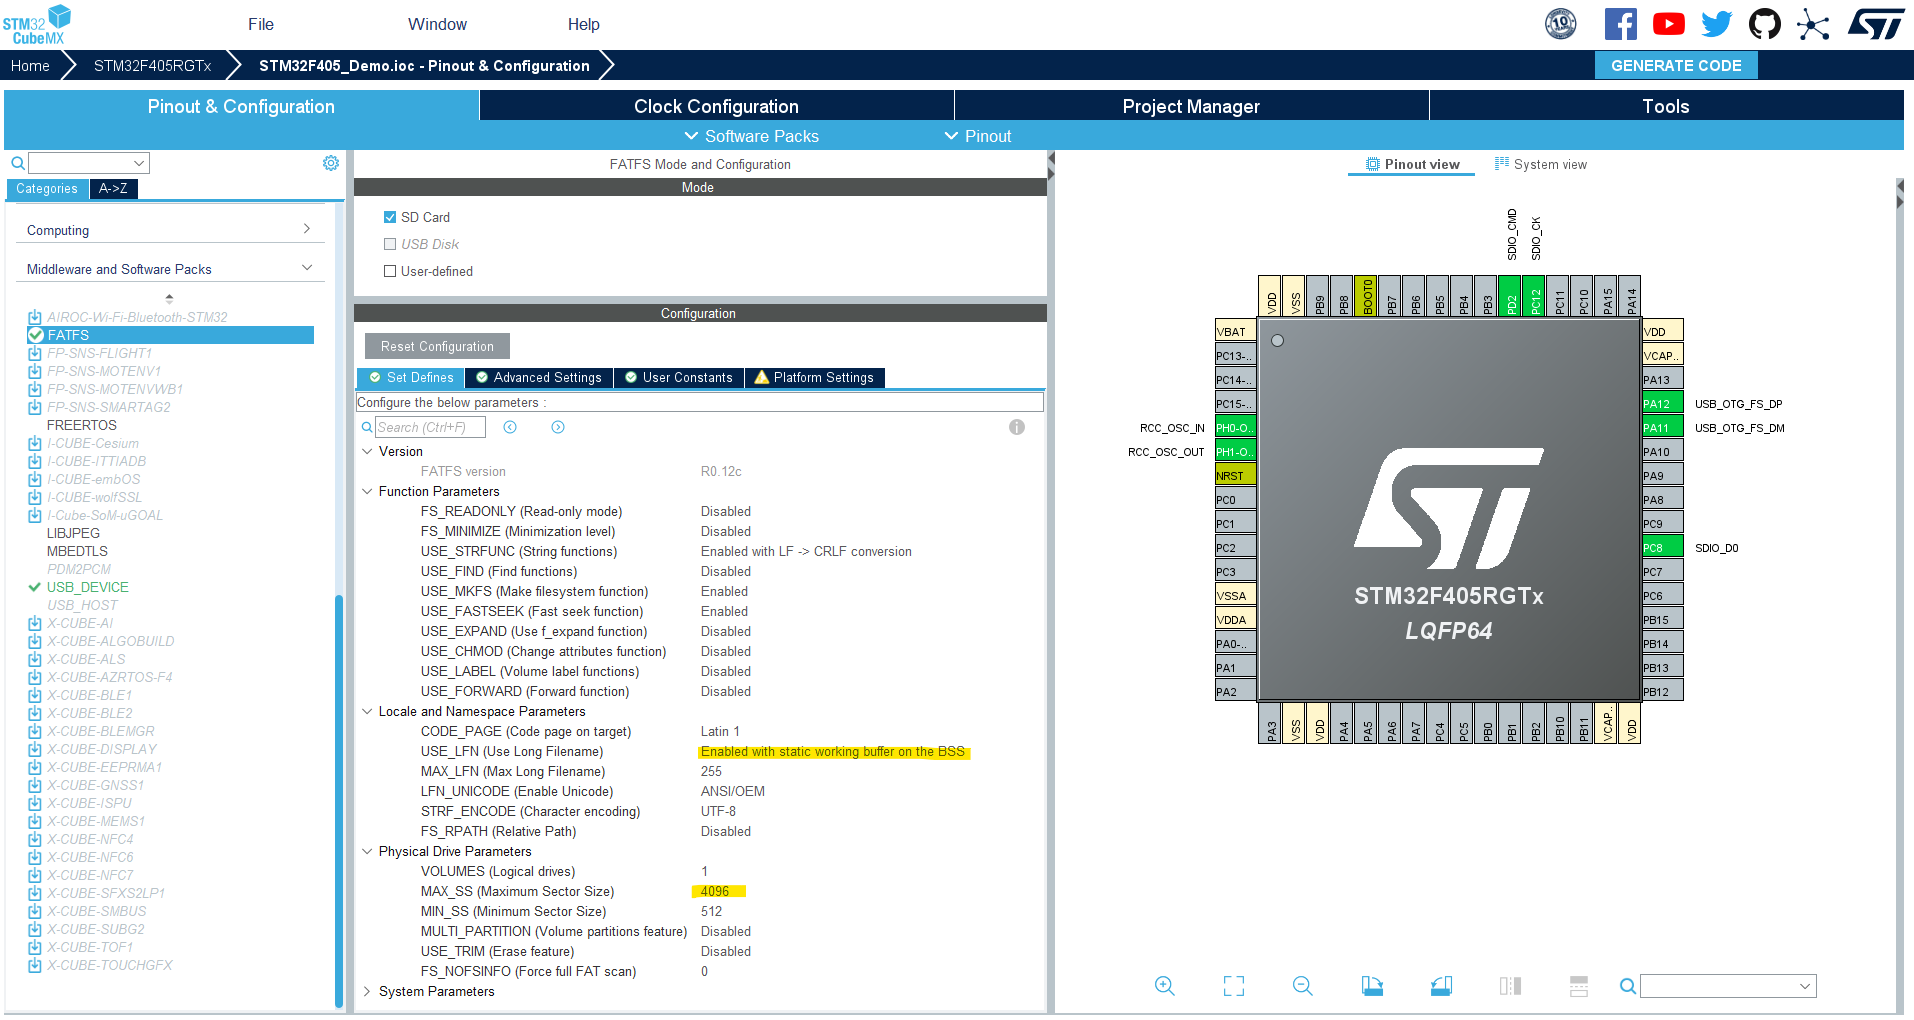
In the FatFS advanced settings tab, enable the DMA template.
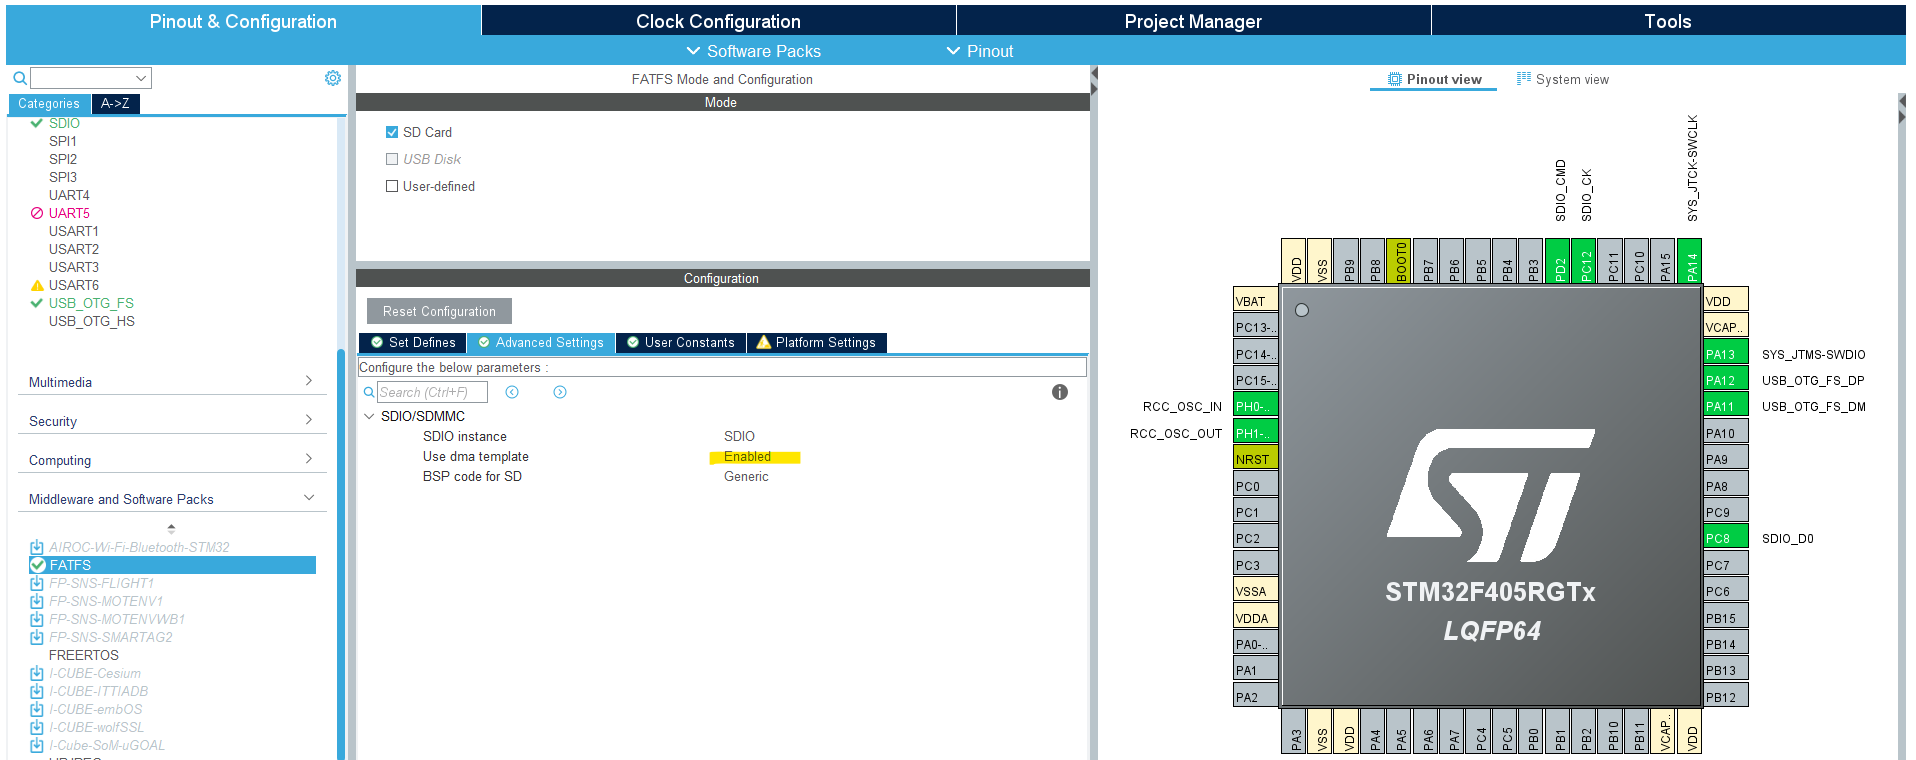
Once you’re done with CubeMX configurations, generate the project code and head over to STM32CubeIDE.
Step #5
Copy The Project’s Code Below into Your Main.c File
Build The Project, Flash The Code To The STM32 Board, and Start Testing!
STM32 SDIO DMA Example Code
The Application Code For This Example (main.c)
|
1 2 3 4 5 6 7 8 9 10 11 12 13 14 15 16 17 18 19 20 21 22 23 24 25 26 27 28 29 30 31 32 33 34 35 36 37 38 39 40 41 42 43 44 45 46 47 48 49 50 51 52 53 54 55 56 57 58 59 60 61 62 63 64 65 66 67 68 69 70 71 72 73 74 75 76 77 78 79 80 81 82 83 84 85 86 87 88 89 90 91 92 93 94 95 96 97 98 99 100 101 102 103 104 105 106 107 108 109 110 111 112 113 114 115 116 117 118 119 120 121 122 123 124 125 126 127 128 129 130 131 132 133 134 135 136 137 138 139 140 141 142 143 144 145 146 147 148 149 150 151 152 153 154 155 156 157 158 |
/* * LAB Name: STM32 SDIO + DMA Example * Author: Khaled Magdy * For More Info Visit: www.DeepBlueMbedded.com */ #include "main.h" #include "fatfs.h" #include "usb_device.h" #include "usbd_cdc_if.h" #include <stdio.h> #include <string.h> SD_HandleTypeDef hsd; DMA_HandleTypeDef hdma_sdio_rx; DMA_HandleTypeDef hdma_sdio_tx; char TxBuffer[250]; void SystemClock_Config(void); static void MX_GPIO_Init(void); static void MX_DMA_Init(void); static void MX_SDIO_SD_Init(void); static void SDIO_SDCard_Test(void); static void USB_CDC_Print(char* TxStr) { while(CDC_Transmit_FS((uint8_t*)TxStr, strlen(TxStr)) == USBD_BUSY); } int main(void) { HAL_Init(); SystemClock_Config(); MX_GPIO_Init(); MX_DMA_Init(); MX_SDIO_SD_Init(); MX_FATFS_Init(); MX_USB_DEVICE_Init(); // Test The SDIO SD Card Interface HAL_Delay(5000); // This delay is not mandatory but it gives me some time to connect the USB cable and open the terminal SDIO_SDCard_Test(); while (1) { } } static void SDIO_SDCard_Test(void) { FATFS FatFs; FIL Fil; FRESULT FR_Status; FATFS *FS_Ptr; UINT RWC, WWC; // Read/Write Word Counter DWORD FreeClusters; uint32_t TotalSize, FreeSpace; char RW_Buffer[200]; do { //------------------[ Mount The SD Card ]-------------------- FR_Status = f_mount(&FatFs, SDPath, 1); if (FR_Status != FR_OK) { sprintf(TxBuffer, "Error! While Mounting SD Card, Error Code: (%i)\r\n", FR_Status); USB_CDC_Print(TxBuffer); break; } sprintf(TxBuffer, "SD Card Mounted Successfully! \r\n\n"); USB_CDC_Print(TxBuffer); //------------------[ Get & Print The SD Card Size & Free Space ]-------------------- f_getfree("", &FreeClusters, &FS_Ptr); TotalSize = (uint32_t)((FS_Ptr->n_fatent - 2) * FS_Ptr->csize * 0.5); FreeSpace = (uint32_t)(FreeClusters * FS_Ptr->csize * 0.5); sprintf(TxBuffer, "Total SD Card Size: %lu Bytes\r\n", TotalSize); USB_CDC_Print(TxBuffer); sprintf(TxBuffer, "Free SD Card Space: %lu Bytes\r\n\n", FreeSpace); USB_CDC_Print(TxBuffer); //------------------[ Open A Text File For Write & Write Data ]-------------------- //Open the file FR_Status = f_open(&Fil, "MyTextFile.txt", FA_WRITE | FA_READ | FA_CREATE_ALWAYS); if(FR_Status != FR_OK) { sprintf(TxBuffer, "Error! While Creating/Opening A New Text File, Error Code: (%i)\r\n", FR_Status); USB_CDC_Print(TxBuffer); break; } sprintf(TxBuffer, "Text File Created & Opened! Writing Data To The Text File..\r\n\n"); USB_CDC_Print(TxBuffer); // (1) Write Data To The Text File [ Using f_puts() Function ] f_puts("Hello! From STM32 To SD Card Over SDIO + DMA, Using f_puts()\n", &Fil); // (2) Write Data To The Text File [ Using f_write() Function ] strcpy(RW_Buffer, "Hello! From STM32 To SD Card Over SDIO + DMA, Using f_write()\r\n"); f_write(&Fil, RW_Buffer, strlen(RW_Buffer), &WWC); // Close The File f_close(&Fil); //------------------[ Open A Text File For Read & Read Its Data ]-------------------- // Open The File FR_Status = f_open(&Fil, "MyTextFile.txt", FA_READ); if(FR_Status != FR_OK) { sprintf(TxBuffer, "Error! While Opening (MyTextFile.txt) File For Read.. \r\n"); USB_CDC_Print(TxBuffer); break; } // (1) Read The Text File's Data [ Using f_gets() Function ] f_gets(RW_Buffer, sizeof(RW_Buffer), &Fil); sprintf(TxBuffer, "Data Read From (MyTextFile.txt) Using f_gets():%s", RW_Buffer); USB_CDC_Print(TxBuffer); // (2) Read The Text File's Data [ Using f_read() Function ] f_read(&Fil, RW_Buffer, f_size(&Fil), &RWC); sprintf(TxBuffer, "Data Read From (MyTextFile.txt) Using f_read():%s", RW_Buffer); USB_CDC_Print(TxBuffer); // Close The File f_close(&Fil); sprintf(TxBuffer, "File Closed! \r\n\n"); USB_CDC_Print(TxBuffer); //------------------[ Open An Existing Text File, Update Its Content, Read It Back ]-------------------- // (1) Open The Existing File For Write (Update) FR_Status = f_open(&Fil, "MyTextFile.txt", FA_OPEN_EXISTING | FA_WRITE); FR_Status = f_lseek(&Fil, f_size(&Fil)); // Move The File Pointer To The EOF (End-Of-File) if(FR_Status != FR_OK) { sprintf(TxBuffer, "Error! While Opening (MyTextFile.txt) File For Update.. \r\n"); USB_CDC_Print(TxBuffer); break; } // (2) Write New Line of Text Data To The File FR_Status = f_puts("This New Line Was Added During File Update!\r\n", &Fil); f_close(&Fil); memset(RW_Buffer,'\0',sizeof(RW_Buffer)); // Clear The Buffer // (3) Read The Contents of The Text File After The Update FR_Status = f_open(&Fil, "MyTextFile.txt", FA_READ); // Open The File For Read f_read(&Fil, RW_Buffer, f_size(&Fil), &RWC); sprintf(TxBuffer, "Data Read From (MyTextFile.txt) After Update:\r\n%s", RW_Buffer); USB_CDC_Print(TxBuffer); f_close(&Fil); //------------------[ Delete The Text File ]-------------------- // Delete The File /* FR_Status = f_unlink(MyTextFile.txt); if (FR_Status != FR_OK){ sprintf(TxBuffer, "Error! While Deleting The (MyTextFile.txt) File.. \r\n"); USC_CDC_Print(TxBuffer); } */ } while(0); //------------------[ Test Complete! Unmount The SD Card ]-------------------- FR_Status = f_mount(NULL, "", 0); if (FR_Status != FR_OK) { sprintf(TxBuffer, "\r\nError! While Un-mounting SD Card, Error Code: (%i)\r\n", FR_Status); USB_CDC_Print(TxBuffer); } else{ sprintf(TxBuffer, "\r\nSD Card Un-mounted Successfully! \r\n"); USB_CDC_Print(TxBuffer); } } |
Test Setup
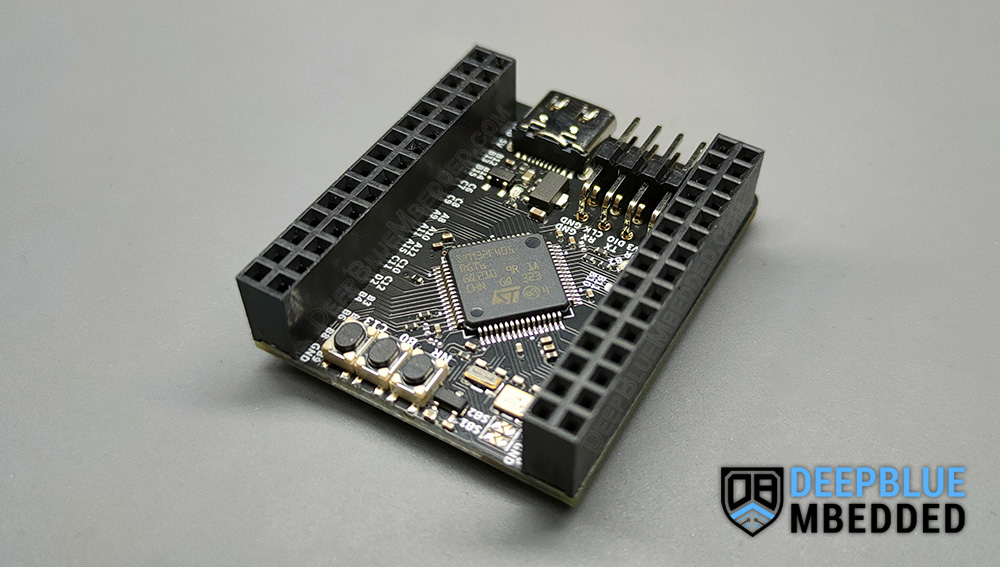
This is my test setup for this example project. I’m using a 2GB SD card as well as a USB cable to connect the STM32 USB CDC to my PC as a virtual COM port. The SD card socket is already soldered to the bottom of my STM32F405 Development Board as stated earlier according to the schematic design figure that I did also show earlier in this tutorial. That’s all about it!
Testing Result
Here is the test result that’s printed on the serial monitor.
And this is the content of the SD card after running this example project as shown on my PC file manager.

It may not be very obvious that this example project is handling the SDIO (read/write) operations using DMA. However, you can check the following files to make sure that the application-level drivers are using the DMA channels under the hood.
FATFS/Target/sd_diskio.c
You’ll find the SD_read() & SD_write() functions are using the DMA versions of the BSP_SD_ReadBlocks_DMA() & BSP_SD_WriteBlocks_DMA() functions. You can also find their implementations in the source file below.
FATFS/Target/bsp_driver_sd.c
The advantage of using DMA over the polling version of SD read/write operations will be obviously visible when you’re attempting to read/write big chunks of data into large files. This is when you can notice major CPU time savings and CPU load reduction overall.
Required Parts For STM32 Examples
All the example Code/LABs/Projects in this STM32 Series of Tutorials are done using the Dev boards & Electronic Parts Below:
| QTY. | Component Name | Amazon.com | AliExpress | eBay |
| 1 | SD Card SDIO Breakout Board | Amazon | AliExpress | eBay |
| 1 | SD Card Reader (For PC) | Amazon | AliExpress | eBay |
| 1 | SD Card 8GB | Amazon | AliExpress | eBay |
| 1 | STM32-F103 BluePill Board (ARM Cortex-M3 @ 72MHz) | Amazon | AliExpress | eBay |
| 1 | Nucleo-L432KC (ARM Cortex-M4 @ 80MHz) | Amazon | AliExpress | eBay |
| 1 | ST-Link V2 Debugger | Amazon | AliExpress | eBay |
| 2 | BreadBoard | Amazon | AliExpress | eBay |
| 1 | LEDs Kit | Amazon & Amazon | AliExpress | eBay |
| 1 | Resistors Kit | Amazon & Amazon | AliExpress | eBay |
| 1 | Capacitors Kit | Amazon & Amazon | AliExpress & AliExpress | eBay & eBay |
| 1 | Jumper Wires Pack | Amazon & Amazon | AliExpress & AliExpress | eBay & eBay |
| 1 | Push Buttons | Amazon & Amazon | AliExpress | eBay |
| 1 | Potentiometers | Amazon | AliExpress | eBay |
| 1 | Micro USB Cable | Amazon | AliExpress | eBay |
★ Check The Links Below For The Full Course Kit List & LAB Test Equipment Required For Debugging ★
Download Attachments
You can download all attachment files for this Article/Tutorial (project files, schematics, code, etc..) using the link below. Please consider supporting our work through the various support options listed in the link down below. Every small donation helps to keep this website up and running and ultimately supports the whole community.
Wrap Up
In conclusion, we’ve discussed how to interface STM32 microcontrollers with SD Card memory using the SDIO hardware interface + DMA with the FatFS firmware library. The provided example project should be a very good starting point for your next STM32 SDIO + DMA SD Card interfacing project. You can also explore the other parts of the STM32 SD Card tutorials series for more information about the other STM32 SD Card interfacing options.
![STM32 SDIO SD Card Example With FatFS [Interfacing Tutorial] STM32 SDIO SD Card Example With FatFS [Interfacing Tutorial]](https://deepbluembedded.com/wp-content/uploads/2024/04/STM32-SDIO-SD-Card-Example-With-FatFS-Interfacing-Tutorial-300x169.jpg)
![STM32 SD Card SPI & FatFS [Tutorial + Examples] STM32 SD Card SPI & FatFS [Tutorial + Examples]](https://deepbluembedded.com/wp-content/uploads/2024/04/STM32-SD-Card-SPI-FatFS-Tutorial-Examples.jpg)
![STM32 SDIO SD Card Example With FatFS [Interfacing Tutorial] STM32 SDIO SD Card Example With FatFS [Interfacing Tutorial]](https://deepbluembedded.com/wp-content/uploads/2024/04/STM32-SDIO-SD-Card-Example-With-FatFS-Interfacing-Tutorial.jpg)
