| Previous Tutorial | Tutorial 26 | Next Tutorial | |||||
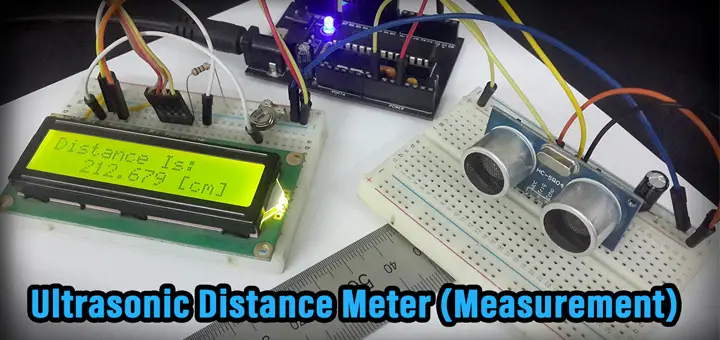
| Ultrasonic Distance Meter With HC-SR04 & LCD | |||||||
| Introductory Level ★☆☆☆☆ | |||||||
In this tutorial, we’ll create a distance meter using the ultrasonic sensor HC-SR04 with an Alphanumeric 16×2 LCD module. In a previous tutorial, we’ve discussed how HC-SR04 Ultrasonic sensor works and how to interface it with a microcontroller. That’s why it’s recommended to give it a read, in case you haven’t yet. For this tutorial, we’ll combine both labs of the HC-SR04 with the LCD. And introduce a slightly more accurate way to measure the echo pulse from the ultrasonic sensor. Without any further introduction, let’s get started!
[toc]
Components Needed For This Tutorial
| Qty. | Component Name | Buy On Amazon.com |
| 1 | PIC16F877A
or PIC18F2550 |
Add |
| 1 | BreadBoard | Add |
| 1 | Alphanumeric LCD 16×2 | Add |
| 1 | Ultrasonic Sensor HC-SR04 | Add |
| 1 | Jumper Wires Pack | Add Add |
| 1 | LM7805 Voltage Regulator (5v) | Add |
| 1 | 8MHz Crystal Oscillator | Add |
| 1 | PICkit2 or 3 Programmer | Add |
Reading HC-SR04 Ultrasonic Sensor’s Output
To trigger the ultrasonic sensor, you’ll have to send a trigger pulse from your microcontroller using any io pin. The trigger pulse is a High-Pulse with a width of 10μs. Then, the ultrasonic sensor finds the distance between it and any object/obstacle confronting it. This distance information is sent back by the ultrasonic sensor to your main microcontroller as a short-pulse echo signal.
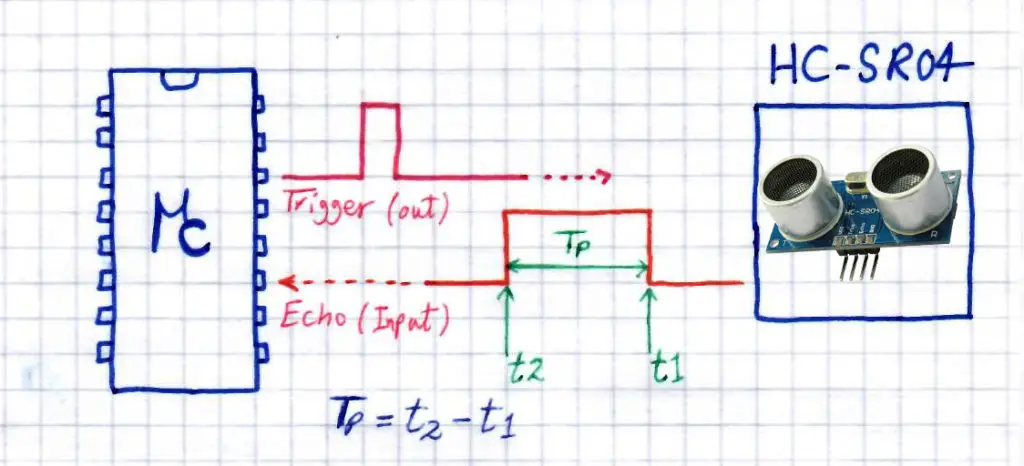
Our target is to measure the pulse width of the echo signal to know how long did it take the ultrasonic waves to travel between the sensor and any confronting object. We’ll use the CCPx module in capture mode to capture the time t1 when the echo pin goes high and reverse the capture edge triggering to capture the time when the echo pin goes low t2. Therefore, the echo pulse width is Tp = t2 – t1
Required Configurations
- Configure CCP1 Module To Capture On Every Rising Edge
- Enable CCP1 Interrupt
- Configure TMR1 To Handle Max. & Min. (Tp)
- Enable TMR1 Overflow Interrupt
Procedure
- Configure CCP1 To Capture Every Rising Edge
- Enable CCP1 Interrupt
- Configure TMR1 & Enable Interrupt
- When CCP1 Capture Interrupt Occurs -> Save t1 & Re-configure CCP1 To Capture On Falling Edge
- When CCP1 Capture Interrupt Occurs -> Save t2 & Get Tp = t2 – t1
- Re-configure CCP1 To Capture Every Rising Edge Once Again .. (Keep Repeating Steps 4 to 6)
Code Listing
|
1 2 3 4 5 6 7 8 9 10 11 12 13 14 15 16 17 18 19 20 21 22 23 24 25 26 27 28 29 30 31 32 33 34 35 36 37 38 39 40 41 42 43 44 45 46 47 48 49 50 51 52 53 54 55 |
//--[ Main Routine ]-- void main(void) { Trig_d = 0; Trig = 0; LCD_Init(); LCD_Clear(); TMR1_Init(); CCP1_Capture_Init(); while(1) { // Trigger The Ultrasonic Sensor Trigger_Ultrasonic(); // Update The LCD Display Update_Display(); __delay_ms(10); } return; } //---------------------------------- //--[ ISR ]-- void __interrupt() ISR(void) { if(TMR1IF) { TMR1_C++; TMR1IF = 0; } if(CCP1IF) { if(Edge == 0) // On The Rising Edge Of Echo Signal { t1 = TMR1; // Save t1 CCP1CON = 0x04; // Re-configure CCP1 To Capture On Falling Edge Edge++; // Flip The State For Next Interrupt } else if(Edge == 1) // On The Falling Edge Of Echo Signal { t2 = TMR1; // Save t2 // Calculate The Echo Pulse Width (tp) if(TMR1_C) tp = (t2+65536*TMR1_C) - t1; else tp = t2 - t1; // Convert tp From TMR1 Ticks To Real-Time & Calculate Distance Tp = tp*0.0000001666; Distance = (Tp / 2)*34000; CCP1CON = 0x05; // Re-configure CCP1 To Capture On Rising Edge Edge = 0; // Reset The State Variable } // Clear Flags For Next Interrupt TMR1_C = 0; CCP1IF = 0; } } //-----------------[ END OF ISR ]----------------- |
Converting Echo Pulse Width To Distance

After measuring the pulse width time of the echo signal being sent by the ultrasonic sensor, we need to extract the distance information from it. In fact, the pulse width (Tp) of the echo signal represents the total trip time it took the sound waves to travel from the sensor to the confronting object back & forth.
Which means, the time it takes the ultrasound waves to travel from the sensor to the object is only half of Tp. Therefore, td = Tp/2. And provided that the sound speed in air is a constant of 340[m/s], we can now get the distance between the sensor and the confronting object from the formula shown below
Distance = td x 340[m/s]
Code Listing
|
1 2 3 |
// Convert tp From TMR1 Ticks To Real-Time & Calculate Distance Tp = tp*0.0000001666; Distance = (Tp / 2)*34000; |
Printing Distance On LCD
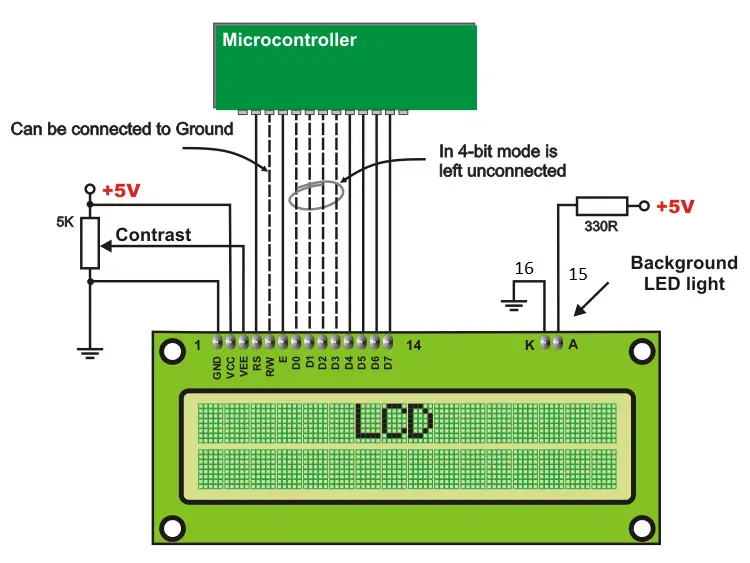
We’ve developed a simple device driver for the Alphanumeric 16×2 LCD in a previous tutorial. So, we’ll just include our library in this project and make changes to the io pin maps if you wish.
The float Distance variable should be converted to a string (array of characters) before being passed to the LCD printing routine. For this job, we’ll use the sprintf function from stdio.h library. And we’ll settle for 3 digits after the decimal point, and you can surely set it to whatever you want. Below is a code snipped indicating the LCD printing functionality.
Code Listing
|
1 2 3 4 5 6 7 8 |
void Update_Display() { LCD_Set_Cursor(1,1); LCD_Write_String("Distance Is:"); LCD_Set_Cursor(2,1); sprintf(Buffer, " %.3f [cm]", Distance); LCD_Write_String(Buffer); } |
Concluding Remarks
LCD Connection Diagram
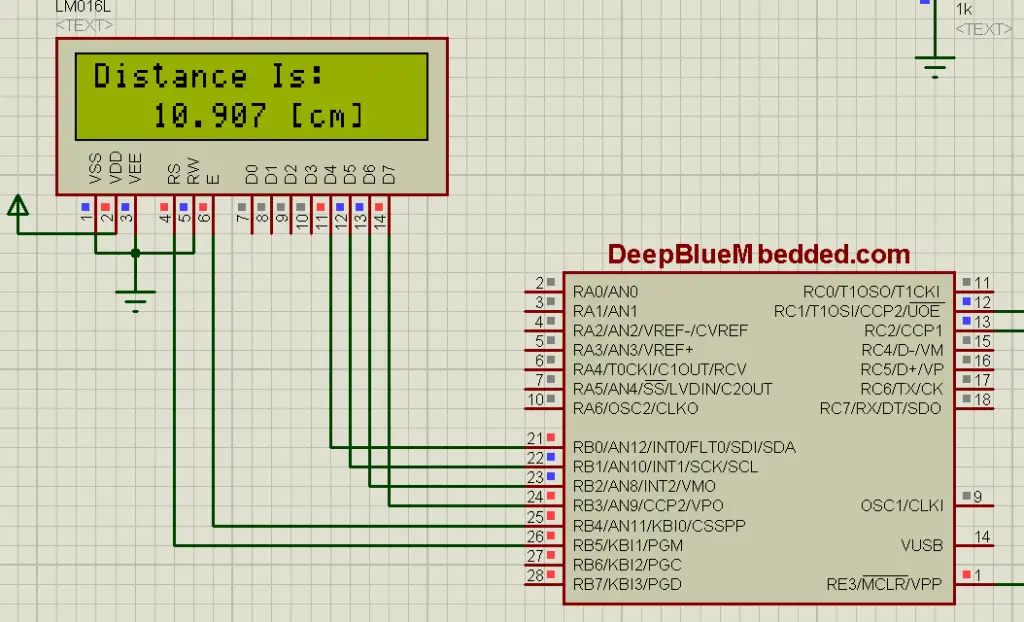
Results In Simulation
Results In Practice
Full Code Listing
|
1 2 3 4 5 6 7 8 9 10 11 12 13 14 15 16 17 18 19 20 21 22 23 24 25 26 27 28 29 30 31 32 33 34 35 36 37 38 39 40 41 42 43 44 45 46 47 48 49 50 51 52 53 54 55 56 57 58 59 60 61 62 63 64 65 66 67 68 69 70 71 72 73 74 75 76 77 78 79 80 81 82 83 84 85 86 87 88 89 90 91 92 93 94 95 96 97 98 99 100 101 102 103 104 105 106 107 108 109 110 111 112 113 114 115 116 117 118 119 120 121 122 123 124 125 126 127 128 129 |
/* * File: main.c * Author: Khaled Magdy * LAB Name: Ultrasonic Distance Meter * Visit My Website @ https://deepbluembedded.com *///------------------------------------------------- // Echo Pin CCP1 RC2 // Trigger Pin RC1 // LCD Data [RB0-RB3] // LCD RS RB5 // LCD EN RB4 //==================================================== #include <xc.h> #include "config.h" #include "LCD.h" #include <stdint.h> #include <stdio.h> #define _XTAL_FREQ 48000000 #define Trig_d TRISC1 #define Trig RC1 //---------------------------------- //--[ Globals ]-- uint8_t TMR1_C = 0, Edge=0; uint32_t t1=0x00, t2=0x00, tp; float Distance=0, Tp; char Buffer[20]; //---------------------------------- //--[ Routines Prototypes ]-- void TMR1_Init(); void CCP1_Capture_Init(); void Trigger_Ultrasonic(); void Update_Display(); //---------------------------------- //--[ Main Routine ]-- void main(void) { Trig_d = 0; Trig = 0; LCD_Init(); LCD_Clear(); TMR1_Init(); CCP1_Capture_Init(); while(1) { // Trigger The Ultrasonic Sensor Trigger_Ultrasonic(); // Update The LCD Display Update_Display(); __delay_ms(10); } return; } //---------------------------------- //--[ ISR ]-- void __interrupt() ISR(void) { if(TMR1IF) { TMR1_C++; TMR1IF = 0; } if(CCP1IF) { if(Edge == 0) // On The Rising Edge Of Echo Signal { t1 = TMR1; // Save t1 CCP1CON = 0x04; // Re-configure CCP1 To Capture On Falling Edge Edge++; // Flip The State For Next Interrupt } else if(Edge == 1) // On The Falling Edge Of Echo Signal { t2 = TMR1; // Save t2 // Calculate The Echo Pulse Width (tp) if(TMR1_C) tp = (t2+65536*TMR1_C) - t1; else tp = t2 - t1; // Convert tp From TMR1 Ticks To Real-Time & Calculate Distance Tp = tp*0.0000001666; Distance = (Tp / 2)*34000; CCP1CON = 0x05; // Re-configure CCP1 To Capture On Rising Edge Edge = 0; // Reset The State Variable } // Clear Flags For Next Interrupt TMR1_C = 0; CCP1IF = 0; } } //---------------------------------- //----[ Functions Definitiotns ]---- void TMR1_Init() { // -- [[ Configure Timer1 To Operate In Timer Mode ]] -- // Clear The Timer1 Register. To start counting from 0 TMR1 = 0; // Choose the local clock source (timer mode) TMR1CS = 0; // Choose the desired prescaler ratio (1:2) T1CKPS0 = 1; T1CKPS1 = 0; // Switch ON Timer1 Module! TMR1ON = 1; // -- [[ Interrupts Configurations ]] -- TMR1IE = 1; // Timer1 Interrupt Enable Bit TMR1IF = 0; // Clear The Interrupt Flag Bit PEIE = 1; // Peripherals Interrupts Enable Bit GIE = 1; // Global Interrupts Enable Bit } void CCP1_Capture_Init() { //--[ Configure The CCP1 Module To Operate in Capture Mode ]-- CCP1CON = 0x05; // Enable CCP1 Interrupt CCP1IF = 0; CCP1IE = 1; } void Update_Display() { LCD_Set_Cursor(1,1); LCD_Write_String("Distance Is:"); LCD_Set_Cursor(2,1); sprintf(Buffer, " %.3f [cm]", Distance); LCD_Write_String(Buffer); } void Trigger_Ultrasonic() { Trig = 1; __delay_us(10); Trig = 0; } |
Download All Project Files
Did You Find This Helpful? Why Not Share it With Your Network Or On FaceBook Related Groups! Maybe Some Others Would Like To Read Such A Content .. Good Luck, everybody!
Regards,
Khaled M.
| Previous Tutorial | Tutorial 26 | Next Tutorial | |||||
Hello, Mr.Khaled Magdy: My name is sath, I want to thank you for every tutorial that you helped all of us with. I learned a lot from you in PIC programming. so thank you, thank you…
Greetings Sath ^^
I’m really soo happy to read your comment. Thanks so much for your kind words and this great feedback!
You are more than welcome. I watched every vedio you have and all so good and helpfull. I also, want to ask you about ASM, or assemply language program espicialy for the ultrasonic, why didn’t you do these vedioes, it will be very uniqe. No one ever ha e it on Youtube. Can you please look into it. Thanks again
I could not understand why we have defined a variable called TMR1_C and why we have used it in the
formula that calculates Echo Pulse Width (tp).Can you please explain.Thanks!