| Previous Tutorial | Tutorial 33 | Next Tutorial | |||||
| Multiplexing 7-Segment Displays | Multi-Digit 7-Segments Interfacing | |||||||
| Introductory Level | |||||||
In this tutorial, we’ll be discussing how to interface multiple digits 7-Segments display with pic microcontrollers, or any other MCUs, generally speaking. I’ll briefly introduce the phenomenon called “persistence of vision” and how we can use it in embedded systems to trick the human eye by multiplexing displays in order to reduce the pin-count required to drive these output 7-segment display units.
By the end of this tutorial, you should be able to implement your own multi-digit 7-segments display controller. And you’ll create a couple of simple projects to test things out. First of which is a 3-Digit counter and the other is a 3-Digit ADC result display. Without further ado, let’s get right into it!
[toc]
Required Components For This Tutorial
| Qty. | Component Name | Buy On Amazon.com |
| 1 | PIC18F2550 | Add |
| 1 | BreadBoard | Add |
| 1 | Multi-Digit 7-Segment Display | Add |
| 1 | Potentiometers | Add |
| Resistors Kit | Add Add | |
| 1 | Capacitors Kit | Add Add |
| 1 | Jumper Wires Pack | Add Add |
| 1 | LM7805 Voltage Regulator (5v) | Add |
| 1 | Crystal Oscillator | Add |
| 1 | PICkit2 or 3 Programmer | Add |
| 2 | 9v Battery or DC Power Supply | Add Add Add |
My DSO Siglent-SDS1104 (on Amazon.com)
My Function Generator Fy-6900 (on Amazon.com)
*Affiliate Links Disclosure: links will make me a small commission at no additional cost to you*
PIC Micro 7-Segments Display Interfacing
In a previous tutorial (7-Segments display interfacing), I’ve demonstrated how to interface a single 7-Segment display unit to display a single-digit number. However, in many situations, it won’t be enough and you’ll need to add more digits and of course, you can’t reserve 7 io pins for each one of them!
Moreover, adding many 7-segments comes at a cost indeed. And at some point, you’ll find out that an LCD module would have given you more display digits at the same, or less cost. And it’ll be your decision to chose one over the other.
The LCD display will give you more digits with less price per digit. But, it’ll be smaller and harder to see. A user can see clearly the LCD display from a distance no more than 1 meter.
On the other hand, the 7-segments display units are larger in size and could be easily seen by users from a greater distance. That’s the trade-off you’ll have to decide on, depending on your project case.
You can use the following online tool to generate the code for any 7-segment display pattern or number you need to display in your project, it’s a very handy tool.
7-Segment Display Code Generator Online Tool
Persistence of Vision – POV
Persistence of vision (POV) refers to the optical illusion that occurs when visual perception of an object does not cease for some time after the rays of light proceeding from it have ceased to enter the eye. The human eye receives the light rays and sends the signals to the brain where perception occurs. The image you see inside your brain takes some time to fade away after it actually disappears in front of your eyes.
Therefore, the eye could be easily tricked by changing a scene fast enough so that the brain perceives an object in two places at the same time. A very clear example of this is the fan blades. While a fan is spinning the blades will seemingly appear to be in multiples positions at the same time due to the POV.
In the animation below, the magician is holding a circular card. On the front face, there is a bird & on the backside, there is an empty cage. But as he spins the card fast enough, your eye will be tricked and your brain will perceive a bird in cage image, which doesn’t actually exist.
The animation below is just a few pictures being displayed one by one but fast enough so that you can feel the overlapping in your mind. Due to the fact that an image takes some time to fade away in your brain.
There are many applications for this phenomenon in embedded systems, where we take advantage of this fact in order to optimize our systems by tricking the human eye. One of them is the multiplexed 7-Segments display which we’ll implement today. And a very common example you might have seen before is the POV Watch. A led bar rotating very fast with a motor mount, so we can make the LEDs “appear” to be in multiple places, therefore we can draw whatever we want using only a strip of LEDs instead of a huge LED matrix.
Multiplexing 7-Segment Display With PIC
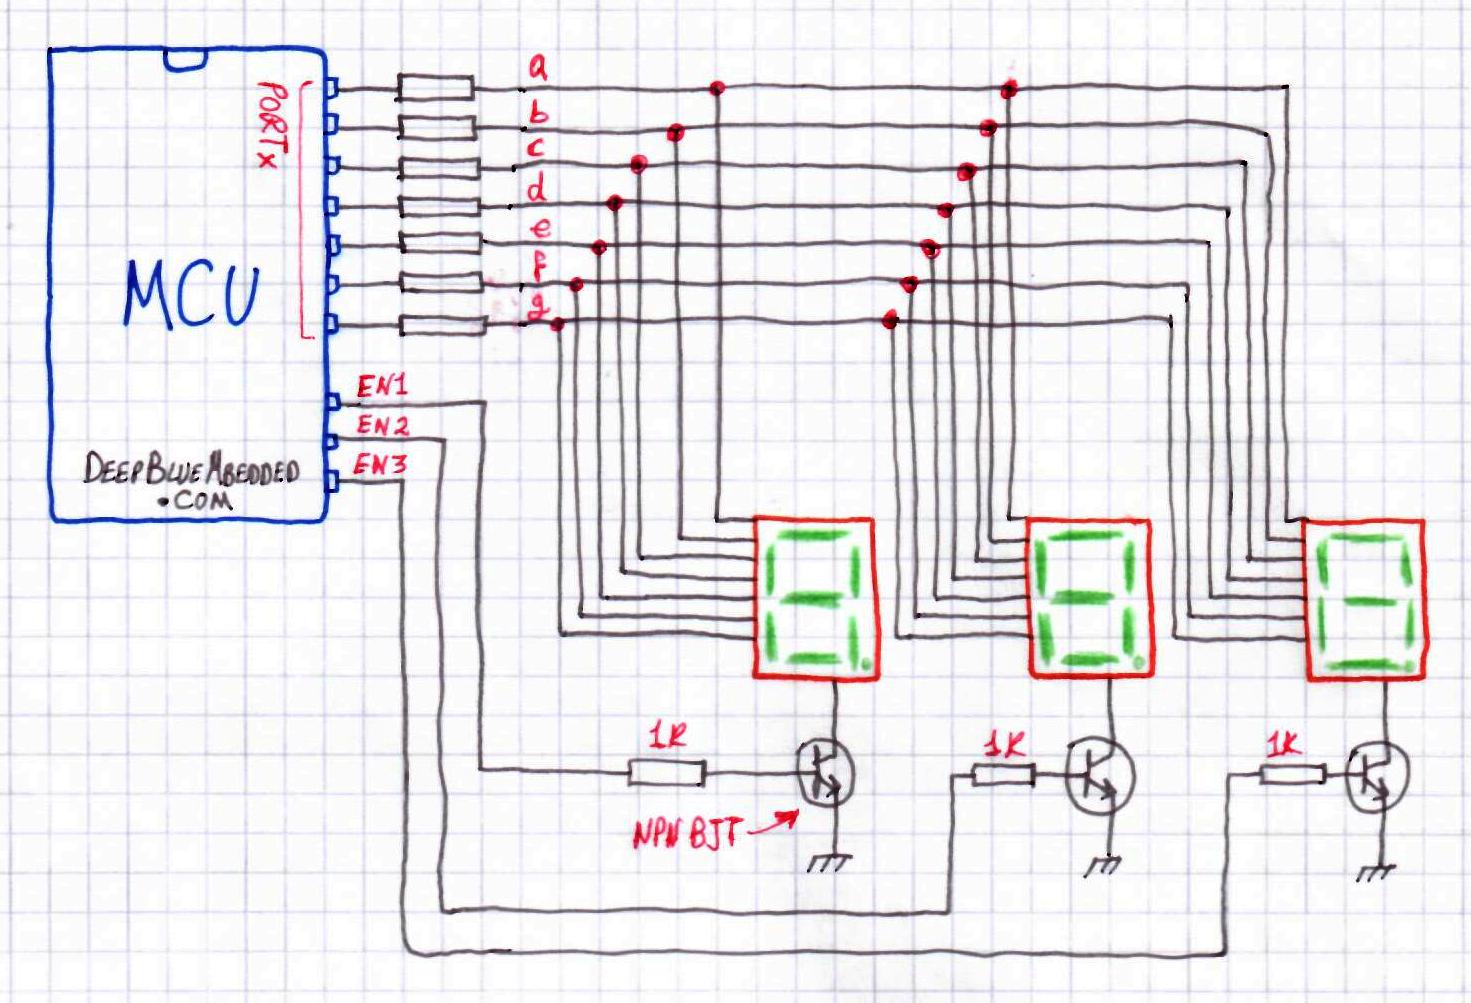
The key idea of controlling multiple 7-segment displays is to use the same 7 IO output pins for all the segment lines. And also an additional control pin (transistor) to activate each 7-segment unit one at a time. And keep switching between all the digits fast enough to seemingly look as if they are lit at the same time.
Down below is a schematic diagram for a 3-Digit 7-Segment display unit and how to hook it up to your microcontroller.
(in case of Using 3 Different 1-Digit 7-Segment Display Units)
(in case of Using a Single 3-Digit 7-Segment Display Unit)
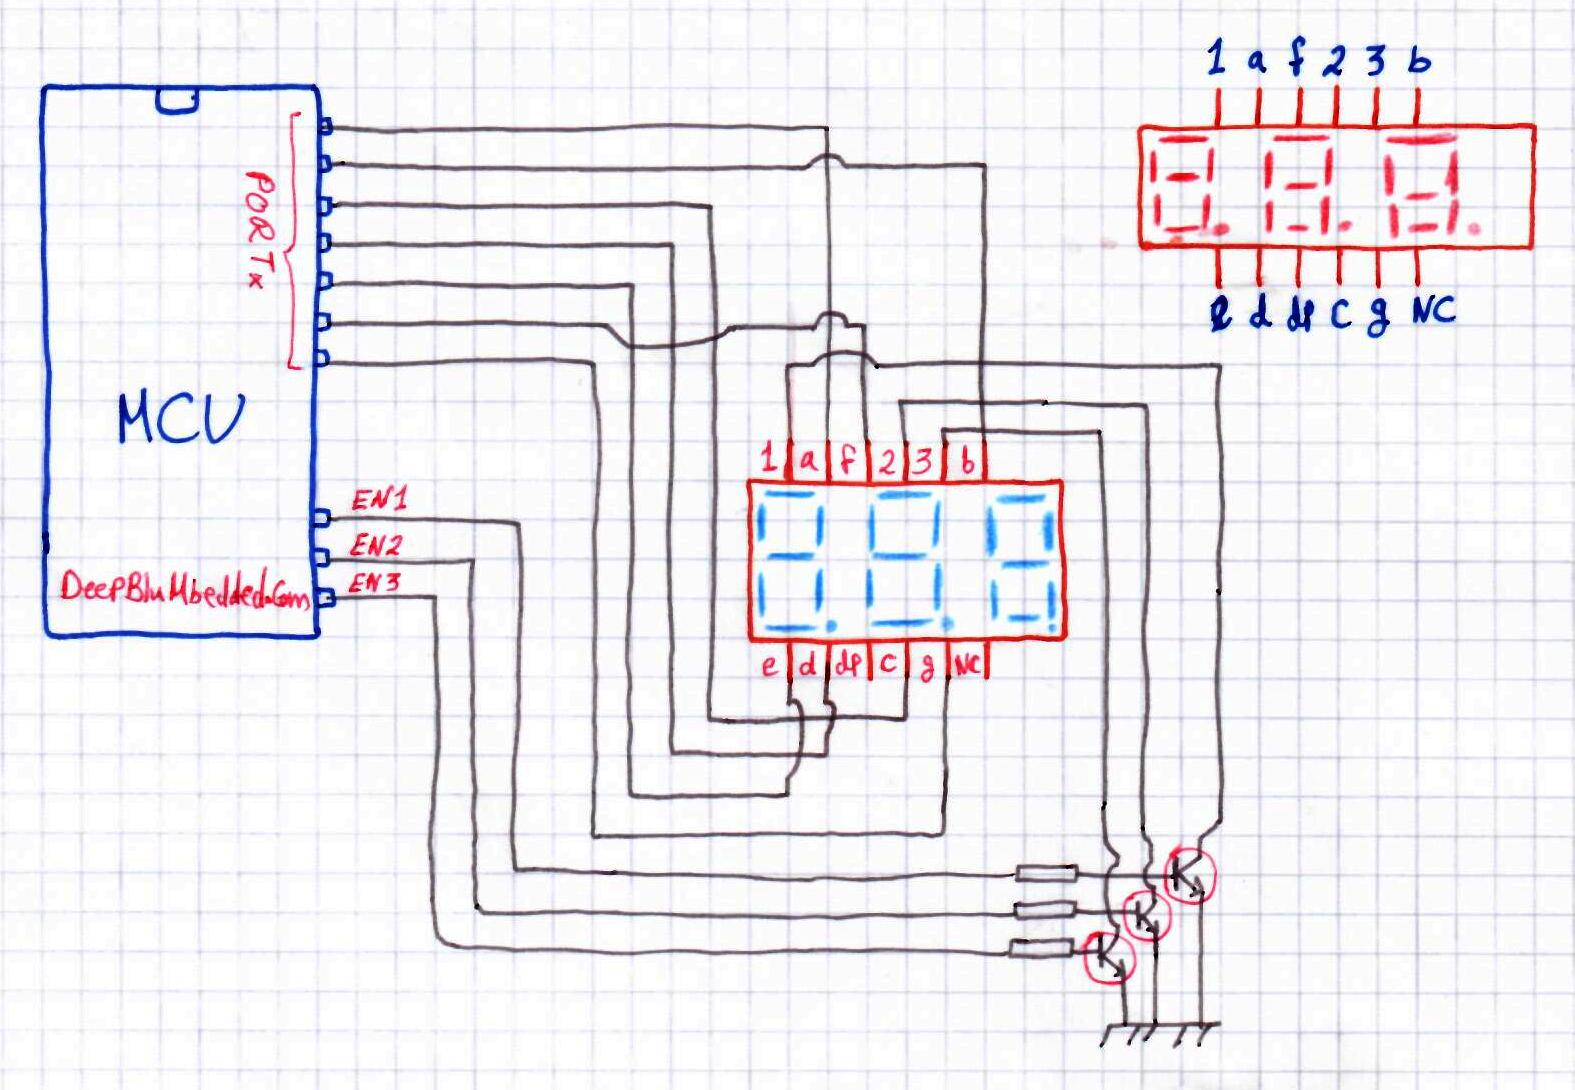
Quick and dirty drawing but hopefully indicates how it will be hooked up.
Note that: in the second diagram, I’ve forgotten to add current limiting resistors for the 7-Segments. You can place a single resistor at the emitter to the ground connection. Or alternatively, one resistor for each line of the 7-Segments. And be aware that placing a single resistor at the emitter will cause non-consistent brightness among different segments. So you should predict that some segments will be brighter than others.
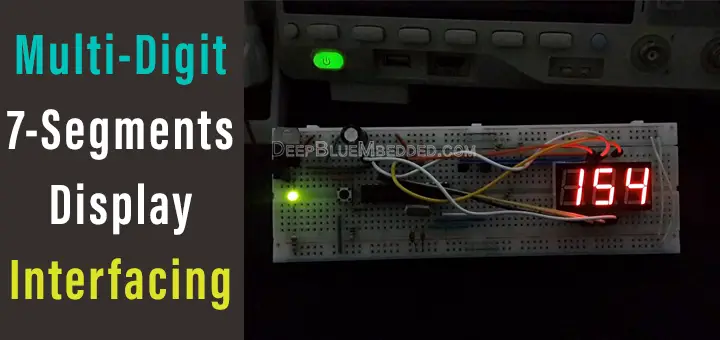
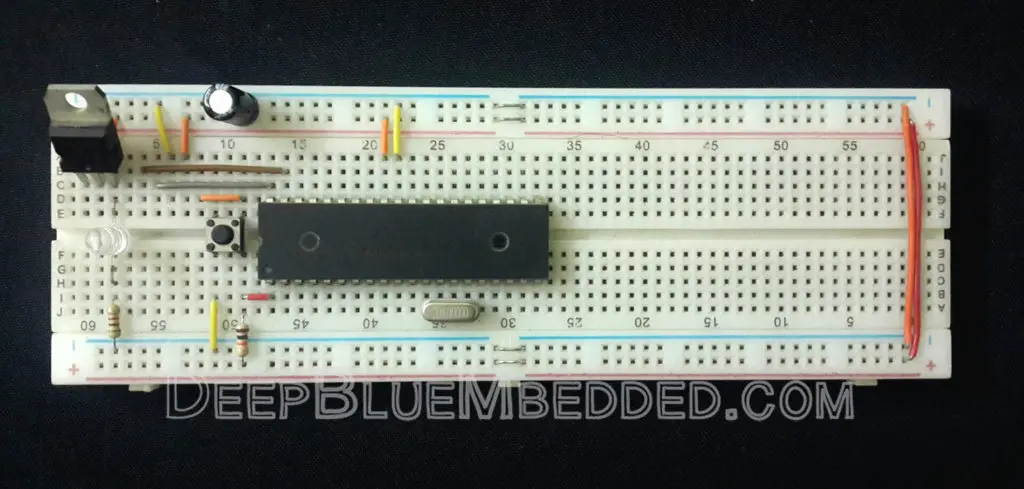
PIC Microcontroller 3-Digit 7-Segment Display Counter – LAB1
| Lab Name | 3-Digit 7-Segment Display Counter |
| Lab Number | 45 |
| Lab Level | Intermediate |
| Lab Objectives | Learn how to interface multiple digits 7-segments display with microcontrollers. And implement a multiplexing technique in order to reduce the required pin-count for the control process. |
1. Coding
Open the MPLAB IDE and create a new project name it “Multiple_7Segments”. If you have some issues doing so, you can always refer to the previous tutorial using the link below.

Set the configuration bits to match the generic setting which we’ve stated earlier. And if you also find troubles creating this file, you can always refer to the previous tutorial using the link below.

Now, open the main.c file and let’s start developing the firmware for our project.
The full code listing for this lab is as follows
|
1 2 3 4 5 6 7 8 9 10 11 12 13 14 15 16 17 18 19 20 21 22 23 24 25 26 27 28 29 30 31 32 33 34 35 36 37 38 39 40 41 42 43 44 45 46 47 48 49 50 51 52 53 54 55 56 57 58 59 60 61 62 63 64 65 66 67 68 69 70 71 72 73 74 75 76 77 78 79 80 81 82 83 84 85 86 87 88 89 90 91 92 93 94 95 96 97 98 99 100 101 102 103 104 105 106 107 108 109 110 111 112 |
/* * File: main.c * Author: Khaled Magdy * Multiple 7-Segments Displays * PIC18F2550 With 4MHz OSC & PLL Config For Fosc=48MHz */ #include <xc.h> #include "config.h" #define _XTAL_FREQ 48000000 #define PreLoad 55535 #define SevenSeg1 PORTB #define SevenSeg1_D TRISB #define EN1 RC0 #define EN1_D TRISC0 #define EN2 RC1 #define EN2_D TRISC1 #define EN3 RC2 #define EN3_D TRISC2 unsigned char Current_Digit=0; unsigned char Segments_Code[10] = {0x3F,0x06,0x5B,0x4F,0x66,0x6D,0x7D,0x07,0x7F,0x6F}; unsigned char SevenSeg1_Digits[3] = {5, 3, 4}; void TMR1_Init(); void SevenSeg1_Init(); void SevenSeg1_Write(unsigned int); void main(void) { unsigned int x=0; SevenSeg1_Init(); while(1) { __delay_ms(100); SevenSeg1_Write(x++); } return; } //=================================== //--------------[ ISR ]-------------- void __interrupt() ISR(void) { if(TMR1IF) { if(Current_Digit==0) { SevenSeg1 = 0x00; EN1 = 1; EN2 = EN3 = 0; SevenSeg1 = Segments_Code[SevenSeg1_Digits[0]]; } if(Current_Digit==1) { SevenSeg1 = 0x00; EN2 = 1; EN1 = EN3 = 0; SevenSeg1 = Segments_Code[SevenSeg1_Digits[1]]; } if(Current_Digit==2) { SevenSeg1 = 0x00; EN3 = 1; EN2 = EN1 = 0; SevenSeg1 = Segments_Code[SevenSeg1_Digits[2]]; } Current_Digit++; if(Current_Digit==3) Current_Digit=0; TMR1IF = 0; TMR1 = PreLoad; // Preloading Timer1 } } //----------[ END OF ISR ]----------- //=================================== // Functions' Definitions void TMR1_Init() { // -- [[ Configure Timer1 To Operate In Timer Mode ]] -- // Preload TMR1 Register Pair TMR1 = PreLoad; // Choose the local clock source (timer mode) TMR1CS = 0; // Choose the desired prescaler ratio (1:8) T1CKPS0 = 1; T1CKPS1 = 1; // Switch ON Timer1 Module! TMR1ON = 1; // Config TMR1 Interrupt TMR1IE = 1; TMR1IF = 0; PEIE = 1; GIE = 1; } void SevenSeg1_Init() { TMR1_Init(); SevenSeg1_D = 0x00; SevenSeg1 = 0x00; EN1_D = EN2_D = EN3_D = 0; EN1 = EN2 = EN3 = 0; } void SevenSeg1_Write(unsigned int num) { if(num<=999) { SevenSeg1_Digits[0] = num / 100; num%=100; SevenSeg1_Digits[1] = num / 10; num%=10; SevenSeg1_Digits[2] = num; } } |
2. Prototyping
Here is a short demo video for the running test for this LAB
 |
PIC Microcontroller 3-Digit 7-Segments + ADC With PIC – LAB2
| Lab Name | 3-Digit 7-Segment Display With ADC |
| Lab Number | 46 |
| Lab Level | Intermediate |
| Lab Objectives | Learn how to interface multiple digits 7-segments display with microcontrollers. And implement a multiplexing technique in order to reduce the required pin-count for the control process. |
1. Coding
Open the MPLAB IDE and create a new project name it “Multiple_7Segments_ADC”. If you have some issues doing so, you can always refer to the previous tutorial using the link below.
Set the configuration bits to match the generic setting which we’ve stated earlier. And if you also find troubles creating this file, you can always refer to the previous tutorial using the link below.
Now, open the main.c file and let’s start developing the firmware for our project.
The full code listing for this lab is as follows
|
1 2 3 4 5 6 7 8 9 10 11 12 13 14 15 16 17 18 19 20 21 22 23 24 25 26 27 28 29 30 31 32 33 34 35 36 37 38 39 40 41 42 43 44 45 46 47 48 49 50 51 52 53 54 55 56 57 58 59 60 61 62 63 64 65 66 67 68 69 70 71 72 73 74 75 76 77 78 79 80 81 82 83 84 85 86 87 88 89 90 91 92 93 94 95 96 97 98 99 100 101 102 103 104 105 106 107 108 109 110 111 112 113 114 115 116 117 118 119 120 121 122 123 124 125 126 127 128 129 |
/* * File: main.c * Author: Khaled Magdy * Multiple 7-Segments Displays + ADC * PIC18F2550 With 4MHz OSC & PLL Config For Fosc=48MHz */ #include <xc.h> #include "config.h" #define _XTAL_FREQ 48000000 #define PreLoad 55535 #define SevenSeg1 PORTB #define SevenSeg1_D TRISB #define EN1 RC0 #define EN1_D TRISC0 #define EN2 RC1 #define EN2_D TRISC1 #define EN3 RC2 #define EN3_D TRISC2 unsigned char Current_Digit=0; unsigned char Segments_Code[10] = {0x3F,0x06,0x5B,0x4F,0x66,0x6D,0x7D,0x07,0x7F,0x6F}; unsigned char SevenSeg1_Digits[3] = {5, 3, 4}; unsigned int AD_RES; void TMR1_Init(); void ADC_Init(); void SevenSeg1_Init(); void SevenSeg1_Write(unsigned int); void main(void) { ADC_Init(); SevenSeg1_Init(); while(1) { } return; } //=================================== //--------------[ ISR ]-------------- void __interrupt() ISR(void) { if(TMR1IF) { if(Current_Digit==0) { SevenSeg1 = 0x00; EN1 = 1; EN2 = EN3 = 0; SevenSeg1 = Segments_Code[SevenSeg1_Digits[0]]; } if(Current_Digit==1) { SevenSeg1 = 0x00; EN2 = 1; EN1 = EN3 = 0; SevenSeg1 = Segments_Code[SevenSeg1_Digits[1]]; } if(Current_Digit==2) { SevenSeg1 = 0x00; EN3 = 1; EN2 = EN1 = 0; SevenSeg1 = Segments_Code[SevenSeg1_Digits[2]]; } Current_Digit++; if(Current_Digit==3) Current_Digit=0; TMR1IF = 0; AD_RES = (ADRESH<<2)+(ADRESL>>6); if(AD_RES>=999) // Hard-Limit The Max Value To Be Displayed AD_RES=999; SevenSeg1_Write(AD_RES); GO_nDONE = 1; TMR1 = PreLoad; // Preloading Timer1 } } //----------[ END OF ISR ]----------- //=================================== // Functions' Definitions void TMR1_Init() { // -- [[ Configure Timer1 To Operate In Timer Mode ]] -- // Preload TMR1 Register Pair TMR1 = PreLoad; // Choose the local clock source (timer mode) TMR1CS = 0; // Choose the desired prescaler ratio (1:8) T1CKPS0 = 1; T1CKPS1 = 1; // Switch ON Timer1 Module! TMR1ON = 1; // Config TMR1 Interrupt TMR1IE = 1; TMR1IF = 0; PEIE = 1; GIE = 1; } void ADC_Init() { ADCON1 = 0x0D; // Ref V+ is VDD and Configure pin as analog pin ADCON2 = 0x3E; // Left Justified, 20Tad and Fosc/64. ADCON0 = 0x05; // Select AN1 ADRESH=0; ADRESL=0; __delay_us(30); GO_nDONE = 1; } void SevenSeg1_Init() { TMR1_Init(); SevenSeg1_D = 0x00; SevenSeg1 = 0x00; EN1_D = EN2_D = EN3_D = 0; EN1 = EN2 = EN3 = 0; } void SevenSeg1_Write(unsigned int num) { if(num<=999) { SevenSeg1_Digits[0] = num / 100; num%=100; SevenSeg1_Digits[1] = num / 10; num%=10; SevenSeg1_Digits[2] = num; } } |
2. Prototyping
Here is a short demo video for the running test for this LAB
|
You can use the following online tool to generate the code for any 7-segment display pattern or number you need to display in your project, it’s a very handy tool.
7-Segment Display Code Generator Online Tool
| Previous Tutorial | Tutorial 33 | Next Tutorial | |||||
Hello…
Thanks about your great job
i want to ask about how to multiplexing 7 segment which was connected with different port’s pins of micro controller.
I saw an ESR meter for Kinsa which was written with JAL language ,i didn’t understand multiplexing method.
can you kindly explain how to do it?
thanks
Can you explain a bit it the code of the first program?
Why have you used isr?
Can you do an example of 3 digit display using Charlieplexing?