
| Previous Tutorial | Tutorial 10 | Next Tutorial | |||||
| Timer Modules VS Delays | |||||||
| PIC Microcontrollers Course Home Page ???? | |||||||
Is this tutorial, we’ll discuss why to use timers instead of delay? What are the drawbacks of using time delays within your main loop? These questions will be addressed and answered in this short tutorial, and we’ll draw some interesting conclusions at the end. So let’s get started right now!
[toc]
Analogy For Timer VS Delay
We can make some simple analogies to differentiate between the Timer-Based & Delay-Based systems. Let’s consider for example that you’ve got a list of tasks to do in the kitchen. Say cake, burger, juice, etc. And let’s also assume that the cake should stay in the oven for a full 1hour.
Delay-Based Case
is this scenario, you’ll put the cake in the oven and keep looking at your watch for an hour. Then, you’ll take it out and start making the burger, juice, and so on.
Timer-Based Case
in this scenario, you’ll put the cake in the oven, set a timer to ring after an hour, and immediately start making the burger and the other tasks until the timer rings (interrupts you), so you take the cake out of the oven.
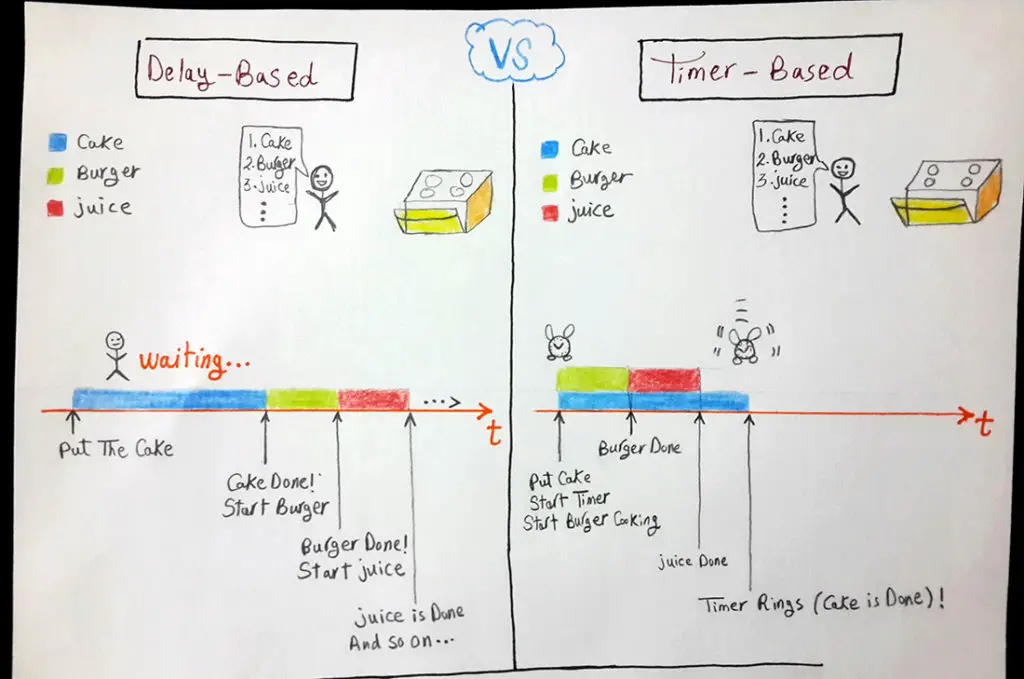
It’s obvious that the last case is way more efficient as you can make some other tasks while having a timer counting in the background of the system. Which will notify (interrupt) you upon period termination. Common sense suggests so in fact. However, there still some folks pushing delays within the core loop of their systems for no apparent reason.
If you’ve, an arbitrarily chosen, event such as an LED that is repeatedly blinking once/2-seconds, then you must use a timer to handle this event in the background. But if you’ve deliberately brought this (toggle event + its delays) from the background to the core loop of the system, you’ll end up wasting the most valuable resources of your system for nothing in return.
Practical Comparison
Consider a very basic embedded device which has a couple of LEDs and a push button. And we’re asked to write the firmware for it so as to achieve the following behavior. The Yellow LED should be blinking once each 2-seconds. The Green LED should toggle when the push button is pressed.
Let’s create that firmware for it in two versions. The first version will utilize the timer1 module in the background to generate 2-seconds time interval for the Yellow LED. And the second version will depend on time delays to blink that LED. Finally, we’ll compare the results and you should notice the difference.
Version1 – Using Timer Module
|
1 2 3 4 5 6 7 8 9 10 11 12 13 14 15 16 17 18 19 20 21 22 23 24 25 26 27 28 29 30 31 32 33 34 35 36 37 38 39 |
#define LED_Yellow RB0 #define LED_Green RB1 uint8_t C = 0; // Global Counter Variable void main() { // -- [[ IO Configurations ]] -- TRISB0 = TRISB1 = 0; // Outputs TRISB2 = 1; // Input RB0 = RB1 = 0; // -- [[ Configure Timer1 + Interrupts ]] -- ... while(1) { if(RB2==1) // When Button Is Pressed, Toggle The Green LED { LED_Green = ~LED_Green; } } } // Interrupt Service Routine - ISR void interrupt ISR () { // Check The Flag Bit if (TMR1IF) { C++; if(C==15) { // Toggle The Yellow LED Each Second LED_Yellow = ~LED_Yellow; // Clear The Global Counter C = 0; } TMR1IF = 0; // Clear The Flag Bit } } |
The main loop of the system has nothing to do other than polling the push button’s pin repeatedly. That’s why the responsiveness of such a system is said to be very high! Which is obviously a positive signal. Nobody wants to push a button then find out that the system did not respond to that input signal. As users, we can not easily tolerate the low responsiveness of systems.
Version2 – Using Delays
|
1 2 3 4 5 6 7 8 9 10 11 12 13 14 15 16 17 18 19 20 21 22 23 |
#define _XTAL_FREQ 4000000 #define LED_Yellow RB0 #define LED_Green RB1 void main() { // Configure IO Pins TRISB0 = TRISB1 = 0; TRISB2 = 1; RB0 = RB1 = 0; while(1) { LED_Yellow = 1; __delay_ms(1000); LED_Yellow = 0; __delay_ms(1000); if(RB2==1) // When Button Is Pressed, Toggle The Green LED { LED_Green = ~LED_Green; } } } |
In this scenario, both events are handled within the main loop (blinking the LED + polling the button). Which results in a huge waste of resources. The execution of a single round in the main loops takes up to 2-seconds. Most of which the CPU is waiting (due to blink-effect delay). That’s why the CPU is more likely to miss your clicks on the button when you press it. This kind of systems is said to have a very low responsiveness, which is obviously a very bad signal.
Timer VS Delay Simulation Results
In this video, I’m showing you the simulation results for both cases described above (Timer-Based Case + Delay-Based Case). You can also try it yourself on a breadboard to check the difference practically.
 |
You might have noticed that it’s the same video for polling VS IRQ interrupts. But it’s exactly the same thing, the same output is shared between both examples. Timer-Based System = Interrupt Driven, and the Delay-Based System = Polling the button from time to time. So it’s OK, and you can verify the results yourself on your board.
Parallel Performance
This is simply another area in which Delay-Based systems remarkably fail compared to Timer-Based ones. The idea of this application is so easy and clear. However, it turns out to be impossible to implement using Delays without sacrificing the time of the CPU. Which turns out to be more valuable than our own time. That’s why we should waste some time creating a timer-based system in order to save the CPU’s Time!
All in all, our system should have 3 LEDs, the 1st one blinks once/2-sec, the 2nd one blinks once/4-seconds, the 3rd one blinks once/6-seconds.
Obviously, The C-Code that should drive the 1st LED should be something like this
|
1 2 3 4 |
LED1 = 1; __delay_ms(1000); LED1 = 0; __delay_ms(1000); |
And the C-Code that should drive the 2nd LED should be something like this
|
1 2 3 4 |
LED2 = 1; __delay_ms(2000); LED2 = 0; __delay_ms(2000); |
And the C-Code that should drive the 3rd LED should be something like this
|
1 2 3 4 |
LED3 = 1; __delay_ms(3000); LED3 = 0; __delay_ms(3000); |
Combining all together in a single loop will require a few manipulations. We can create a couple of counter variables, and choose a convenient Time-Base. For the delay values in our example, it turns out to be (1-second). Hence, we can write the Delay-Based version of code as follows
|
1 2 3 4 5 6 7 8 9 10 11 12 13 14 15 16 17 18 |
void main() { unsigned char x, y; x = y = 0; TRISB0 = TRISB1 = TRISB2 = 0; // Output Pins Config LED1 = LED2 = LED3 = 0; // Output Pins Low Initially while(1) { if (1) {LED1 = ~ LED1;} if (x == 2) {LED2 = ~ LED2; x=0;} if (y == 3) {LED3 = ~ LED3; y=0;} __delay_ms(1000); // The Time Base x++; y++; } } |
That’s a way for getting the previously described system to work using delays. It should be clear that there must be some sort of sacrifices in terms of the CPU time and processing power. On the other hand, we can implement the same system in the Timer-Based way as we previously did in LAB7 at no additional costs (nearly). We’ll just use a couple of bytes for another 2-counters.
|
1 2 3 4 5 6 7 8 9 10 11 12 13 14 15 16 17 18 19 20 21 22 23 24 25 26 27 |
uint8_t A, B, C; // Global Counters A = B = C = 0; void main() { // Configure The( IO Pins + Timer + Interrupts) ... while(1) { // Do Nothing ! } } void interrupt ISR() { if (TMR1IF) // Check The Flag { A++; B++; C++; // Increment The Counters if(C==15) { LED1 = ~ LED1; C=0; } if(A==30) { LED2 = ~ LED2; A=0; } if(B==45) { LED3 = ~ LED3; B=0; } TMR1IF = 0; // Clear the Flag } } |
Can you see what I’ve done here? I’m using multiple counter variables to the same time base in order to generate multiple parallel time intervals @ a cost of a couple of bytes + 2 addition operations. Which is absolutely amazing!
In fact, the more interesting yet funny attempt for this application came from a guy who completely hates Timers. He noticed the huge reduction in systems response to external inputs due to the Time-Base delay (1-sec), so he picked a much smaller value for the Time-Base (about 10ms). The result was a code that looked like this
|
1 2 3 4 5 6 7 8 9 10 11 12 13 14 15 16 17 18 19 |
void main() { unsigned int x, y; x = y = 0; TRISB0 = TRISB1 = TRISB2 = 0; LED1 = LED2 = LED3 = 0; while(1) { if (1) {LED1 = ~ LED1;} if (x == 200) {LED2 = ~ LED2; x=0;} if (y == 300) {LED3 = ~ LED3; y=0;} __delay_ms(10); // The Time Base x++; y++; } } |
The results which he’d got were amazing indeed. His system performed way better than the others of larger Time-Bases (1-second and so) in terms of the system’s responsiveness to external inputs. However, you should notice the wasted resources still too much to be negligible! In fact, I’m still wondering about this kind of attempts to avoid every situation that requires using Timer modules.
At the end of the day, I hope you’ve got the point of this tutorial. And let me know if you’re still wondering about anything related to this subject.
Conclusion
1
Time-based events should always be handled using timer modules and their interrupts. Yes, it’s true that the easiest way to make a time-separation between a couple of events is to put a time delay in between. But you must be aware that it’ll dramatically drop down the overall performance of the system by wasting too many resources for nothing worthy in return.
However, there are some few situations in which it’s better to suspend all operations and wait for a short time interval. In this kind of cases, it doesn’t matter if you’ve done it with a timer or delay macro. All in all, you should always avoid using too many delays as possible as you can. It’s something like avoiding globals in C-Programming.
2
Software delays (with delay macro) VS Hardware delays (with timers). Will always show a better performance for hardware-generated time intervals as compared to software-generated ones. As we’ve discussed why this happens earlier in this tutorial.
3
Test everything yourself to make sure you’ve got everything right. You can always leave a comment and ask for whatever you want. You are more than welcomed ^^
In the next tutorial, we’ll see how to generate time intervals with timer modules that are 100% accurate without any glitches. If you’re still remembering the Timer Module Tutorial, we found out at the end that the 1-second time interval has turned out to be less than a second (nearly 0.98 sec). So let’s move forward!
| PIC Microcontrollers Course Home Page ???? | |||||||
| Previous Tutorial | Tutorial 10 | Next Tutorial | |||||
Hi there, Fantastic tutorials – really greatful to you Khaled so please keep them coming ????
With the first version of the code, when I press the RB2, RB1 comes on and stays on until I release RB2, rather than toggling. What was happening was that it was toggling so fast I couldn’t see it. I added a __delay_ms(1000) in the while(1) loop and can now see what’s happening.
A couple of weeks ago I had no idea how to use the delay function so that progress is all down to your tutorials – thanks again
I’m so glad to hear this ^^
Wish you the best of luck!
Sir Khaled Magdy, what IDE you’ve been used to run the code?
Mplab X IDE
Simulation was done in Proteus ISIS
very good man i am your second copy in our life , i love electronics , physics ,math and computer , and i will with you when you change the world , great changing , my god be with us , with my best wishes