In this tutorial, you’ll learn how to set a static IP for ESP32 and make the IP address fixed any time it connects to a network with Arduino IDE. We’ll discuss the possible ways to make sure that ESP32 gets a static IP address every time it connects to the network.
Before proceeding with this tutorial, you should have installed the ESP32 Arduino Core in your Arduino IDE to be able to compile and build projects for ESP32 in Arduino IDE. Follow the tutorial below to get started if you haven’t done that already.
If you’re just starting with ESP32, it’s highly recommended to begin with the following tutorial to kickstart your journey with ESP32 microcontrollers. Then, go to the second link which directs you to the main page for ESP32 Tutorials Series, where you’ll find all ESP32 tutorials ordered and categorized in a logical way that guarantees you systematic progress in learning ESP32 programming and IoT.
Table of Contents
- ESP32 IP Address Assignation
- ESP32 Static IP Address Example (Arduino)
- Assign Static IP Address To ESP32 With MAC
- Concluding Remarks
ESP32 IP Address Assignation
When an ESP32 connects to a network, it will obtain an IP address dynamically using the DHCP (Dynamic Host Configuration Protocol). Every time the ESP32 restarts and re-connects to the network, it’s guaranteed that it’s going to take the same IP address again. The IP address assigned is randomly decided by the DHCP.
The DHCP also provides additional network settings such as subnet mask and gateway. The subnet mask determines the range of IP addresses that are considered local to the network, while the gateway is the IP address of the router that allows the ESP32 to communicate with devices on other networks. These settings are automatically configured by the DHCP.
So we can summarize the network configuration settings that DHCP assigns to the ESP32 once it joins a network as follows:
- Local IP Address: The local IP address assigned to the ESP32
- Subnet Mask: The range of IP addresses that are considered local to the network
- Gateway Address: The IP address of the router that allows the ESP32 to communicate with devices on outside networks
- DNS IP Address: Primary and secondary IP address of the DNS server that resolves domain names to IP addresses
Given that we’re not going to use DHCP for IP address assignation, we still need to assign all other network settings (information) that were previously done by the DHCP. Even if we set a valid static IP address, if other fields have invalid values the connection will still fail.
The safe way to do it is to run a simple ESP32 WiFi connection example and print all the auto-assigned values by the DHCP (Local IP, subnet mask, gateway address, and DNS address). Then we change the IP address to the desired value and keep the other fields as is and save the settings. And this is what we’re going to do in the next example.
ESP32 Static IP Address Example (Arduino)
As stated earlier, to assign a static IP address to ESP32 without DHCP, we’ll have to define the following parameters.
|
1 2 3 4 5 |
IPAddress local_IP(192, 168, 1, x); // Your Desired Static IP Address IPAddress subnet(255, 255, 255, 0); IPAddress gateway(192, 168, 1, 1); IPAddress primaryDNS(192, 168, 1, 1); // Not Mandatory IPAddress secondaryDNS(0, 0, 0, 0); // Not Mandatory |
Then you need to call the WiFi.config() function within the setup() function as shown below.
|
1 2 3 4 5 6 7 8 |
void setup() { ... // Configures Static IP Address if (!WiFi.config(local_IP, gateway, subnet, primaryDNS, secondaryDNS)) { Serial.println("Configuration Failed!"); } } |
But as we’ve discussed earlier it’s better to normally connect to your WiFi network without static IP just to get the default parameters. Then assign the desired static IP address. This is what we’ll be doing next.
Get Default ESP32 Network Parameters
Here is a generic ESP32 example to connect it to your WiFi network and print the DHCP auto-assigned parameters Local IP, subnet mask, gateway address, and DNS address).
|
1 2 3 4 5 6 7 8 9 10 11 12 13 14 15 16 17 18 19 20 21 22 23 24 25 26 27 28 29 30 31 32 33 34 35 36 37 |
/* * ESP32 WiFi Connect Example (Print DHCP Network Configurations) * Full Tutorial @ https://deepbluembedded.com/esp32-wifi-library-examples-tutorial-arduino/ */ #include <WiFi.h> // Replace with your own network credentials const char* ssid = "yourNetworkSSID"; const char* password = "yourNetworkPassword"; void setup(){ Serial.begin(115200); WiFi.mode(WIFI_STA); WiFi.begin(ssid, password); Serial.println("\nConnecting to WiFi Network .."); // Wait until connection is established while(WiFi.status() != WL_CONNECTED){ Serial.print("."); delay(100); } // Print network settings assigned by the DHCP Serial.println("\nConnected to the WiFi network"); Serial.print("Local ESP32 IP: "); Serial.println(WiFi.localIP()); Serial.print("Subnet Mask: " ); Serial.println(WiFi.subnetMask()); Serial.print("Gateway IP: "); Serial.println(WiFi.gatewayIP()); Serial.print("DNS 1: "); Serial.println(WiFi.dnsIP(0)); Serial.print("DNS 2: "); Serial.println(WiFi.dnsIP(1)); } void loop(){ // Do Nothing } |
Don’t forget to change the ssid and password to match your network credentials.
Here are the network setting (auto-assigned by DHCP) after connecting the ESP32 to the WiFi network.
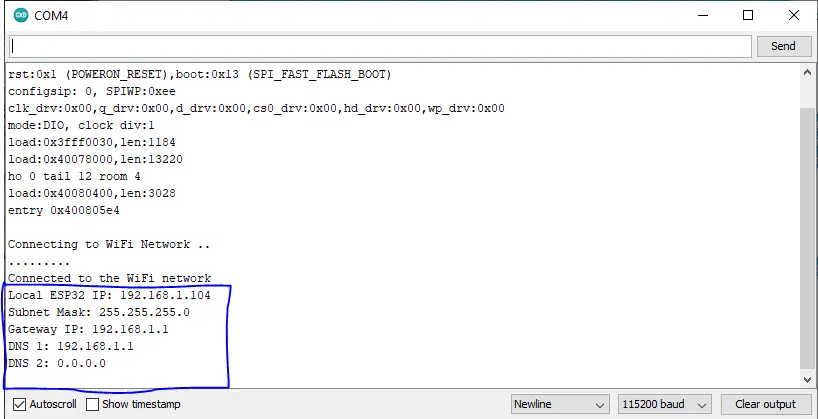
Now, we can modify the local IP and keep the rest as is to avoid having any wrong settings. And we can also neglect the DNS address which is optional anyway.
Assign Static IP Address For ESP32
Here is how to set a static IP address for ESP32 full Arduino code example.
|
1 2 3 4 5 6 7 8 9 10 11 12 13 14 15 16 17 18 19 20 21 22 23 24 25 26 27 28 29 30 31 32 33 34 35 36 37 38 39 40 |
/* * ESP32 WiFi Connect Example (Print DHCP Network Configurations) * Full Tutorial @ https://deepbluembedded.com/esp32-wifi-library-examples-tutorial-arduino/ */ #include <WiFi.h> // Replace with your own network credentials const char* ssid = "yourNetworkSSID"; const char* password = "yourNetworkPassword"; IPAddress local_IP(192, 168, 1, 108); // Desired Static IP Address IPAddress subnet(255, 255, 255, 0); IPAddress gateway(192, 168, 1, 1); IPAddress primaryDNS(192, 168, 1, 1); // Not Mandatory IPAddress secondaryDNS(0, 0, 0, 0); // Not Mandatory void setup(){ Serial.begin(115200); WiFi.mode(WIFI_STA); // Configures Static IP Address if (!WiFi.config(local_IP, gateway, subnet, primaryDNS, secondaryDNS)) { Serial.println("Configuration Failed!"); } WiFi.begin(ssid, password); Serial.println("\nConnecting to WiFi Network .."); // Wait until connection is established while(WiFi.status() != WL_CONNECTED){ Serial.print("."); delay(100); } Serial.println("\nConnected to the WiFi network"); // Print The IP And It Should Match The Desired Static IP That We've Defined Serial.print("Local ESP32 IP: "); Serial.println(WiFi.localIP()); } void loop(){ // Do Nothing } |
Don’t forget to change the ssid and password to match your network credentials.
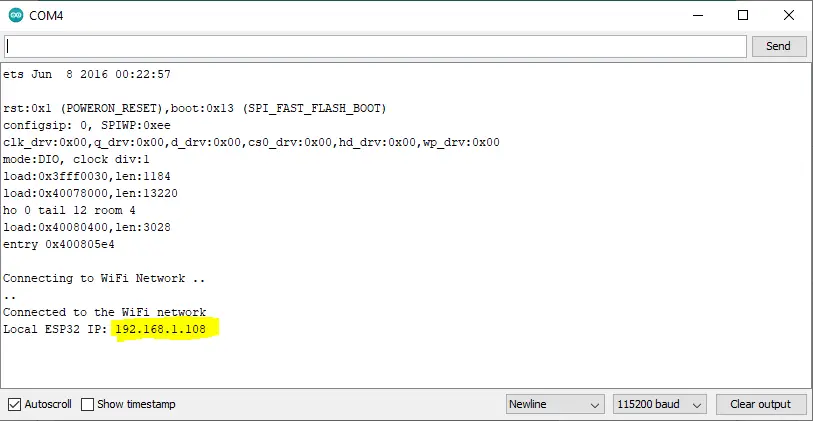
And here is the result after running this example code on my ESP32 board. The ESP32 has been assigned with the desired Static (Fixed) IP address that we’ve defined in the code. And you can change it however you want and give it a try.
Assign Static IP Address To ESP32 With MAC
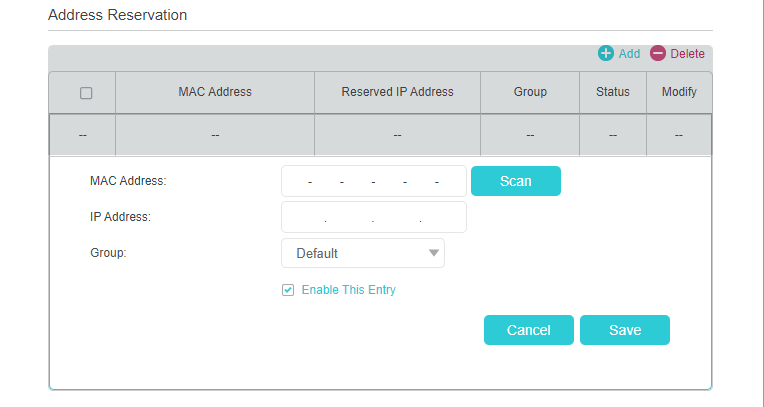
Alternatively or if you’ve been facing any issues while assigning a static IP for your ESP32, you can rely on your router to do this job and always assign a fixed IP address to the ESP32 board whenever it attempts to connect to the WiFi network. This can be achieved by giving your router the MAC address of the ESP32 and telling it to assign a static fixed IP address to it whenever a new connection with ESP32 is established.
In this way, you can guarantee that your specific ESP32 board will always get a pre-defined static IP address when it joins the WiFi network of your router (access point). And it doesn’t require any code on the ESP32 side.
However, you still need to go to the admin settings page of your router and do this configuration step manually for once and it’ll stay there.
Occasionally we may in some cases need to reset the router to solve some ISP issues. Resetting your router using the tiny hole button will delete all saved configurations on the router. And obviously, the saved MAC address and static IP address of the ESP32 will be whipped out. You’ll need to redo it again when this happens.
To open the router’s admin settings page, you need to enter 192.168.1.1 in the URL section of the browser.
For example, the TP-Link Archer VR600 admin setting interface has this option under: Advanced Settings > Network > LAN Settings > Address Reservation. And different routers will have the same option but maybe in a different position of its interface.
Write the MAC address of the ESP32 and the desired static IP address and click save. That’s all!
Parts List
Here is the full components list for all parts that you’d need in order to perform the practical LABs mentioned here in this article and for the whole ESP32 series of tutorials found here on DeepBlueMbedded. Please, note that those are affiliate links and we’ll receive a small commission on your purchase at no additional cost to you, and it’d definitely support our work.
Concluding Remarks
To conclude this tutorial, we’ll highlight the fact that you can assign a static IP address to your ESP32 board in two different ways. The first of which is to use the provided Arduino code example to set a Static IP address for ESP32. The other way is to configure your router (access point) to check the MAC address of the ESP32 and assign to it a static IP address when it connects to the network.
If you’re just starting to learn about ESP32 WiFi, it’s highly recommended that you follow the tutorial below and keep it bookmarked in your browser. It is crafted specifically to help beginners with ESP32 WiFi to know everything about this huge topic and draw a clear roadmap for what to learn in a systematic way.
You can easily get overwhelmed when starting with ESP32 WiFi by the number of topics and libraries out there (e.g HTTP, TCP/IP, UDP, WebServers, AsyncWebServers, WebSocket, MQTT, ESP-NOW, etc…). There are too many libraries, modes, topologies, and protocols that make just getting started an even harder task than it should be. And the most reasonable question is where should I get started? The guide below is the perfect answer!
This is the ultimate guide for ESP32 WiFi, if you’re just starting with ESP32 WiFi, you should definitely check it out. It’ll provide you with a clear roadmap for what to learn and in which order to fully understand everything about ESP32 WiFi.
