This is the ultimate guide for ESP32 WiFi. If you’re getting started with ESP32 WiFi, this is the definitive guide tutorial you need to follow. You’ll learn everything about ESP32 WiFi with step-by-step examples (in Arduino Core). The topics are broken down, categorized, and organized in such a clear way that guarantees you steady systematic progress toward learning and mastering ESP32 WiFi-Based Applications & IoT development.
The ultimate goal of this tutorial is to help beginners with ESP32 WiFi to know everything about this huge topic and draw a clear roadmap for what to learn in a systematic way. One can easily get overwhelmed when starting with ESP32 WiFi by the number of topics and libraries out there (e.g HTTP, TCP/IP, UDP, WebServers, AsyncWebServers, WebSocket, MQTT, mDNS, MESH, ESP-NOW, etc…). There are too many libraries, modes, topologies, and protocols that make just getting started an even harder task than it should be.
As a beginner, it’s rather easy to get overwhelmed by the tremendous amount of articles and tutorials that fall under the ESP32 WiFi topic. And the most reasonable question is where should I get started? This article is here to answer this very question!
Table of Contents
- ESP32 WiFi
- Getting Started With ESP32 WiFi
- ESP32 WiFi Modes
- ESP32 WiFi Networking
- ESP32 WiFi Example Projects
- ESP32 WiFi Protocols
- ESP32 WiFi Other Applications
- Troubleshooting ESP32 WiFi Issues
- Concluding Remarks
- Great ESP32 WiFi Resources
ESP32 WiFi
The ESP32 is a powerful dual-core microcontroller with integrated RF hardware that supports (Bluetooth, BLE, and WiFi). We’ve discussed ESP32 Bluetooth Functionalities in a previous tutorial, but in this tutorial, we’re interested in looking deeper at the ESP32 WiFi capabilities. Which include but are not limited to the following:

- ESP32 WiFi implements TCP/IP and full 802.11 b/g/n WiFi MAC protocol
- Data rate up to 150 Mbps
- Adjustable signal transmitting power
- Up to 20.5 dBm of transmitting power
- Antenna Diversity: There is an external RF switch to select the best antenna to minimize the effects of channel fading
- ESP32 WiFi MAC that applies low-level protocol functions automatically
We’re going to use the ESP32 WiFi.h Arduino library to leverage the hardware WiFi capabilities of the ESP32 microcontroller. We also need to know more about the WiFi modes of operation and some basic networking concepts. That’s what we’ll cover in the next sections hereafter.
Getting Started With ESP32 WiFi
Now let’s get started with ESP32 WiFi and prepare the setup needed to experiment with ESP32 WiFi and create some applications to test everything we’re going to learn in each section.
Requirements For Starting With ESP32 WiFi
HW Requirements
You just need an ESP32 Dev Board at minimum. But It’s highly recommended to check out the Full HW Kit List for this series of tutorials if you’re interested in following along with all examples and projects for ESP32 Tutorials on DeepBlueMbedded.
SW Requirements
Before proceeding with this tutorial, you should have installed the ESP32 Arduino Core in your Arduino IDE to be able to compile and build projects for ESP32 in Arduino IDE. Follow the tutorial below to get started if you haven’t done that already.
If you’re just starting with ESP32, it’s highly recommended to begin with the following tutorial to kickstart your journey with ESP32 microcontrollers. Then, go to the second link which directs you to the main page for ESP32 Tutorials Series, where you’ll find all ESP32 tutorials ordered and categorized in a logical way that guarantees you systematic progress in learning ESP32 programming and IoT.
ESP32 WiFi Library (Arduino IDE)
By default, the ESP32 WiFi library is already built-in the Arduino Core for ESP32, and no need for external library installation. The ESP32 WiFi library provides the fundamental operations that you’d need in any Wi-Fi-based application. However, additional features of ESP32 WiFi and specific protocols can be accessed through external libraries that we’ll need to install as we go further with the example projects.
Given that the ESP32 WiFi library is already in Arduino Core, the next step will be to include it in your code before being able to use WiFi functionalities with ESP32. Here is how to do it:
#include <WiFi.h>
ESP32 WiFi Modes
The ESP32 WiFi can run in one of the following modes: WiFi Station, Access Point, or Both at the same time. There is an additional mode called Promiscuous mode in which the ESP32 will act as a WiFi sniffer. The ESP32 Library does support the first 3 modes by default. To set the ESP32 WiFi mode, you can use the WiFi.mode() function which takes one argument as an input (the desired mode).
| Station Mode (STA): the ESP32 connects to other existing networks (like your router at home or any other access point) | WiFi.mode(WIFI_STA); |
| Access Point Mode (AP): the ESP32 creates its own network by acting as an access point that other WiFi stations can connect to it | WiFi.mode(WIFI_AP); |
| Access Point + Station Mode (AP_STA): in this mode, the ESP32 WiFi will act as both Access Point and WiFi Station Simultaneously | WiFi.mode(WIFI_AP_STA); |
Next, we’ll dive deeper into these modes and how they work.
WiFi Station Mode
When you set the ESP32 in WiFi Station mode, this allows it to connect to any other Wi-Fi network (like your home router). In this mode, the ESP32 can send and receive data to/from other devices connected to the same network using its unique IP address.
For example, you can connect an ESP32 to your home Wi-Fi network and use it to control smart home devices such as lights, thermostats, and door locks.

The network here is established by the router (AP) to which the devices are connected. The ESP32 connects to the WiFi network of your router and gets assigned a unique IP address that can be used to communicate with other devices on the network.
Set The ESP32 in Station Mode (STA)
To set your ESP32 to work in station mode, you need to call the WiFi.mode(WIFI_STA) function. Which takes the WiFi_Mode as a parameter.
WiFi.mode(WIFI_STA);
You also need to define the credentials of the WiFi network you want your ESP32 to connect to (let’s say the home router). This step is done as follows.
// Replace with your own network credentials
const char* ssid = "yourNetworkSSID";
const char* password = "yourNetworkPassword";
Now, you’re ready to start connecting your ESP32 to the WiFi network in station mode by calling the WiFi.begin() function. Which takes the predefined network credentials as arguments.
WiFi.begin(ssid, password);
Access Point (AP) Mode (SoftAP Mode)
When you set the ESP32 in Access Point mode, this allows it to create a Wi-Fi network. This means you’ll have your own WiFi network and no need for an external router to connect your devices. Other devices (stations) can easily connect to the ESP32’s network and communicate with it.
For example, you can use ESP32 in Access Point mode to create a local network that other ESP32 (Stations), your computer, or your smartphone can all connect to it and exchange data without needing to have a router at all.
The absence of a router in this network means that it’s only a local network and your devices can not access the web by any means.

The Access Point Mode (AP) is also referred to as SoftAP (Soft Access Point) because it allows you to create your own network without a router or any hardware access point. Just a piece of software running on the ESP32, and you’ll have a new network created through the ESP32 Soft Access Point (SoftAP).
In Soft Access Point Mode (AP), the ESP32 acts like a router and it assigns IPs to the clients connected to it. And it can have up to 5 clients at maximum.
Set The ESP32 in Access Point Mode (AP)
To set your ESP32 to work in Access Point mode(SoftAP or AP), you need to call the WiFi.mode(WIFI_AP) function. Which takes the WiFi_Mode as a parameter.
WiFi.mode(WIFI_AP);
Then, you need to make sure that you’ve defined the network credentials of the ESP32 WiFi network which we’re going to create. Note that this is the SSID that other devices will see when scanning for WiFi networks nearby and the Password defined will be the one used by other devices to join your ESP32 WiFi network. Those can be defined as follows
// Replace With Your Desired SSID & Password
const char* ssid = "ESP32-AP";
const char* password = "01234567";
And finally, you need to call the WiFi.softAP() function to start the ESP32 access point operation.
WiFi.softAP(ssid, password);
The WiFi.softAP() function can also take more optional parameters in case you need to use any of them.
WiFi.softAP(const char* ssid, const char* password, int channel, int ssid_hidden, int max_connection);
Here is the full parameters list for this function.
- ssid: name for the access point – maximum of 63 characters
- password: has a minimum 8-character length, set to NULL if you want the access point to be open
- channel: Wi-Fi channel number (1-13)
- ssid_hidden: (0 = broadcast SSID, 1 = hide SSID)
- max_connection: maximum simultaneous connected clients (1-4)
ESP32 AP-STA (Access Point + Station) Mode
This mode allows the ESP32 to act as a WiFi station and an access point simultaneously. In this mode, the ESP32 can connect to an existing Wi-Fi network as a station while also acting as an access point for other devices to connect to it. This can be useful in scenarios where the ESP32 needs to connect to an existing network to access the internet but also needs to create its own network for other devices to connect to it.
For example, a home automation system where the ESP32 needs to connect to the home WiFi network to access the internet, but also needs to create its own network for other smart devices (stations) to connect to it.
Set The ESP32 in AP-STA (WiFi Station + Access Point) Mode
To set the ESP32 WiFi to operate in AP-STA mode, you need to call this function.
WiFi.mode(WIFI_AP_STA);
ESP32 WiFi Sniffer (Promiscuous Mode)
This mode allows the ESP32 to monitor and capture all Wi-Fi traffic that is passing through a specific channel within its range. In other words, the ESP32 can be used as a wireless network sniffer to analyze and debug Wi-Fi network traffic. This can be particularly useful for developers who are working on Wi-Fi-enabled devices or applications and need to analyze the Wi-Fi traffic to debug issues or optimize performance.
This mode is not defined nor implemented explicitly in the ESP32 WiFi.h Library but it can be achieved by developing an application dedicated to this task. If it sounds interesting, we can do that in a separate tutorial of course.
ESP32 WiFi Networking
And now we’ll move to ESP32 WiFi basic networking topics and concepts with example code snippets for how to implement each of them in your Arduino projects. Understanding the basics of networking with ESP32 WiFi is crucial for any IoT project.

In this section, we’ll cover key concepts and perform basic operations with the ESP32 WiFi Library. Such as: how to set up and configure the ESP32 to scan for WiFi networks, connect to an existing network, check connection status & strength, and get the IP & MAC addresses of the ESP32 WiFi.
We’ll also learn how to disconnect and reconnect to a WiFi network after a connection failure or loss, how to handle ESP32 WiFi events without polling some flags or blocking the CPU, and how to create ESP32 Webserver applications (in both STA mode and SoftAP mode).
A solid introduction to ESP32 WiFi networking can’t be complete without discussing some network protocols. However, this section is getting extremely long already. Therefore, we’ll dedicate a section to discussing the different ESP32 WiFi Protocols hereafter in this tutorial.
ESP32 Scan WiFi Networks
The ESP32 can scan for WiFi networks within its range and return the found networks’ SSIDs and signal strength for each network. You’ll find a sample code example in Arduino IDE for ESP32 WiFi Scanner. Open File > Examples > WiFi > WiFiScan sketch.
Here is the full code listing of this example:
/*
 *  ESP32 WiFi Scanner Example. Examples > WiFi > WiFiScan
 *  Full Tutorial @ https://deepbluembedded.com/esp32-wifi-library-examples-tutorial-arduino/
 */

#include "WiFi.h"

void setup()
{
    Serial.begin(115200);

    // Set WiFi to station mode and disconnect from an AP if it was previously connected.
    WiFi.mode(WIFI_STA);
    WiFi.disconnect();
    delay(100);

    Serial.println("Setup done");
}

void loop()
{
    Serial.println("Scan start");

    // WiFi.scanNetworks will return the number of networks found.
    int n = WiFi.scanNetworks();
    Serial.println("Scan done");
    if (n == 0) {
        Serial.println("no networks found");
    } else {
        Serial.print(n);
        Serial.println(" networks found");
        Serial.println("Nr | SSID                             | RSSI | CH | Encryption");
        for (int i = 0; i < n; ++i) {
            // Print SSID and RSSI for each network found
            Serial.printf("%2d",i + 1);
            Serial.print(" | ");
            Serial.printf("%-32.32s", WiFi.SSID(i).c_str());
            Serial.print(" | ");
            Serial.printf("%4d", WiFi.RSSI(i));
            Serial.print(" | ");
            Serial.printf("%2d", WiFi.channel(i));
            Serial.print(" | ");
            switch (WiFi.encryptionType(i))
            {
            case WIFI_AUTH_OPEN:
                Serial.print("open");
                break;
            case WIFI_AUTH_WEP:
                Serial.print("WEP");
                break;
            case WIFI_AUTH_WPA_PSK:
                Serial.print("WPA");
                break;
            case WIFI_AUTH_WPA2_PSK:
                Serial.print("WPA2");
                break;
            case WIFI_AUTH_WPA_WPA2_PSK:
                Serial.print("WPA+WPA2");
                break;
            case WIFI_AUTH_WPA2_ENTERPRISE:
                Serial.print("WPA2-EAP");
                break;
            case WIFI_AUTH_WPA3_PSK:
                Serial.print("WPA3");
                break;
            case WIFI_AUTH_WPA2_WPA3_PSK:
                Serial.print("WPA2+WPA3");
                break;
            case WIFI_AUTH_WAPI_PSK:
                Serial.print("WAPI");
                break;
            default:
                Serial.print("unknown");
            }
            Serial.println();
            delay(10);
        }
    }
    Serial.println("");

    // Delete the scan result to free memory for code below.
    WiFi.scanDelete();

    // Wait a bit before scanning again.
    delay(5000);
}
This example is particularly useful when you try to connect to a nearby network but keeps failing. This WiFi scanner example will show you the signal strength of each WiFi network within the ESP32 range. The RSSI (Received Signal Strength Indicator) is what you’re looking for if you’d like to know the signal strength of each nearby network.
The function WiFi.scanNetworks() is used to handle the core logic of WiFi scanning and it returns the number of networks found.
int n = WiFi.scanNetworks();
At this point, you’ll have the number of found networks nearby and you can access any of the following parameters of each network.
- SSID
- RSSI
- Channel
- EncryptionType
To get & print the SSID of any found network in the list, call the following function WiFi.SSID(i) and pass to it the index of the found network.
Serial.print(WiFi.SSID(i));
To get & print the WiFi channel number for a found network use the WiFi.channel(i) function and pass to it the found network’s ID as shown below.
Serial.print(WiFi.channel(i));
And lastly, you can get & print the WiFi encryption type of any found network using WiFi.encryptionType(i) function as shown below.
int WiFi_EncType = WiFi.encryptionType(i);
if(WiFi_EncType == xyz)
{
    Serial.println("EncType = xyz")
}
Where the possible options for WiFi network encryption type are the following:
- WIFI_AUTH_OPEN
- WIFI_AUTH_WEP
- WIFI_AUTH_WPA_PSK
- WIFI_AUTH_WPA2_PSK
- WIFI_AUTH_WPA_WPA2_PSK
- WIFI_AUTH_WPA2_ENTERPRISE
- WIFI_AUTH_WPA3_PSK
- WIFI_AUTH_WPA2_WPA3_PSK
- WIFI_AUTH_WAPI_PSK
And this is the result of running the ESP32 WiFi Scanner sketch on my end.

And I can definitely confirm that my home router WiFi has the strongest signal as it’s in the next room, followed by my other router on another floor which has a bit weaker signal as we can expect. So we can conclude this topic and move to the next which is trying to connect to an existing WiFi network with ESP32.

This article will provide more in-depth information about WiFi network scanning to find all WiFi networks (access points) in the range of the ESP32 WiFi.
ESP32 Connecting To a WiFi Network
To connect your ESP32 board to an existing WiFi network, you need to have the SSID and password for that network. And it should also have a fairly good signal strength to have a stable connection.
In the previous section, we learned how to scan for nearby networks with ESP32. And you should have found your home router WiFi network in the list. So, the next step is to call the WiFi.begin(ssid, password) function that takes the SSID and Password of the desired network and attempts to connect your ESP32 to it.
You should replace the ssidand passwordvalues by your WiFi network name and its actual password before building and testing the code example below.
Here is the full code example:
#include <WiFi.h>

// Replace with your own network credentials
const char* ssid = "yourNetworkSSID";
const char* password = "yourNetworkPassword";

void setup(){

    Serial.begin(115200);

    WiFi.mode(WIFI_STA);
    WiFi.begin(ssid, password);
    Serial.println("\nConnecting to WiFi Network ..");

    while(WiFi.status() != WL_CONNECTED){
        Serial.print(".");
        delay(100);
    }

    Serial.println("\nConnected to the WiFi network");
    Serial.print("Local ESP32 IP: ");
    Serial.println(WiFi.localIP());
}

void loop(){
    // Do Nothing
}
And let’s see How it works
First of all, you know that the ESP32 WiFi can operate as a WiFi station (STA) that connects to existing networks or as a WiFi access point (AP) that creates its own network. Given that we’re trying to connect to an existing WiFi network we should set the ESP32 WiFi mode to STA mode. And this is what we’ve done in the first step.
WiFi.mode(WIFI_STA);
Next, we call the WiFi.begin() function which attempts to connect the ESP32 to the desired network. You should have edited the ssidand passwordstrings to match the actual network name and password for your WiFi network.
WiFi.begin(ssid, password);
The connection process is not instantaneous, it’s going to take some time. So we need to add a delay and keep checking (polling) for the connection status. We’ll be using the WiFi.status() function to get the WiFi connection status, and it should return WL_CONNECTED whenever the connection is successfully established.
while(WiFi.status() != WL_CONNECTED)
{
    Serial.print(".");
    delay(100);
}
Whenever a successful connection is established, the while loop will break and we’ll print a message to the serial monitor indicating this event. And we’ll also get the local IP for the ESP32 and print it as well.
Serial.println("\nConnected to the WiFi network");
Serial.print("Local ESP32 IP: ");
Serial.println(WiFi.localIP());
And now we’ve finally connected our ESP32 to a WiFi network successfully.
Polling for the WiFi connection status in a while loop is not a recommended practice. One better solution is to set up a timer interrupt and periodically check for the connection status or even implement a timeout mechanism after which we can re-attempt the connection process.
There is also an even better solution which is to use the WiFi Events callback functions for ESP32 WiFi that we’ll discuss hereafter in this tutorial near the end. So make sure to stick around, and for the sake of simplicity, we’ll keep the polling while loop as is just for now.
Check out the following tutorial for more information about Connecting ESP32 To a WiFi Network.

This article will give more in-depth information about different ways to connect ESP32 to an existing WiFi network, how to debug for loss of connection, and implement an Auto Re-connect application.
Get ESP32 WiFi Connection Status
To get the WiFi connection status, you can use the WiFi.status() function. Which returns a flag that indicates the current WiFi connection status. Here is a table for the possible status flag values and what each status value means.
| ID | ESP32 WiFi Status | Status Description |
| 0 | WL_IDLE_STATUS | Default Status Before Trying To Connect To a WiFi Network |
| 1 | WL_NO_SSID_AVAIL | The ESP32 couldn’t find the WiFi network. Either the network is too far from the ESP32, or the SSID of the network is incorrect. |
| 2 | WL_SCAN_COMPLETED | Scanning For Nearby WiFi Networks is Completed |
| 3 | WL_CONNECTED | Connected to a WiFi network (AP) |
| 4 | WL_CONNECT_FAILED | Connecting to a WiFi network (AP) has failed |
| 5 | WL_CONNECTION_LOST | Connection with a WiFi network has been lost |
| 6 | WL_DISCONNECTED | Disconnected from a WiFi network |
Here is a code example that checks the WiFi connection status and prints it while attempting a new connection. This can be very helpful while debugging for WiFi connection issues because you can easily tell where the ESP32 gets stuck or fail.
Don’t forget to change the SSID and Password to match your own WiFi network credentials.
/*
 *  ESP32 WiFi Connection Status Debugging
 *  Full Tutorial @ https://deepbluembedded.com/esp32-wifi-library-examples-tutorial-arduino/
 */

#include <WiFi.h>

// Replace with your own network credentials
const char* ssid = "yourNetworkSSID";
const char* password = "yourNetworkPassword";

int WiFiStatus;

String Get_WiFiStatus(int Status){
    switch(Status){
        case WL_IDLE_STATUS:
        return "WL_IDLE_STATUS";
        case WL_SCAN_COMPLETED:
        return "WL_SCAN_COMPLETED";
        case WL_NO_SSID_AVAIL:
        return "WL_NO_SSID_AVAIL";
        case WL_CONNECT_FAILED:
        return "WL_CONNECT_FAILED";
        case WL_CONNECTION_LOST:
        return "WL_CONNECTION_LOST";
        case WL_CONNECTED:
        return "WL_CONNECTED";
        case WL_DISCONNECTED:
        return "WL_DISCONNECTED";
    }
}

void setup(){
    Serial.begin(115200);
    Serial.println("Connecting..");
    WiFi.begin(ssid, password);
    WiFiStatus = WiFi.status();
    while(WiFiStatus != WL_CONNECTED){
        delay(250);
        WiFiStatus = WiFi.status();
        Serial.println(Get_WiFiStatus(WiFiStatus));
    }
    Serial.println("\nConnected To The WiFi Network");
    Serial.print("Local ESP32 IP: ");
    Serial.println(WiFi.localIP());
}

void loop(){
  // Do Nothing
}
And you can see the results below. It’s printing the current status of the WiFi connection, so you’d know if it gets stuck at any stage or something.

Check ESP32 WiFi Connection Strength
To get and print the RSSI (Received Signal Strength Indicator), use the WiFi.RSSI(i) function as shown below.
Serial.print(WiFi.RSSI(i));
Which gives you an estimated signal strength value for any surrounding network you’ve found while scanning.
RSSI is an estimated measure of the WiFi signal strength for a specific network (router or access point). The return value has the following form and unit (-x dBm). Which means a lower absolute value indicates a more powerful connection. Here’s how to judge the RSSI value and decide on the signal strength rating:
- RSSI > -30 dBm: Amazing!
- RSSI < -55 dBm: Very good signal
- RSSI < -67 dBm: Fairly good
- RSSI < -70 dBm: Okay
- RSSI < -80 dBm: Not good
- RSSI < -90 dBm: Extremely weak signal (unusable)
Here is an example code for printing the RSSI value for the WiFi network (established by my home router) after connecting to it with my ESP32 board. Try it on your own and don’t forget to change the network SSID and password to match your network credentials.
/*
 *  ESP32 WiFi Network RSSI (Signal Strength) Example
 *  Full Tutorial @ https://deepbluembedded.com/esp32-wifi-library-examples-tutorial-arduino/
 */
#include <WiFi.h>

// Replace with your own network credentials
const char* ssid = "yourNetworkSSID";
const char* password = "yourNetworkPassword";

void setup(){
    Serial.begin(115200);
    WiFi.mode(WIFI_STA);
    WiFi.begin(ssid, password);
    Serial.println("\nConnecting");
    // Keep Waiting Until Connection is Established
    while(WiFi.status() != WL_CONNECTED){
        Serial.print(".");
        delay(100);
    }
    // Connected Successfully
    Serial.println("\nConnected To The WiFi Network");
    Serial.print("Local ESP32 IP: ");
    Serial.println(WiFi.localIP());
    // Print The RSSI (Received Signal Strength Indicator)
    Serial.print("RRSI: ");
    Serial.print(WiFi.RSSI());
    Serial.println(" dBm");
}

void loop(){
  // Do Nothing
}
As you can see in the result below, it did print the RSSI value for my WiF network. Which shows an acceptable signal strength level, the router is moderately far from my board and it’s in another room.

You can also check out the following tutorial to know more about getting the WiFi Signal Strength with ESP32.

This article will provide more in-depth information about ESP32 WiFi signal strength and how to get and judge the RSSI values to determine the WiFi connection quality between your ESP32 and any access point.
Get ESP32 MAC Address and Change It
The MAC address is a unique identifier address that gets assigned to each device that will be connected to other networks by the manufacturer on a hardware level. This means it’s a unique ID for each device on the network and it takes the following form: 25:3A:42:CE:B7:FF (for example).
It’s a 6-Bytes array each byte of which is represented by 2 hexadecimal digits that can take any value between (0…9-A…F). And it doesn’t matter if the letters are upper-case or lower-case. The MAC address: 25:3A:42:CE:B7:FF is perfectly the same as 25:3a:42:ce:b7:ff MAC address.
The MAC address of the ESP32 can be easily obtained using the WiFi library that’s already built into the Arduino Core for ESP32. You need to call the WiFi.macAddress() function that returns the MAC address in the form of a 6-byte array formatted as a string.
Here’s an example code that demonstrates how to get the MAC address of the ESP32:
/*
 *  ESP32 Get MAC Address Example
 *  Full Tutorial @ https://deepbluembedded.com/esp32-wifi-library-examples-tutorial-arduino/
 */
#include <WiFi.h>

void setup(){
    Serial.begin(115200);
    Serial.print("\nDefault ESP32 MAC Address: ");
    Serial.println(WiFi.macAddress());
}

void loop(){
  // Do Nothing
}
And this is the result after running this code on my ESP32 board. You may need to restart your ESP32 if you didn’t catch the message on the serial monitor on the first run.

To change the ESP32 MAC address in Arduino IDE, you can use the esp_wifi_set_mac()function from the esp_wifi.h library. Which takes the WiFi mode and the MAC address array as arguments.
Here is an example code for MAC Address change to a custom address in Arduino IDE.
/*
 *  ESP32 Set New MAC Address Example
 *  Full Tutorial @ https://deepbluembedded.com/esp32-wifi-library-examples-tutorial-arduino/
 */
#include <WiFi.h>
#include <esp_wifi.h>

uint8_t New_MAC_Address[] = {0x10, 0xAA, 0xBB, 0xCC, 0x33, 0xF5};

void setup(){
    Serial.begin(115200);
    WiFi.mode(WIFI_STA);
    Serial.print("\nOLD ESP32 MAC Address: ");
    Serial.println(WiFi.macAddress());
    esp_wifi_set_mac(WIFI_IF_STA, New_MAC_Address);
    Serial.print("NEW ESP32 MAC Address: ");
    Serial.println(WiFi.macAddress());
}

void loop(){
  // Do Nothing
}
This was the result on the serial terminal after running this example code on my ESP32 board.

So we’ve now successfully changed the MAC address.
The MAC Address Change is temporary and it gets whipped out when the ESP32 is restarted. You need to include the same code for changing the MAC address in each application where it’s needed. Otherwise, the ESP32 default MAC address will be the effective address of the device.
You can also check out the following tutorial to know more about getting the default MAC address and setting a custom MAC address for your ESP32 board. And get more tips about fixing any issue that may arise while doing this operation.

This article will give more in-depth information about ESP32 MAC address and how to get the default MAC address, and how to set a custom MAC address for your ESP32 board.
Get ESP32 WiFi IP Address
After a successful connection to a WiFi network is established, you can easily get the IP address assigned to your ESP32 by the access point (router). You only need to call the WiFi.localIP() function.
And you can print it to the serial terminal just like the example shown below.
Serial.print("Local ESP32 IP: ");
Serial.println(WiFi.localIP());
Set Static IP Address For ESP32 WiFi
When an ESP32 connects to a network, it will obtain an IP address dynamically using the DHCP (Dynamic Host Configuration Protocol). Every time the ESP32 restarts and re-connects to the network, it’s guaranteed that it’s going to take the same IP address again. The IP address assigned is randomly decided by the DHCP.
To assign a static IP address to ESP32 without DHCP, we’ll have to define the following parameters.
IPAddress local_IP(192, 168, 1, x); // Your Desired Static IP Address
IPAddress subnet(255, 255, 255, 0);
IPAddress gateway(192, 168, 1, 1);
IPAddress primaryDNS(192, 168, 1, 1); // Not Mandatory
IPAddress secondaryDNS(0, 0, 0, 0);   // Not Mandatory
Then you need to call the WiFi.config() function within the setup() function as shown below.
void setup() {
    ...
   // Configures Static IP Address
   if (!WiFi.config(local_IP, gateway, subnet, primaryDNS, secondaryDNS))
   {
       Serial.println("Configuration Failed!");
   }
}
It’s highly recommended to follow the tutorial below for more complete examples to set a static IP address for the ESP32 board in two different ways. And also some tips to make sure you don’t encounter any issues while trying those techniques.

This article will give more in-depth information about ESP32 Static IP address assignation, and what the DHCP does. And how to safely set a static IP address for your ESP32 board in two different ways.
Change ESP32 Hostname
To change the ESP32 hostname, you need to call the WiFi.setHostname() function before calling WiFi.mode() and then WiFi.begin() in this exact same order.
Here’s an example code that demonstrates how to set a custom ESP32 Hostname in Arduino IDE.
/*
 *  ESP32 WiFi HostName Change Example
 *  Full Tutorial @ https://deepbluembedded.com/esp32-wifi-library-examples-tutorial-arduino/
 */
#include <WiFi.h>

// Replace with your own network credentials
const char* ssid = "yourNetworkSSID";
const char* password = "yourNetworkPassword";
const char* MyHostName = "ESP32-Test";

void setup(){
    Serial.begin(115200);
    WiFi.setHostname(MyHostName);
    WiFi.mode(WIFI_STA);
    WiFi.begin(ssid, password);
    Serial.println("\nConnecting to WiFi Network ..");
    // Wait until connection is established
    while(WiFi.status() != WL_CONNECTED){
        Serial.print(".");
        delay(100);
    }
    // Print ESP32's IP & HostName
    Serial.println("\nConnected to the WiFi network");
    Serial.print("Local ESP32 IP: ");
    Serial.println(WiFi.localIP());
    Serial.print("ESP32 HostName: ");
    Serial.println(WiFi.getHostname());
}

void loop(){
    // Do Nothing
}
And this is the result after running this code on my ESP32 board. You may need to restart your ESP32 if you didn’t catch the message on the serial monitor on the first run.

And now my router is seeing the new ESP32 Hostname after running the example code above.

Sometimes you need to wait a little bit or even restart your router device to see the updated new hostname for your ESP32. So you can try this if it didn’t automatically update to the new name. For me, it was a near-instantaneous event and I didn’t need to do any extra steps after uploading the code.
The ESP32 Hostname string is allowed to have only letters, numbers, and the dash “-” symbol. Follow this rule so you don’t make up an invalid hostname. And try to make it compact and descriptive as much as possible.
It’s highly recommended to follow the tutorial below for more information about getting changing the default ESP32 hostname.

This article will give more in-depth information about ESP32 HostName, and how to get and change the default WiFi hostname for ESP32.
Disconnect ESP32 WiFi
To disconnect from a WiFi network that you’re currently connected to, simply use the WiFi.disconnect() function.
WiFi.disconnect();
Then your ESP32 is free to connect to a new WiFi network or reconnect to the same previous network. It really depends on your application and what logic functionality you’re trying to achieve.
ESP32 WiFi Events
The ESP32 WiFi library has a very powerful feature known as WiFi Events. Which is basically, some callback functions for almost all WiFi events that enable you to set a handler function for any event you’re interested in. This eliminates the need for polling for the WiFi status flags or putting the CPU in a busy waiting state or keeping it blocked.
The CPU can be doing the core logic of your application not worrying about the WiFi status flag which may get into a disconnected state for example. Because, whenever the WiFi goes into a disconnected state, the corresponding event will get triggered and the callback handler function that you’ve defined will get called and do the needed logic for that event (for a disconnected event, the handler should attempt reconnection for example).
Here is a complete list of all ESP32 WiFi events found in the WiFi library with a brief description of what each event means.
| ID | ESP32 WiFi Event | Event Description |
| 0 |
ARDUINO_EVENT_WIFI_READY | ESP32 WiFi driver initialized |
| 1 |
ARDUINO_EVENT_WIFI_SCAN_DONE | WiFi scan completed |
| 2 |
ARDUINO_EVENT_WIFI_STA_START | Station mode started |
| 3 |
ARDUINO_EVENT_WIFI_STA_STOP | Station mode stopped |
| 4 |
ARDUINO_EVENT_WIFI_STA_CONNECTED | Station mode connected to an AP |
| 5 |
ARDUINO_EVENT_WIFI_STA_DISCONNECTED | Station mode disconnected from an AP |
| 6 |
ARDUINO_EVENT_WIFI_STA_AUTHMODE_CHANGE | Authentication mode of the AP connected to the station mode has changed |
| 7 |
ARDUINO_EVENT_WIFI_STA_GOT_IP | Station mode got an IP address from the connected AP |
| 8 |
ARDUINO_EVENT_WIFI_STA_GOT_IP6 | Station mode got an IPv6 address from the connected AP |
| 9 |
ARDUINO_EVENT_WIFI_STA_LOST_IP | Station mode lost IP address from the connected AP |
| 10 |
ARDUINO_EVENT_WIFI_AP_START | Access point mode started |
| 11 |
ARDUINO_EVENT_WIFI_AP_STOP | Access point mode stopped |
| 12 |
ARDUINO_EVENT_WIFI_AP_STACONNECTED | A station connected to the access point mode |
| 13 |
ARDUINO_EVENT_WIFI_AP_STADISCONNECTED | A station disconnected from the access point mode |
| 14 |
ARDUINO_EVENT_WIFI_AP_STAIPASSIGNED | IP address assigned to a station connected to the access point mode |
| 15 |
ARDUINO_EVENT_WIFI_AP_PROBEREQRECVED | A probe request has been received by the access point mode |
| 16 |
ARDUINO_EVENT_WIFI_AP_GOT_IP6 | IPv6 address obtained by the access point mode |
| 17 |
ARDUINO_EVENT_WIFI_FTM_REPORT | A Fast Transition Management (FTM) report has been received |
| 18 |
ARDUINO_EVENT_ETH_START | Ethernet interface started |
| 19 |
ARDUINO_EVENT_ETH_STOP | Ethernet interface stopped |
| 20 |
ARDUINO_EVENT_ETH_CONNECTED | Ethernet interface connected to a network |
| 21 |
ARDUINO_EVENT_ETH_DISCONNECTED | Ethernet interface disconnected from a network |
| 22 |
ARDUINO_EVENT_ETH_GOT_IP | IP address obtained by the Ethernet interface |
| 23 |
ARDUINO_EVENT_ETH_GOT_IP6 | IPv6 address obtained by the Ethernet interface |
| 24 |
ARDUINO_EVENT_WPS_ER_SUCCESS | Wi-Fi Protected Setup (WPS) successful |
| 25 |
ARDUINO_EVENT_WPS_ER_FAILED | Wi-Fi Protected Setup (WPS) failed |
| 26 |
ARDUINO_EVENT_WPS_ER_TIMEOUT | Wi-Fi Protected Setup (WPS) timed out |
| 27 |
ARDUINO_EVENT_WPS_ER_PIN | Wi-Fi Protected Setup (WPS) PIN has been generated |
| 28 |
ARDUINO_EVENT_WPS_ER_PBC_OVERLAP | Wi-Fi Protected Setup (WPS) overlap detected |
| 29 |
ARDUINO_EVENT_SC_SCAN_DONE | Smart Config completed |
| 30 |
ARDUINO_EVENT_SC_FOUND_CHANNEL | Channel found by Smart Config |
| 31 |
ARDUINO_EVENT_SC_GOT_SSID_PSWD | Smart Config got the SSID and password |
| 32 |
ARDUINO_EVENT_SC_SEND_ACK_DONE | ACK sent by Smart Config |
| 33 |
ARDUINO_EVENT_PROV_INIT | Provisioning started |
| 34 |
ARDUINO_EVENT_PROV_DEINIT | Provisioning stopped |
| 35 |
ARDUINO_EVENT_PROV_START | Provisioning is started. |
| 36 |
ARDUINO_EVENT_PROV_END | Provisioning is ended. |
| 37 |
ARDUINO_EVENT_PROV_CRED_RECV | Credentials have been received during provisioning. |
| 38 |
ARDUINO_EVENT_PROV_CRED_FAIL | Provisioning failed due to invalid credentials. |
| 39 |
ARDUINO_EVENT_PROV_CRED_SUCCESS | Provisioning completed successfully. |
| 40 |
ARDUINO_EVENT_MAX | NULL |
There are so many applications where it’s needed to use the built-in ESP32 WiFi events to set your custom handler functions for the events of interest without having to keep the CPU blocked waiting for the status flag to be a certain value of waste CPU time in any other way.
In the next section, we’ll implement a WiFi auto-reconnect application based on WiFi events. We’ll set a callback handler for the event ARDUINO_EVENT_WIFI_STA_DISCONNECTED. Which will attempt re-connection by calling the WiFi.begin() function.
And you can also check the tutorial below for 2 more simple examples of using WiFi events in practical projects explained step by step so you can easily get the hang of it. I’m pretty sure, once you get this concept, most of your ESP32 WiFi projects will incorporate WiFi events callback handler functions.
This tutorial will give you 2 more examples of WiFi events to learn more about setting callback functions (event handlers) for ESP32 WiFi projects.
ESP32 WiFi Reconnect
There are so many ways to implement a WiFi reconnect strategy for ESP32 in case it loses the WiFi connection to the network. Here are some possible options:
- Reconnect with WiFi.reconnect() Function
- Timeout reset to achieve Auto-Reconnect
- Using WiFi.persistent() Auto-Reconnect Built-in Function
- Auto-Reconnect with ESP32 WiFi Events
All of the options listed above are demonstrated in detail in a separate tutorial but for the sake of simplicity, we’ll discuss only one option in this tutorial which is #4 (Auto Reconnect With WiFi Events).
So, we’ll implement an Auto Re-Connect technique based on the ESP32 WiFi events callback functions. We’ll set a callback handler for the event ARDUINO_EVENT_WIFI_STA_DISCONNECTED. Which will attempt re-connection by calling the WiFi.begin() function.
The WiFi disconnected event handler function will attempt re-connection whenever the WiFi connection between ESP32 and the Access Point is lost. Without needing to poll for any flag or keep the CPU in a blocked state.
Here is the full example code:
/*
 *  ESP32 WiFi Auto Re-Connect
 *  Full Tutorial @ https://deepbluembedded.com/esp32-wifi-library-examples-tutorial-arduino/
 */

#include <WiFi.h>

// Replace with your own network credentials
const char* ssid = "yourNetworkSSID";
const char* password = "yourNetworkPassword";


void ConnectedToAP_Handler(WiFiEvent_t wifi_event, WiFiEventInfo_t wifi_info) {
  Serial.println("Connected To The WiFi Network");
}

void GotIP_Handler(WiFiEvent_t wifi_event, WiFiEventInfo_t wifi_info) {
  Serial.print("Local ESP32 IP: ");
  Serial.println(WiFi.localIP());
}

void WiFi_Disconnected_Handler(WiFiEvent_t wifi_event, WiFiEventInfo_t wifi_info) {
  Serial.println("Disconnected From WiFi Network");
  // Attempt Re-Connection
  WiFi.begin(ssid, password);
}

void setup() {
  Serial.begin(115200);

  WiFi.mode(WIFI_STA);
  WiFi.onEvent(ConnectedToAP_Handler, ARDUINO_EVENT_WIFI_STA_CONNECTED);
  WiFi.onEvent(GotIP_Handler, ARDUINO_EVENT_WIFI_STA_GOT_IP);
  WiFi.onEvent(WiFi_Disconnected_Handler, ARDUINO_EVENT_WIFI_STA_DISCONNECTED);
  WiFi.begin(ssid, password);
  Serial.println("Connecting to WiFi Network ..");
}

void loop() {
  // Do Nothing
}
For testing, I had to disable my router’s WiFi (click the WLAN tiny button on your router to enable/disable WiFi). And then re-enabled it again to check if my ESP32 would re-connect automatically. And it did!

ESP32 WiFi Web Servers
In networking, a Web Server is defined to be a program that serves HTML and other web documents to web browsers over the Internet. With ESP32, you can:
- Build your own web servers and control devices connected to them from anywhere in the world.
- Collect data from sensors, do some processing, and push the results to the web in real-time so other people can access it.
- Fetch data from the web, do some processing and take actions based on it.
- Create your own network of devices (Web Server + Clients) or any other topology to make embedded devices talk to each other within a local network of your creation that may or may not be also connected to the worldwide web.
- The possibilities are just endless!
That being said, the possibilities are endless but a web server definition will stay the name. And don’t confuse the act of using ESP32 as a WebServer to be a mode or something. It’s not a mode for operation at the end of the day, it’s just an application. If the ESP32 is running a program to server HTML or any web documents over the internet, we’ll call it a Web Server.
ESP32 Web Server applications can however be implemented in different ways depending on the WiFi mode we’d like to use. In other words, you can create an ESP32 Web Server (in Station Mode) or a Web Server (in Access Point Mode). It depends on how you’d like the network to be in your application.
Choosing between a WiFi WebServer (Station Mode) and a WiFi WebServer (Access Point Mode), ultimately depends on the specific project requirements. If the device needs to interact with a pre-existing WiFi network and access the internet, a Web Server in Station Mode is the best option. On the other hand, if the device needs to create its own network for other devices to connect to, a Web Server in Access Point Mode is the way to go.
Here is a side-by-side comparison of both applications. And we’ll implement a practical example for each of them in the next section to make sure you’ve got a clear understanding of their differences.
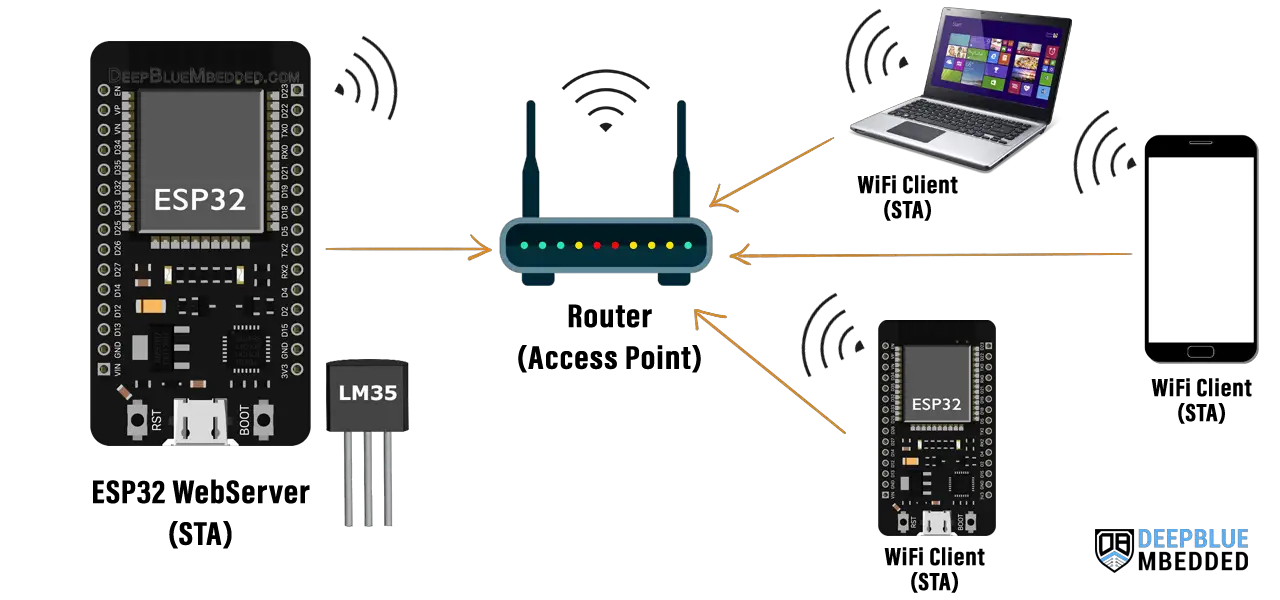
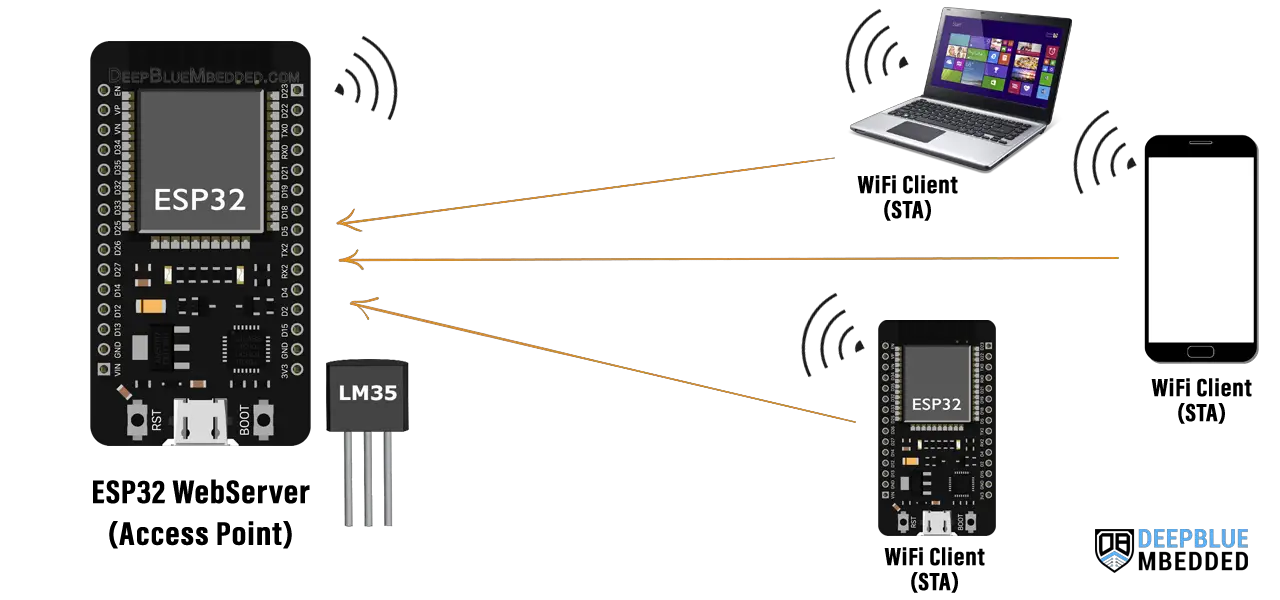
| ESP32 Web Server (Station Mode) | ESP32 Web Server (Access Point Mode) |
 |
 |
|
The ESP32 WebServer in station mode has to be connected to a network so other devices can connect to it and exchange data. The example above is for an ESP32 Webserver that reads the LM35 temperature sensor and provides this data for other devices. The ESP32 Connects to the WiFi network of the router (access point) and other devices on the same network are able to see the temperature data shared by the ESP32 webserver (station mode). |
The ESP32 WebServer in access point mode (AP) creates its own network and other devices can connect to it. The example above is for an ESP32 Webserver that reads the LM35 temperature sensor and provides this data for other devices. The ESP32 Creates a WiFi network and other devices on this network can get the temperature data shared by the ESP32 webserver (access point mode). |
ESP32 WiFi Example Projects
Now, we’ll create a couple of example projects to practice what we’ve learned so far about ESP32 WiFi modes, networking, and WiFi library functions. We’ll put everything together to create a very simple ESP32 WebServer application, ESP32-Based WiFi Access Point, and ESP32 Client-Server WiFi Communication between 2 ESP32 boards.
Each example project is illustrated in more detail in a separate tutorial but we’ll summarize everything hereafter and you’d better check them out one by one for more details and useful tips.
1. ESP32 Web Server (WiFi Station)
In this example, we’ll create an ESP32 WebServer (in Station “STA“ Mode) that will serve a webpage that provides clients with the following features:
- Button to control an LED state (LED1)
- Slider Trackbar to control the brightness of a second LED (LED2)
The ESP32 WebServer shall operate in station mode which means it’s going to connect to your WiFi home network then it’s possible to test the application with any device on the network (laptop, desktop, smartphone, etc).
Wiring
Here is how to hook up the output signals to the LEDs.

Example Code
Here is the Full Code Listing For This Example (ESP32 WebServer Station Mode)
/*
 *  ESP32 WebServer (Station Mode) Example
 *  Full Tutorial @ https://deepbluembedded.com/esp32-wifi-library-examples-tutorial-arduino/
 */
#include <WiFi.h>
#include <WebServer.h>

// Replace with your own network credentials
const char* ssid = "yourNetworkSSID";
const char* password = "yourNetworkPassword";

WebServer server(80);

const int led1Pin = 25;
const int led2Pin = 13;
int ledState = LOW;
int ledBrightness = 0;

const char html[] PROGMEM = R"rawliteral(
<!DOCTYPE html>
<html>
<head>
  <title>ESP32 Web Server</title>
  <style>
    body {
      font-family: sans-serif;
    }
    .container {
      display: flex;
      flex-direction: column;
      align-items: center;
    }
    button {
      font-size: 1.5em;
      margin: 10px;
      padding: 10px;
      background-color: lightgray; /* Set the initial background color */
    }
    button.on {
      background-color: green; /* Set the background color when the LED is ON */
    }
    input[type=range] {
      width: 50%;
    }
  </style>
</head>
<body>
  <div class="container">
    <h1>ESP32 Web Server</h1>
    <br>
    <h3>LED1 State Control</h3>
    <button id="button" onclick="toggleLED()">LED: OFF</button>
    <br>
    <br>
    <h3>LED2 Brightness Control</h3>
    <input type="range" id="trackbar" min="0" max="255" step="1" value="0" oninput="setBrightness()">
  </div>
  <script>
    var ledState = false;
    var ledBrightness = 0;
    var button = document.getElementById('button');
    var trackbar = document.getElementById('trackbar');
    function toggleLED() {
      ledState = !ledState;
      var xhr = new XMLHttpRequest();
      xhr.open('GET', '/led?state=' + (ledState ? '1' : '0'), true);
      xhr.send();
      button.innerHTML = 'LED: ' + (ledState ? 'ON' : 'OFF');
      button.classList.toggle('on', ledState); // Add or remove the 'on' class based on the LED state
    }
    function setBrightness() {
      ledBrightness = trackbar.value;
      var xhr = new XMLHttpRequest();
      xhr.open('GET', '/brightness?value=' + ledBrightness, true);
      xhr.send();
    }
  </script>
</body>
</html>
)rawliteral";

void handleRoot() {
  server.send(200, "text/html", html);
}

void handleLED() {
  ledState = server.arg("state").toInt();
  digitalWrite(led1Pin, ledState);
  server.send(200, "text/plain", String(ledState));
}

void handleBrightness() {
  ledBrightness = server.arg("value").toInt();
  analogWrite(led2Pin, ledBrightness);
  server.send(200, "text/plain", String(ledBrightness));
}

void setup() {
  Serial.begin(115200);
  pinMode(led1Pin, OUTPUT);
  pinMode(led2Pin, OUTPUT);
  digitalWrite(led1Pin, ledState);
  analogWrite(led2Pin, ledBrightness);
  // WiFi Configuration & Init
  WiFi.mode(WIFI_STA);
  WiFi.begin(ssid, password);
  Serial.print("Connecting To WiFi Network .");
  while (WiFi.status() != WL_CONNECTED) {
    Serial.print(".");
    delay(100);
  }
  // Connected Successfully
  Serial.println("\nConnected To The WiFi Network");
  Serial.print("Local ESP32 IP: ");
  Serial.println(WiFi.localIP());
  // Attach Server Handler Functions & Start WebServer
  server.on("/", handleRoot);
  server.on("/led", handleLED);
  server.on("/brightness", handleBrightness);
  server.begin();
}

void loop() {
  server.handleClient();
}
The HTML webpage has all the elements we need for this application ( LED control button, Trackbar, Label headers, CSS stylesheet, and javascript code for handling events).
Then we’re defining some handler functions for the following events: Serve the HTML webpage, handle the LED1 state change, and handle the LED2 brightness value change.
void handleRoot() {
  server.send(200, "text/html", html);
}

void handleLED() {
  ledState = server.arg("state").toInt();
  digitalWrite(led1Pin, ledState);
  server.send(200, "text/plain", String(ledState));
}

void handleBrightness() {
  ledBrightness = server.arg("value").toInt();
  analogWrite(led2Pin, ledBrightness);
  server.send(200, "text/plain", String(ledBrightness));
}
Then, in the setup() function: we configure and initialize the WiFi and the WebServer. And print the WiFi connection successful message as well as the WebServer IP address. So you know the IP address that you need to access on your web browser in order to interact with the ESP32 WebServer.
void setup() {
  Serial.begin(115200);
  pinMode(led1Pin, OUTPUT);
  pinMode(led2Pin, OUTPUT);
  digitalWrite(led1Pin, ledState);
  analogWrite(led2Pin, ledBrightness);
  // WiFi Configuration & Init
  WiFi.mode(WIFI_STA);
  WiFi.begin(ssid, password);
  Serial.print("Connecting To WiFi Network .");
  while (WiFi.status() != WL_CONNECTED) {
    Serial.print(".");
    delay(100);
  }
  // Connected Successfully
  Serial.println("\nConnected To The WiFi Network");
  Serial.print("Local ESP32 IP: ");
  Serial.println(WiFi.localIP());
  // Attach Server Handler Functions & Start WebServer
  server.on("/", handleRoot);
  server.on("/led", handleLED);
  server.on("/brightness", handleBrightness);
  server.begin();
}
In the loop() function: we just need to call the server.handleClient() function repeatedly. And that’s all about it.
Testing Results
After running this example project on my ESP32, I opened the Serial monitor to get the WebServer IP address. And it was as shown below.

Then, I went to my computer’s web browser and typed in the IP address ( 192.168.1.104) in the URL bar. The ESP32 WebServer webpage has loaded and I was able to control LED1 & LED2. The same thing was also achievable via the smartphone web browser as you can see in the short demo below.
2. Create ESP32 WiFi (Access Point) Web Server
In this example, we’ll create an ESP32 WebServer (in Access Point “AP” Mode) that will serve a webpage that provides clients with the following features:
- Button to control an LED state (LED1)
- Slider Trackbar to control the brightness of a second LED (LED2)
The ESP32 WebServer shall operate in Access Point Mode which means it’s going to create its own WiFi network without the need to have a router at home. Then it’s possible to test the application with any device (laptop, desktop, smartphone, etc) after connecting to the ESP32 WiFi network.
This is the exact same previous example with only one difference which is the ESP32 WiFi operation mode. It’s AP (SoftAP Access Point Mode) that allows the ESP32 to create its own WiFi network and we’ll connect to it with a smartphone to test the application.
Wiring
Here is how to hook up the output signals to the LEDs. (Same as the previous example)
Example Code
Here is the Full Code Listing For This Example (ESP32 WebServer Access Point Mode)
/*
 *  ESP32 WebServer (Access Point "AP" Mode) Example
 *  Full Tutorial @ https://deepbluembedded.com/esp32-wifi-library-examples-tutorial-arduino/
 */
#include <WiFi.h>
#include <WebServer.h>

// Replace With Your Desired SSID & Password
const char* ssid = "ESP32-LED-AP";
const char* password = "01234567";

WebServer server(80);

const int led1Pin = 25;
const int led2Pin = 13;
int ledState = LOW;
int ledBrightness = 0;

const char html[] PROGMEM = R"rawliteral(
<!DOCTYPE html>
<html>
<head>
  <title>ESP32 Web Server</title>
  <style>
    body {
      font-family: sans-serif;
    }
    .container {
      display: flex;
      flex-direction: column;
      align-items: center;
    }
    button {
      font-size: 1.5em;
      margin: 10px;
      padding: 10px;
      background-color: lightgray; /* Set the initial background color */
    }
    button.on {
      background-color: green; /* Set the background color when the LED is ON */
    }
    input[type=range] {
      width: 50%;
    }
  </style>
</head>
<body>
  <div class="container">
    <h1>ESP32 Web Server</h1>
    <br>
    <h3>LED1 State Control</h3>
    <button id="button" onclick="toggleLED()">LED: OFF</button>
    <br>
    <br>
    <h3>LED2 Brightness Control</h3>
    <input type="range" id="trackbar" min="0" max="255" step="1" value="0" oninput="setBrightness()">
  </div>
  <script>
    var ledState = false;
    var ledBrightness = 0;
    var button = document.getElementById('button');
    var trackbar = document.getElementById('trackbar');
    function toggleLED() {
      ledState = !ledState;
      var xhr = new XMLHttpRequest();
      xhr.open('GET', '/led?state=' + (ledState ? '1' : '0'), true);
      xhr.send();
      button.innerHTML = 'LED: ' + (ledState ? 'ON' : 'OFF');
      button.classList.toggle('on', ledState); // Add or remove the 'on' class based on the LED state
    }
    function setBrightness() {
      ledBrightness = trackbar.value;
      var xhr = new XMLHttpRequest();
      xhr.open('GET', '/brightness?value=' + ledBrightness, true);
      xhr.send();
    }
  </script>
</body>
</html>
)rawliteral";

void handleRoot() {
  server.send(200, "text/html", html);
}

void handleLED() {
  ledState = server.arg("state").toInt();
  digitalWrite(led1Pin, ledState);
  server.send(200, "text/plain", String(ledState));
}

void handleBrightness() {
  ledBrightness = server.arg("value").toInt();
  analogWrite(led2Pin, ledBrightness);
  server.send(200, "text/plain", String(ledBrightness));
}

void setup() {
  Serial.begin(115200);
  pinMode(led1Pin, OUTPUT);
  pinMode(led2Pin, OUTPUT);
  digitalWrite(led1Pin, ledState);
  analogWrite(led2Pin, ledBrightness);
  // WiFi AP Configuration & Init
  Serial.println("Setting Up ESP32 AP Network..");
  WiFi.softAP(ssid, password);
  Serial.print("ESP32 AP IP: ");
  Serial.println(WiFi.softAPIP());
  // Attach Server Handler Functions & Start WebServer
  server.on("/", handleRoot);
  server.on("/led", handleLED);
  server.on("/brightness", handleBrightness);
  server.begin();
}

void loop() {
  server.handleClient();
}
The code for this example is exactly the same as the previous example (Station Mode). However, the only difference is the configuration of ESP32 WiFi mode to be AP (Access Point) instead of STA in the previous example project. And the WiFi network credentials for our ESP32 AP are going to be:
- SSID: ESP32-LED-AP
- WiFi Password: 01234567
And after running this example project on my ESP32 board, I was able to get the following message on the serial monitor.

Then, I used my smartphone to search for the WiFi network “ ESP32-LED-AP” and provided its password “ 01234567”. And I was able to connect to the ESP32 WiFi network.
The next step was to test the application by visiting the ESP32 WebServer IP address ( 192.168.4.1) on my browser. And the testing result was perfectly the same as the previous example.
ESP32 WiFi Protocols
The ESP32 supports various communication protocols over WiFi and other wireless communication technologies such as BLE, LoRa, and GSM. In this section, we’ll only focus on getting an overall view of the ESP32 WiFi Protocols that you need to learn about just to have a clear picture of the ESP32 WiFi capabilities and also to make a guided decision on whether to use a specific protocol for a specific application of your or not.
This is going to be an exhaustive list to some extent but summarized to keep the length of this tutorial manageable and still provide you with enough details to get an overall view of what protocols can be used with ESP32 WiFi in general.
ESP32 HTTP

HTTP (Hypertext Transfer Protocol) is a protocol used for data communication over the Internet. The ESP32 provides a built-in WiFi stack that allows us to connect to a WiFi network and send HTTP requests. HTTP requests can be of two types: GET and POST.
HTTP GET requests are used to retrieve data from a web server. In GET requests, the data is sent in the URL of the request. HTTP POST requests, on the other hand, are used to send data to a web server. In POST requests, the data is sent in the body of the request.
We can use HTTPClient.h library to send HTTP requests with ESP32. The http.begin() function is used to specify the URL of the request. We can then use the http.GET() or http.POST() functions to send the request. If the request is successful, we can get the response using the http.getString() function.
ESP32 HTTPS

HTTPS is a secure version of HTTP, which means that all data sent between the client and server is encrypted. This is important for protecting sensitive data such as passwords, credit card numbers, and other personal information.
To make an HTTPS request with the ESP32, you first need to make sure that you have the necessary certificates installed on your device. You can obtain these certificates from a trusted certificate authority (CA) or generate them yourself using OpenSSL.
Once you have the certificates, you can use the ESP32’s built-in WiFiClientSecure.h library to make HTTPS requests. Note that HTTPS requests can take longer than HTTP requests due to the encryption overhead. Also, be sure to use the correct port number (443 for HTTPS) when connecting to the server.
ESP32 UDP

UDP (User Datagram Protocol) is a connectionless protocol that enables devices to send and receive data over a network without establishing a dedicated connection. This makes it suitable for applications where low-latency communication is important, such as real-time control systems or sensor networks.
But it’s less reliable than other communication protocols as it doesn’t provide any guarantee that the data you’re sending is well-received on the other end. It just sends the data as quickly as possible and forgets about it. To use UDP with ESP32, you can use the built-in WiFiUDP.h library or AsyncUDP library for asynchronous operation.
The UDP protocol is a simple and efficient way to send and receive data over a network, but it does not provide any error checking or flow control. For more advanced applications, you may want to consider using a protocol that provides these features, such as TCP or MQTT.
ESP32 TCP

TCP (Transmission Control Protocol) is a connection-oriented protocol that allows reliable, ordered delivery of a stream of bytes between applications running on hosts. ESP32 can act as a TCP client or TCP server.
To use ESP32 TCP, you need to create a TCP socket and then connect to the remote server. Once the connection is established, you can send and receive data over the socket. ESP32 TCP server works in a similar way. You create a TCP server socket and then wait for clients to connect. Once a client connects, you can send and receive data over the socket.
TCP is a reliable and ordered protocol, which means that data is delivered in the order it was sent and any lost packets are retransmitted. This makes TCP a good choice for applications that require reliable data transmissions, such as file transfers or remote control of devices. However, TCP has a much higher overhead compared to UDP, which means it can be much slower.
ESP32 WebSocket
WebSocket is a protocol that provides full-duplex communication over a TCP connection. It enables bidirectional communication between the client and the server in real-time.
One of the main benefits of using WebSocket is that it allows you to create a real-time communication channel that can push data from the server to the client without the need for the client to constantly poll the server for updates. This can lead to a significant improvement in the efficiency and responsiveness of your application.
Given that WebSocket protocol is built on top of TCP, you’ll need to install a TCP library like AsyncTCP.h for ESP32. And you’ll be able to create WebSocket-based web server applications. And we’ll some example projects based on this protocol in future tutorials.
ESP32 SMTP

SMTP (Simple Mail Transfer Protocol) is a protocol that’s used for sending emails. This protocol is widely used for sending emails by applications and devices such as security systems, monitoring systems, and more. Using SMTP, the ESP32 can send emails to a specified email address when a certain event occurs or when specific conditions are met.
To use SMTP with ESP32, we need to have access to an SMTP server. The SMTP server can be a local server or a remote server. Once we have access to an SMTP server, we can use the ESP32 WiFi to connect to the server and send emails.
To send an email using ESP32 and SMTP protocol, we need to follow these steps:
- Connect to the WiFi network using the WiFi library.
- Connect to the SMTP server using the TCP/IP stack.
- Authenticate with the SMTP server if required.
- Send an email by sending the email message to the SMTP server.
SMTP protocol can be used for a variety of applications, such as sending email notifications or alerts from ESP32-based IoT devices. And we’ll definitely dedicate a couple of future tutorials to exploring the functionality and applications for this protocol.
ESP32 MQTT
MQTT (Message Queuing Telemetry Transport) is a lightweight messaging protocol that is used in IoT applications to exchange messages between devices. It is a publish/subscribe protocol that is designed to be used with low-bandwidth and unreliable networks. MQTT is supported by ESP32 and can be used for communication between ESP32 devices and other MQTT-enabled devices or servers.
MQTT works on the concept of a broker, which acts as a central hub for all the connected devices. The devices can publish messages to a specific topic on the broker, and other devices can subscribe to that topic to receive the messages. MQTT supports three levels of Quality of Service (QoS) to ensure reliable message delivery.
It’s important to note that MQTT is a client-server protocol and requires a broker to work. There are many public MQTT brokers available that can be used for testing and development, but for production use, it’s recommended to set up a private MQTT broker.
There is an ESP32 library for MQTT protocol which is called “ PubSubClient”. That can be used to connect to MQTT brokers and publish/subscribe to topics in your IoT applications. And we’ll be doing a handful of projects to practice using the MQTT protocol in different applications in future tutorials.
ESP32 ESP-NOW

The ESP-NOW is a low-power peer-to-peer communication protocol developed by Espressif, the manufacturer of ESP32 microcontrollers. It allows for simple, fast, and reliable communication between two or more ESP32 modules without the need for a Wi-Fi network.
ESP-NOW operates at the MAC layer and can be used to send data between ESP32 devices directly, without the need for a router or access point. This makes it ideal for applications where low power consumption and simple, direct communication are required.
ESP-NOW is particularly useful in applications such as home automation, where multiple devices need to communicate with each other in a decentralized manner. It can be used to build a network of devices that can communicate with each other using very little power, making it ideal for battery-powered devices. Features of ESP-NOW include:
- Fast Communication Protocol
- Energy-Efficient Communication
- Up to 250 bytes of payload in each packet
- Communication can be encrypted or not
- Too many network topologies can be achieved by ESP-NOW
- Advertised Range of up to 1km (Users report ranges between 200-500 meters in practice)
To use ESP-NOW, you first need to get the esp_now.h library and initialize the protocol on each device by calling esp_now_init(). Then, you need to register each device with the protocol by calling esp_now_add_peer(). This tells the ESP32 which devices it can communicate with.
Once the devices have been registered, you can use esp_now_send() to send data from one device to another. Data is sent in packets, and each packet can contain up to 250 bytes of data.
ESP-MESH With ESP32

ESP-MESH is a networking protocol developed by Espressif Systems, the manufacturer of the ESP32 microcontroller. It enables the creation of mesh networks that can connect multiple ESP32 nodes, allowing for reliable and robust communication between them.
Mesh networks are particularly useful in situations where traditional point-to-point connections are not possible, such as in large buildings or outdoor areas. With ESP-MESH, nodes can communicate with each other in a decentralized manner, allowing for dynamic network topology and easy scalability.
Some of the key features of ESP-MESH include:
- Automatic topology formation: ESP-MESH nodes can automatically discover and connect to each other, forming a mesh network without the need for manual configuration.
- Self-healing: If a node in the network fails or goes offline, the other nodes can automatically re-route their communication to maintain connectivity.
- Parent selection: ESP-MESH nodes can dynamically select the most suitable parent node to connect to, based on factors such as signal strength and network load.
- Security: ESP-MESH supports various security features such as encryption, authentication, and access control, to ensure that only authorized devices can join the network.
With ESP-MESH, you can create a wide range of applications, such as home automation, industrial monitoring, and smart agriculture. The protocol is also compatible with other standard mesh networking protocols, such as Zigbee and Thread, allowing for interoperability with other devices and systems.
ESP-TOUCH With ESP32

The ESP-TOUCH protocol is a technology developed by Espressif that simplifies the process of configuring ESP32 and other ESP8266EX-embedded devices to connect to a Wi-Fi network. It is designed to make the configuration process as easy as possible for users, allowing them to connect their devices with just a few simple steps using a smartphone.
The protocol works by sending a Wi-Fi configuration packet from a smartphone to the ESP32 or ESP8266EX-embedded device. The device receives the packet and uses the information to connect to the specified Wi-Fi network.
One of the key advantages of ESP-TOUCH is that it eliminates the need for the user to manually enter the Wi-Fi network name and password into the device. Instead, the protocol handles the entire configuration process automatically, saving time and effort for the user.
The ESP-TOUCH protocol is also very secure, using advanced encryption algorithms to protect the Wi-Fi network name and password during transmission. This ensures that the information is kept safe from unauthorized access or interception.
ESP32 ESP-Modbus

Modbus is a communication protocol widely used in industrial control systems to connect electronic devices. Modbus is a request-response protocol that operates on top of different physical communication layers such as RS-232, RS-485, WiFi, Ethernet, and others. The Modbus protocol includes several function codes, each with a specific purpose, such as reading and writing data, controlling devices, and more.
There is an official library from Espressif called ESP-Modbus that adds support for this protocol on ESP32 microcontrollers for industrial applications.
ESP32 mDNS (Multicast DNS)
mDNS (Multicast DNS) is a multicast UDP service that allows devices on a network to discover and communicate with each other using domain names instead of IP addresses. It is particularly useful in situations where the IP addresses of devices on the network are constantly changing or unknown.
mDNS works by using multicast DNS packets to broadcast queries and responses on the local network. When a device wants to discover another device on the network, it sends out an mDNS query for the device’s hostname. The device with the matching hostname responds with its IP address, allowing the querying device to establish a connection.
ESP32 supports mDNS out of the box through the built-in “ ESPmDNS.h” library. To use mDNS on the ESP32, simply include the library in your code and initialize it with a unique hostname. The provided examples in the ESP32 Arduino-Core library should be enough to help you get started.
ESP32 WiFi Other Applications
The ESP32 WiFi doesn’t only enable so many IoT applications, different communication protocols, and various network topologies. But it also enables us to create more interesting applications. In this section, we’ll go through a brief description of various extra applications that are also possible thanks to ESP32 WiFi capabilities.
ESP32 OTA (Over-The-Air) Updates With WiFi
One of the great advantages of the ESP32 is its support for over-the-air (OTA) updates, which allows you to update your code remotely, without having to physically connect your ESP32 to a computer. This can be particularly useful if your ESP32 is installed in a remote location, or if you have many ESP32s that need a firmware update.
There are several ways to perform OTA updates on the ESP32, but the most common method is to use the ArduinoOTA library. This library is included in the ESP32 Arduino Core, and it provides a simple and convenient way to perform OTA updates for the ESP32.
ESP32 NTP Time Synchronization
NTP (Network Time Protocol) is a popular protocol used for time synchronization over networks. The ESP32 can easily get the time from an NTP server using the built-in time library.
Once the ESP32 gets the time from the NTP server, it can be used to synchronize the internal clock of the device. This can be done using the built-in time library as well.
ESP32 WiFi Power Saving
The ESP32 offers different power-saving modes that you can switch between in order to achieve certain overall power consumption. Most IoT devices deal with battery energy as a critical resource and battery lifetime needs to be maximized. It can be tedious to have to go to the field where the ESP32 node is installed and recharge the battery manually very frequently.
Check the following tutorial for more information about ESP32 Power Saving modes and potential applications for each mode.

This article will give you more in-depth information about the ESP32 power-saving modes, sleep modes, their power consumption, and potential applications for each mode.
Troubleshooting ESP32 WiFi Issues
You may run into some issues while trying ESP32 WiFi examples and it can get really frustrating. Most of the WiFi connection/disconnection issues and solutions are found in the article linked below. And I’ll keep adding more common issues & their solutions based on your comments and experience.
Parts List
Here is the full components list for all parts that you’d need in order to perform the practical LABs mentioned here in this article and for the whole ESP32 series of tutorials found here on DeepBlueMbedded. Please, note that those are affiliate links and we’ll receive a small commission on your purchase at no additional cost to you, and it’d definitely support our work.
Download Attachments
You can download all attachment files for this Article/Tutorial (project files, schematics, code, etc..) using the link below. Please consider supporting my work through the various support options listed in the link down below. Every small donation helps to keep this website up and running and ultimately supports our community.
Concluding Remarks
To conclude this tutorial, we’ll highlight the fact that there is no limit to what you can do with ESP32 WiFi, applications are endless, and protocols & topologies are increasing over time. I’ve done my best to give you an overview of all the possibilities and capabilities of ESP32 WiFi. And to gather everything you need to know in one place with a logical order for the topics for those of you who feel lost while getting started with ESP32 WiFi.
This guide turned out to be gigantic and it will continuously be updated with more resources and links to articles that will explain every topic in much detail with practical example projects, tips, and more. Stay tuned for future tutorials and check out the tutorials on the main page of the ESP32 Tutorials Series.
Great ESP32 WiFi Resources
Here are some great resources that you can reference to learn more about WiFi and ESP32.
Hi Khaled,
I appreciate your tutorial very much. For me it was the perfect match for a small ESP32-project adding Wifi functionality.
And I like your personal profile. Maybe, that is because I am a (now retired) HW engineer too. So I can understand your motivation and the passion driving you very well.
Again, well done
Siggi Hagedorn
Hi Siggi. Thanks so much for your kind words!
This is truly amazing!
Thank you so much for such a quality contenant , it´s very rare to find such a complete and detailed guide it´s very satisfying to read .