| Previous Tutorial | Tutorial 4 | Next Tutorial | |||||
| ESP32 Set CPU Clock Speed (Frequency) – Arduino IDE | |||||||
| ESP32 Course Home Page ???? | |||||||
In this tutorial, you’ll learn how to set or change the ESP32 CPU clock speed (Frequency) in Arduino Core. This is a short tutorial but it’s very useful and important in future work in this series of tutorials.
We’ll be using this in power consumption control, enhancing RTOS tasks execution time, maybe getting a higher ADC sampling rate, and much more possibilities. If not for that, let it just be for the sake of getting the most out of the CPU. Without further ado, let’s get right into it!
[toc]
Requirements For This Tutorial
Prior Knowledge
- Nothing
Software Tools
Hardware Components
You can either get the complete course kit for this series of tutorials using the link down below. Or just refer to the table for the exact components to be used in practical LABs for only this specific tutorial.
ESP32 CPU Speed (Frequency)
As we’ve stated earlier in this series of tutorials, the ESP32 is a dual-core system with two Harvard Architecture Xtensa LX6 CPUs. All embedded memory, external memory, and peripherals are located on the data bus and/or the instruction bus of these CPUs.
CPU Clock
Both CPUs can be clocked from various sources internally or externally. The most important circuitry is the PLL (Phase-Locked Loop) which multiplies the input clock frequency (whether it’s an external crystal or internal oscillator). This results in a much higher frequency signal that’s derived from the main clock source (orders of magnitude in terms of frequency).
The PLL_CLK is an internal PLL clock signal with a frequency of 320 MHz or 480 MHz. Note that this PLL clock is divided /2 or /4 before it’s fed to any CPU. The table down below from the datasheet shows the possible configurations for the clock.

Peripherals Clock
The APB bus clock (APB_CLK) is derived from CPU_CLK, the division factor depends on the CPU_CLK source as shown in the table down below. The peripherals clock signals are APB_CLK, REF_TICK, LEDC_SCLK, APLL_CLK, and PLL_D2_CLK.
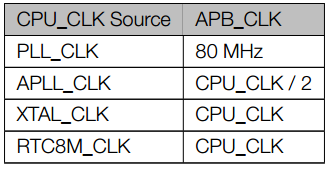
With that being said, we can conclude that setting the PLL_CLK as a clock source will help us choose the 480MHz PLL clock output as a clock source for the CPU (the CPU_CLK will be 480/2 MHz). While the APB bus will be clocked @ 80MHz due to this option being selected.
Should we be concerned about the peripherals clock and APB_CLK? Of course, especially if you’re trying to optimize for power consumption or maximizing the performance. You need to know & control this parameter. The bus clock rate dictates the speed at which you can access control registers, read a peripheral, GPIO pin states, etc. If it’s a bottle-neck, then a change has to be made indeed.
Why Would You Need To Change ESP32 CPU Clock?
You should consider changing the clock rate for your microcontroller, in general, under certain circumstances. Number one being the power consumption optimization. And then, we can say enhancing the performance of the CPU to meet certain timing requirements, boosting a specific peripheral, etc.
Power Consumption Optimization
Generally speaking, it’s a rule of thumb, all digital logic circuits consume more power the higher the clock rate is. The faster it goes, the more power it draws. Here is a simplified (approximation) for what happens and why it’s the case.
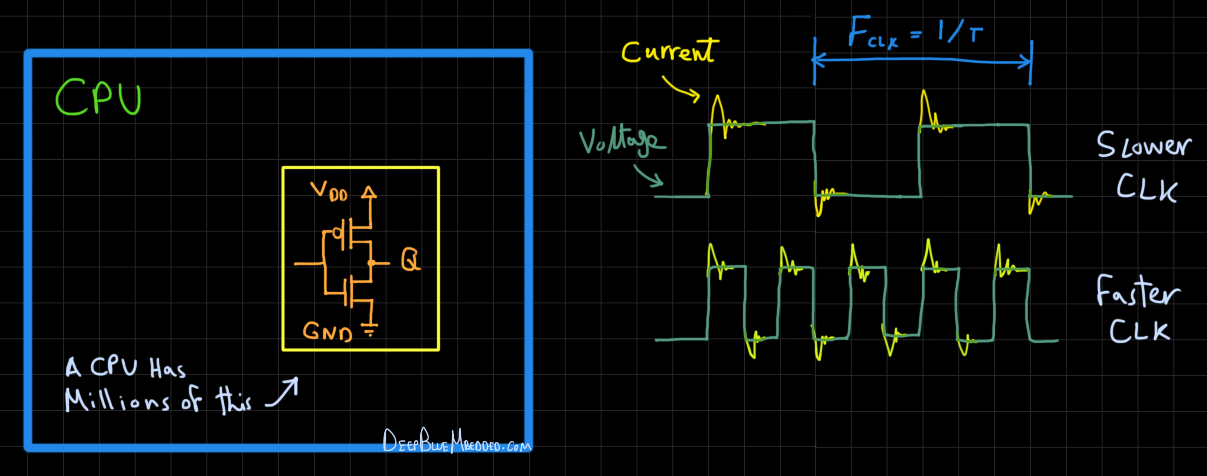
We can divide the reasoning behind this into two pieces: Static Power Consumption & Dynamic Power Consumption. The static power consumption is due to the manufacturing of the transistors being very small in size and there is uncontrollable leakage current even without being switched ON and OFF. That’s the static part.
The dynamic power consumption, on the other hand, is what happens while switching the gates as shown in the diagram above. Which has its own reasons as well. First of which is the gates’ capacitance, which requires a high surge of current to switch ON and OFF so quickly that we keep following the clock signal without being distorted.
And also the transistor technology has the inherent feature of not being completely turned OFF or ON at each edge of the clock. This means we have a dead-short between Vdd & GND for a very short period of time. With both transistors conducting, called “Shoot-through” current spikes.
Therefore, the more clock edges you have in a finite period of time, the more current spikes there are. In other words, the higher the clock frequency, the higher power drawn by the CPU. (P = I x V)
Enhancing The Performance
The other, more obvious, the reason for willing to change the clock rate is to enhance the performance of the ESP32 in terms of computational power. To achieve some required timing behavior or any other application-dependent reasoning. Let’s now move to how we can change the ESP32 CPU clock frequency using the Arduino Core API functions.
ESP32 Change CPU Speed (in Arduino)
This is the function we’ll be using to set the ESP32 CPU clock frequency.
|
1 2 3 4 5 6 |
//function takes the following frequencies as valid values: // 240, 160, 80 <<< For all XTAL types // 40, 20, 10 <<< For 40MHz XTAL // 26, 13 <<< For 26MHz XTAL // 24, 12 <<< For 24MHz XTAL bool setCpuFrequencyMhz(uint32_t cpu_freq_mhz); |
As we can see in the documentation of this function, it can expect 80, 160, or 240 as valid inputs as well.
In case you’re willing to use a lower CPU clock for power consumption optimization, you’ll need first to check the XTAL crystal frequency using the function down below. Then, use the corresponding valid options shown in the comment section in the code snippet above.
|
1 |
uint32_t getXtalFrequencyMhz(); // In MHz |
After making a change to the CPU clock frequency, you can double-check the CPU clock rate value by reading the following function’s return value.
|
1 |
uint32_t getCpuFrequencyMhz(); // In MHz |
To read the APB bus clock rate, use this function.
|
1 |
uint32_t getApbFrequency(); // In Hz |
And now, let’s make some tests!
Components For This Tutorial’s LABs
| QTY. | Component Name | Buy Links |
| 1 | ESP32 Devkit v1 DOIT Board | Amazon.com – eBay.com – Banggood.com |
| 2 | BreadBoard | Amazon.com – eBay.com – Banggood.com |
| 1 | Jumper Wires Pack | Amazon.com / Amazon.com – eBay.com / eBay.com – Banggood.com |
| 1 | Micro USB Cable | Amazon.com – eBay.com – Banggood.com |
*Affiliate Disclosure: When you click on links in this section and make a purchase, this can result in this site earning a commission. Affiliate programs and affiliations include, but are not limited to, the eBay Partner Network (EPN) and Amazon.com, Banggood.com. This may be one of the ways to support this free platform while getting your regular electronic parts orders as usual at no extra cost to you.
ESP32 Read Default CPU Clock – LAB
| LAB Number | 7 |
| LAB Name | Read ESP32 CPU Default Clock Rate |
ESP32 Read Default Clocks – Code Example
The code example down below does the following: starts a serial communication port, checks the CPU clock rate & XTAL Freq & APB bus clock, and prints them out over the serial port to the PC. Then, do a free-running loop toggling a GPIO pin at max speed. That’s all
The Full code Listing
|
1 2 3 4 5 6 7 8 9 10 11 12 13 14 15 16 17 18 19 20 21 22 23 24 25 26 27 28 29 30 31 32 33 34 |
/* * LAB: 7 * Name: ESP32 Read Default Clocks * Author: Khaled Magdy * For More Info Visit: www.DeepBlueMbedded.com */ #define GPIO_pin 5 uint32_t Freq = 0; void setup() { pinMode(GPIO_pin, OUTPUT); Serial.begin(115200); Freq = getCpuFrequencyMhz(); Serial.print("CPU Freq = "); Serial.print(Freq); Serial.println(" MHz"); Freq = getXtalFrequencyMhz(); Serial.print("XTAL Freq = "); Serial.print(Freq); Serial.println(" MHz"); Freq = getApbFrequency(); Serial.print("APB Freq = "); Serial.print(Freq); Serial.println(" Hz"); } void loop() { digitalWrite(GPIO_pin, 1); digitalWrite(GPIO_pin, 0); } |
Choose the board, COM port, hold down the BOOT button, click upload and keep your finger on the BOOT button pressed. When the Arduino IDE starts sending the code, you can release the button and wait for the flashing process to be completed. Now, the ESP32 is flashed with the new firmware.
Screenshot For The Result

Well, I had no idea about the XTAL crystal frequency, it turned out to be 40MHz, that’s OK. The CPU turned out to be clocked at the Max rate by default (which is 240MHz). And the APB frequency is 80MHz as expected, Remember this table?
| When the CPU is being Clocked from the PLL_CLK, the APB bus will have an 80MHz clock rate. Which we’ve already validated in the results above. | |
Let’s now see how fast the GPIO pin is being switched ON & OFF on my DSO.
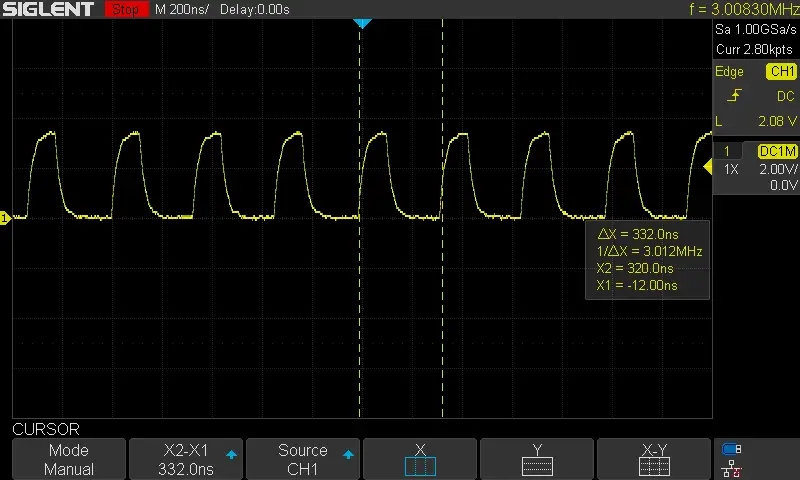
It turned out to be 3MHz as you can see. It’s not a good-looking square wave due to the drive capability of the GPIO pin output driver and also maybe due to propping attenuation for High-frequency components. All in all, we have got an estimate for this parameter.
ESP32 Change CPU Speed (Frequency) – LAB
| LAB Number | 8 |
| LAB Name | ESP32 CPU Frequency Change (For Power Consumption) |
ESP32 Low-Power CPU Clock Setting – Code Example
In this example, we’ll be optimizing for power consumption by choosing the lowest CPU clock frequency possible. Given that the XTAL frequency is 40MHz, recall the API function documentation.
|
1 2 3 4 5 6 |
//function takes the following frequencies as valid values: // 240, 160, 80 <<< For all XTAL types // 40, 20, 10 <<< For 40MHz XTAL // 26, 13 <<< For 26MHz XTAL // 24, 12 <<< For 24MHz XTAL bool setCpuFrequencyMhz(uint32_t cpu_freq_mhz); |
As you can see in the comments above, the lowest valid input for the CPU frequency (@40MHz XTAL) is 10MHz. So let’s set that value and re-run the previous LAB’s test.
|
1 2 3 4 5 6 7 8 9 10 11 12 13 14 15 16 17 18 19 20 21 22 23 24 25 26 27 28 29 30 31 32 33 34 35 |
/* * LAB: 8 * Name: ESP32 Read Default Clocks * Author: Khaled Magdy * For More Info Visit: www.DeepBlueMbedded.com */ #define GPIO_pin 5 uint32_t Freq = 0; void setup() { pinMode(GPIO_pin, OUTPUT); Serial.begin(115200); setCpuFrequencyMhz(10); Freq = getCpuFrequencyMhz(); Serial.print("CPU Freq = "); Serial.print(Freq); Serial.println(" MHz"); Freq = getXtalFrequencyMhz(); Serial.print("XTAL Freq = "); Serial.print(Freq); Serial.println(" MHz"); Freq = getApbFrequency(); Serial.print("APB Freq = "); Serial.print(Freq); Serial.println(" Hz"); } void loop() { digitalWrite(GPIO_pin, 1); digitalWrite(GPIO_pin, 0); } |
Screenshot For The Result
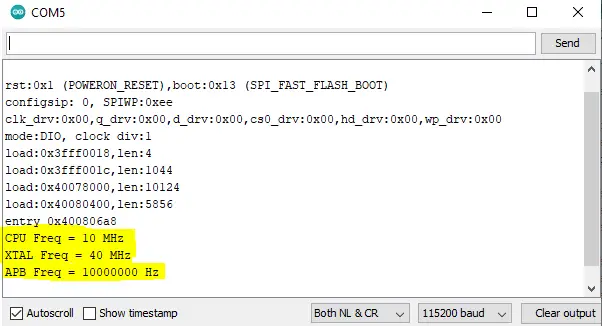
The CPU turned is now clocked @ 10MHz. And the APB frequency is 10MHz as well. Recall this table?
| When the CPU is being Clocked from the XTAL_CLK, the APB bus will have the same clock rate as the CPU. Which we’ve already validated in the results above. | |
Let’s now see how fast the GPIO pin is being switched ON & OFF on my DSO.
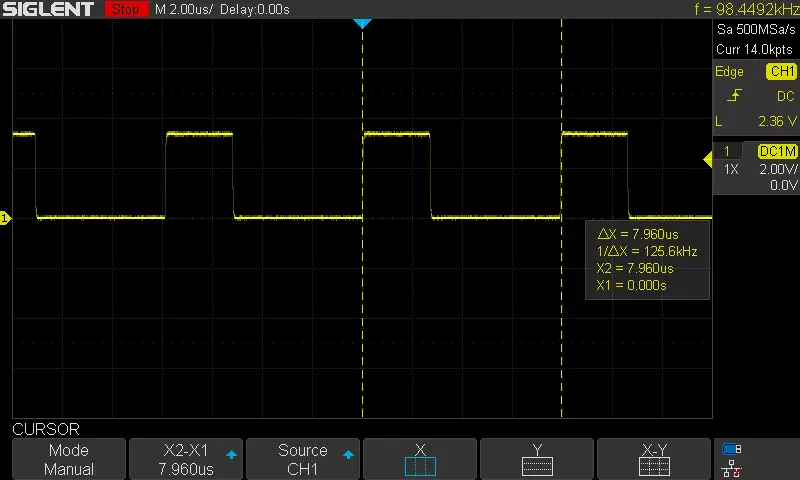
It turned out to be 0.125MHz (or 125KHz) as you can see. This was nearly expected because in the previous test the CPU clock rate was 240MHz and the max GPIO switching rate was 3MHz. Now, the CPU clock is reduced to 10MHz, so the max GPIO pin switching is expected to fall down to 1/24th of its previous value.
Theoretically, it should have become (1/24)x3 = 0.125MHz (very close to what we’ve got). This means the CPU clock speed is the dominant factor in this experiment but also the APB bus clock rate has its role in deciding on the peripherals’ max data rate as well.
Concluding Remarks
I know the GPIO pin toggling thing maybe a little bit wired way of showing how bus clock rate affects the performance of all peripherals. It just applies to all other peripherals on the bus not only GPIO pins. That’s the point of doing this in the first place!
ESP32 CPU clock control is extremely important in many applications, and I hope it’s more clear to all of you by the end of this tutorial. I’ll keep updating this series of tutorials by adding more applications and techniques that may help you in your projects. Drop me a comment if you’ve got any questions or suggestions, I’ll be glad to help!
You can also check the ESP32 Course Home Page ???? for more ESP32 tutorials divided into sections based on categories. This may be helpful for you in case of searching for a specific tutorial or application.
Did you find this helpful? If yes, please consider supporting this work and sharing these tutorials!
Stay tuned for the upcoming tutorials and don’t forget to SHARE these tutorials. And consider SUPPORTING this work to keep publishing free content just like this!
| ESP32 Course Home Page ???? | |||||||
| Previous Tutorial | Tutorial 4 | Next Tutorial | |||||
Oh, thanks so much for this detailed explanation! YOU’re the BEST, Keep going
Does setting the CPU core clock affecting the ULP co-processor? In term of power consumption, does lowering the CPU clock will further reduce the power during deep sleep?
If I slow down the CPU frequency the 115200 baud setting is no longer valid in the terminal. (I get garbage characters instead of cpu freq info.) I’m surprised you have the correct text displayed…
I get the same result as well. I also get garbage chracters instead of CPU fre info.