In this tutorial, you’ll learn how to set up an ESP32 to Connect to a wifi network with Arduino IDE. We’ll use the ESP32 WiFi library which is built-in already within Arduino Core for ESP32.
Before proceeding with this tutorial, you should have installed the ESP32 Arduino Core in your Arduino IDE to be able to compile and build projects for ESP32 in Arduino IDE. Follow the tutorial below to get started if you haven’t done that already.
If you’re just starting with ESP32, it’s highly recommended to begin with the following tutorial to kickstart your journey with ESP32 microcontrollers. Then, go to the second link which directs you to the main page for ESP32 Tutorials Series, where you’ll find all ESP32 tutorials ordered and categorized in a logical way that guarantees you systematic progress in learning ESP32 programming and IoT.
Table of Contents
ESP32 Connect To WiFi Network Example
Before attempting to connect to an existing WiFi network, let’s make sure that your setup is properly functioning by running the ESP32 WiFi scanner example. Which will list all available networks that the ESP32 could find nearby. This step is not mandatory but to make sure that everything is okay at your end.
Scan For Available WiFi Networks
To scan for the available WiFi networks nearby your ESP32, you can simply use the ESP32 WiFiScan example sketch in your Arduino IDE. Open File > Examples > WiFi > WiFiScan sketch.
Here is the full code listing of this example:
|
1 2 3 4 5 6 7 8 9 10 11 12 13 14 15 16 17 18 19 20 21 22 23 24 25 26 27 28 29 30 31 32 33 34 35 36 37 38 39 40 41 42 43 44 45 46 47 48 49 50 51 52 53 54 55 56 57 58 59 60 61 62 63 64 65 66 67 68 69 70 71 72 73 74 75 76 77 78 79 80 81 82 83 84 85 86 |
/* * ESP32 WiFi Scanner Example. Examples > WiFi > WiFiScan * Full Tutorial @ https://deepbluembedded.com/esp32-wifi-library-examples-tutorial-arduino/ */ #include "WiFi.h" void setup() { Serial.begin(115200); // Set WiFi to station mode and disconnect from an AP if it was previously connected. WiFi.mode(WIFI_STA); WiFi.disconnect(); delay(100); Serial.println("Setup done"); } void loop() { Serial.println("Scan start"); // WiFi.scanNetworks will return the number of networks found. int n = WiFi.scanNetworks(); Serial.println("Scan done"); if (n == 0) { Serial.println("no networks found"); } else { Serial.print(n); Serial.println(" networks found"); Serial.println("Nr | SSID | RSSI | CH | Encryption"); for (int i = 0; i < n; ++i) { // Print SSID and RSSI for each network found Serial.printf("%2d",i + 1); Serial.print(" | "); Serial.printf("%-32.32s", WiFi.SSID(i).c_str()); Serial.print(" | "); Serial.printf("%4d", WiFi.RSSI(i)); Serial.print(" | "); Serial.printf("%2d", WiFi.channel(i)); Serial.print(" | "); switch (WiFi.encryptionType(i)) { case WIFI_AUTH_OPEN: Serial.print("open"); break; case WIFI_AUTH_WEP: Serial.print("WEP"); break; case WIFI_AUTH_WPA_PSK: Serial.print("WPA"); break; case WIFI_AUTH_WPA2_PSK: Serial.print("WPA2"); break; case WIFI_AUTH_WPA_WPA2_PSK: Serial.print("WPA+WPA2"); break; case WIFI_AUTH_WPA2_ENTERPRISE: Serial.print("WPA2-EAP"); break; case WIFI_AUTH_WPA3_PSK: Serial.print("WPA3"); break; case WIFI_AUTH_WPA2_WPA3_PSK: Serial.print("WPA2+WPA3"); break; case WIFI_AUTH_WAPI_PSK: Serial.print("WAPI"); break; default: Serial.print("unknown"); } Serial.println(); delay(10); } } Serial.println(""); // Delete the scan result to free memory for code below. WiFi.scanDelete(); // Wait a bit before scanning again. delay(5000); } |
And this is the result of running the ESP32 WiFi Scanner sketch on my end.

My home WiFi network is at the top of the list and now we can proceed to the next step.
This article will give more in-depth information about WiFi network scanning for finding all WiFi networks (access points) in the range of the ESP32 WiFi.
Connecting ESP32 To a WiFi Network (Access Point)
To connect your ESP32 board to an existing WiFi network, you need to have the SSID and password for that network. And it should also have a fairly good signal strength to have a stable connection.
In the previous section, we learned how to scan for nearby networks with ESP32. And you should have found your home router WiFi network in the list. So, the next step is to call the WiFi.begin(ssid, password) function that takes the SSID and Password of the desired network and attempts to connect your ESP32 to it.
You should replace the ssidand passwordvalues by your WiFi network name and its actual password before building and testing the code example below.
Here is the full code example:
|
1 2 3 4 5 6 7 8 9 10 11 12 13 14 15 16 17 18 19 20 21 22 23 24 25 26 27 28 29 30 31 32 |
/* * ESP32 WiFi Connect To an Existing Network * Full Tutorial @ https://deepbluembedded.com/esp32-wifi-library-examples-tutorial-arduino/ */ #include <WiFi.h> // Replace with your own network credentials const char* ssid = "yourNetworkSSID"; const char* password = "yourNetworkPassword"; void setup(){ Serial.begin(115200); WiFi.mode(WIFI_STA); WiFi.begin(ssid, password); Serial.println("\nConnecting to WiFi Network .."); while(WiFi.status() != WL_CONNECTED){ Serial.print("."); delay(100); } Serial.println("\nConnected to the WiFi network"); Serial.print("Local ESP32 IP: "); Serial.println(WiFi.localIP()); } void loop(){ // Do Nothing } |
And let’s see How it works
First of all, you know that the ESP32 WiFi can operate as a WiFi station (STA) that connects to existing networks or as a WiFi access point (AP) that creates its own network. Given that we’re trying to connect to an existing WiFi network we should set the ESP32 WiFi mode to STA mode. And this is what we’ve done in the first step.
|
1 |
WiFi.mode(WIFI_STA); |
Next, we call the WiFi.begin() function which attempts to connect the ESP32 to the desired network. You should have edited the ssidand passwordstrings to match the actual network name and password for your WiFi network.
|
1 |
WiFi.begin(ssid, password); |
The connection process is not instantaneous, it’s going to take some time. So we need to add a delay and keep checking (polling) for the connection status. We’ll be using the WiFi.status() function to get the WiFi connection status, and it should return WL_CONNECTED whenever the connection is successfully established.
|
1 2 3 4 5 |
while(WiFi.status() != WL_CONNECTED) { Serial.print("."); delay(100); } |
Whenever a successful connection is established, the while loop will break and we’ll print a message to the serial monitor indicating this event. And we’ll also get the local IP for the ESP32 and print it as well.
|
1 2 3 |
Serial.println("\nConnected to the WiFi network"); Serial.print("Local ESP32 IP: "); Serial.println(WiFi.localIP()); |
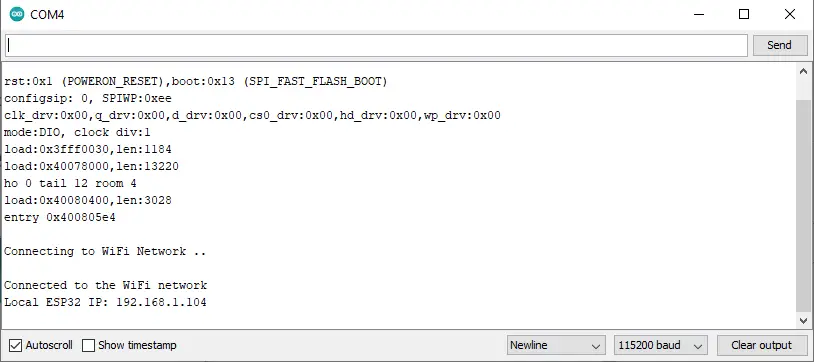
And here is a screenshot of the result after running this example code on my ESP32 board.
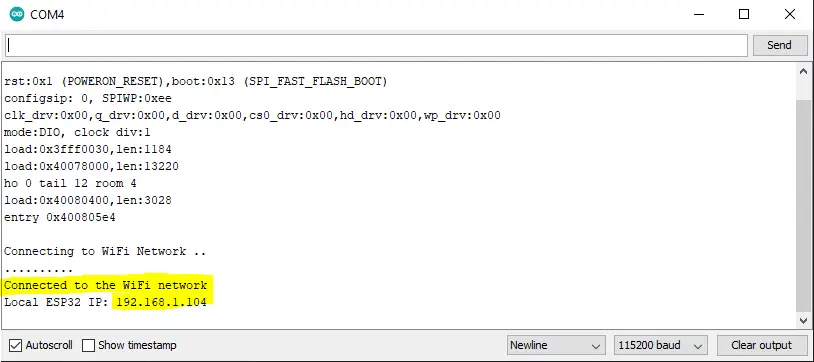
And now we’ve finally connected our ESP32 to a WiFi network successfully.
Polling for the WiFi connection status in a while loop is not a recommended practice. One better solution is to set up a timer interrupt and periodically check for the connection status or even implement a timeout mechanism after which we can re-attempt the connection process.
There is also an even better solution which is to use the WiFi Events callback functions for ESP32 WiFi. It’s a callback function that gets called whenever a specific WiFi event happens. Using this technique will eliminate the need for polling that blocks the CPU or periodic timer interrupts for checking the WiFi connection status.
The major issue with having a while loop polling for the connection status flag forever is that it can stuck forever. The CPU will remain blocked waiting for a flag that never goes high. Therefore, somebody has to manually reset the ESP32 now to get out of this situation. That’s a major flaw in the system that can be avoided in the first place with a better implementation.
Next, we’ll do another implementation using ESP32 WiFi events to avoid a potential infinite loop by polling the connection status flag forever.
ESP32 Connecting To WiFi Network (WiFi Events)
Here is how to simply implement a callback-based notification for a successful connection without polling the status flag.
The full example code listing:
|
1 2 3 4 5 6 7 8 9 10 11 12 13 14 15 16 17 18 19 20 21 22 23 24 25 26 27 28 29 30 31 32 33 |
/* * ESP32 WiFi Connect To an Existing Network (With WiFi Event, No Polling) * Full Tutorial @ https://deepbluembedded.com/esp32-wifi-library-examples-tutorial-arduino/ */ #include <WiFi.h> // Replace with your own network credentials const char* ssid = "yourNetworkSSID"; const char* password = "yourNetworkPassword"; void ConnectedToAP_Handler(WiFiEvent_t wifi_event, WiFiEventInfo_t wifi_info) { Serial.println("Connected To The WiFi Network"); } void GotIP_Handler(WiFiEvent_t wifi_event, WiFiEventInfo_t wifi_info) { Serial.print("Local ESP32 IP: "); Serial.println(WiFi.localIP()); } void setup() { Serial.begin(115200); WiFi.mode(WIFI_STA); WiFi.onEvent(ConnectedToAP_Handler, ARDUINO_EVENT_WIFI_STA_CONNECTED); WiFi.onEvent(GotIP_Handler, ARDUINO_EVENT_WIFI_STA_GOT_IP); WiFi.begin(ssid, password); Serial.println("\nConnecting to WiFi Network .."); } void loop() { // Do Nothing } |
How it works?
We simply need to call the WiFi.onEvent() function and pass to it 2 parameters. The first parameter is the handler function that we’ve created and would like to get it called whenever a specific event happens. The second parameter is the ID or name of the event that we’d like to trigger the callback function on.
Here I’m giving it a function to be called whenever the WiFi connection is successful.
|
1 |
WiFi.onEvent(ConnectedToAP_Handler, ARDUINO_EVENT_WIFI_STA_CONNECTED); |
And here I’m giving it a function to be called whenever the ESP32 WiFi station gets an IP from the Access Point.
|
1 |
WiFi.onEvent(GotIP_Handler, ARDUINO_EVENT_WIFI_STA_GOT_IP); |
This is the function that I’ve defined to be called on a successful connection event. It’s going only to print a message on the serial terminal.
|
1 2 3 |
void ConnectedToAP_Handler(WiFiEvent_t wifi_event, WiFiEventInfo_t wifi_info) { Serial.println("Connected To The WiFi Network"); } |
And this is the function that I’ve defined to be called on getting an IP from the Access Point. It’s going to print the ESP32 WiFi IP.
|
1 2 3 4 |
void GotIP_Handler(WiFiEvent_t wifi_event, WiFiEventInfo_t wifi_info) { Serial.print("Local ESP32 IP: "); Serial.println(WiFi.localIP()); } |
As you can see in the serial monitor screenshot below, it works just as fine.
Another useful application for ESP32 WiFi events is to set up a callback function that gets triggered on the WiFi disconnection event. Then, we can attempt re-connection again automatically without having to reset the system or constantly poll for the connection status. And this is what we’re going to do next.
ESP32 WiFi Auto Re-Connect After a Connection Loss
Finally, we’ll implement an Auto Re-Connect technique based on the ESP32 WiFi events callback functions. We’ll set a callback handler for the event ARDUINO_EVENT_WIFI_STA_DISCONNECTED. Which will attempt re-connection by calling the WiFi.begin() function.
It’s very similar to the previous example except for the WiFi disconnected event handler function which attempts re-connection whenever the WiFi connection between ESP32 and the Access Point is lost.
Here is the full example code:
|
1 2 3 4 5 6 7 8 9 10 11 12 13 14 15 16 17 18 19 20 21 22 23 24 25 26 27 28 29 30 31 32 33 34 35 36 37 38 39 40 41 |
/* * ESP32 WiFi Auto Re-Connect * Full Tutorial @ https://deepbluembedded.com/esp32-wifi-library-examples-tutorial-arduino/ */ #include <WiFi.h> // Replace with your own network credentials const char* ssid = "yourNetworkSSID"; const char* password = "yourNetworkPassword"; void ConnectedToAP_Handler(WiFiEvent_t wifi_event, WiFiEventInfo_t wifi_info) { Serial.println("Connected To The WiFi Network"); } void GotIP_Handler(WiFiEvent_t wifi_event, WiFiEventInfo_t wifi_info) { Serial.print("Local ESP32 IP: "); Serial.println(WiFi.localIP()); } void WiFi_Disconnected_Handler(WiFiEvent_t wifi_event, WiFiEventInfo_t wifi_info) { Serial.println("Disconnected From WiFi Network"); // Attempt Re-Connection WiFi.begin(ssid, password); } void setup() { Serial.begin(115200); WiFi.mode(WIFI_STA); WiFi.onEvent(ConnectedToAP_Handler, ARDUINO_EVENT_WIFI_STA_CONNECTED); WiFi.onEvent(GotIP_Handler, ARDUINO_EVENT_WIFI_STA_GOT_IP); WiFi.onEvent(WiFi_Disconnected_Handler, ARDUINO_EVENT_WIFI_STA_DISCONNECTED); WiFi.begin(ssid, password); Serial.println("Connecting to WiFi Network .."); } void loop() { // Do Nothing } |
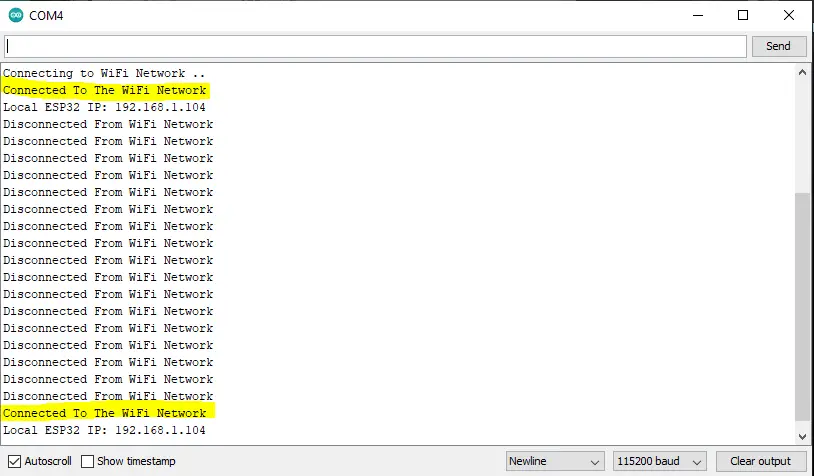
For testing, I had to disable my router’s WiFi (click the WLAN button on your router to enable/disable WiFi). And then re-enabled it again to check if my ESP32 will re-connect automatically. And it did!
ESP32 Not Connecting To WiFi
Several issues may prevent your ESP32 board from connecting to a WiFi network. In this section, we’ll discuss some of these issues and how to fix each of them.
ESP32 Power Source Doesn’t Deliver Sufficient Current
Sometimes the WiFi scan sketch doesn’t operate properly and this is because your board is going to draw a significant amount of current at startup which can be an issue if you’re not using a good power supply. So we can say that the potential causes of such an issue may be one or more of the following:
- Poor-quality USB cable
- Using long USB cables
- Using a USB extender cable
- The power supply can’t supply sufficient current
- The USB port is not capable of delivering the required current
Try using a different power supply or use the external 3.3v or 5v input port if you can’t get it running on the power delivered by the USB port. I did run into a similar issue in the past and the reason turned out to be the USB extender cable was not coping with the current demand of the ESP32 board.
A very good indication that you’re facing a power supply or cable issue is having a brownout reset. Observe the Serial monitor and check the messages sent by the ESP32. Whenever your board runs into a brownout reset detection event, it sends you a message over the serial port.
Debug ESP32 WiFi Connection Issues By Monitoring Status Flag
One way to keep track of what’s going on with your ESP32 WiFi connection is to keep polling for the status flag and print its current status to the serial terminal to see how it’s going. It can run into one of the following scenarios:
- Connection Successful: no issues
- The WiFi Network (SSID) is not found
- The WiFi Network’s password is not correct
And here is an example code for checking and printing the connection status to the serial terminal.
|
1 2 3 4 5 6 7 8 9 10 11 12 13 14 15 16 17 18 19 20 21 22 23 24 25 26 27 28 29 30 31 32 33 34 35 36 37 38 39 40 41 42 43 44 45 46 47 48 49 50 |
/* * ESP32 WiFi Connection Status Debugging * Full Tutorial @ https://deepbluembedded.com/esp32-wifi-library-examples-tutorial-arduino/ */ #include <WiFi.h> // Replace with your own network credentials const char* ssid = "yourNetworkSSID"; const char* password = "yourNetworkPassword"; int WiFiStatus; String Get_WiFiStatus(int Status){ switch(Status){ case WL_IDLE_STATUS: return "WL_IDLE_STATUS"; case WL_SCAN_COMPLETED: return "WL_SCAN_COMPLETED"; case WL_NO_SSID_AVAIL: return "WL_NO_SSID_AVAIL"; case WL_CONNECT_FAILED: return "WL_CONNECT_FAILED"; case WL_CONNECTION_LOST: return "WL_CONNECTION_LOST"; case WL_CONNECTED: return "WL_CONNECTED"; case WL_DISCONNECTED: return "WL_DISCONNECTED"; } } void setup(){ Serial.begin(115200); Serial.println("Connecting.."); WiFi.begin(ssid, password); WiFiStatus = WiFi.status(); while(WiFiStatus != WL_CONNECTED){ delay(250); WiFiStatus = WiFi.status(); Serial.println(Get_WiFiStatus(WiFiStatus)); } Serial.println("\nConnected To The WiFi Network"); Serial.print("Local ESP32 IP: "); Serial.println(WiFi.localIP()); } void loop(){ // Do Nothing } |
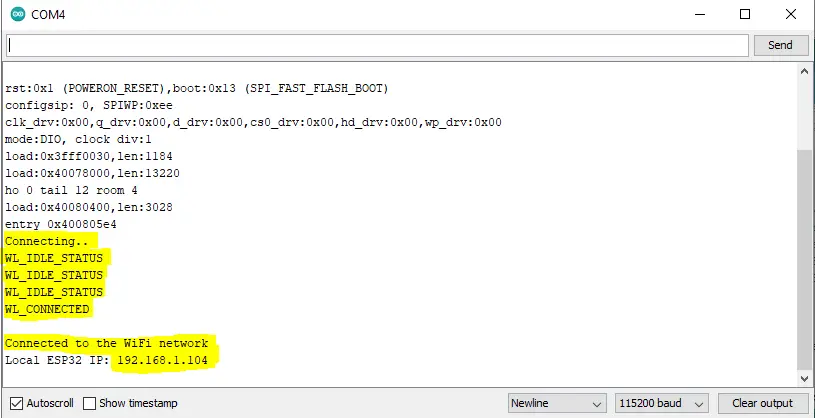
And you can see the results below. It’s printing the current status of the WiFi connection, so you’d know if it gets stuck at any stage or something.
ESP32 WiFi Re-Connect By Timeout & Restarting
The ESP32 may sometimes fail to connect to a WiFi network temporarily and the best way to get the connection back is just to restart and re-attempt the connection once again. This can be implemented by adding a timeout counter and allowing some time for ESP32 WiFi connection establishment. If it’s exceeded, commit a restart operation for the ESP32.
And here is an example of how to do it. The ESP32 will restart if the connection wasn’t successful after 10 seconds of waiting.
|
1 2 3 4 5 6 7 8 9 10 11 12 13 14 15 16 17 18 19 20 21 22 23 24 25 26 27 28 29 30 31 32 33 34 35 36 37 38 |
/* * ESP32 WiFi Reconnection After TimeOut By Restarting The ESP32 * Full Tutorial @ https://deepbluembedded.com/esp32-wifi-library-examples-tutorial-arduino/ */ #include <WiFi.h> // Replace with your own network credentials const char* ssid = "yourNetworkSSID"; const char* password = "yourNetworkPassword"; int TimeOutCounter = 0; void setup(){ Serial.begin(115200); WiFi.mode(WIFI_STA); WiFi.begin(ssid, password); Serial.println("\nConnecting"); // Keep Waiting Until Connection is Established or Restart After 10Sec while(WiFi.status() != WL_CONNECTED){ Serial.print("."); delay(100); TimeOutCounter++; if(TimeOutCounter >= 100) { // After 10 Seconds of Waiting, Restart The ESP32 ESP.restart(); } } // Connected Successfully Serial.println("\nConnected To The WiFi Network"); Serial.print("Local ESP32 IP: "); Serial.println(WiFi.localIP()); } void loop(){ // Do Nothing } |
You can also try it by disabling your router’s WLAN (WiFi) while the ESP32 is trying to connect or just by giving it a wrong SSID or a wrong password in the string within your code, it should also keep restarting every 10 seconds.
ESP32 WiFi Channel Change
When your ESP32 encounters issues connecting to the Wi-Fi, it may be due to the Wi-Fi channel chosen by your Access Point. This is because, despite the Wi-Fi frequency being set at 2.4GHz, the Access Point (router) makes use of various subbands, also known as channels, to minimize network traffic. This allows for several Wi-Fi routers to operate simultaneously in a confined space such as a building without interfering with each other.
The channel number for your WiFi network by your access point (router) is found after running the ESP32 WiFi scanner example. However, you can change it in the router settings and try reconnecting again.
In case you’re having so many IoT devices connected via Wi-Fi, it’s recommended to have a second Wi-Fi router to separate home use from IoT use. By choosing channel 1 or 6 for the IoT sensor router and a channel between 11 and 14 for the other router, you should no longer encounter Wi-Fi connectivity issues.
Parts List
Here is the full components list for all parts that you’d need in order to perform the practical LABs mentioned here in this article and for the whole ESP32 series of tutorials found here on DeepBlueMbedded. Please, note that those are affiliate links and we’ll receive a small commission on your purchase at no additional cost to you, and it’d definitely support our work.
Concluding Remarks
To conclude this tutorial, we’ll highlight the fact that connecting to a WiFi network with your ESP32 is just the first step in getting started with ESP32 WiFi and there are so many applications that you can create after you get the basics of ESP32 WiFi and networking.
If you’re just starting to learn about ESP32 WiFi, it’s highly recommended that you follow the tutorial below and keep it bookmarked in your browser. It is crafted specifically to help beginners with ESP32 WiFi to know everything about this huge topic and draw a clear roadmap for what to learn systematically.
You can easily get overwhelmed when starting with ESP32 WiFi by the number of topics and libraries out there (e.g HTTP, TCP/IP, UDP, WebServers, AsyncWebServers, WebSocket, MQTT, ESP-NOW, etc…). There are too many libraries, modes, topologies, and protocols that make just getting started an even harder task than it should be. And the most reasonable question is where should I get started? The guide below is the perfect answer!
This is the ultimate guide for ESP32 WiFi, if you’re just starting with ESP32 WiFi, you should definitely check it out. It’ll provide you with a clear roadmap for what to learn and in which order to fully understand everything about ESP32 WiFi.
