In this tutorial, you’ll learn how to Get the ESP32 Hostname and also change it to a custom hostname in Arduino IDE. It’s fairly simple, but you need to implement the steps in the exact same order for it to work.
Before proceeding with this tutorial, you should have installed the ESP32 Arduino Core in your Arduino IDE to be able to compile and build projects for ESP32 in Arduino IDE. Follow the tutorial below to get started if you haven’t done that already.
If you’re just starting with ESP32, it’s highly recommended to begin with the following tutorial to kickstart your journey with ESP32 microcontrollers. Then, go to the second link which directs you to the main page for ESP32 Tutorials Series, where you’ll find all ESP32 tutorials ordered and categorized in a logical way that guarantees you systematic progress in learning ESP32 programming and IoT.
Table of Contents
ESP32 Get HostName
The ESP32 Hostname is the device name that other WiFi devices will see on the network. You can get the ESP32 hostname by calling the WiFi.getHostname() function. Here is an example code for getting and printing the ESP32 WiFi hostname.
|
1 |
Serial.println(WiFi.getHostname()); |
Here is the generic (default) hostname for my ESP32 board as seen by my router.

As you can see it’s pretty much some random generic hostname. And you may need to rename your ESP32 WiFi device to have a better more meaningful hostname. This is what we’ll be doing in the example below.
ESP32 HostName Change
To change the ESP32 hostname, you need to call the WiFi.setHostname() function before calling WiFi.mode() and then WiFi.begin() in this exact same order.
Here’s an example code that demonstrates how to set a custom ESP32 Hostname in Arduino IDE.
|
1 2 3 4 5 6 7 8 9 10 11 12 13 14 15 16 17 18 19 20 21 22 23 24 25 26 27 28 29 30 31 32 33 |
/* * ESP32 WiFi HostName Change Example * Full Tutorial @ https://deepbluembedded.com/esp32-wifi-library-examples-tutorial-arduino/ */ #include <WiFi.h> // Replace with your own network credentials const char* ssid = "yourNetworkSSID"; const char* password = "yourNetworkPassword"; const char* MyHostName = "ESP32-Test"; void setup(){ Serial.begin(115200); WiFi.setHostname(MyHostName); WiFi.mode(WIFI_STA); WiFi.begin(ssid, password); Serial.println("\nConnecting to WiFi Network .."); // Wait until connection is established while(WiFi.status() != WL_CONNECTED){ Serial.print("."); delay(100); } // Print ESP32's IP & HostName Serial.println("\nConnected to the WiFi network"); Serial.print("Local ESP32 IP: "); Serial.println(WiFi.localIP()); Serial.print("ESP32 HostName: "); Serial.println(WiFi.getHostname()); } void loop(){ // Do Nothing } |
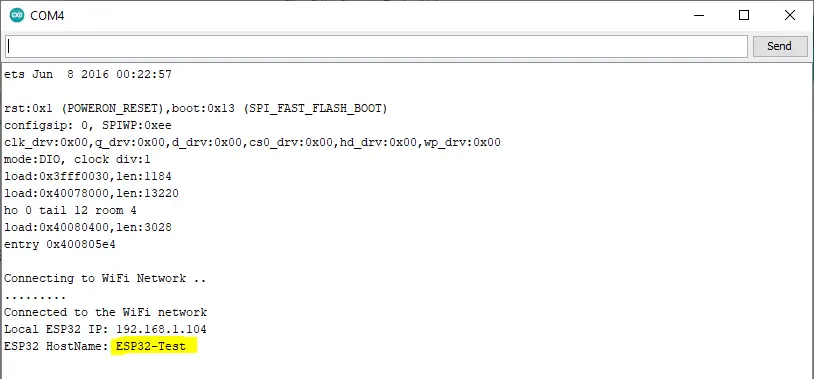
And this is the result after running this code on my ESP32 board. You may need to restart your ESP32 if you didn’t catch the message on the serial monitor on the first run.

And now my router is seeing the new ESP32 Hostname after running the example code above.

Sometimes you need to wait a little bit or even restart your router device to see the updated new hostname for your ESP32. So you can try this if it didn’t automatically update to the new name. For me, it was a near-instantaneous event and I didn’t need to do any extra steps after uploading the code.
The ESP32 Hostname string is allowed to have only letters, numbers, and the dash “-” symbol. Follow this rule so you don’t make up an invalid hostname. And try to make it compact and descriptive as much as possible.
Parts List
Here is the full components list for all parts that you’d need in order to perform the practical LABs mentioned here in this article and for the whole ESP32 series of tutorials found here on DeepBlueMbedded. Please, note that those are affiliate links and we’ll receive a small commission on your purchase at no additional cost to you, and it’d definitely support our work.
Concluding Remarks
To conclude this tutorial, we’ll highlight the fact that the ESP32 Hostname is the name that other devices see on the network and it’s by default some random generic name. It can be easily changed to a more descriptive hostname with some simple steps that you need to include in every project whenever needed.
If you’re just starting to learn about ESP32 WiFi, it’s highly recommended that you follow the tutorial below and keep it bookmarked in your browser. It is crafted specifically to help beginners with ESP32 WiFi to know everything about this huge topic and draw a clear roadmap for what to learn in a systematic way.
You can easily get overwhelmed when starting with ESP32 WiFi by the number of topics and libraries out there (e.g HTTP, TCP/IP, UDP, WebServers, AsyncWebServers, WebSocket, MQTT, ESP-NOW, etc…). There are too many libraries, modes, topologies, and protocols that make just getting started an even harder task than it should be. And the most reasonable question is where should I get started? The guide below is the perfect answer!
This is the ultimate guide for ESP32 WiFi, if you’re just starting with ESP32 WiFi, you should definitely check it out. It’ll provide you with a clear roadmap for what to learn and in which order to fully understand everything about ESP32 WiFi.


