| Previous Tutorial | Tutorial 22 | Next Tutorial | |||||
| How To Receive UART Serial Data With STM32 – DMA / Interrupt / Polling | |||||||
| STM32 Course Home Page ???? | |||||||
In this tutorial, I’ll briefly list down the different ways to receive UART data in STM32 microcontrollers. Starting with the least efficient way which is polling for the UART peripheral received data, then we’ll see the interrupt-driven reception method which involves the CPU intervention but it’s non-blocking anyway. And lastly, and most importantly, the DMA UART receive method which doesn’t require any CPU intervention at all and can be considered the most efficient way to achieve this task.
[toc]
Required Components For LABs
All the example code/LABs/projects in the course are going to be done using those boards below.
- Nucleo32-L432KC (ARM Cortex-M4 @ 80MHz) or (eBay)
- Blue Pill STM32-F103 (ARM Cortex-M3 @ 72MHz) or (eBay)
- ST-Link v2 Debugger or (eBay)
| QTY | Component Name | ???? Amazon.com | ???? eBay.com |
| 2 | BreadBoard | Amazon | eBay |
| 1 | LEDs Kit | Amazon Amazon | eBay |
| 1 | Resistors Kit | Amazon Amazon | eBay |
| 1 | Capacitors Kit | Amazon Amazon | eBay & eBay |
| 2 | Jumper Wires Pack | Amazon Amazon | eBay & eBay |
| 1 | 9v Battery or DC Power Supply | Amazon Amazon Amazon | eBay |
| 1 | Micro USB Cable | Amazon | eBay |
| 1 | Push Buttons | Amazon Amazon | eBay |
| 1 | USB-TTL Converter or FTDI Chip | Amazon Amazon | eBay eBay |
★ Check The Full Course Complete Kit List
Some Extremely Useful Test Equipment For Troubleshooting:
- My Digital Storage Oscilloscope (DSO): Siglent SDS1104 (on Amazon.com) (on eBay)
- FeelTech DDS Function Generator: KKMoon FY6900 (on Amazon.com) (on eBay)
- Logic Analyzer (on Amazon.com) (on eBay)
Affiliate Disclosure: When you click on links in this section and make a purchase, this can result in this site earning a commission. Affiliate programs and affiliations include, but are not limited to, the eBay Partner Network (EPN) and Amazon.com.
STM32 UART Receive
This tutorial is intended to be an example application for the DMA unit which we’ve discussed in the previous tutorial (DMA Tutorial). However, I’d like also to list down all the other possible ways in order to receive serial UART data with an STM32 microcontroller including the DMA method.
1 The Polling Method
The polling method is essentially a blocking function being called from the main routine and it does block the CPU so it can’t proceed in the main task execution until a certain amount of UART data bytes are received. After receiving the required amount of data, the function ends and the CPU continues the main code execution. Otherwise, and if the UART peripheral for some reason didn’t receive the expected amount of data, the function will keep blocking the CPU for a certain amount of time “time-out” after which it gets terminated and gives back the control to the CPU to resume the main code.
This function for example
|
1 |
HAL_UART_Receive (&huart1, UART1_rxBuffer, 12, 5000); |
Receives 12 bytes to the buffer. if it does that in 100uSec, it’s ok and the CPU will resume main code execution. If it doesn’t receive that amount of data, the CPU will be kept blocked waiting for 5sec until this function returns to the main context. And obviously, it’s not an efficient way to receive serial data despite the fact that it does actually work.
2 The Interrupt Method
Using interrupt signals is a convenient way to achieve serial UART data reception. The CPU initializes the UART receive hardware so that it fires an interrupt signal whenever a new byte of data is received. And in the ISR code, we save the received data in a buffer for further processing.
This way of handling the UART data reception is a non-blocking way. As the CPU initiates the receiving process and it resumes executing the main code. Until an interrupt is received, then it freezes the main context and switches to the ISR handler to save the received byte to a buffer and switches back to the main context and resume the main code.
|
1 |
HAL_UART_Receive_IT(&huart1, UART1_rxBuffer, 12); |
The above function initializes the UART receive process in interrupt mode (non-blocking) and upon completion, a callback function is called to notify the application and the processor knows that the received data buffer is now ready.
This method is a non-blocking one, yet very efficient. However, if you’re receiving a continuous stream of serial data, an insane number of interrupts per second will have to be handled by the CPU which is a huge loading and a waste of time for it. In this situation, even the interrupt method will be inefficient and unnecessarily loading the CPU and consuming too much of the CPU time. And in worst scenarios, there might be some data packets lost or dropped in the way. Now, it comes the time to use the DMA method.
3 The DMA Method
Using the DMA unit in order to direct the received serial UART data from the UART peripheral directly to the memory is considered to be the most efficient way to do such a task. It requires no CPU intervention at all, you’ll have only to set it up and go execute the main application code. The DMA will notify back the CPU upon reception completion and that received data buffer will be in the pre-programmed location.
The DMA can prioritize the channels, decide on the data width, and also the amount of data to be transferred up to 65536 bytes. Which is amazing in fact, and all you’ve got to do is to initialize it like this.
|
1 |
HAL_UART_Receive_DMA (&huart1, UART1_rxBuffer, 12); |
In the following sections, we’ll create a simple STM32 UART receive examples using each of the 3 methods.
| Note: Make sure you’ve completed the STM32 UART tutorial for more information about how it works in detail. And for more basic information about serial communication and UART absolute guide check this out. |
STM32 UART Receive LAB Brief
| LAB Number | 18 |
| LAB Title | STM32 UART Receive LAB (3 Methods Applications) |
- Application1: Setup UART receive system using the polling method
- Application2: Setup UART receive system using the interrupt method
- Application3: Setup UART receive system using the DMA method
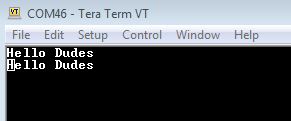
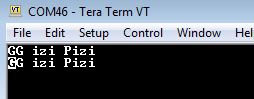
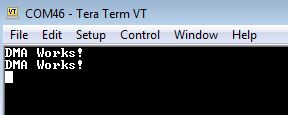
Each application will have to receive 12 bytes of data from the PC terminal and echo back the received data buffer. So in the testing, we’ll expect to see back whatever data we send through the terminal.
STM32 UART Receive Polling Example
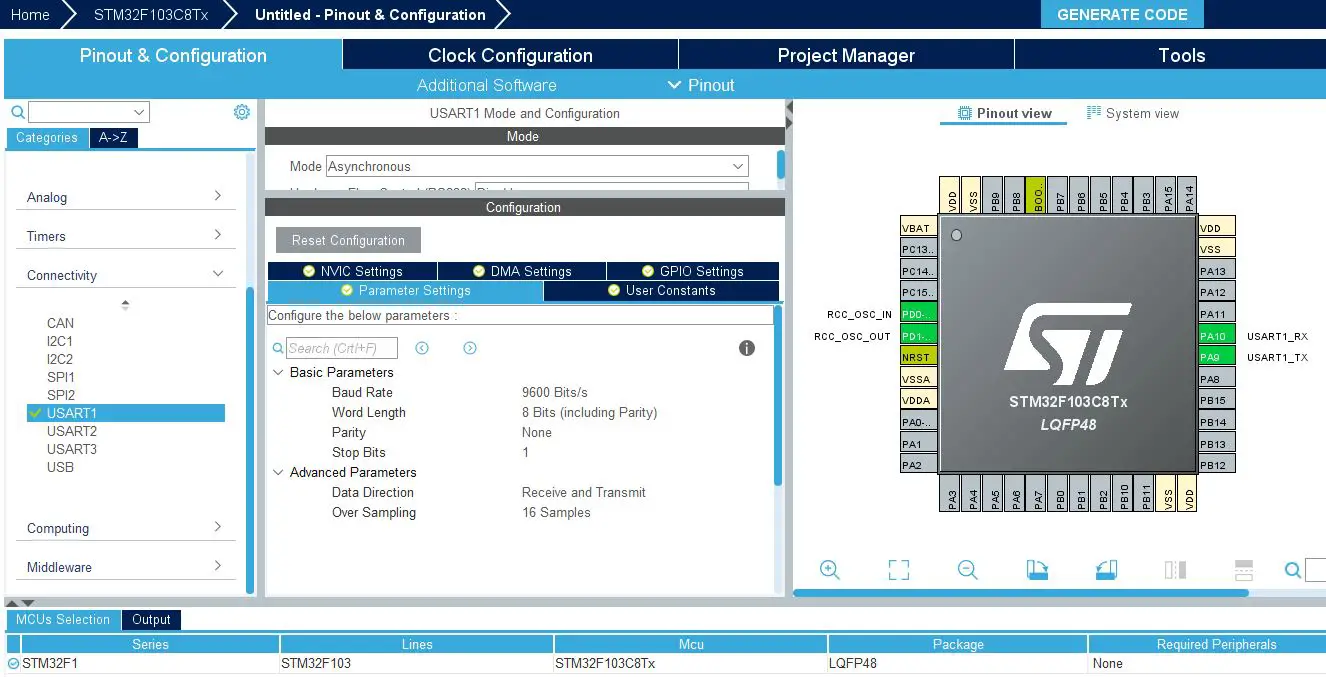
Start New CubeMX Project & Setup The Clock
Setup The UART1 Peripheral in Async Mode @ 9600bps
Generate Code & Open CubeIDE or Any Other IDE You’re Using
Write This Application Code (main.c)
|
1 2 3 4 5 6 7 8 9 10 11 12 13 14 15 16 17 18 19 20 21 22 23 24 25 26 |
#include "main.h" uint8_t UART1_rxBuffer[12] = {0}; UART_HandleTypeDef huart1; void SystemClock_Config(void); static void MX_GPIO_Init(void); static void MX_USART1_UART_Init(void); int main(void) { HAL_Init(); SystemClock_Config(); MX_GPIO_Init(); MX_USART1_UART_Init(); HAL_UART_Receive (&huart1, UART1_rxBuffer, 12, 5000); HAL_UART_Transmit(&huart1, UART1_rxBuffer, 12, 100); while (1) { } } |
Testing Result On The TeraTerm Terminal
STM32 UART Recieve Interrupt Example
Start New CubeMX Project & Setup The Clock
Setup The UART1 Peripheral in Async Mode @ 9600bps
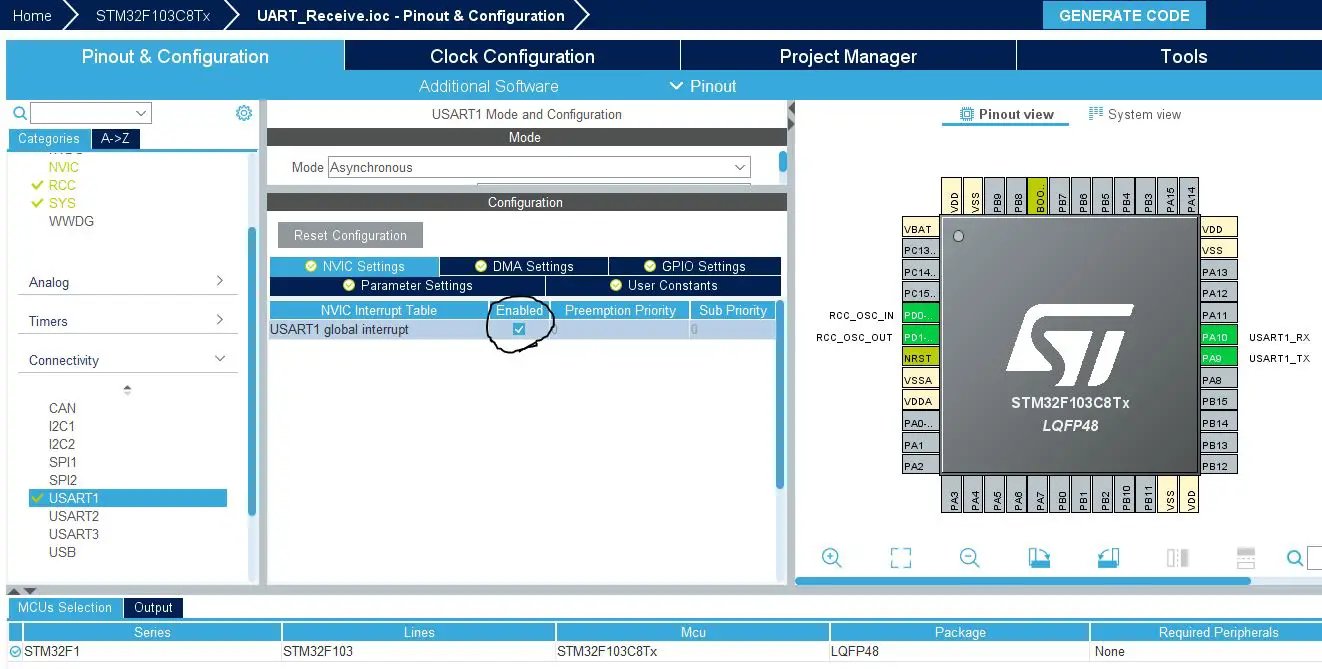
Enable The UART1 Global Interrupt From NVIC Controller Tab
Generate Code & Open CubeIDE or Any Other IDE You’re Using
Write This Application Code (main.c)
|
1 2 3 4 5 6 7 8 9 10 11 12 13 14 15 16 17 18 19 20 21 22 23 24 25 26 27 28 29 30 31 |
#include "main.h" uint8_t UART1_rxBuffer[12] = {0}; UART_HandleTypeDef huart1; void SystemClock_Config(void); static void MX_GPIO_Init(void); static void MX_USART1_UART_Init(void); int main(void) { HAL_Init(); SystemClock_Config(); MX_GPIO_Init(); MX_USART1_UART_Init(); HAL_UART_Receive_IT (&huart1, UART1_rxBuffer, 12); while (1) { } } void HAL_UART_RxCpltCallback(UART_HandleTypeDef *huart) { HAL_UART_Transmit(&huart1, UART1_rxBuffer, 12, 100); HAL_UART_Receive_IT(&huart1, UART1_rxBuffer, 12); } |
Testing Result On The TeraTerm Terminal
STM32 UART Receive DMA Example
Start New CubeMX Project & Setup The Clock
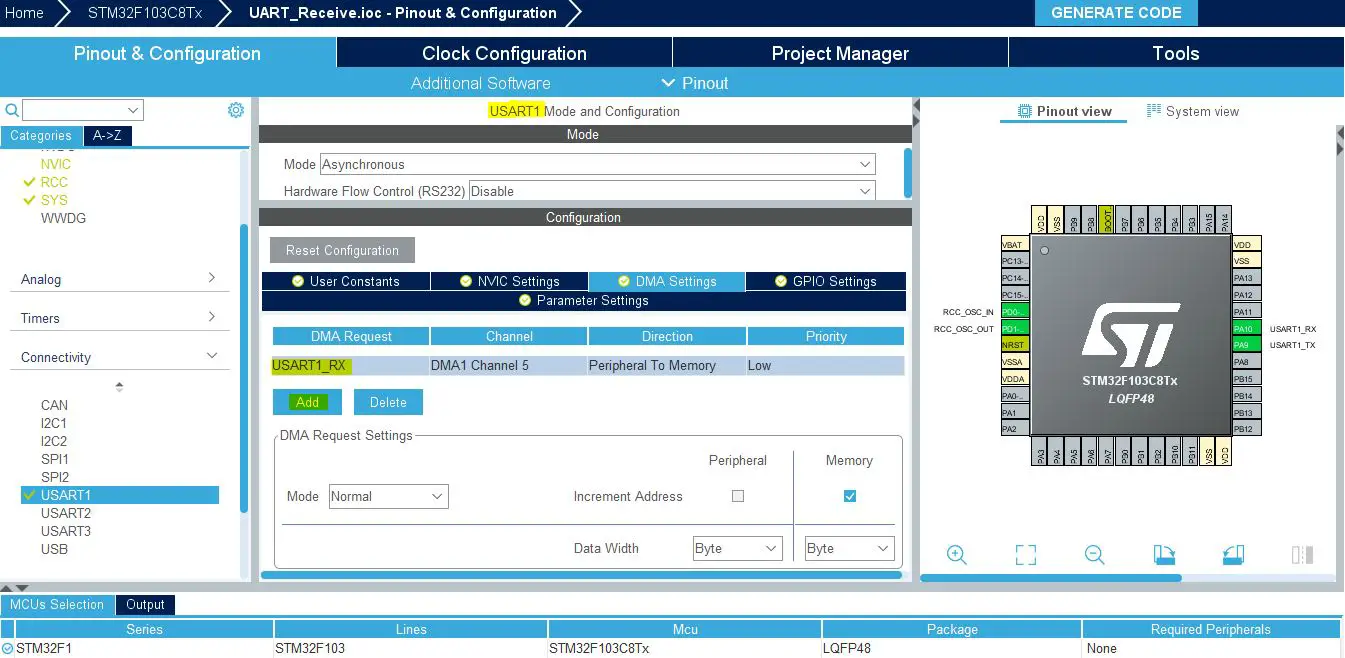
Setup The UART1 Peripheral in Async Mode @ 9600bps
Add A DMA Channel For UART RX From The DMA Tab
Generate Code & Open CubeIDE or Any Other IDE You’re Using
Write This Application Code (main.c)
|
1 2 3 4 5 6 7 8 9 10 11 12 13 14 15 16 17 18 19 20 21 22 23 24 25 26 27 28 29 30 31 32 33 34 |
#include "main.h" uint8_t UART1_rxBuffer[12] = {0}; UART_HandleTypeDef huart1; DMA_HandleTypeDef hdma_usart1_rx; void SystemClock_Config(void); static void MX_GPIO_Init(void); static void MX_DMA_Init(void); static void MX_USART1_UART_Init(void); int main(void) { HAL_Init(); SystemClock_Config(); MX_GPIO_Init(); MX_DMA_Init(); MX_USART1_UART_Init(); HAL_UART_Receive_DMA (&huart1, UART1_rxBuffer, 12); while (1) { } } void HAL_UART_RxCpltCallback(UART_HandleTypeDef *huart) { HAL_UART_Transmit(&huart1, UART1_rxBuffer, 12, 100); HAL_UART_Receive_DMA(&huart1, UART1_rxBuffer, 12); } |
Testing Result On The TeraTerm Terminal
Did you find this helpful? If yes, please consider supporting this work and sharing these tutorials!
Stay tuned for the upcoming tutorials and don’t forget to SHARE these tutorials. And consider SUPPORTING this work to keep publishing free content just like this!
| Previous Tutorial | Tutorial 22 | Next Tutorial | |||||
Thanks a lot for this article.
I usually use uart with interrupt on each byte, as the length of the data is unknown.
Sometimes it is only 1 byte, and other times it can be 50 bytes.
I know the end of the transmission ends with \n, as l usually design both sides..
How can l use DMA with unknown data length?
Thank again,
Lior
I’m really sorry for the late response. But what you’re talking about seems to be software defined thing which means we can use whatever hardware features available for us and implement this functionality.
In the near future, I’ll be publishing an article called “BCM Communication”. Which is going to be something like what you’re asking about. It’s a software communication module that sends char-based messages of any length. Each data packet will have the info of the data bytes count, header, footer, and checksum for error detection.
It’s a kind of basic software protocol that the user can include and use in his/her project.
As usual, it’s going to be configurable to different data rates and hardware layer. the messages can be sent/received over UART or SPI. More features can be added in the future. We’ll see how this piece of software will turn out to be.
Kind regards,
Khaled M.
Your article helped me a lot. Thanks for that ????
I had one doubt though, why you have used HAL_UART_Receive_IT()/_DMA() in the Interrupt Subroutine (ISR). Won’t the Transmit function be enough in the ISR, as we already have Receive function in the main().
I am referring to the DMA and Interrupt codes.
Got UART DMA working with CubeIDE 1.7.0 and Nucleo-H723ZG with difficulty! At first the code echoed back zeros. The CubeMX code generator issues the UART init before the DMA init and I noticed your code did the reverse, so I changed the order and it worked! Why? Is this an MX error?
Yeah, I believe it was generated in that order by Cube MX