| Previous Tutorial | Tutorial 2 | Next Tutorial | |||||
| ESP32 Hello World! Serial Port Print – Arduino | |||||||
| ESP32 Course Home Page ???? | |||||||
In this tutorial, you’ll learn how to use the ESP32 serial print function in Arduino IDE to print our first Hello world example. Then, we’ll discuss how to print numeric variables for debugging Arduino code. And finally, use the ESP32 to send some numeric data over the serial port and plot the data points in Arduino IDE serial plotter. So, let’s get started!
[toc]
Requirements For This Tutorial
Prior Knowledge
- Nothing
Software Tools
Hardware Components
You can either get the complete course kit for this series of tutorials using the link down below. Or just refer to the table for the exact components to be used in practical LABs for only this specific tutorial.
ESP32 UART Serial Port
As we’ve stated earlier in the introductory tutorial, the ESP32 has 3 UART peripherals. One of which is hard-wired to the USB-TTL converter on the ESP32 dev board itself. This is what we’re going to use in this tutorial to send data from the ESP32 to our PC over the UART serial port.
This is a very easy and quick way to debug your Arduino Applications by printing out the current variables’ values to the terminal screen and keep track of what’s going on. And maybe check some flags, logic decisions, etc.
Another use that we’ll also try in this tutorial is the serial plotting feature in the Arduino IDE. We can actually send numeric variables from the ESP32 to the PC and get the value plotted in a graphical interface inside Arduino IDE itself.
ESP32 Serial Port Initialization
First of all, you need to initialize the UART serial port before you’re able to use it for sending/receiving any data. The Arduino built-in library for the serial port doesn’t require you to enter any configuration parameter for the UART peripheral other than the Baud Rate. Which is the rate at which we’ll be sending/receiving serial data.
To initialize (start) the serial port, you need to call the Serial.begin() function and pass the desired baud rate value to it. As shown in the example down below.
|
1 |
Serial.begin(115200); |
This step is typically done in the setup() function before starting the main loop() function. Now, we can send/receive serial data over the UART port using the Arduino API functions shown in the next sections down below.
ESP32 Serial Print Functions
To send data over the serial port, you need to call the Serial.print() function. Which will send the string equivalent of your message byte-by-byte until it’s done. While the Serial.prinln() function will do the exact same thing but it sends a line termination escape sequence “\r\n” at the end of the message.
|
1 |
Serial.println("Hello!"); |
The code above will print “Hello!” in one line and terminate the line to start a new line for the next message.
ESP32 Serial Read Functions
Before reading serial data, it’s important to check if there is data that has been received already in the buffer or not. And then, we can proceed to read its contents. To check if data has been already received or not, you can use the Serial.available() function.
The example down below shows you how to check the incoming data and echo the received data back to the serial port. So you can see what the ESP32 has already received.
|
1 2 3 4 5 6 7 8 9 10 11 12 13 14 15 16 17 |
int incomingByte = 0; // for incoming serial data void setup() { Serial.begin(115200); // opens serial port, sets data rate to 115200 bps } void loop() { // send data only when you receive data: if (Serial.available() > 0) { // read the incoming byte: incomingByte = Serial.read(); // say what you got: Serial.print("ESP32 received: "); Serial.println(incomingByte); } } |
| If you want to learn more about UART Serial Communication Protocol. And how serial communication works at the low level. You can check that tutorial guide for UART communication. It’s pretty long, but very informative indeed! |
Components For This Tutorial’s LABs
| QTY. | Component Name | Buy Links |
| 1 | ESP32 Devkit v1 DOIT Board
|
Amazon.com – eBay.com – Banggood.com |
| 2 | BreadBoard | Amazon.com – eBay.com – Banggood.com |
| 1 | Micro USB Cable | Amazon.com – eBay.com – Banggood.com |
*Affiliate Disclosure: When you click on links in this section and make a purchase, this can result in this site earning a commission. Affiliate programs and affiliations include, but are not limited to, the eBay Partner Network (EPN) and Amazon.com, Banggood.com. This may be one of the ways to support this free platform while getting your regular electronic parts orders as usual at no extra cost to you.
ESP32 Hello World Example – LAB
| LAB Number | 2 |
| LAB Name | Hello World Serial Print |
- Initialize the UART serial port @ the desired Baud Rate
- Send a “Hello World!” message once a second
ESP32 Hello World Code Example
The delay() function is used in this example just to achieve the timing requirement for this LAB. In order to have a message sent once a second. Note that it’s not an efficient way to get this job done, you’ll be introduced to better techniques later on in this course (series of tutorials).
|
1 2 3 4 5 6 7 8 9 10 11 12 13 14 15 16 17 |
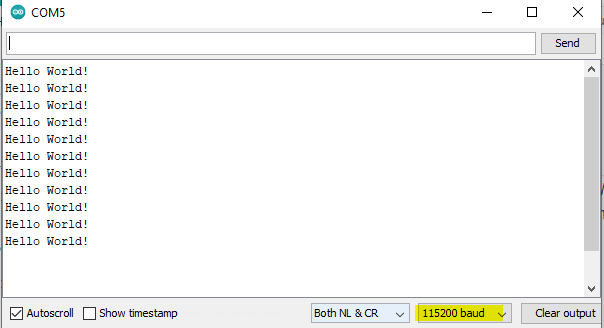
/* * LAB: 2 * Name: ESP32 Hello World Serial Print * Author: Khaled Magdy * For More Info Visit: www.DeepBlueMbedded.com */ void setup() { Serial.begin(115200); } void loop() { Serial.println("Hello World!"); delay(1000); } |
Choose the board, COM port, hold down the BOOT button, click upload and keep your finger on the BOOT button pressed. When the Arduino IDE starts sending the code, you can release the button and wait for the flashing process to be completed. Now, the ESP32 is flashed with the new firmware.
Open the Arduino serial monitor from the icon on the top right or from the tools menu and select Tools > Serial Monitor
Screenshot For The Result
ESP32 Print String And Variable – LAB
| LAB Number | 3 |
| LAB Name | ESP32 Serial Print String & Numeric Variable |
- Initialize the UART serial port @ the desired Baud Rate
- Create a counter variable
- Send a message showing the counter variable’s value (once a second)
ESP32 Printing a String + Numeric Variable
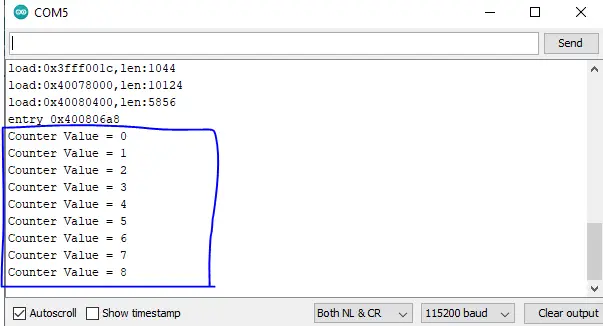
The numeric variable (Counter) will be evaluated and converted to a string and get printed after the “Counter Value = ” string. The counter is incremented by 1, then the ESP32 executes a delay for 1 second, and repeat!
|
1 2 3 4 5 6 7 8 9 10 11 12 13 14 15 16 17 18 19 20 |
/* * LAB: 3 * Name: ESP32 String + Variable Serial Print * Author: Khaled Magdy * For More Info Visit: www.DeepBlueMbedded.com */ int Counter = 0; void setup() { Serial.begin(115200); } void loop() { Serial.print("Counter Value = "); Serial.println(Counter++); delay(1000); } |
Choose the board, COM port, hold down the BOOT button, click upload and keep your finger on the BOOT button pressed. When the Arduino IDE starts sending the code, you can release the button and wait for the flashing process to be completed. Now, the ESP32 is flashed with the new firmware.
Screenshot For The Result
ESP32 Serial Plotter Example – LAB
| LAB Number | 4 |
| LAB Name | ESP32 Serial Plotter |
- Initialize the UART serial port @ the desired Baud Rate
- Create a lookup table (Array)
- Send a message containing the current value in the lookup table
ESP32 Serial Plotter in Arduino
The code example down below defines a sine waveform lookup table consisting of 32 values (Array of integers). Then, we’ll send those data points one-by-one over the UART serial print and use the Arduino Serial Plotter to plot the incoming data points. Which should be a, roughly looking, sinusoidal waveform.
|
1 2 3 4 5 6 7 8 9 10 11 12 13 14 15 16 17 18 19 20 21 22 23 24 |
/* * LAB: 4 * Name: ESP32 Serial Plotter * Author: Khaled Magdy * For More Info Visit: www.DeepBlueMbedded.com */ int Sine_LUT[32] = {128,152,176,198,218,234,245,253,255,253,245,234,218,198,176,152,128,103,79,57,37,21,10,2,0,2,10,21,37,57,79,103}; int i = 0; void setup() { Serial.begin(115200); } void loop() { Serial.println(Sine_LUT[i++]); if(i == 32) { i = 0; } delay(10); } |
Choose the board, COM port, hold down the BOOT button, click upload and keep your finger on the BOOT button pressed. When the Arduino IDE starts sending the code, you can release the button and wait for the flashing process to be completed. Now, the ESP32 is flashed with the new firmware.
Demo Video For The Result
Did you find this helpful? If yes, please consider supporting this work and sharing these tutorials!
Stay tuned for the upcoming tutorials and don’t forget to SHARE these tutorials. And consider SUPPORTING this work to keep publishing free content just like this!
| ESP32 Course Home Page ???? | |||||||
| Previous Tutorial | Tutorial 2 | Next Tutorial | |||||

This is the ultimate guide for ESP32 WiFi, if you’re just starting with ESP32 WiFi, you should definitely check it out. It’ll provide you with a clear roadmap for what to learn and in which order to fully understand everything about ESP32 WiFi.